Benvenuti in MedITEX IVF
From MedITEX - Wiki
MedITEX IVF è la nostra soluzione IT tutto in uno per la medicina riproduttiva. Garantisce a Medici ed esperti nei centri di fertilità un elevato livello di qualità e una documentazione delle terapie allo stato dell’arte. MedITEX IVF è una piattaforma che permette di raccogliere tutti i dati importanti relativi alla diagnostica e alla terapia.
Unisce informazioni provenienti da diverse risorse (IVF, laboratorio, ecografie, ambulatori, sala operatoria, accettazione). Per questo motivo, la piattaforma può facilmente essere adattata ai requisiti specifici di ogni singolo centro per la riproduzione. Tutti I dati importanti possono essere immediatamente documentati e recuperati da diverse aree di lavoro, e tutto ciò può essere fatto senza l’uso del cartaceo.
Contents |
Aiuto Online
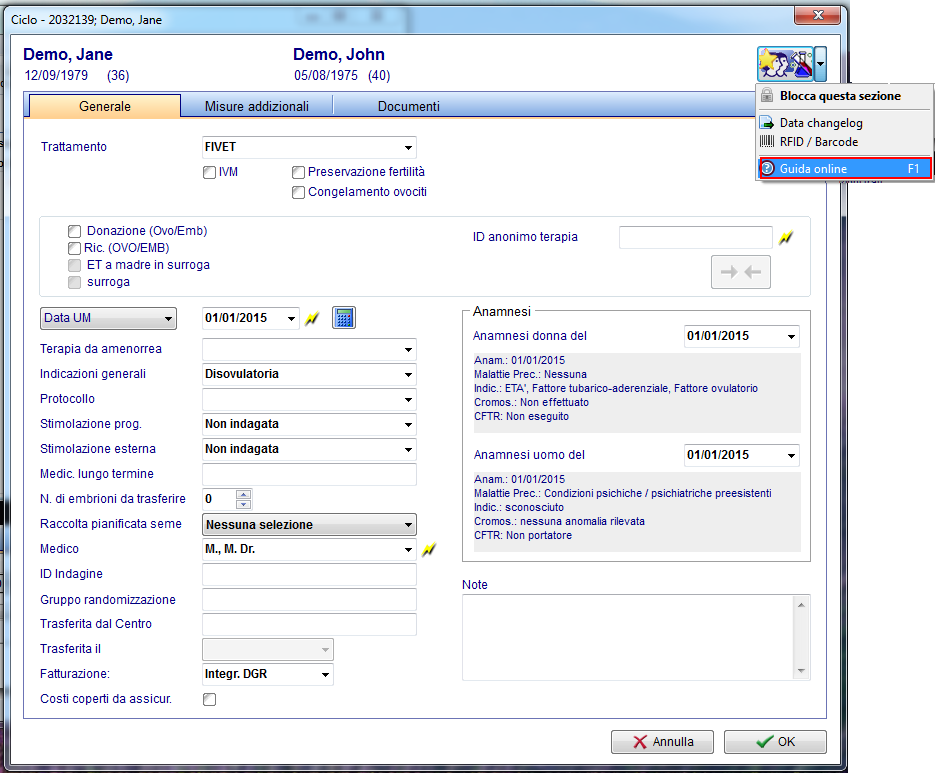
L’aiuto online help è disponibile nell’intero programma MedITEX IVF. E’ possibile accedere all’aiuto relativo alla finestra aperta in quel momento premendo F1 nella tastiera oppure cliccando su Guida online disponibile nel menù a tendina dei campi QM.
Dopo aver cliccato F1, si aprirà la pagina di Aiuto relativa alla finestra di IVF in cui ci si trova.
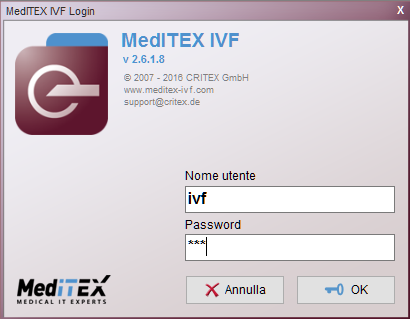
La sicurezza prima di tutto: Password individuali
Quando viene avviato MedITEX IVF, viene chiesto l’inserimento di un username e una password:
 |
|
Impostazioni: definire la propria struttura
Le impostazioni di MedITEX IVF sono della massima importanza. Permettono di adattare il programma alle specifiche condizioni ed esigenze del centro in questione.
| Clicca qui per saperne di più sulle impostazioni. |
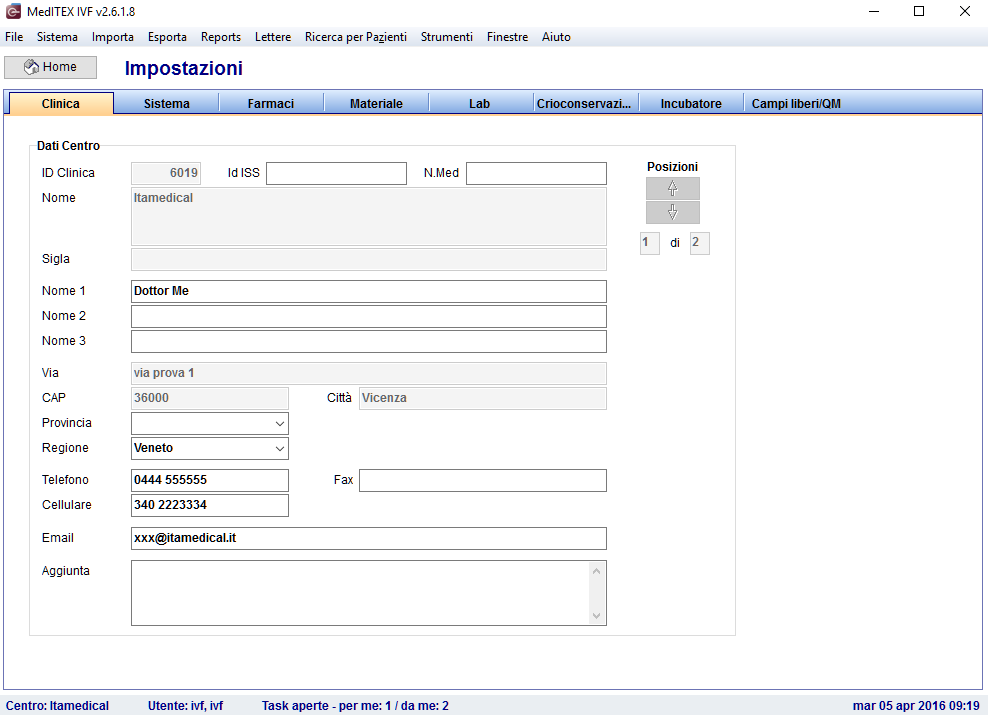 ] ] |
- Questa sezione include le impostazioni di sistema, aggiunta o modifica di medicinali esistenti, gestione del materiale, interfaccia con Accounting e programmi di laboratorio e l’organizzazione dello stoccaggio in crio banca. Possono essere gestiti nelle impostazioni anche le definizioni dei campi QM e il contenuto delle tabelle di sistema.
- E’ cruciale definire in maniera corretta e completa le impostazioni prima di utilizzare MedITEX IVF.
Interfaccia
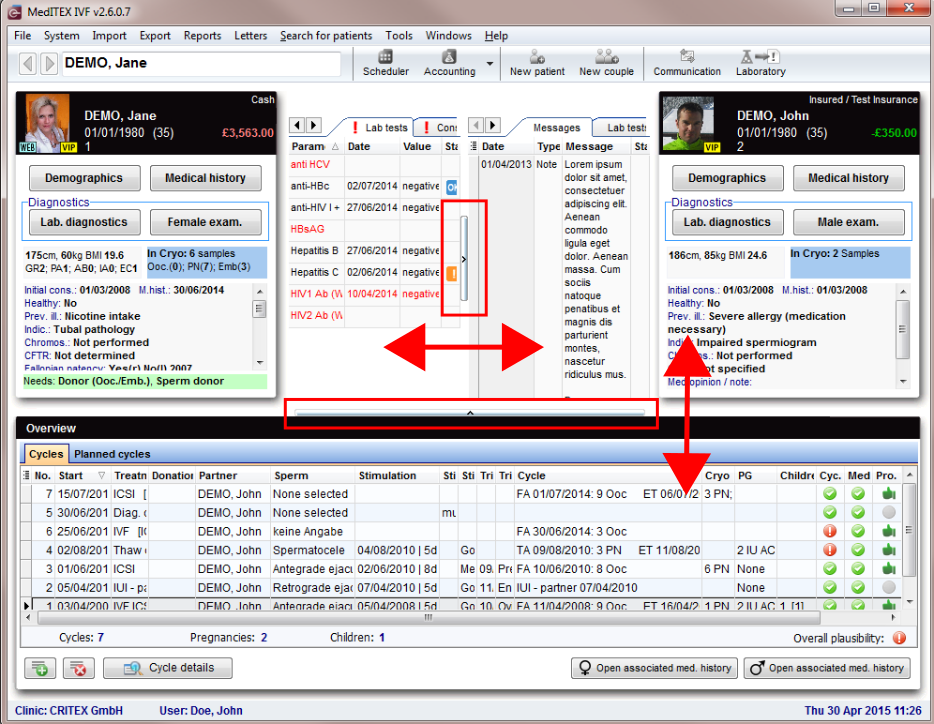
Dopo essere entrati con username e password si aprirà la pagina iniziale di MedITEX IVF. Nella schermata principale è possibile vedere le informazioni più importanti relative ai pazienti che compongono la coppia selezionata, come ad esempio messaggi e alert o l’overview dei cicli precedentemente effettuati.
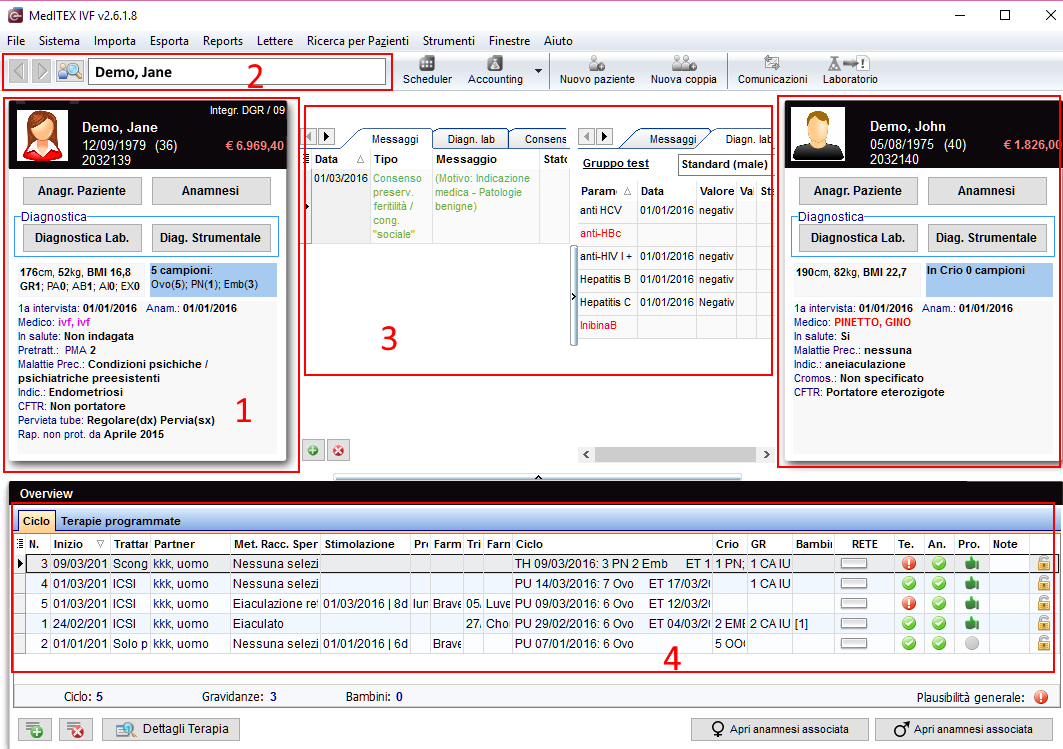 |
Da questa schermata è possibile accedere a tutte le sezioni del programma, aggiungere nuovi pazienti, creare cicli, importare ed esportare dati ed eseguire tutte le funzionalità del programma.
Impostazioni, Medici di Riferimento, contratti crio, stoccaggio crio, RFID/barcode e molte altre funzionalità a cui è possibile accedere attraverso Sistema nella barra degli strumenti. A report, liste, gestione errori e al Report Editor è possibile accedere attraverso Reports.
Finestra di informazioni femminile e maschile
La schermata con i dati della donna (sinistra) e del suo partner (destra) è utile per la visualizzazione di una panoramica dei dati più importanti del paziente e dei dati medici, e per accedere a tutte le informazioni del paziente. Da qui si ha accesso ai dati dei pazienti, documenti, anamnesi, campioni in crio, esami di laboratorio, altri esami e donazioni.
 |
|
|
Ogni schermata mostra:
E’ possibile accedere a:
|
|
| La sezione relative alle informazioni sulle donazioni possono non essere disponibili nel caso la donazione non sia permessa nel paese in cui si trova l’utente. |
Ricerca Paziente
  |
Passare al paziente precedente o successivo. |
 |
Inserire un nuovo paziente. |
 |
Inserire una nuova coppia. |
 |
Aprire tutti i messaggi in Panoramica Comunicazione. |
In questa sezione è possibile ricercare i pazienti esistenti o creare nuovi pazienti o nuove coppie. E’ possibile ricercare pazienti utilizzando il cognome, la data di nascita, il numero di telefono (cellulare, abitazione) e l’ID paziente. E’ possibile digitare una parte del cognome o dell’ID paziente per trovare tutti i pazienti che hanno quella stessa radice. Il paziente viene selezionato con doppio click sul suo nome; il paziente sarà visualizzato con il/la suo/sua partner (se presente).
Messaggi, Valori di laboratorio e Informazioni Donatore
 |
|
|
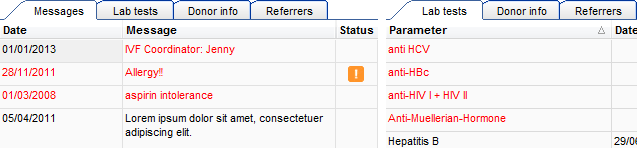
In quest’area vengono mostrati i risultati di laboratorio, note /messaggi di attenzione, Informazioni sui donatori e sui medici di Riferimento. E’ possibile inoltre trovare informazioni You will also find information on linked sperm donations. Choose in the system settings which are the lab parameter to be published. If the parameter is red it means that the lab test has reached the expiry date set by the user. The attention/note messages may be created by the user in the Medical History section. Double-clicking on a row containing a message, a finding or the sperm donor info will open the related window. Click on any cell to be able to copy its content. Right-click and copy, or press CTRL-C after choosing the desired cell. |
|
| You can also define and choose your own message type and colour at the system settings --> system tables. Follow the link to get more informations. | |
Overview of cycles
 |
 |
In the bottom section of the page are summarized the outcome of the previous treatments. The meaning of the columns is explained in the cycle section.
Dynamic resizing
You can adjust the size of contents of the main window by moving two controllers. This functionality enables more information to be viewed at once.
 |
QM fields: Individual quality management
It is you who knows which data you wish to document:
- You need a study number for certain therapies? No problem.
- You would like to test – for a trial period of one month – what the temperature in the IVF laboratory was during the ICSI and if a window was open? With MedITEX IVF you can do that.
- You are using four different puncture needles and wish to store their users and batch numbers? And add a comment? No problem either.
MedITEX IVF offers a continuous QM concept that allows you to add any number of persons, materials, free fields and times to almost any input window. All of this information can be accessed using special buttons, the QM fields.
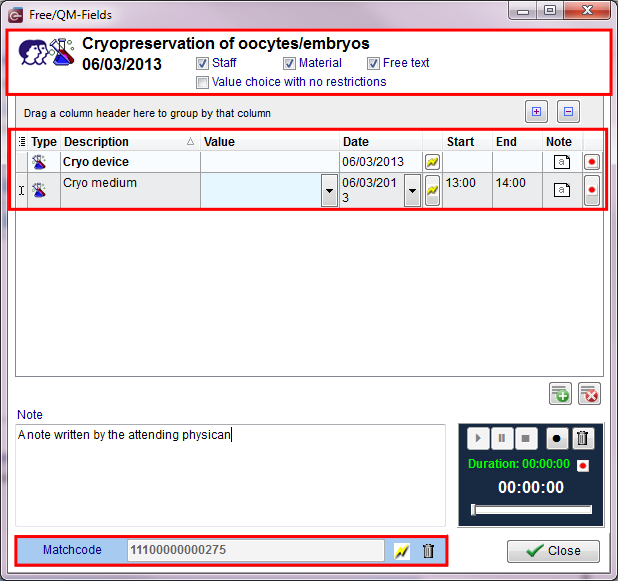 |
The QM concept allows you to flexibly define your own “individual” MedITEX IVF. This additional information can of course also be analyzed, together with standard, “hard-coded” fields.
In the QM window you can also record and play voice messages, and use match codes with a bar-code reader or a RFID chip.
You can define the content of all QM fields in the settings under the tab “Free / QM Fields” in System -> Settings.
Managing Lists
Every list in MedITEX IVF has several important features:
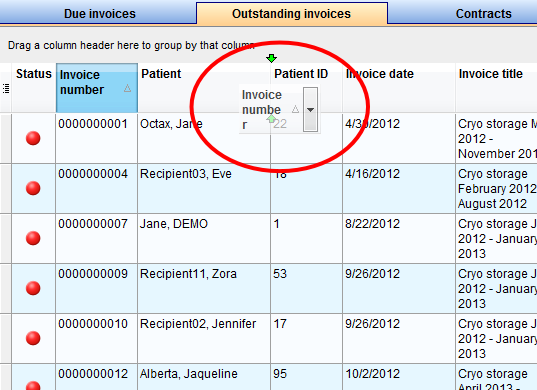
Sort and filter
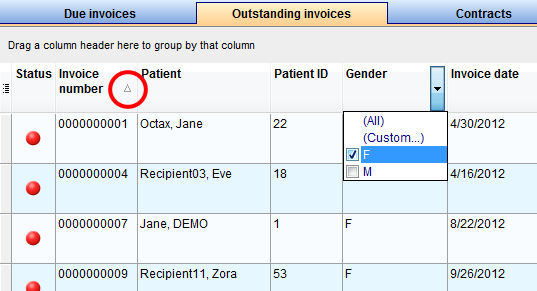
Clicking on the arrow next to the column header, you can filter the table content by the information contained in that row. Therefore, only the information that was checked will be displayed.
To sort the list ascending or descending, simply click on the blue header of the desired column.
For this example, the list is sorted ascending by Invoice number (red circle) and is filtered by Gender so it only shows female patients.
 |
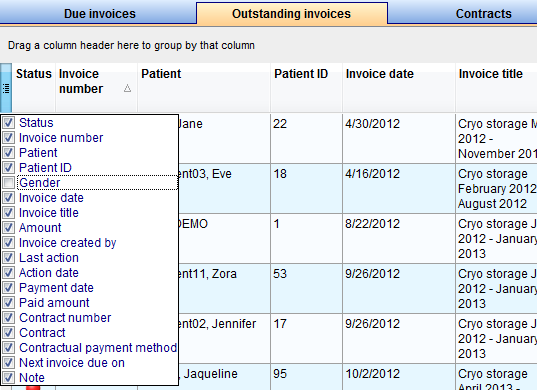
Hide show columns
Some lists have a special button on the left side of the header. This button allows you to hide and move columns.
For this example, the column Gender was unchecked. So when you compare it with the picture above, the whole column Gender is no longer available.
To move columns around from this button, simply click and drag the name of a column up and down. Two green arrows will help positioning the column in place.
 |
Arrange columns
It is also possible to move columns around the list simply by clicking and dragging. Two green arrows will help positioning the column in place.
 |
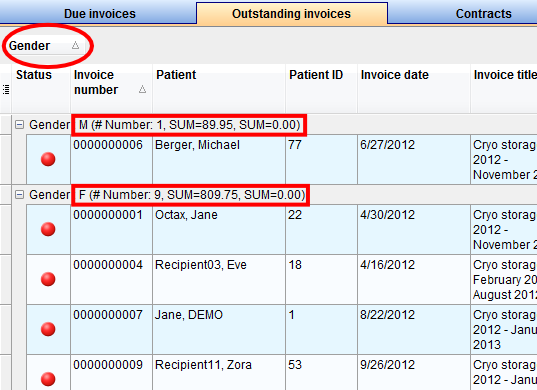
Group
It is also possible to group the content of lists in MedITEX IVF. In order to do that, simply drag a column to the dark grey area on the top of the list. Grouping by more than one column is possible as well.
To revert the list to its original form, simply drag the column back in place.
For this example, the table was grouped by Gender.
 |
Persistence
One of the biggest advantages of managing lists is that each one is saved individually for a user. So next time you log in, MedITEX IVF will display your lists just the way you left them.
Some images and buttons throughout this Wiki have links that, once clicked, will open another page with more information.
This links are identified by blue dots around images.
 |
| Click on images with blue dots around it to have further information |
| Back to the MedITEX IVF manual | Back to top |