Updating MedITEX
From MedITEX - Wiki
(Difference between revisions)
| Line 81: | Line 81: | ||
</li> | </li> | ||
<li><span id="result_box" lang="en"><span class="hps"><span style="color: #ff0000;"><span style="color: #000000;">Copy the <span style="color: #800080;">installCritexUDF.exe</span> and <span style="color: #800080;">CritexFirebirdUDF.dll</span> manually from the update package folder (<span style="color: #0000ff;">...\CRITEX\Updates\MedITEX_IVF_AutoUpdate_x.xxx</span>) to the MedITEX IVF folder (<span style="color: #0000ff;">...\CRITEX\MedITEX IVF</span>).<br />Also copy the <span id="result_box" lang="en"><span class="hps"><span style="color: #ff0000;"><span style="color: #000000;"><span style="color: #800080;">CritexFirebirdUDF.dll </span>into your Firebird-folder(<span style="color: #0000ff;">...\Firebird\Firebird_2_5\UDF</span>).</span></span></span></span><br /><br /></span><strong> </strong></span></span></span></li> | <li><span id="result_box" lang="en"><span class="hps"><span style="color: #ff0000;"><span style="color: #000000;">Copy the <span style="color: #800080;">installCritexUDF.exe</span> and <span style="color: #800080;">CritexFirebirdUDF.dll</span> manually from the update package folder (<span style="color: #0000ff;">...\CRITEX\Updates\MedITEX_IVF_AutoUpdate_x.xxx</span>) to the MedITEX IVF folder (<span style="color: #0000ff;">...\CRITEX\MedITEX IVF</span>).<br />Also copy the <span id="result_box" lang="en"><span class="hps"><span style="color: #ff0000;"><span style="color: #000000;"><span style="color: #800080;">CritexFirebirdUDF.dll </span>into your Firebird-folder(<span style="color: #0000ff;">...\Firebird\Firebird_2_5\UDF</span>).</span></span></span></span><br /><br /></span><strong> </strong></span></span></span></li> | ||
| − | <li><span id="result_box" lang="en"><span class="hps"><span style="color: #ff0000;"><span style="color: #000000;">Now start the <span id="result_box" lang="en"><span class="hps"><span style="color: #ff0000;"><span style="color: #000000;"><span style="color: #800080;">installCritexUDF.exe <span id="result_box" lang="en"><span title="Ob die Datei geschlossen werden darf sehen sie anhand des Eintrags der letzten Spalte. " | + | <li><span id="result_box" lang="en"><span class="hps"><span style="color: #ff0000;"><span style="color: #000000;">Now start the <span id="result_box" lang="en"><span class="hps"><span style="color: #ff0000;"><span style="color: #000000;"><span style="color: #800080;">installCritexUDF.exe <span style="color: #000000;">as an <span style="text-decoration: underline; color: #ff0000;"><strong>administrator</strong></span>, make sure that the given path for the <span style="text-decoration: underline;">Firebird UDF Folder</span> is the correct one. (<span style="color: #0000ff;">...\Firebird\Firebird_2_5\UDF</span>). If not all or not a single function is checked (like here) please check <strong><span style="text-decoration: underline;">all of them</span></strong> manually. Afterwards start the installation by clicking “Install”.</span><span id="result_box" lang="en"><span title="Ob die Datei geschlossen werden darf sehen sie anhand des Eintrags der letzten Spalte. "> |
<table border="0"> | <table border="0"> | ||
<tbody> | <tbody> | ||
| Line 90: | Line 90: | ||
</table> | </table> | ||
</span></span></span></span></span></span></span></span><strong><br /><br /></strong></span></span></span></li> | </span></span></span></span></span></span></span></span><strong><br /><br /></strong></span></span></span></li> | ||
| − | <li><span id="result_box" lang="en"><span class="hps"><span style="color: #ff0000;"><strong></strong></span><span id="result_box" lang="en"><span class="hps">Now start</span> <span class="hps">the</span> <span class="hps" style="color: #800080;">Updater.exe</span> <span class="hps atn">(</span><span style="color: #0000ff;">...\<span class="hps">CRITEX</span><span class="hps">\</span><span class="hps">Updates\</span><span class="hps">MedITEX_IVF_AutoUpdate_x.xxx</span><span class="hps">\</span><span class="hps">Updater.exe</span></span><span>)</span> <span class="hps">as an <span style="color: #ff0000;"><strong><span style="text-decoration: underline;">administrator.</span></strong></span></span></span><br /><br /></span></span></li> | + | <li><span id="result_box" lang="en"><span class="hps"><span style="color: #ff0000;"><strong> </strong></span><span id="result_box" lang="en"><span class="hps">Now start</span> <span class="hps">the</span> <span class="hps" style="color: #800080;">Updater.exe</span> <span class="hps atn">(</span><span style="color: #0000ff;">...\<span class="hps">CRITEX</span><span class="hps">\</span><span class="hps">Updates\</span><span class="hps">MedITEX_IVF_AutoUpdate_x.xxx</span><span class="hps">\</span><span class="hps">Updater.exe</span></span><span>)</span> <span class="hps">as an <span style="color: #ff0000;"><strong><span style="text-decoration: underline;">administrator.</span></strong></span></span></span><br /><br /></span></span></li> |
<li><span id="result_box" lang="en"><span class="hps">If the <span style="color: #339966;">"Updater"</span> is done, close it and restart all services you have stopped in <strong>step 7.</strong></span></span></li> | <li><span id="result_box" lang="en"><span class="hps">If the <span style="color: #339966;">"Updater"</span> is done, close it and restart all services you have stopped in <strong>step 7.</strong></span></span></li> | ||
</ol> | </ol> | ||
Revision as of 14:54, 3 July 2014
Instructions for the updating process of MedITEX |
► Folder and paths ► Open windows and programs ► Files |
- Establish a connection with Teamviewer (Only for remote).
- Download the Updatepackage from a link, wich you have received from us.
- Copy the update package to ...\CRITEX\Updates. If the folder "Updates" does not exist, simply create.
- Unzip the update package now (...\CRITEX\Updates\MedITEX_IVF_AutoUpdate_x.xxx.exe). Set it as the destination directory to "...\CRITEX\Updates" and then click "Install".
<tbody>
 unzip
unzip
- The folder "MedITEX_IVF_AutoUpdate_x.xxx" has now been created. Create an additional folder called "Archive" and move the MedITEX_IVF_AutoUpdate_x.xxx.exe in this folder.
<tbody>
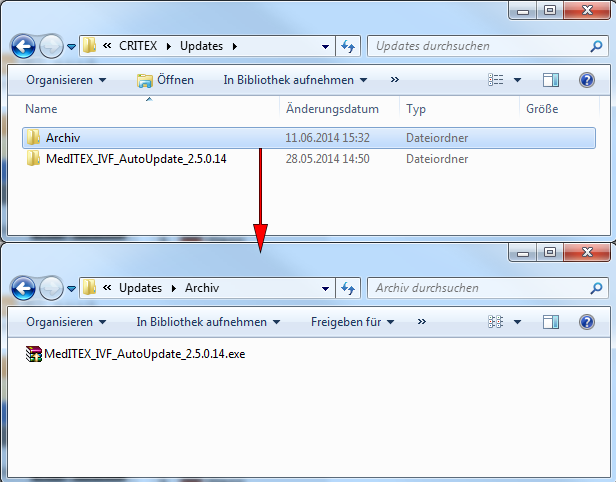 folder
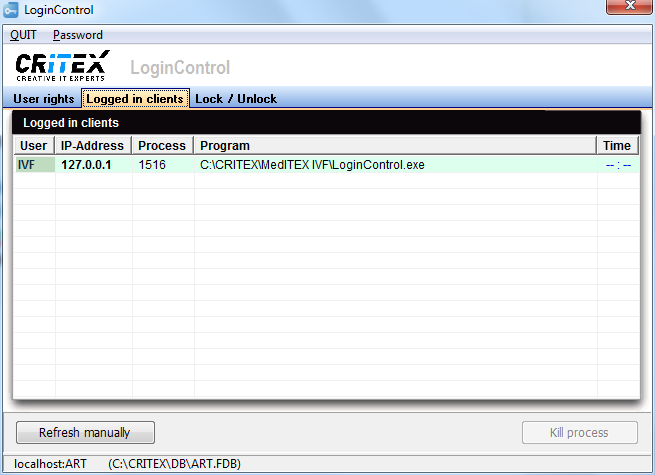
 - Start the LoginControl.exe (...\CRITEX\MedITEX IVF\LoginControl.exe). If you select the tab „Logged in clients" you can see all services and users accessing the database.
Make sure that every single user is logged out and no one longer use the program.
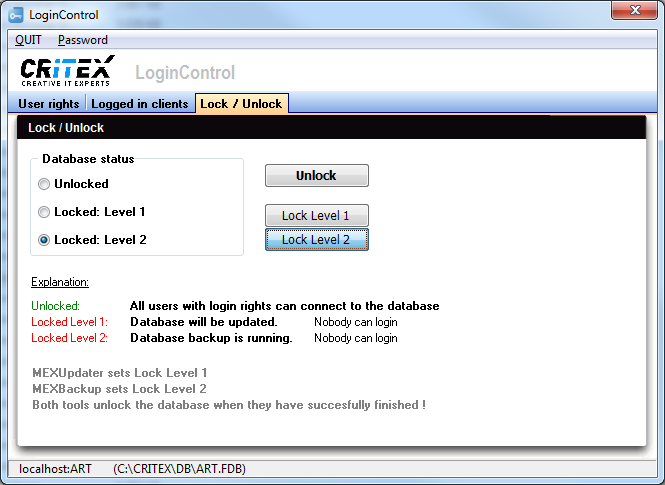
Important: To make sure that no one logs in again, move to "Login Control". Under the tab "Lock / Unlock" set the lock level to 2.
<tbody>
 fileserver
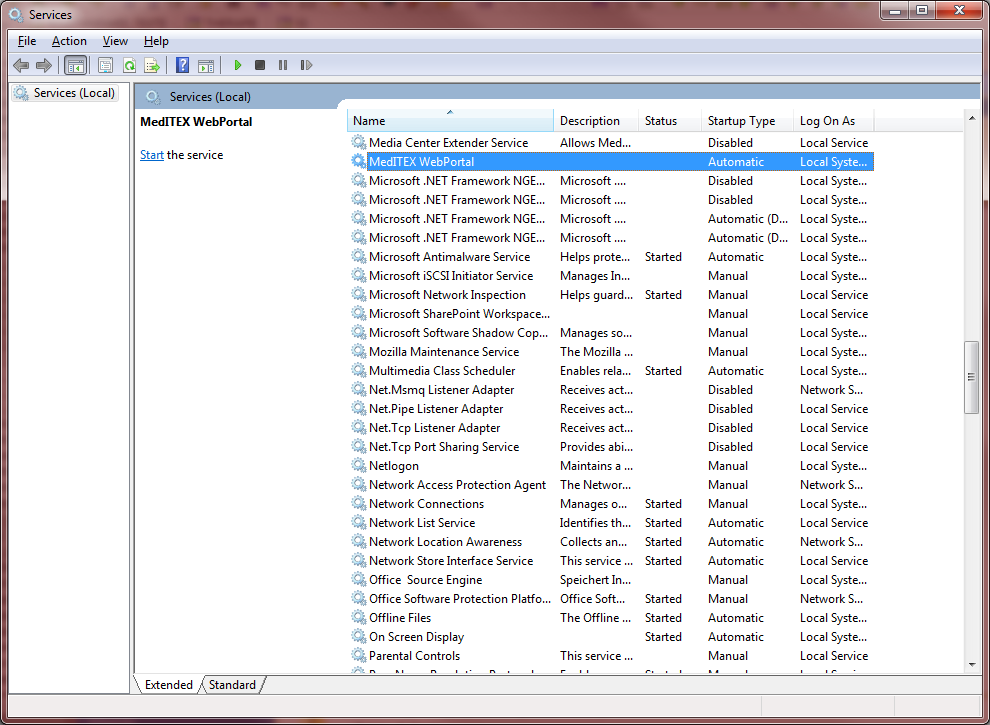
 - In the "Services" window ("Control Panel\All Control Panel Items\Administrative Tools\Services" or simply type "services" into the Windows search function) stop all services that appear in the "Login Control".
Important: Keep the window open at best. You have to restart all terminated services after a successful update proces.
<tbody>
 fileserver
 - All users are logged off and all services stoped. The LoginControl.exe may remain. Take advantage of the refresh button to update the view.
<tbody>
 loginControl
 - Move to the "File Server Management" and close all files whose name includes "CRITEX" or "MedITEX" but only if the file is not writing. If the file is writing or not you can see by the entry of the last column.
<tbody>
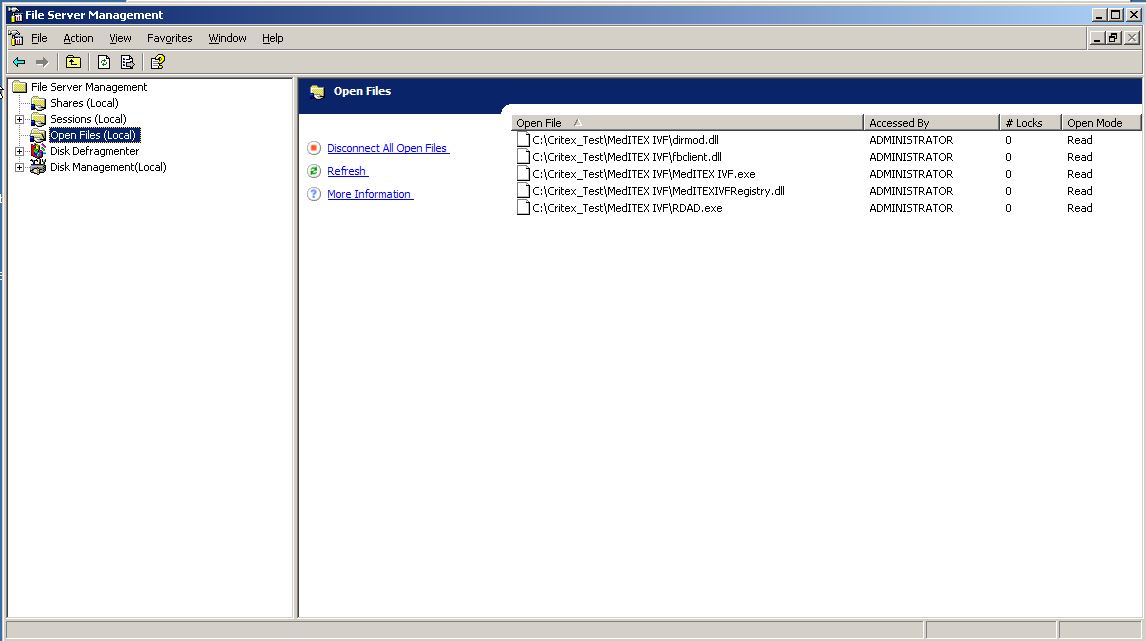 fileserver
 - Backups
Important: Start this step only when step 8 and 9 has been completed.
- You need to run the backup ...\CRITEX\MedITEX IVF\MedITEX Backup.exe
Caution: Once the backup is complete the lock level in the "Login Control" is unchained and users can log on again. So always keep an eye on the backup process. Once this is done,you should promptly set the lock level on 1. Please check if someone could login within this short time window. Only continue if the conditions of step 8 and 9 are given.
<tbody>
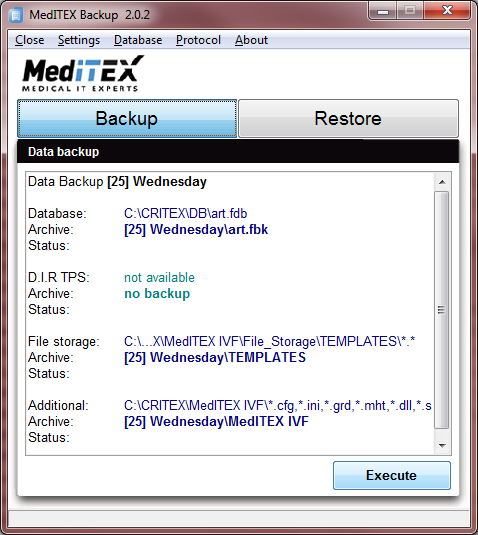 Backup
 - Navigate to ...\CRITEX\BackUp once the backup is complete.
Here is the just created backup "[xx] day of the week" (xx stands for the calendar week). Copy the latest backup to a newly created folder of you. You can name the folder as follows:.. _before_update_x.xxx_date (X. xxx Here is the respective update version).
- You need to run the backup ...\CRITEX\MedITEX IVF\MedITEX Backup.exe
- Copy the installCritexUDF.exe and CritexFirebirdUDF.dll manually from the update package folder (...\CRITEX\Updates\MedITEX_IVF_AutoUpdate_x.xxx) to the MedITEX IVF folder (...\CRITEX\MedITEX IVF).
Also copy the CritexFirebirdUDF.dll into your Firebird-folder(...\Firebird\Firebird_2_5\UDF).
- Now start the installCritexUDF.exe as an administrator, make sure that the given path for the Firebird UDF Folder is the correct one. (...\Firebird\Firebird_2_5\UDF). If not all or not a single function is checked (like here) please check all of them manually. Afterwards start the installation by clicking “Install”.
<tbody>
 UDF
UDF - Now start the Updater.exe (...\CRITEX\Updates\MedITEX_IVF_AutoUpdate_x.xxx\Updater.exe) as an administrator.
- If the "Updater" is done, close it and restart all services you have stopped in step 7.


