Scheduler main page
From MedITEX - Wiki
| Line 112: | Line 112: | ||
<tbody> | <tbody> | ||
<tr> | <tr> | ||
| − | |||
<td> | <td> | ||
| − | <p>In this list it is possible to <strong>vary the order of resources</strong> by moving the selected resource it up or down using the | + | <p><img src="/images/DefineSpecialView.png" alt="" width="572" height="532" /></p> |
| + | </td> | ||
| + | </tr> | ||
| + | <tr> | ||
| + | <td> | ||
| + | <p>In this list it is possible to <strong>vary the order of resources</strong> by moving the selected resource it up or down using the corresponding buttons on the right side. In the middle of the window you can <strong>create your personal scheduler view:</strong> day, week, timeline or year.</p> | ||
<p><strong>This order will be saved for each user individually</strong>. So if you quit the scheduler and log in again you will see the order as you have defined it.</p> | <p><strong>This order will be saved for each user individually</strong>. So if you quit the scheduler and log in again you will see the order as you have defined it.</p> | ||
</td> | </td> | ||
Revision as of 10:37, 18 January 2013
 |
Contents |
Buttons
Some buttons have special functionalities. Click on it to have more information.
| <a href="/index.php?title=Appointment_lists"><img style="display: block; margin-left: auto; margin-right: auto; border: 2px dotted blue;" src="/images/AppointmentList.png" alt="" width="125" height="24" /></a> | Show the appointment of selected patient. |
| <a href="/index.php?title=Appointments"><img style="display: block; margin-left: auto; margin-right: auto; border: 2px dotted blue;" src="/images/NewAppointment.PNG" alt="" /></a> | Open a new appointment. |
| <img style="display: block; margin-left: auto; margin-right: auto;" src="/images/OpenPatientInMeditexIVF.PNG" alt="" width="27" height="27" /> | If MediTEX IVF is installed, this button opens the patient in it. |
| <a href="/index.php?title=Scheduler_Views#Resource_representation"><img style="display: block; margin-left: auto; margin-right: auto; border: 2px dotted blue;" src="/images/Defi.png" alt="" width="84" height="27" /></a> | Defined selection of resources. |
| <img src="/images/A.png" alt="" width="50" height="26" /> | Shows all resources in the schedule. |
| <a href="/index.php?title=Scheduler_main_page#Special_selection"><img style="display: block; margin-left: auto; margin-right: auto; border: 2px dotted blue;" src="/images/SpecialSelection.png" alt="" width="134" height="26" /></a> |
With a click on the button Special selection you can open a list with all existing and active resources, which were defined in the settings. |
| <a href="/index.php?title=Scheduler_Views"><img style="display: block; margin-left: auto; margin-right: auto; border: 2px dotted blue;" src="/images/ViewOptionsBut.png" alt="" width="137" height="82" /></a> | Use the buttons D, W and T to change the view of the scheduler in day, work week or time grid view. |
Clickable areas on the left side of the scheduler
Some clickable areas have special functionalities. Click on it to have more information.
| <a href="/index.php?title=Scheduler_Views#Quick_selection_of_different_sets_of_resources"><img style="display: block; margin-left: auto; margin-right: auto; border: 2px dotted blue;" src="/images/DelRed.png" alt="" width="140" height="99" /></a> | Choose resources after group or set. |
| <a href="/index.php?title=Scheduler_Views"><img style="display: block; margin-left: auto; margin-right: auto; border: 2px dotted blue;" src="/images/Date.png" alt="" width="151" height="284" /></a> |
You see the current date in the blue square. If Day view is active, it is possible to select several days in the months navigation. |
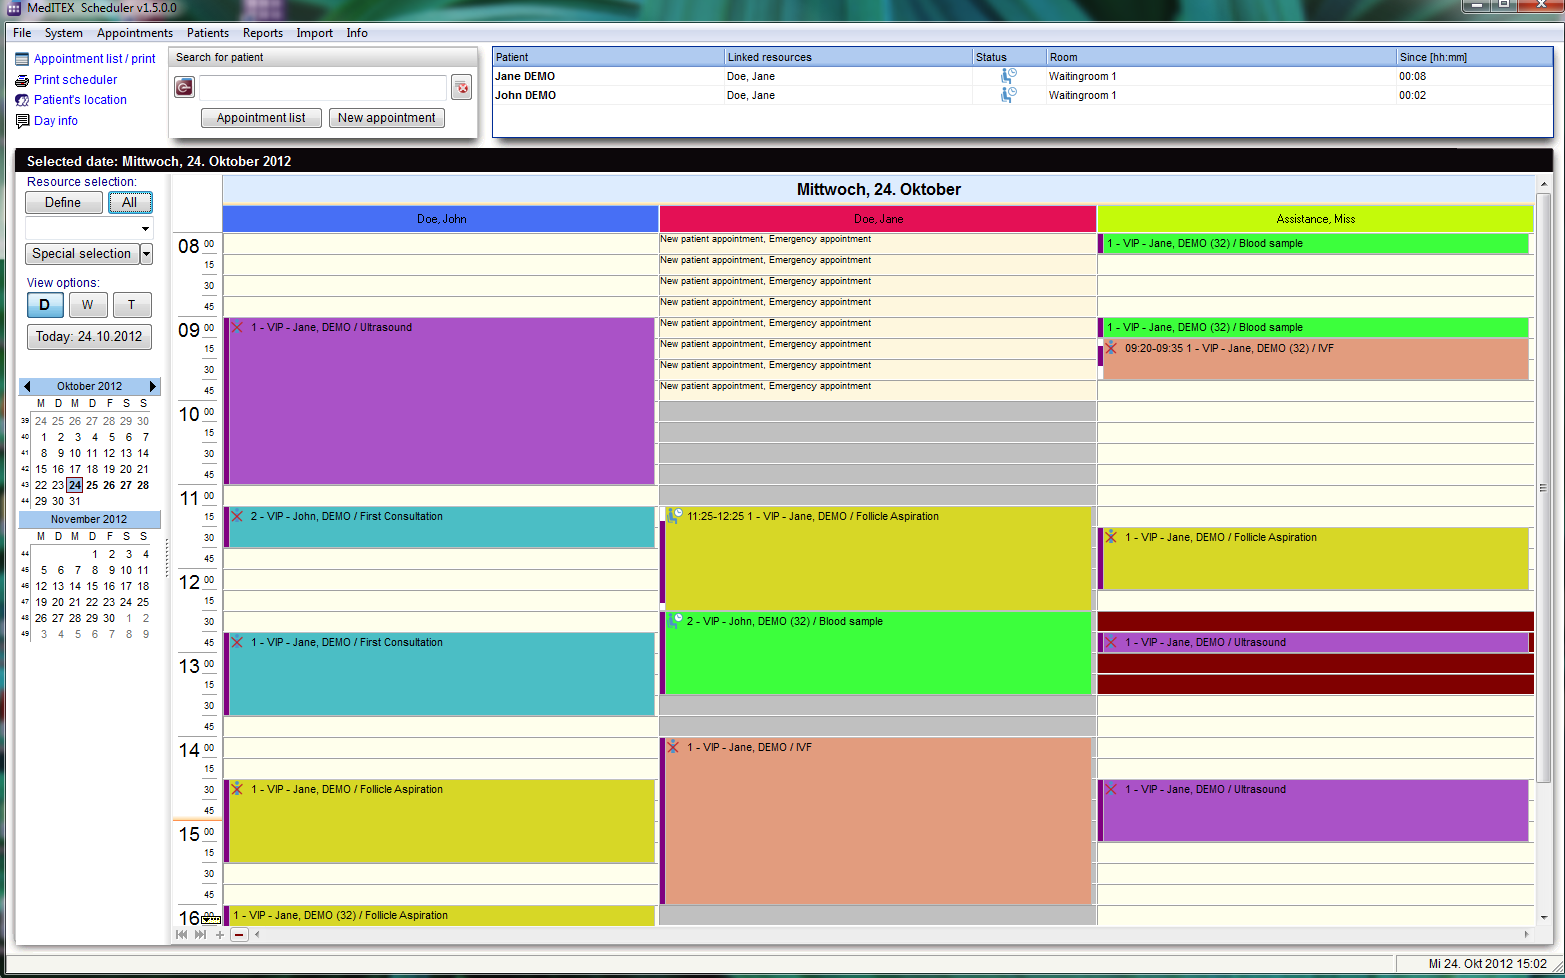
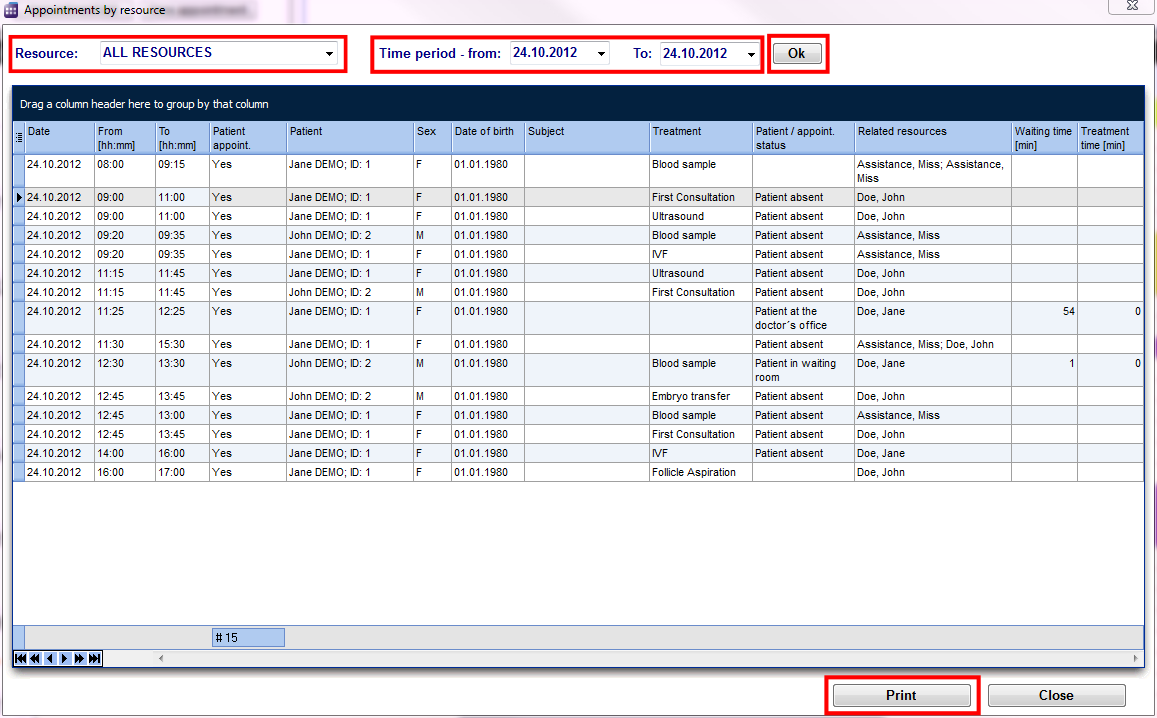
| <a href="/index.php?title=Scheduler_main_page#Appointment_list_.2F_print"><img style="display: block; margin-left: auto; margin-right: auto; border: 2px dotted blue;" src="/images/Appointmentlist-print.png" alt="" width="154" height="25" /></a> | Resources on a selected date. There is the option to print. |
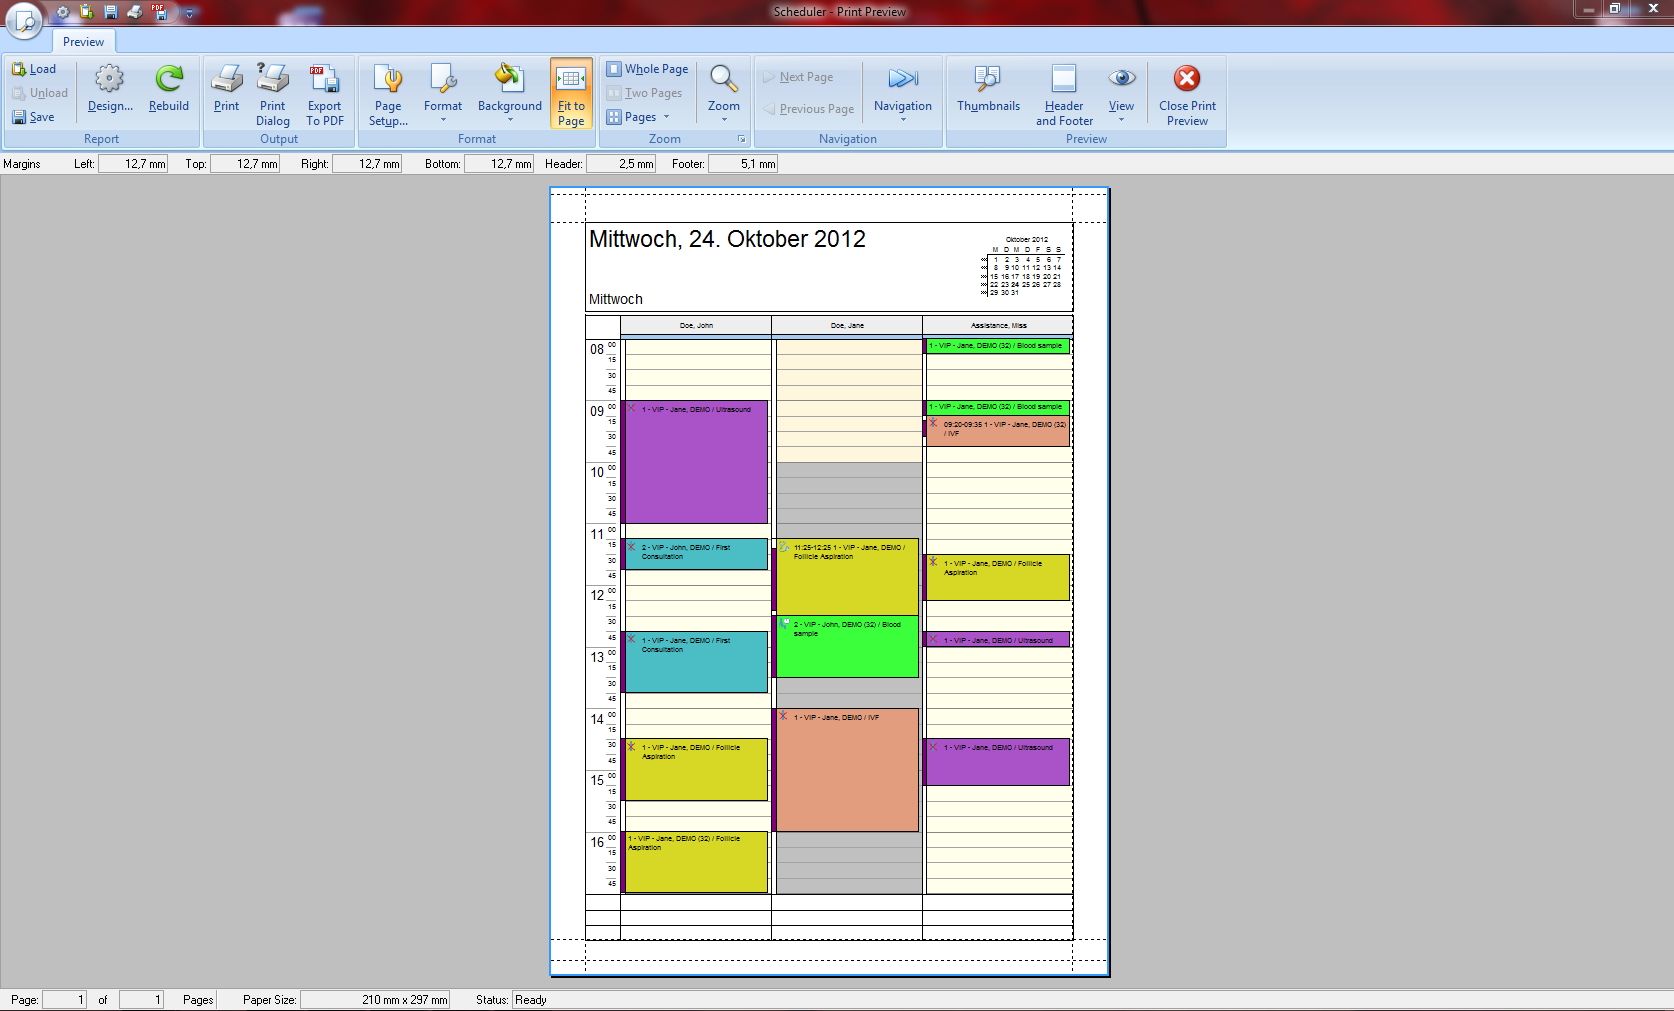
| <a href="/index.php?title=Scheduler_main_page#Scheduler_print_preview"><img style="display: block; margin-left: auto; margin-right: auto; border: 2px dotted blue;" src="/images/printScheduler.png" alt="" width="124" height="23" /></a> |
Print view of the scheduler. |
| <a href="/index.php?title=Patient_location"><img style="display: block; margin-left: auto; margin-right: auto; border: 2px dotted blue;" src="/images/PatientLocation.png" alt="" width="135" height="22" /></a> |
Waiting room. |
| <a href="/index.php?title=Scheduler_main_page#Day_info"><img style="display: block; margin-left: auto; margin-right: auto; border: 2px dotted blue;" src="/images/DayInfo.png" alt="" width="135" height="22" /></a> |
Important messages for a certain day. Messages from current date are shown in the Main Window. |
| <a href="/index.php?title=Scheduler_main_page#Number_of_displayed_resources"><img style="display: block; margin-left: auto; margin-right: auto; border: 2px dotted blue;" src="/images/MainWindowNSmall.png" alt="" width="166" height="72" /></a> | Change visible resources. |
Tabs on the top of the scheduler
Tabs display valuable information. Click on it to learn more.
| <a href="/index.php?title=Patient_location"><img style="display: block; margin-left: auto; margin-right: auto; border: 2px dotted blue;" src="/images/PatientsLShortRed.png" alt="" width="556" height="100" /></a> |
| Patients in the waiting room. You can see the name of the patient and doctor, status, room number and waiting time. |
| <a href="/index.php?title=Scheduler_main_page#Day_info"><img style="display: block; margin-left: auto; margin-right: auto; border: 2px dotted blue;" src="/images/DayInfoShortRed.png" alt="" width="401" height="102" /></a> |
|
Important messages from current date. By clicking in the field you can add news to your info. |
Special selection
|
<img src="/images/DefineSpecialView.png" alt="" width="572" height="532" /> |
|
In this list it is possible to vary the order of resources by moving the selected resource it up or down using the corresponding buttons on the right side. In the middle of the window you can create your personal scheduler view: day, week, timeline or year. This order will be saved for each user individually. So if you quit the scheduler and log in again you will see the order as you have defined it. |
Appointment list / print
 |
|
Filters the list with resource name, time and date. If you click on Print, the print preview will be opened. The window also will be opened if you click in the menu bar: Appointments -> Appointments by resource. |
Scheduler print preview
 |
|
Prints the appointments. The window will also be opened if you click in the menu bar: Appointments -> Print scheduler. |
Day info
 |
| Edit, add or delete messages in this window. Save it with OK, otherwise click Cancel. |
Number of displayed resources
 |
| When you start MedITEX Scheduler and you have more than three resources defined, the scheduler will usually display 4 resources. In the bottom of the scheduler you will find small navigation buttons. With "+" you can increase the number of the resources in your view, and with "–" decrease it. |
| <a href="/index.php?title=MedITEX_Scheduler_manual">Back to the MedITEX Scheduler menu </a> | <a href="#top">Back to top</a> |