Scheduler main page

From MedITEX - Wiki

(Difference between revisions)
Jump to: navigation, search
Line 109: Line 109:
 
<p>[[Image:MainWindowN.png|none|750px|thumb|left|link=http://wiki.meditex-software.com/images/MainWindowN.png|Change  here the visible resources]]</p>
 
<p>[[Image:MainWindowN.png|none|750px|thumb|left|link=http://wiki.meditex-software.com/images/MainWindowN.png|Change  here the visible resources]]</p>
 
<p>&nbsp;</p>
 
<p>&nbsp;</p>
 +
<h3>Special selection</h3>
 +
<p>[[Image:DefineSpecialView.png|none|750px|thumb|left|link=http://wiki.meditex-software.com/images/DefineSpecialView.png|Define  a special view]]</p>
 +
<p>In this list it  is possible to vary the order  of resources by  moving  the  selected  resource it up or down using the  corresponding  buttons  on the  right  side. In the middle of the window you can create  your personal scheduler view: day, week, timeline or year.</p>
 +
<p>This  order will be saved for each user  individually. So if you quit    the  scheduler and log in again you will  see the order as you have    defined  it.</p>
 
<p>&nbsp;</p>
 
<p>&nbsp;</p>
 
<p>&nbsp;</p>
 
<p>&nbsp;</p>
<h2>Generating a patient appointment</h2>
 
<p style="text-align: justify;">In  order to generate a new appointment you can click on the button &ldquo;New  appointment&rdquo; or you can double click in the calendar of a certain  resource; the appointment detail form will appear on the right side of  the screen.</p>
 
<p><img style="border: 3px solid gainsboro; margin-bottom: 2px; margin-right: 40px; padding: 3px;" src="/images/fig40.png" alt="" width="750" height="400" /></p>
 
 
<p>&nbsp;</p>
 
<p>&nbsp;</p>
<p style="text-align: justify;">If you  double click into a resource, this resource will automatically be  inserted into the resource list of the appointment form.</p>
 
<p style="text-align: justify;">If you go over the button &ldquo;New appointment&rdquo;, the list remains empty.</p>
 
<p>&nbsp;<img style="border: 3px solid gainsboro; margin-bottom: 2px; margin-right: 40px; padding: 3px;" src="/images/fig41.png" alt="" width="486" height="101" /></p>
 
 
<p>&nbsp;</p>
 
<p>&nbsp;</p>
<p style="text-align: justify;">You  can add further resources to this appointment by clicking the green &ldquo;+&rdquo;  button. The resource whose cell is marked in the scheduler</p>
 
<p style="text-align: justify;">will  be added to the list. In order to change the resource you can click in  the cell containing its name, and select another one.</p>
 
<p><img style="border: 3px solid gainsboro; margin-bottom: 2px; margin-right: 40px; padding: 3px;" src="/images/fig42.png" alt="" width="491" height="163" /></p>
 
<p>&nbsp;<img style="border: 3px solid gainsboro; margin-bottom: 2px; margin-right: 40px; padding: 3px;" src="/images/fig43.png" alt="" width="221" height="170" /></p>
 
 
<p>&nbsp;</p>
 
<p>&nbsp;</p>
<p style="text-align: justify;">In  order to create the appointment for a certain patient, search for a  patient and the appointment will automatically be filled out with the  patient data in the left yellow box of the appointment form. The patient  search is always equal to the patient data in the appointment editor.  If the patient is not in the database yet, you can also fill out the  &ldquo;Subject&rdquo; field of the appointment form. You have to use at least one of  these two options in order to be able to save the appointment.</p>
 
<p><img style="border: 3px solid gainsboro; margin-bottom: 2px; margin-right: 40px; padding: 3px;" src="/images/fig44.png" alt="" width="750" height="177" /></p>
 
<p><img style="border: 3px solid gainsboro; margin-bottom: 2px; margin-right: 40px; padding: 3px;" src="/images/fig45.png" alt="" width="750" height="182" /></p>
 
<p>&nbsp;</p>
 
<p style="text-align: justify;">The  patient data can be accessed in the menu item &bdquo;Patients&ldquo;, or by clicking  on the magnifier symbol in the appointment editor. In this form you can  also input the complete data of a new patient.</p>
 
<p><img style="border: 3px solid gainsboro; margin-bottom: 2px; margin-right: 40px; padding: 3px;" src="/images/fig46.png" alt="" width="750" height="182" /></p>
 
<p style="text-align: justify;">After  saving, the appointment will be displayed in the scheduler in all  entered resources with the patient&rsquo;s id, name and age and/or the  subject.</p>
 
<p>&nbsp;</p>
 
<h2>Generating an appointment with a treatment</h2>
 
<table border="0" width="827" height="237">
 
<tbody>
 
<tr>
 
<td>
 
<p style="text-align: justify;">If you want to simplify the generation of appointments, you can</p>
 
<p style="text-align: justify;">predefine treatments in the program settings by stating the</p>
 
<p style="text-align: justify;">duration,  colour and assigned resources (see <a href="/index.php?title=Settings_%28Scheduler%29#Treatments_as_appointment_templates_.E2.80.93_tab_sheet_.E2.80.9ETreatments.E2.80.9C">here</a>). These</p>
 
<p style="text-align: justify;">treatments will be  offered in the treatment drop-down field of</p>
 
<p style="text-align: justify;">the appointment editor. If  the box &ldquo;Treatments filtered after</p>
 
<p style="text-align: justify;">linked resources&rdquo; is checked you will  only see the treatments</p>
 
<p style="text-align: justify;">that contain the same resources which you  entered in the</p>
 
<p style="text-align: justify;">resource list of the appointment or which have no  resource at all.</p>
 
</td>
 
<td><img style="border: 3px solid gainsboro; margin-left: 10px;" src="/images/fig47.png" alt="" width="287" height="193" /></td>
 
</tr>
 
</tbody>
 
</table>
 
<p>&nbsp;</p>
 
<p style="text-align: justify;">If you  chose a treatment, all linked resources will automatically be entered  in the resource list of the appointment with the predefined duration,  which can be different for each resource (also see <a href="/index.php?title=Settings_%28Scheduler%29#Treatments_as_appointment_templates">here</a>). The saved appointment will be shown in the colour that was defined with the treatment.</p>
 
<p><img style="border: 3px solid gainsboro; margin-bottom: 2px; margin-right: 40px; padding: 3px;" src="/images/fig48.png" alt="" width="750" height="400" /></p>
 
<p>&nbsp;</p>
 
<p>The following screenshots show that the appointment editor was opened  for a new appointment, while the resource &ldquo;Doe, John&rdquo; is selected (a  cell in his calendar is selected). Because the box <em>&ldquo;Treatments filtered after linked resources&rdquo;</em> is checked, we see all treatments in which the resource &ldquo;Doe, John&rdquo; participates.</p>
 
<p>With the selection of treatment &ldquo;Follicle aspiration a&rdquo; all other  resources which are linked with the treatment, in this case &ldquo;OR 2&rdquo;, were  entered in the resource list and the duration was automatically  adjusted for every resource.</p>
 
<p><img style="border: 3px solid gainsboro; margin-bottom: 2px; margin-right: 40px; padding: 3px;" src="/images/fig49.png" alt="" width="750" height="400" /></p>
 
<p><img style="border: 3px solid gainsboro; margin-bottom: 2px; margin-right: 40px; padding: 3px;" src="/images/fig50.png" alt="" width="750" height="400" /></p>
 
<p>&nbsp;</p>
 
<p style="text-align: justify;">Once  you save the appointment, you can see it in the scheduler across the  involved resources with the defined colour and the duration for each  resource involved.</p>
 
<p><img style="border: 3px solid gainsboro; margin-bottom: 2px; margin-right: 40px; padding: 3px;" src="/images/fig51.png" alt="" width="750" height="400" /></p>
 
<p>&nbsp;</p>
 
<h2>Free movement in the scheduler while assigning an appointment</h2>
 
<p style="text-align: justify;">During  the creation of an appointment, it is possible to freely move within  one resource, and thus quickly find an appropriate time gap. You can  change the resource view and the days. With a click in a resource the  start date and the start time will automatically be adjusted in the  appointment editor, and the time intervals for the complete duration  will be marked in the resource calendar. In this way the appointment can  quickly be arranged with the patient on the other side of the telephone  line.</p>
 
<p><img style="border: 3px solid gainsboro; margin-bottom: 2px; margin-right: 40px; padding: 3px;" src="/images/fig52.jpg" alt="" width="750" height="401" /></p>
 
<p>&nbsp;</p>
 
<h2>Common appointments</h2>
 
<p style="text-align: justify;">In  order to generate appointments which are not related to a certain  patient, like internal staff meetings, holiday etc., you can use the  second tab sheet &bdquo;Internal/general&rdquo; of the appointment editor. Fill in  the subject and add all resources which will be involved in this  appointment with the &ldquo;+&rdquo; button. It is also possible to set the  appointment to &ldquo;All day&rdquo; and lock the resource(s) for the duration of  appointment.</p>
 
<p><img style="border: 3px solid gainsboro; margin-bottom: 2px; margin-right: 40px; padding: 3px;" src="/images/fig53.png" alt="" width="750" height="400" /></p>
 

Revision as of 16:29, 5 November 2012

Back to <a href="/index.php?title=Scheduler_Manual">MedITEX Scheduler Manual</a> home page


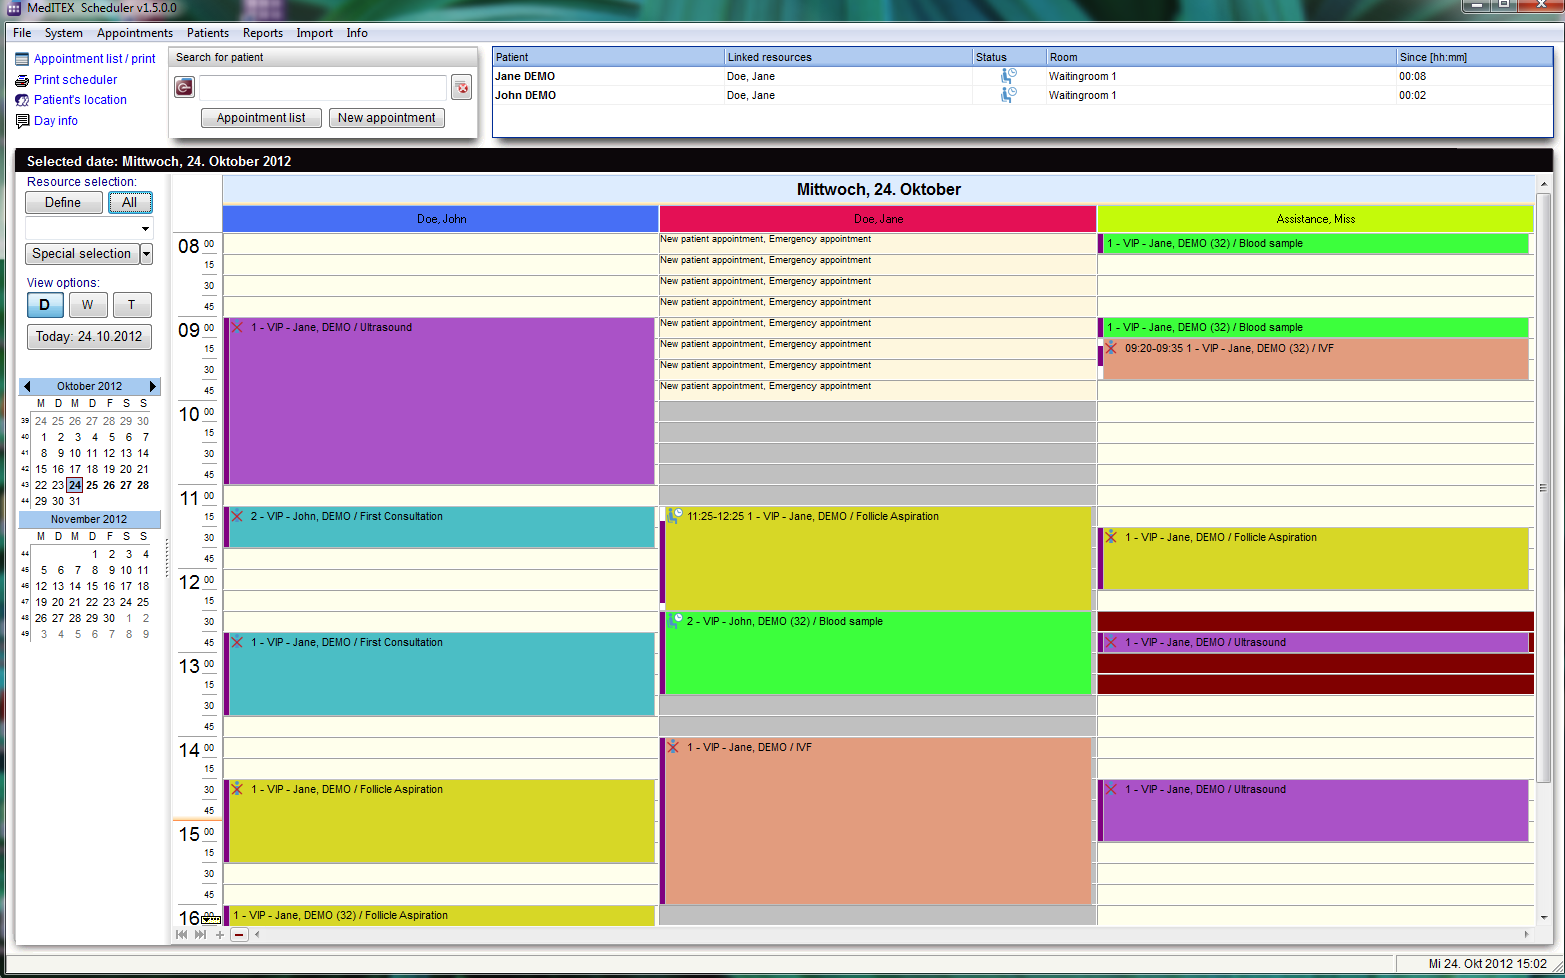
Main window.


Contents

Buttons

<tbody> </tbody>
<a href="/index.php?title=Appointments_of_patient"><img src="/images/AppointmentList.png" alt="" width="125" height="24" /></a> Show the appointment of selected patient.
<a href="/index.php?title=Patient appointment"><img src="/images/NewAppointment.PNG" alt="" width="125" height="26" /></a> Open a new appointment.
<a href="/index.php?title=MedITEX IVF"><img style="display: block; margin-left: auto; margin-right: auto;" src="/images/OpenPatientInMeditexIVF.PNG" alt="" width="27" height="27" /></a> If MediTEX IVF is installed, this button opens the patient in it.
<a href="/index.php?title=Empty selection"><img style="display: block; margin-left: auto; margin-right: auto;" src="/images/EmptySelection.png" alt="" width="26" height="31" /></a> Empty selection.
<a href="/index.php?title=Resource_selection"><img src="/images/Defi.png" alt="" width="84" height="27" /></a> Defined selection of resources.
<a href="/index.php?title=Resource selection"><img src="/images/A.png" alt="" width="50" height="26" /></a>  Shows all resources.
<a href="/index.php?title=Special selection"><img src="/images/SpecialSelection.png" alt="" width="134" height="26" /></a>

With a click on the button “Special selection” you can open a list with all existing and active resources, which were defined in the settings.

<a href="/index.php?title=Scheduler_Views"><img src="/images/ViewOptionsBut.png" alt="" width="137" height="82" /></a>
Use the buttons “D”, “W” and “T” to change the view of the scheduler in day, work week or time grid view.


Clickable areas on the left side of the scheduler

<tbody> </tbody>
<a href="/index.php?title=Resource_selection"><img src="/images/DelRed.png" alt="" width="140" height="99" /></a> Choose resources after group or set.
<a href="/index.php?title=Scheduler_Views"><img src="/images/Date.png" alt="" width="151" height="284" /></a>

You see the current date in the blue square.

If “Day view” is active, it is possible to select several days in the months navigation.

<a href="/index.php?title=Appointments by resource"><img src="/images/Appointmentlist-print.png" alt="" width="154" height="25" /></a> Resources on a selected date and printing.
<a href="/index.php?title=Scheduler - Print Preview"><img src="/images/printScheduler.png" alt="" width="124" height="23" /></a>
Print view of the scheduler.
<a href="/index.php?title=Patient´s location"><img src="/images/PatientLocation.png" alt="" width="135" height="22" /></a>
Waiting room.
<a href="/index.php?title=Message of the day"><img src="/images/DayInfo.png" alt="" width="135" height="22" /></a>
Important messages for a certain day. Messages from current date are shown in the Main Window.
<a href="/index.php?title=Scheduler_main_page#Number_of_displayed_resources"><img src="/images/MainWindowNSmall.png" alt="" width="166" height="72" /></a> Change visible resources.


Tabs on the top of the scheduler

<tbody> </tbody>
<a href="/index.php?title=Patient appointment"><img src="/images/PatientsLShortRed.png" alt="" width="556" height="100" /></a>
Patients in the waiting room. You can see the name of the patient and doctor, status, room number and waiting time.


<tbody> </tbody>
 <a href="/index.php?title=Day info"><img src="/images/DayInfoShortRed.png" alt="" width="401" height="102" /></a>
Important messages from current date.


Links

Number of displayed resources

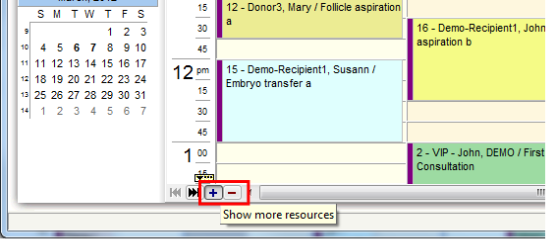
When you start MedITEX Scheduler and you have more than three resources defined, the scheduler will usually display 4 resources. In the bottom of the scheduler you will find small navigation buttons. With “+” you can increase the number of the resources in your view, and with “–“ decrease it.

Change here the visible resources


Special selection

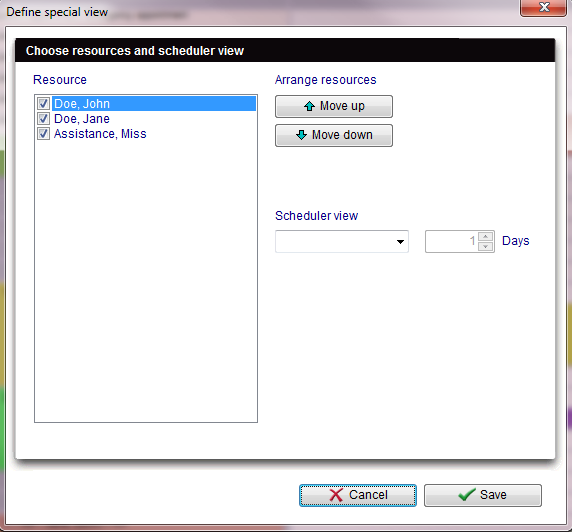
Define a special view

In this list it is possible to vary the order of resources by moving the selected resource it up or down using the corresponding buttons on the right side. In the middle of the window you can create your personal scheduler view: day, week, timeline or year.

This order will be saved for each user individually. So if you quit the scheduler and log in again you will see the order as you have defined it.