How to donate frozen oocytes or embryos?
From MedITEX - Wiki
| Line 1: | Line 1: | ||
| − | a | + | <p>In order to donate frozen oocytes/embryos, a few prerequisites need to be fulfilled.</p> |
| + | <h3>Donor</h3> | ||
| + | <p>The option <strong><span style="text-decoration: underline;">Person is:</span> Donor (Ooc./Emb.) </strong>needs to be checked for the donor of the oocytes/embryos. These are the steps:<strong><br /></strong></p> | ||
| + | <ul> | ||
| + | <li>Click on <strong>Demographics </strong>(female) then, double-click the green area on the right.</li> | ||
| + | </ul> | ||
| + | <table style="margin-left: auto; margin-right: auto;" border="0"> | ||
| + | <tbody> | ||
| + | <tr> | ||
| + | <td>[[Image:DemographicsDonorRed.png|none|740px|thumb|left|link=http://wiki.meditex-software.com/images/DemographicsDonorRed.png|]]</td> | ||
| + | </tr> | ||
| + | </tbody> | ||
| + | </table> | ||
| + | <ul> | ||
| + | <li>On the opened window <strong>Person and donor information</strong>, you need to check that the <strong><span style="text-decoration: underline;">Person is:</span> Donor (Ooc./Emb.)</strong>.</li> | ||
| + | </ul> | ||
| + | <table style="margin-left: auto; margin-right: auto;" border="0"> | ||
| + | <tbody> | ||
| + | <tr> | ||
| + | <td><img src="/images/PandDInfo1.1Red.png" alt="" width="612" height="184" /></td> | ||
| + | </tr> | ||
| + | </tbody> | ||
| + | </table> | ||
| + | <p> </p> | ||
| + | <p>Change to the recipient patient.</p> | ||
| + | <p> </p> | ||
| + | <h3>Recipient</h3> | ||
| + | <p>The option <strong><span style="text-decoration: underline;">Person needs:</span></strong> <strong>Donor (Ooc./Emb.) </strong>needs to be checked for the recipient of the oocytes/embryos. These are the steps:</p> | ||
| + | <ul> | ||
| + | <li>Click on <strong>Demographics </strong>(female) then, double-click the green area on the right.</li> | ||
| + | </ul> | ||
| + | <table style="margin-left: auto; margin-right: auto;" border="0"> | ||
| + | <tbody> | ||
| + | <tr> | ||
| + | <td>[[Image:DemographicsDonorRed.png|none|740px|thumb|left|link=http://wiki.meditex-software.com/images/DemographicsDonorRed.png|]]</td> | ||
| + | </tr> | ||
| + | </tbody> | ||
| + | </table> | ||
| + | <ul> | ||
| + | <li>On the opened window <strong>Person and donor information</strong>, you need to check that the <strong><span style="text-decoration: underline;">Person needs:</span></strong> <strong>Donor (Ooc./Emb.)</strong>.</li> | ||
| + | </ul> | ||
| + | <table style="margin-left: auto; margin-right: auto;" border="0"> | ||
| + | <tbody> | ||
| + | <tr> | ||
| + | <td><img src="/images/PandDInfo1.3Red.png" alt="" width="612" height="184" /></td> | ||
| + | </tr> | ||
| + | </tbody> | ||
| + | </table> | ||
| + | <p> </p> | ||
| + | <h2>Donor's cycle</h2> | ||
| + | <p>To create a cycle, click on the '<strong>+</strong>' button at the bottom left corner of the main patient's window.</p> | ||
| + | <table style="margin-left: auto; margin-right: auto;" border="0"> | ||
| + | <tbody> | ||
| + | <tr> | ||
| + | <td>[[Image:MainWindowNewCycleRed.png|none|740px|thumb|left|link=http://wiki.meditex-software.com/images/MainWindowNewCycleRed.png|]]</td> | ||
| + | </tr> | ||
| + | </tbody> | ||
| + | </table> | ||
| + | <p> </p> | ||
| + | <p>Create either <strong>Only aspiration</strong> or any <strong>IVF/ICSI</strong> cycles and check <strong>Donation (Ooc/Emb)</strong>.</p> | ||
| + | <table style="margin-left: auto; margin-right: auto;" border="0"> | ||
| + | <tbody> | ||
| + | <tr> | ||
| + | <td> | ||
| + | <p>[[Image:DonationCycleMatchingDonorRed.png|none|740px|thumb|left|link=http://wiki.meditex-software.com/images/DonationCycleMatchingDonorRed.png|]]</p> | ||
| + | </td> | ||
| + | </tr> | ||
| + | </tbody> | ||
| + | </table> | ||
| + | <p> </p> | ||
| + | <p>After creating the cycle, switch to <strong>Aspiration</strong> and select the amount of oocytes collected.</p> | ||
| + | <p> </p> | ||
| + | <h3>Only aspiration</h3> | ||
| + | <p>In <strong>Cryo/Donation</strong>, double-click the red cell for <strong>Cryo </strong>(1). The cryopreservation window will open and you must check <strong>For donation</strong> (2).</p> | ||
| + | <p> </p> | ||
| + | <h2>Donation</h2> | ||
| + | <p>In a donor’s cycle, click on the <strong>Cryo/Donation</strong> tab. Double-click the last red cell next to <strong>Donate</strong>. The <strong>Distribution</strong> window will open.</p> | ||
| + | <table style="margin-left: auto; margin-right: auto;" border="0"> | ||
| + | <tbody> | ||
| + | <tr> | ||
| + | <td><img src="/images/DonateNumberOfOocytesRed.png" alt="" width="279" height="405" /></td> | ||
| + | </tr> | ||
| + | </tbody> | ||
| + | </table> | ||
| + | <p> </p> | ||
| + | <p>Now that we have linked recipient’s cycle, we need to distribute oocytes and confirm pressing the green button.</p> | ||
| + | <table style="margin-left: auto; margin-right: auto;" border="0"> | ||
| + | <tbody> | ||
| + | <tr> | ||
| + | <td><img src="/images/DonationConfirmationRed.png" alt="" width="654" height="276" /></td> | ||
| + | </tr> | ||
| + | </tbody> | ||
| + | </table> | ||
| + | <p> </p> | ||
| + | <p>After the donation has been completed, we can open the cycle of the recipient and continue cultivation. You can switch between cycles with the buttons from the image below. If a patient has more than one recipient/donor a message will ask you to whom you want to switch.</p> | ||
| + | <table style="margin-left: auto; margin-right: auto;" border="0"> | ||
| + | <tbody> | ||
| + | <tr> | ||
| + | <td> | ||
| + | <p>[[Image:DonorRecipientButtonRed.png|none|740px|thumb|left|link=http://wiki.meditex-software.com/images/DonorRecipientButtonRed.png|]]</p> | ||
| + | </td> | ||
| + | </tr> | ||
| + | </tbody> | ||
| + | </table> | ||
| + | <p> </p> | ||
| + | <h2>New recipient</h2> | ||
| + | <p>If we need to donate to another recipient simultaneously, we can click on the <strong>Cycle links</strong> button (in the <strong>Distribution</strong> window).</p> | ||
| + | <table style="margin-left: auto; margin-right: auto;" border="0"> | ||
| + | <tbody> | ||
| + | <tr> | ||
| + | <td><img src="/images/DonationOocyteDistributionRed.png" alt="" width="710" height="630" /></td> | ||
| + | </tr> | ||
| + | </tbody> | ||
| + | </table> | ||
| + | <p> </p> | ||
| + | <p>For this case, <strong>Matcher</strong> will open and you can repeat matching procedures from the beginning, but this time, using another recipient.</p> | ||
| + | <table style="margin-left: auto; margin-right: auto;" border="0"> | ||
| + | <tbody> | ||
| + | <tr> | ||
| + | <td><img src="/images/MultipleDonation.png" alt="" width="710" height="630" /></td> | ||
| + | </tr> | ||
| + | </tbody> | ||
| + | </table> | ||
| + | <p> </p> | ||
| + | <p>You can have as many recipients/donors attached as you need.</p> | ||
| + | <table style="float: right;" border="0"> | ||
| + | <tbody> | ||
| + | <tr> | ||
| + | <td style="text-align: right;"><a href="/index.php?title=MedITEX_IVF_how_to">Back to the How to</a></td> | ||
| + | <td style="text-align: right;"><a href="#top">Back to top</a></td> | ||
| + | </tr> | ||
| + | </tbody> | ||
| + | </table> | ||
Revision as of 15:05, 6 December 2012
In order to donate frozen oocytes/embryos, a few prerequisites need to be fulfilled.
Contents |
Donor
The option Person is: Donor (Ooc./Emb.) needs to be checked for the donor of the oocytes/embryos. These are the steps:
- Click on Demographics (female) then, double-click the green area on the right.
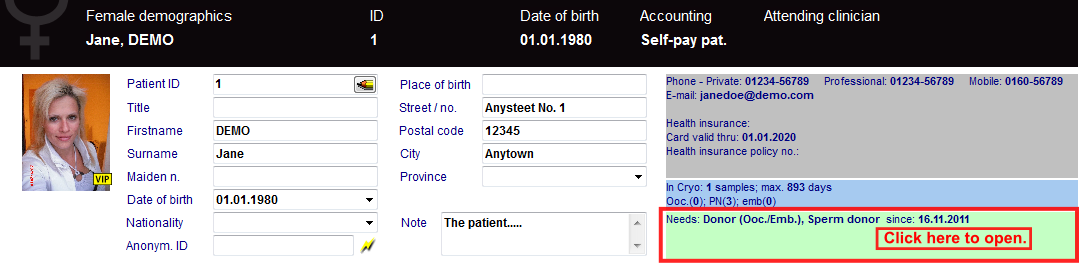 |
- On the opened window Person and donor information, you need to check that the Person is: Donor (Ooc./Emb.).
| <img src="/images/PandDInfo1.1Red.png" alt="" width="612" height="184" /> |
Change to the recipient patient.
Recipient
The option Person needs: Donor (Ooc./Emb.) needs to be checked for the recipient of the oocytes/embryos. These are the steps:
- Click on Demographics (female) then, double-click the green area on the right.
| |
- On the opened window Person and donor information, you need to check that the Person needs: Donor (Ooc./Emb.).
| <img src="/images/PandDInfo1.3Red.png" alt="" width="612" height="184" /> |
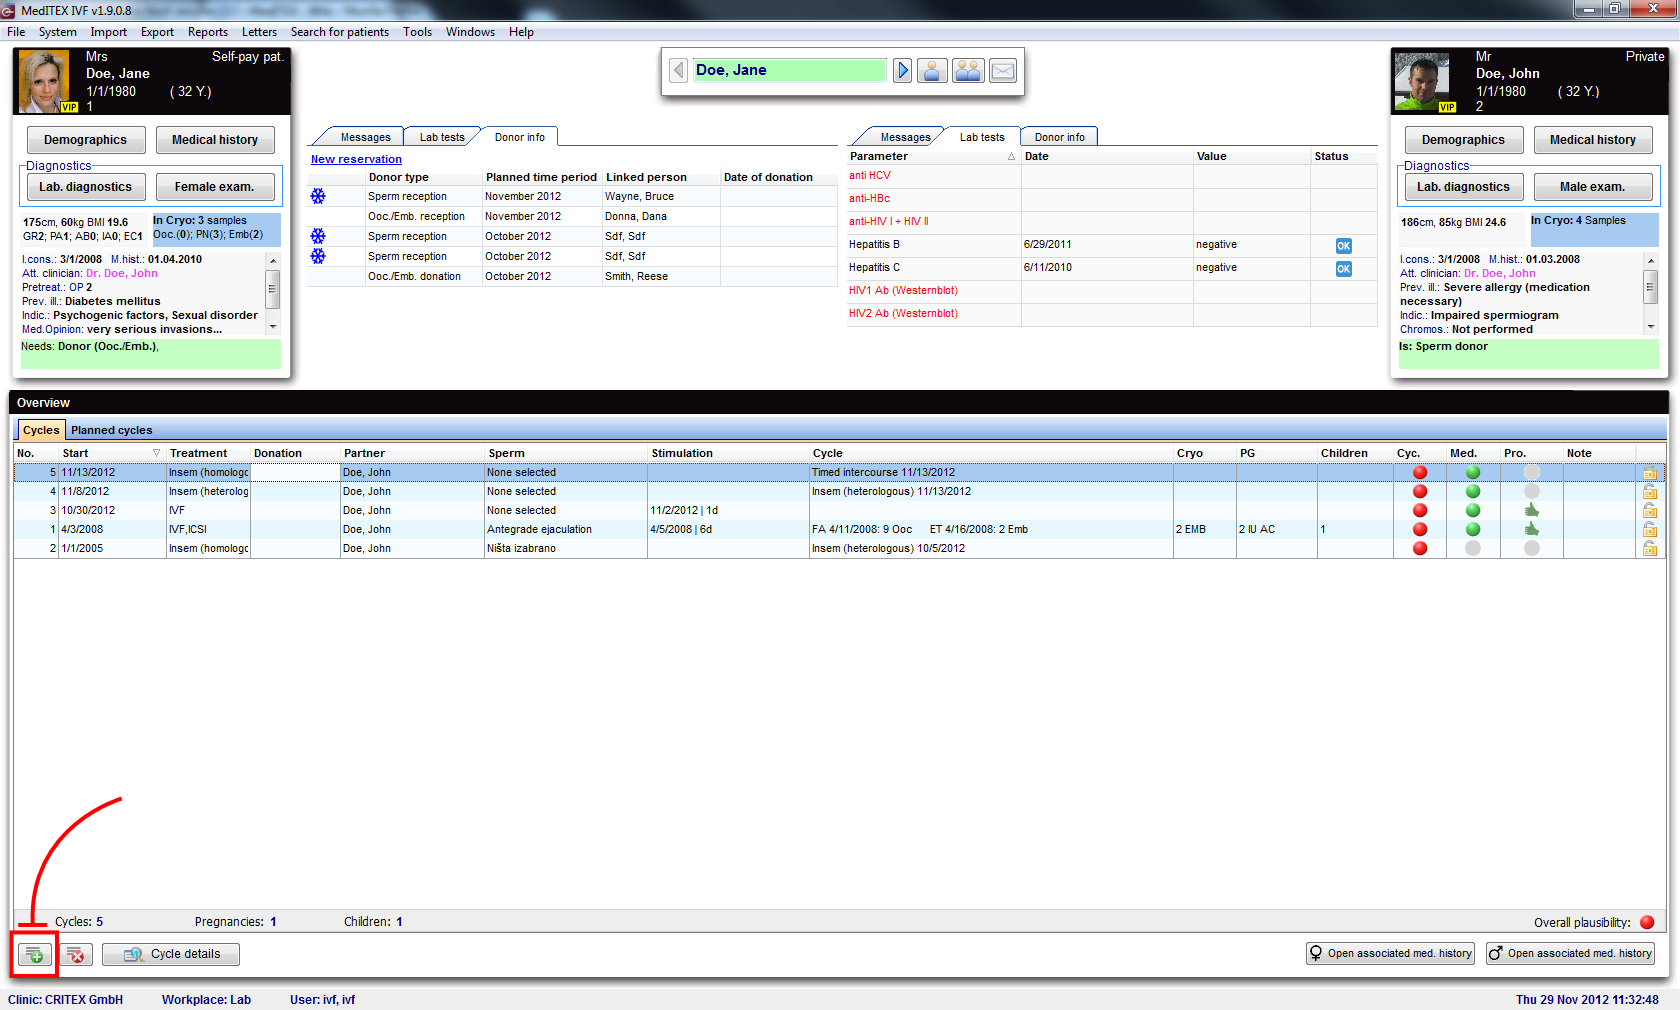
Donor's cycle
To create a cycle, click on the '+' button at the bottom left corner of the main patient's window.
 |
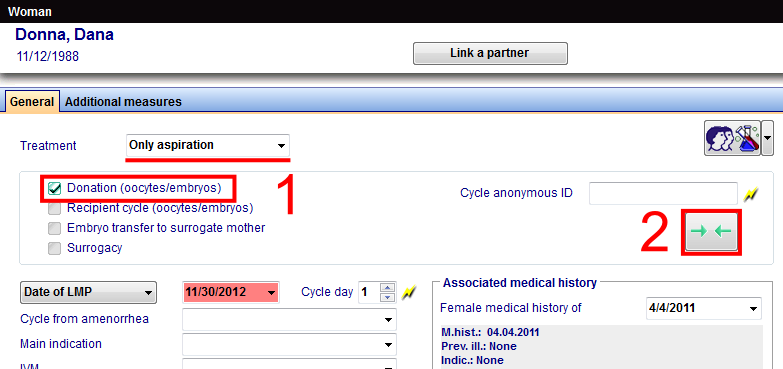
Create either Only aspiration or any IVF/ICSI cycles and check Donation (Ooc/Emb).
 |
After creating the cycle, switch to Aspiration and select the amount of oocytes collected.
Only aspiration
In Cryo/Donation, double-click the red cell for Cryo (1). The cryopreservation window will open and you must check For donation (2).
Donation
In a donor’s cycle, click on the Cryo/Donation tab. Double-click the last red cell next to Donate. The Distribution window will open.
| <img src="/images/DonateNumberOfOocytesRed.png" alt="" width="279" height="405" /> |
Now that we have linked recipient’s cycle, we need to distribute oocytes and confirm pressing the green button.
| <img src="/images/DonationConfirmationRed.png" alt="" width="654" height="276" /> |
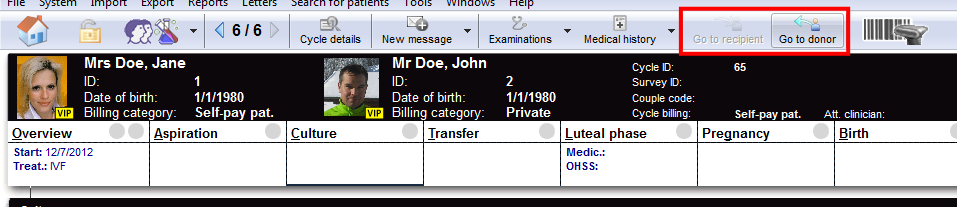
After the donation has been completed, we can open the cycle of the recipient and continue cultivation. You can switch between cycles with the buttons from the image below. If a patient has more than one recipient/donor a message will ask you to whom you want to switch.
 |
New recipient
If we need to donate to another recipient simultaneously, we can click on the Cycle links button (in the Distribution window).
| <img src="/images/DonationOocyteDistributionRed.png" alt="" width="710" height="630" /> |
For this case, Matcher will open and you can repeat matching procedures from the beginning, but this time, using another recipient.
| <img src="/images/MultipleDonation.png" alt="" width="710" height="630" /> |
You can have as many recipients/donors attached as you need.
| <a href="/index.php?title=MedITEX_IVF_how_to">Back to the How to</a> | <a href="#top">Back to top</a> |