How to create a new semen analysis?
From MedITEX - Wiki
| (14 intermediate revisions by 2 users not shown) | |||
| Line 1: | Line 1: | ||
| − | <p> | + | <p>On the patient's main window, select<strong> Lab. diagnostics</strong>.</p> |
| + | <p>Clicking on the arrow at the right of <strong>New sample</strong> and select <strong>Semem analysis</strong>.</p> | ||
<table style="margin-left: auto; margin-right: auto;" border="0"> | <table style="margin-left: auto; margin-right: auto;" border="0"> | ||
<tbody> | <tbody> | ||
<tr> | <tr> | ||
| − | <td | + | <td><img src="/images/newsamsper.jpg" alt="" /></td> |
| − | + | ||
| − | </td> | + | |
</tr> | </tr> | ||
</tbody> | </tbody> | ||
</table> | </table> | ||
| − | |||
<p> </p> | <p> </p> | ||
<table style="margin-left: auto; margin-right: auto;" border="0"> | <table style="margin-left: auto; margin-right: auto;" border="0"> | ||
| Line 15: | Line 13: | ||
<tr> | <tr> | ||
<td> | <td> | ||
| − | <p style="text-align: justify;">[[Image: | + | <p style="text-align: justify;">[[Image:SemenAn1.png|none|740px|thumb|left|link=http://wiki.meditex-software.com/images/SemenAn1.png| ]]</p> |
</td> | </td> | ||
</tr> | </tr> | ||
</tbody> | </tbody> | ||
</table> | </table> | ||
| + | <p style="text-align: justify;">In this window it is possible to document general data about the semen sample before and after preparation. The <strong>After preparation</strong> section differs from the <strong>Native</strong> section only for a label called <strong>Preparation</strong>. In this label it is possible to document: preparation date and time, operator and up to four preparation methods. Thanks to the document section it is possible to attach a document to the semen analysis.</p> | ||
<p style="text-align: justify;"> </p> | <p style="text-align: justify;"> </p> | ||
| + | <p>Buttons with a blue dotted frame have special functionalities. Click on it to have more information.</p> | ||
<table border="0"> | <table border="0"> | ||
<tbody> | <tbody> | ||
<tr> | <tr> | ||
| − | <td><img style="display: block; margin-left: auto; margin-right: auto;" src="/images/QMico.jpg" alt="" /></td> | + | <td><a href="/index.php?title=Free_/_QM_fields"><img style="display: block; margin-left: auto; margin-right: auto; border: 2px dotted blue;" src="/images/QMico.jpg" alt="" /></a></td> |
| − | <td colspan="2"><strong>QM / free fields | + | <td colspan="2"><strong>QM / free fields</strong>: click on this icon to access the <strong>QM field</strong> section related to this area or on the right arrow to block the QM fields and see the change log.</td> |
</tr> | </tr> | ||
<tr> | <tr> | ||
| − | <td><img style="display: block; margin-left: auto; margin-right: auto;" src="/images/snow.jpg" alt=" | + | <td><a href="/index.php?title=Freezing_a_new_sample#Freezing_a_sperm_sample"><img style="display: block; margin-left: auto; margin-right: auto; border: 2px dotted blue;" src="/images/snow.jpg" alt="" /></a></td> |
| − | <td colspan="2"><strong>Cryopreservation | + | <td colspan="2"><strong>Cryopreservation</strong>: click on this icon to put this sample in the cryostorage.</td> |
</tr> | </tr> | ||
<tr> | <tr> | ||
| − | <td> | + | <td><a href="/index.php?title=Cryo_storage"><img style="display: block; margin-left: auto; margin-right: auto; border: 2px dotted blue;" src="/images/water.png" alt="" /></a></td> |
| − | + | <td colspan="2"><strong>Thawing</strong>: click on this button to thaw a straw from the cryo storage.<br /></td> | |
| − | + | ||
| − | + | ||
| − | + | ||
| − | <td colspan="2" | + | |
| − | + | ||
| − | </td> | + | |
</tr> | </tr> | ||
<tr> | <tr> | ||
<td><img style="display: block; margin-left: auto; margin-right: auto;" src="/images/genlet.jpg" alt="" /></td> | <td><img style="display: block; margin-left: auto; margin-right: auto;" src="/images/genlet.jpg" alt="" /></td> | ||
| − | <td colspan="2"><strong>Generate letter | + | <td colspan="2"><strong>Generate letter</strong>: click this icon to generate a spermiogram letter.</td> |
</tr> | </tr> | ||
<tr> | <tr> | ||
<td> <img style="display: block; margin-left: auto; margin-right: auto;" src="/images/changepat.jpg" alt="" /></td> | <td> <img style="display: block; margin-left: auto; margin-right: auto;" src="/images/changepat.jpg" alt="" /></td> | ||
| − | <td colspan="2"><strong>Change patient | + | <td colspan="2"><strong>Change patient</strong>: click on this icon to go to another patient. If the black arrow on the right is clicked, it is possible to choose to skip to the latest semen analysis or to generate a new one.</td> |
</tr> | </tr> | ||
<tr> | <tr> | ||
<td><img style="display: block; margin-left: auto; margin-right: auto;" src="/images/calcul.jpg" alt="" /></td> | <td><img style="display: block; margin-left: auto; margin-right: auto;" src="/images/calcul.jpg" alt="" /></td> | ||
| − | <td colspan="2"><strong>Calculator | + | <td colspan="2"><strong>Calculator</strong>: it automatically calculates the WHO precentages for each WHO class.</td> |
</tr> | </tr> | ||
</tbody> | </tbody> | ||
</table> | </table> | ||
<p style="text-align: justify;"> </p> | <p style="text-align: justify;"> </p> | ||
| − | < | + | <h2 style="text-align: justify;">WHO sperm calculator / Motility counter</h2> |
| − | + | <p style="text-align: justify;">By clicking on the <strong>Calculator</strong> icon, a window new will open. In this window you can enter the total number of sperms observed and the number of sperms observed for each of these categories: imotile, locally motile, non-linear motile, slow progressive motile and fast progressive motile, or you use the motility counter.</p> | |
| − | + | <table border="0" width="258" height="58"> | |
| − | <p style="text-align: justify;">By clicking on the | + | <tbody> |
| + | <tr> | ||
| + | <td><img src="/images/plus48.png" alt="" width="48" height="48" /></td> | ||
| + | <td><a href="/index.php?title=Motility_counter">Click here</a>, for more informations.</td> | ||
| + | </tr> | ||
| + | </tbody> | ||
| + | </table> | ||
<p> </p> | <p> </p> | ||
| − | < | + | <table style="float: right;" border="0"> |
| + | <tbody> | ||
| + | <tr> | ||
| + | <td style="text-align: right;"><a href="/index.php?title=MedITEX_IVF_how_to">Back to How to</a></td> | ||
| + | <td style="text-align: right;"><a href="#top">Back to top</a></td> | ||
| + | </tr> | ||
| + | </tbody> | ||
| + | </table> | ||
| + | <p><span class="mw-headline"><br /></span></p> | ||
Latest revision as of 15:45, 12 February 2013
On the patient's main window, select Lab. diagnostics.
Clicking on the arrow at the right of New sample and select Semem analysis.
| <img src="/images/newsamsper.jpg" alt="" /> |
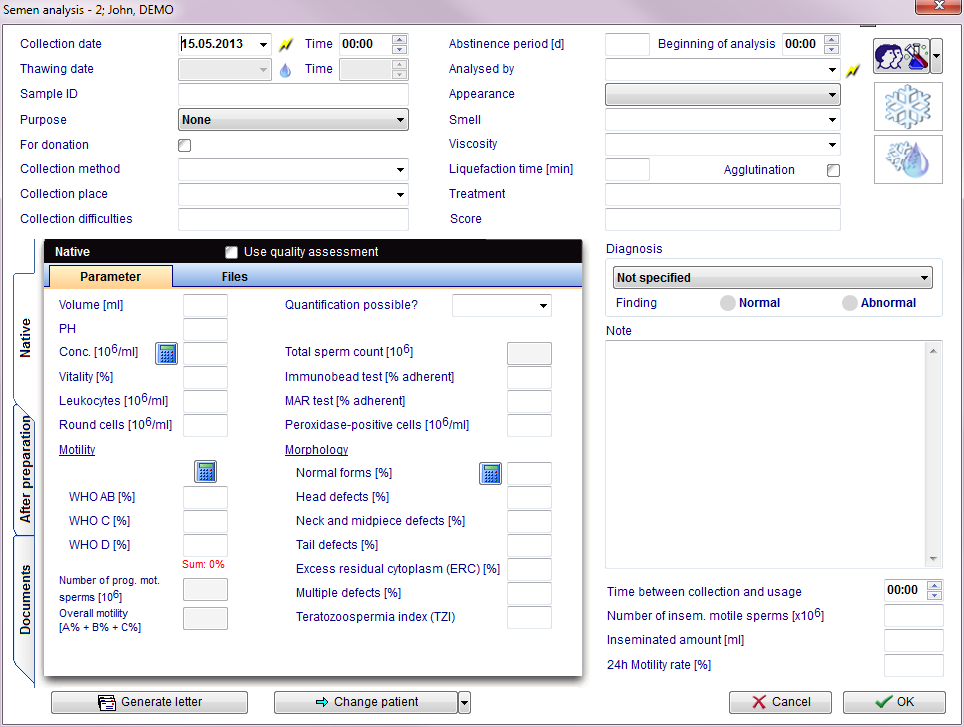 |
In this window it is possible to document general data about the semen sample before and after preparation. The After preparation section differs from the Native section only for a label called Preparation. In this label it is possible to document: preparation date and time, operator and up to four preparation methods. Thanks to the document section it is possible to attach a document to the semen analysis.
Buttons with a blue dotted frame have special functionalities. Click on it to have more information.
| <a href="/index.php?title=Free_/_QM_fields"><img style="display: block; margin-left: auto; margin-right: auto; border: 2px dotted blue;" src="/images/QMico.jpg" alt="" /></a> | QM / free fields: click on this icon to access the QM field section related to this area or on the right arrow to block the QM fields and see the change log. | |
| <a href="/index.php?title=Freezing_a_new_sample#Freezing_a_sperm_sample"><img style="display: block; margin-left: auto; margin-right: auto; border: 2px dotted blue;" src="/images/snow.jpg" alt="" /></a> | Cryopreservation: click on this icon to put this sample in the cryostorage. | |
| <a href="/index.php?title=Cryo_storage"><img style="display: block; margin-left: auto; margin-right: auto; border: 2px dotted blue;" src="/images/water.png" alt="" /></a> | Thawing: click on this button to thaw a straw from the cryo storage. |
|
| <img style="display: block; margin-left: auto; margin-right: auto;" src="/images/genlet.jpg" alt="" /> | Generate letter: click this icon to generate a spermiogram letter. | |
| <img style="display: block; margin-left: auto; margin-right: auto;" src="/images/changepat.jpg" alt="" /> | Change patient: click on this icon to go to another patient. If the black arrow on the right is clicked, it is possible to choose to skip to the latest semen analysis or to generate a new one. | |
| <img style="display: block; margin-left: auto; margin-right: auto;" src="/images/calcul.jpg" alt="" /> | Calculator: it automatically calculates the WHO precentages for each WHO class. | |
WHO sperm calculator / Motility counter
By clicking on the Calculator icon, a window new will open. In this window you can enter the total number of sperms observed and the number of sperms observed for each of these categories: imotile, locally motile, non-linear motile, slow progressive motile and fast progressive motile, or you use the motility counter.
| <img src="/images/plus48.png" alt="" width="48" height="48" /> | <a href="/index.php?title=Motility_counter">Click here</a>, for more informations. |
| <a href="/index.php?title=MedITEX_IVF_how_to">Back to How to</a> | <a href="#top">Back to top</a> |