How to create a new semen analysis?
From MedITEX - Wiki
| Line 1: | Line 1: | ||
<p>If the arrow at the right of the "New sample" icon is clicked when the male patient is selected, one more option it is available: spermiogram.</p> | <p>If the arrow at the right of the "New sample" icon is clicked when the male patient is selected, one more option it is available: spermiogram.</p> | ||
| − | < | + | <table style="margin-left: auto; margin-right: auto;" border="0"> |
| − | <table border="0"> | + | <tbody> |
| + | <tr> | ||
| + | <td> | ||
| + | <p><img src="/images/newsamsper.jpg" alt="" /></p> | ||
| + | </td> | ||
| + | </tr> | ||
| + | </tbody> | ||
| + | </table> | ||
| + | <p> </p> | ||
| + | <p> </p> | ||
| + | <table style="margin-left: auto; margin-right: auto;" border="0"> | ||
<tbody> | <tbody> | ||
<tr> | <tr> | ||
| Line 10: | Line 20: | ||
</tbody> | </tbody> | ||
</table> | </table> | ||
| − | |||
| − | |||
<p style="text-align: justify;"> </p> | <p style="text-align: justify;"> </p> | ||
<table border="0"> | <table border="0"> | ||
<tbody> | <tbody> | ||
<tr> | <tr> | ||
| − | <td><img style="display: block; margin-left: auto; margin-right: auto;" src="/images/QMico.jpg" alt=" | + | <td><img style="display: block; margin-left: auto; margin-right: auto;" src="/images/QMico.jpg" alt="" /></td> |
<td colspan="2"><strong>QM / free fields:</strong> Click on this icon to access the <strong>QM field</strong> section related to this area or on the right arrow to block the QM fields or to see the change log</td> | <td colspan="2"><strong>QM / free fields:</strong> Click on this icon to access the <strong>QM field</strong> section related to this area or on the right arrow to block the QM fields or to see the change log</td> | ||
</tr> | </tr> | ||
| Line 24: | Line 32: | ||
</tr> | </tr> | ||
<tr> | <tr> | ||
| − | <td><img src="/images/Browse.png" alt=" | + | <td><img style="display: block; margin-left: auto; margin-right: auto;" src="/images/Browse.png" alt="" /></td> |
<td colspan="2"><strong>Browse: </strong></td> | <td colspan="2"><strong>Browse: </strong></td> | ||
</tr> | </tr> | ||
<tr> | <tr> | ||
| − | <td> <a href="/index.php?title=Lab_diagnostics#Using_the_double_witnessing"><img style="display: block; margin-left: auto; margin-right: auto;" src="/images/doubwit.jpg" alt=" | + | <td> <a href="/index.php?title=Lab_diagnostics#Using_the_double_witnessing"><img style="display: block; margin-left: auto; margin-right: auto;" src="/images/doubwit.jpg" alt="" /></a></td> |
<td colspan="2"> | <td colspan="2"> | ||
<p><strong>Use Double withnessing: </strong>Check this box to document the double witnessing according the "WHO laboratory manual for t he examination and processing of human semen - Fifth edition 2010" </p> | <p><strong>Use Double withnessing: </strong>Check this box to document the double witnessing according the "WHO laboratory manual for t he examination and processing of human semen - Fifth edition 2010" </p> | ||
| Line 34: | Line 42: | ||
</tr> | </tr> | ||
<tr> | <tr> | ||
| − | <td><img style="display: block; margin-left: auto; margin-right: auto;" src="/images/genlet.jpg" alt=" | + | <td><img style="display: block; margin-left: auto; margin-right: auto;" src="/images/genlet.jpg" alt="" /></td> |
<td colspan="2"><strong>Generate letter:</strong> Click this icon to generate a spermiogram letter </td> | <td colspan="2"><strong>Generate letter:</strong> Click this icon to generate a spermiogram letter </td> | ||
</tr> | </tr> | ||
<tr> | <tr> | ||
| − | <td> <img style="display: block; margin-left: auto; margin-right: auto;" src="/images/changepat.jpg" alt=" | + | <td> <img style="display: block; margin-left: auto; margin-right: auto;" src="/images/changepat.jpg" alt="" /></td> |
<td colspan="2"><strong>Change patient:</strong> Click on this icon to go to another patient. If the black arrow on the right is clicked it is possible to choose to skip to the latest spermiogram or to generate a new spermiogram </td> | <td colspan="2"><strong>Change patient:</strong> Click on this icon to go to another patient. If the black arrow on the right is clicked it is possible to choose to skip to the latest spermiogram or to generate a new spermiogram </td> | ||
</tr> | </tr> | ||
<tr> | <tr> | ||
| − | <td><img style="display: block; margin-left: auto; margin-right: auto;" src="/images/calcul.jpg" alt=" | + | <td><img style="display: block; margin-left: auto; margin-right: auto;" src="/images/calcul.jpg" alt="" /></td> |
<td colspan="2"><strong>Calculator:</strong> It calculates automatically the WHO precentages for each WHO class.</td> | <td colspan="2"><strong>Calculator:</strong> It calculates automatically the WHO precentages for each WHO class.</td> | ||
</tr> | </tr> | ||
</tbody> | </tbody> | ||
</table> | </table> | ||
| + | <p style="text-align: justify;"> </p> | ||
<p style="text-align: justify;">In this window it is possible to document general data about the semen sample and data before and after the preparation. The "After preparation" section differs from the "Native" section only for a label called "Preparation". In this label it is possible to document: preparation date and time, operator and up to four preparation methods. Thanks to the document section it is possible to attach a document to the spermiogram.</p> | <p style="text-align: justify;">In this window it is possible to document general data about the semen sample and data before and after the preparation. The "After preparation" section differs from the "Native" section only for a label called "Preparation". In this label it is possible to document: preparation date and time, operator and up to four preparation methods. Thanks to the document section it is possible to attach a document to the spermiogram.</p> | ||
| − | < | + | <p style="text-align: justify;"> </p> |
| − | <p style="text-align: justify;">By clicking on the calculator icon <img src="/images/calcul.jpg" alt=" | + | <h2 style="text-align: justify;">Calculating the motility</h2> |
| + | <p style="text-align: justify;">By clicking on the calculator icon <img src="/images/calcul.jpg" alt="" /> a window opens. In this window shall be input the total number of sperms observed and the number of sperms observed for each of this category: imotile, locally motile, non linear motile, slow progressive motile and fast progressive motile.</p> | ||
<p> </p> | <p> </p> | ||
<p>-> Link to double withnessing.</p> | <p>-> Link to double withnessing.</p> | ||
Revision as of 14:43, 13 December 2012
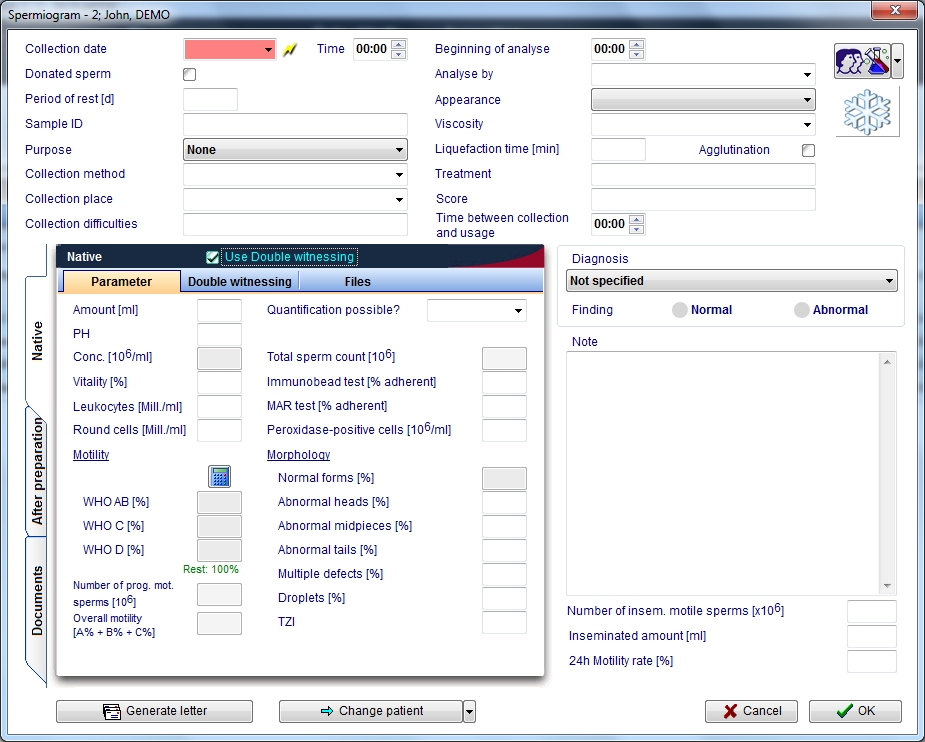
If the arrow at the right of the "New sample" icon is clicked when the male patient is selected, one more option it is available: spermiogram.
|
<img src="/images/newsamsper.jpg" alt="" /> |
 |
| <img style="display: block; margin-left: auto; margin-right: auto;" src="/images/QMico.jpg" alt="" /> | QM / free fields: Click on this icon to access the QM field section related to this area or on the right arrow to block the QM fields or to see the change log | |
| <img style="display: block; margin-left: auto; margin-right: auto;" src="/images/snow.jpg" alt="" width="64" height="51" /> | Cryopreservation: Click on this icon to put this sample in the <a href="/index.php?title=Cryo_storage">cryostorage</a> | |
| <img style="display: block; margin-left: auto; margin-right: auto;" src="/images/Browse.png" alt="" /> | Browse: | |
| <a href="/index.php?title=Lab_diagnostics#Using_the_double_witnessing"><img style="display: block; margin-left: auto; margin-right: auto;" src="/images/doubwit.jpg" alt="" /></a> |
Use Double withnessing: Check this box to document the double witnessing according the "WHO laboratory manual for t he examination and processing of human semen - Fifth edition 2010" |
|
| <img style="display: block; margin-left: auto; margin-right: auto;" src="/images/genlet.jpg" alt="" /> | Generate letter: Click this icon to generate a spermiogram letter | |
| <img style="display: block; margin-left: auto; margin-right: auto;" src="/images/changepat.jpg" alt="" /> | Change patient: Click on this icon to go to another patient. If the black arrow on the right is clicked it is possible to choose to skip to the latest spermiogram or to generate a new spermiogram | |
| <img style="display: block; margin-left: auto; margin-right: auto;" src="/images/calcul.jpg" alt="" /> | Calculator: It calculates automatically the WHO precentages for each WHO class. | |
In this window it is possible to document general data about the semen sample and data before and after the preparation. The "After preparation" section differs from the "Native" section only for a label called "Preparation". In this label it is possible to document: preparation date and time, operator and up to four preparation methods. Thanks to the document section it is possible to attach a document to the spermiogram.
Calculating the motility
By clicking on the calculator icon <img src="/images/calcul.jpg" alt="" /> a window opens. In this window shall be input the total number of sperms observed and the number of sperms observed for each of this category: imotile, locally motile, non linear motile, slow progressive motile and fast progressive motile.
-> Link to double withnessing.