How to assign a matchcode to a QM field?
From MedITEX - Wiki
| Line 1: | Line 1: | ||
<p> </p> | <p> </p> | ||
<h3>Matchcode functionality</h3> | <h3>Matchcode functionality</h3> | ||
| − | <table style="margin-left: auto; margin-right: auto;" border="0" width=" | + | <p>Matchcode scanning in <strong>MedITEX IVF</strong> can be done everywhere in the program.</p> |
| + | <p>Depending on the section where the scanning is performed and on the matchcode properties (to which item in MedITEX IVF it is assigned), matchode scanning has several different functionalities:</p> | ||
| + | <p><strong>1.</strong> Opening specific section in MedITEX IVF</p> | ||
| + | <ul> | ||
| + | <li>Matchcode assigned to QM window (“Area matchcode”) is scanned.</li> | ||
| + | </ul> | ||
| + | <ul> | ||
| + | <li>Exception: if matchcode scanning is done when so-called “modal” window is opened, this window has to be closed first, in order to be able to perform any other step (e.g. “Cryo storage” window of a patient is one of those windows).</li> | ||
| + | </ul> | ||
| + | <p> </p> | ||
| + | <p><strong>2.</strong> Opening specific QM window in MedITEX IVF</p> | ||
| + | <ul> | ||
| + | <li>Matchcode assigned to QM field in QM window is scanned.</li> | ||
| + | </ul> | ||
| + | <ul> | ||
| + | <li>Corresponding QM field is focused.</li> | ||
| + | </ul> | ||
| + | <ul> | ||
| + | <li>Exception: the same as in functionality (1.).</li> | ||
| + | </ul> | ||
| + | <p><em>The difference between functionality (1.) and this functionality is that here, not only specific section in MedITEX IVF is opened, but afterwards, also assigned QM window is opened.</em></p> | ||
| + | <p> </p> | ||
| + | <p><strong>3.</strong> Comparing material of two patients in order to determine whether it is material of a couple or not (using RFID matcher).</p> | ||
| + | <p> </p> | ||
| + | <p><strong>4.</strong> Adding QM material fields</p> | ||
| + | <ul> | ||
| + | <li>Matchcode assigned to article’s batch (<strong>System settings -> Material</strong>) is scanned.</li> | ||
| + | </ul> | ||
| + | <ul> | ||
| + | <li>Corresponding material QM field will be added only if QM window is firslty open. Otherwise, program will jump to <strong>System settings -> Material</strong> section and open the corresponding article’s batch.</li> | ||
| + | </ul> | ||
| + | <p> </p> | ||
| + | <p> </p> | ||
| + | <p>In <strong>MedITEX IVF</strong>, a matchcode (Barcode or RFID code) can be assigned to every QM window and will be displayed in “Area matchcode”, by clicking on the “<strong>+</strong>” button.</p> | ||
| + | <table style="margin-left: auto; margin-right: auto;" border="0" width="616" height="693"> | ||
<tbody> | <tbody> | ||
<tr> | <tr> | ||
| − | <td> | + | <td><img src="/images/BarcodeMatcherWindow.png" alt="" /></td> |
| − | < | + | |
| − | </td> | + | |
</tr> | </tr> | ||
| + | </tbody> | ||
| + | </table> | ||
| + | <p> </p> | ||
| + | <p>The following window opens. Once the code is scanned, field “Code” is filled.</p> | ||
| + | <table style="margin-left: auto; margin-right: auto;" border="0" width="10" height="24"> | ||
| + | <tbody> | ||
<tr> | <tr> | ||
| − | <td> | + | <td><img src="/images/BarcodeWindowAssign.png" alt="" /></td> |
| − | < | + | |
| − | </td> | + | |
</tr> | </tr> | ||
</tbody> | </tbody> | ||
</table> | </table> | ||
<p> </p> | <p> </p> | ||
| + | <p>In QM window, matchcode can be also assigned to QM field, by clicking on the button “<strong>+</strong>” in the column next to the column “QM field matchcode”.</p> | ||
<table style="margin-left: auto; margin-right: auto;" border="0"> | <table style="margin-left: auto; margin-right: auto;" border="0"> | ||
<tbody> | <tbody> | ||
<tr> | <tr> | ||
| − | <td> | + | <td><img src="/images/BarcodeQMField.png" alt="" /></td> |
| − | < | + | |
| − | + | ||
| − | + | ||
| − | + | ||
| − | + | ||
| − | + | ||
| − | + | ||
</tr> | </tr> | ||
</tbody> | </tbody> | ||
</table> | </table> | ||
<p> </p> | <p> </p> | ||
| − | <table style="margin-left: auto; margin-right: auto;" border="0 | + | <p>QM window, with its own assigned matchcode and two QM fields assigned matchcodes, is displayed in the following way:</p> |
| + | <table style="margin-left: auto; margin-right: auto;" border="0"> | ||
<tbody> | <tbody> | ||
<tr> | <tr> | ||
| − | <td><img src="/images/ | + | <td><img src="/images/BarcodeWindowQM.png" alt="" /></td> |
| − | + | ||
| − | + | ||
| − | + | ||
| − | + | ||
</tr> | </tr> | ||
</tbody> | </tbody> | ||
</table> | </table> | ||
<p> </p> | <p> </p> | ||
| − | <h3> | + | <h3>Material matchcode</h3> |
| + | <p><strong>MedITEX IVF</strong> offers the possibility to insert material QM fields by scanning the matchcode (Barcode or RFID) assigned to the material linked with that QM field.</p> | ||
<table style="margin-left: auto; margin-right: auto;" border="0"> | <table style="margin-left: auto; margin-right: auto;" border="0"> | ||
<tbody> | <tbody> | ||
<tr> | <tr> | ||
| − | <td><img | + | <td><img src="/images/MatchcodeScanning.png" alt="" /></td> |
| − | + | ||
| − | + | ||
| − | + | ||
| − | + | ||
| − | + | ||
| − | + | ||
| − | + | ||
| − | + | ||
| − | + | ||
| − | + | ||
| − | + | ||
</tr> | </tr> | ||
</tbody> | </tbody> | ||
</table> | </table> | ||
| − | |||
<h3>Define conditions</h3> | <h3>Define conditions</h3> | ||
<table style="margin-left: auto; margin-right: auto;" border="0"> | <table style="margin-left: auto; margin-right: auto;" border="0"> | ||
Revision as of 11:03, 6 September 2016
Contents |
Matchcode functionality
Matchcode scanning in MedITEX IVF can be done everywhere in the program.
Depending on the section where the scanning is performed and on the matchcode properties (to which item in MedITEX IVF it is assigned), matchode scanning has several different functionalities:
1. Opening specific section in MedITEX IVF
- Matchcode assigned to QM window (“Area matchcode”) is scanned.
- Exception: if matchcode scanning is done when so-called “modal” window is opened, this window has to be closed first, in order to be able to perform any other step (e.g. “Cryo storage” window of a patient is one of those windows).
2. Opening specific QM window in MedITEX IVF
- Matchcode assigned to QM field in QM window is scanned.
- Corresponding QM field is focused.
- Exception: the same as in functionality (1.).
The difference between functionality (1.) and this functionality is that here, not only specific section in MedITEX IVF is opened, but afterwards, also assigned QM window is opened.
3. Comparing material of two patients in order to determine whether it is material of a couple or not (using RFID matcher).
4. Adding QM material fields
- Matchcode assigned to article’s batch (System settings -> Material) is scanned.
- Corresponding material QM field will be added only if QM window is firslty open. Otherwise, program will jump to System settings -> Material section and open the corresponding article’s batch.
In MedITEX IVF, a matchcode (Barcode or RFID code) can be assigned to every QM window and will be displayed in “Area matchcode”, by clicking on the “+” button.
| <img src="/images/BarcodeMatcherWindow.png" alt="" /> |
The following window opens. Once the code is scanned, field “Code” is filled.
| <img src="/images/BarcodeWindowAssign.png" alt="" /> |
In QM window, matchcode can be also assigned to QM field, by clicking on the button “+” in the column next to the column “QM field matchcode”.
| <img src="/images/BarcodeQMField.png" alt="" /> |
QM window, with its own assigned matchcode and two QM fields assigned matchcodes, is displayed in the following way:
| <img src="/images/BarcodeWindowQM.png" alt="" /> |
Material matchcode
MedITEX IVF offers the possibility to insert material QM fields by scanning the matchcode (Barcode or RFID) assigned to the material linked with that QM field.
| <img src="/images/MatchcodeScanning.png" alt="" /> |
Define conditions
 |
|
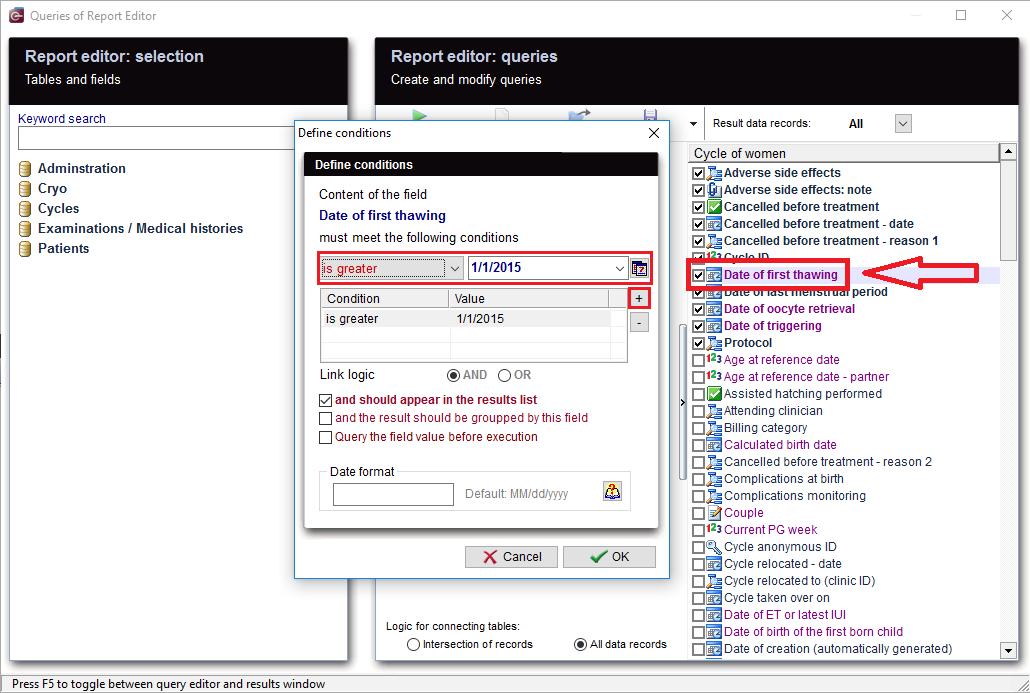
You can define your own conditions. If you want the time range to be limited, or look for a suitable date of your choice, E.g.: "Date of first thawing", double-clicking on this date opens the window for the condition you want to set. With '+' button, a new condition is applied. Several conditions can be applied, for example, "is greater" and "less equal". This condtion filters "Date of first thawing" .You get now all the cycles in which a thawing was made in this period. Inseminations or Aspirations then naturally fall out. If you just want cycles with thawing, this is the correct filter. You could, for example, Filter on "reference date". Then again, all therapies are considered, but you were just expecting the result of your choice (for example, all pregnancies), so, inevitably another filter should be set. But you could also choose "Date of ET or latest IUI" to use as a filter, then only therapies in which there has been an insemination or a transfer can be used. It's not the case for not implemented, canceled cycles, or cycles where everything was frozen, thus there was no transfer, and that makes them automatically fall out of the result. |
| <img style="display: block; margin-left: auto; margin-right: auto;" src="/images/WomanCycleQueryParameter.png" alt="" /> |
| You can check this box before running your query. |
| <img style="display: block; margin-left: auto; margin-right: auto;" src="/images/CycleOfWomanParameter.png" alt="" /> |
| As soon as you run your query, an extra window will appear, and you have the possibility to edit or insert a value as a parameter for the condition you already set. |
As you can see, there are many ways to make a query, so it should be carefully considered; what methods to use and which filters to set, so no cycles are accidentally excluded, or there is no way to get too many results, since unwanted therapies have been filtered out.
More
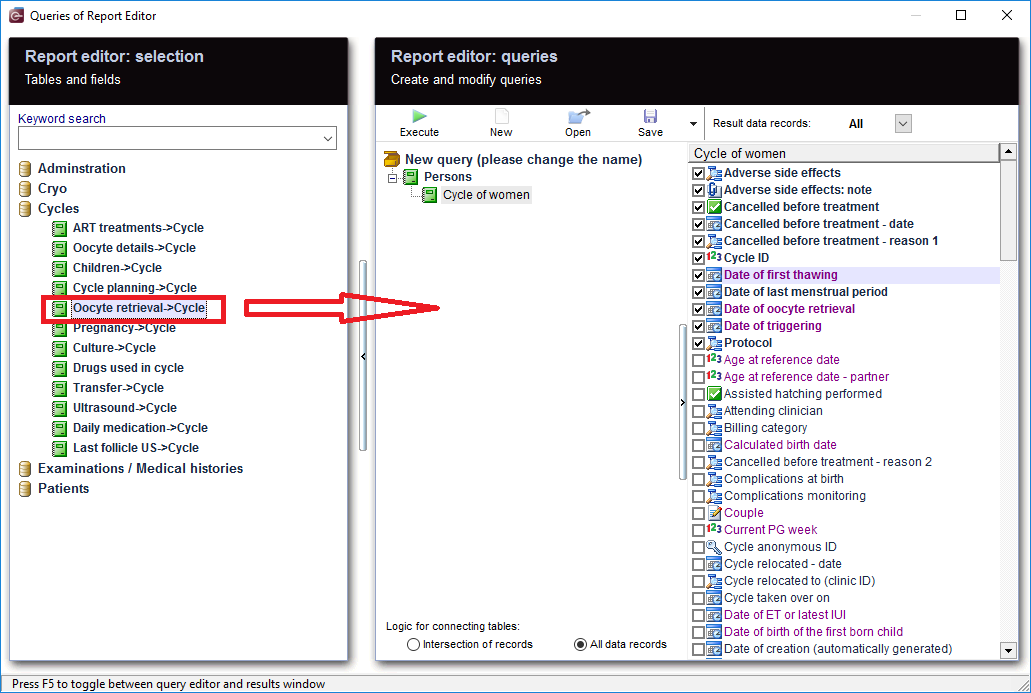 |
| If you can not find all the required fields in the "Cycle of women" , then it is of course possible to implement more details in the query. |
| <img src="/images/CycleOfWomanRecords.png" alt="" /> |
|
From the results, the patient records can be opened by double-clicking on the desired section. Double-clicking on the column "Persons." opens the Administration space. Double-clicking on the column "Cycle." opens the Cycle overview. |
| <img src="/images/SaveLoad.PNG" alt="" width="160" height="36" /> |
Do not forget to save the query. It can be loaded later. |
| <a href="/index.php?title=Queries_examples">Back to Queries examples </a> |
<a href="#top">Back to top</a> |