How to add a new patient?
From MedITEX - Wiki
| Line 90: | Line 90: | ||
<tbody> | <tbody> | ||
<tr> | <tr> | ||
| − | <td style="text-align: right;"><a href="/index.php?title=MedITEX_Scheduler_how_to | + | <td style="text-align: right;"><a href="/index.php?title=MedITEX_Scheduler_how_to">Back to How to</a></td> |
<td style="text-align: right;"><a href="#top">Back to top</a></td> | <td style="text-align: right;"><a href="#top">Back to top</a></td> | ||
</tr> | </tr> | ||
Latest revision as of 16:28, 28 November 2012
In order to create a new patient, follow these steps:
From the menu bar, open an empty patient mask.
| <img style="display: block; margin-left: auto; margin-right: auto;" src="/images/Patients1Red.png" alt="" width="485" height="147" /> |
You can immediately begin with the insertion of data.
We will divide this interface into smaller sections that have specific functionalities, in order to better explain them.
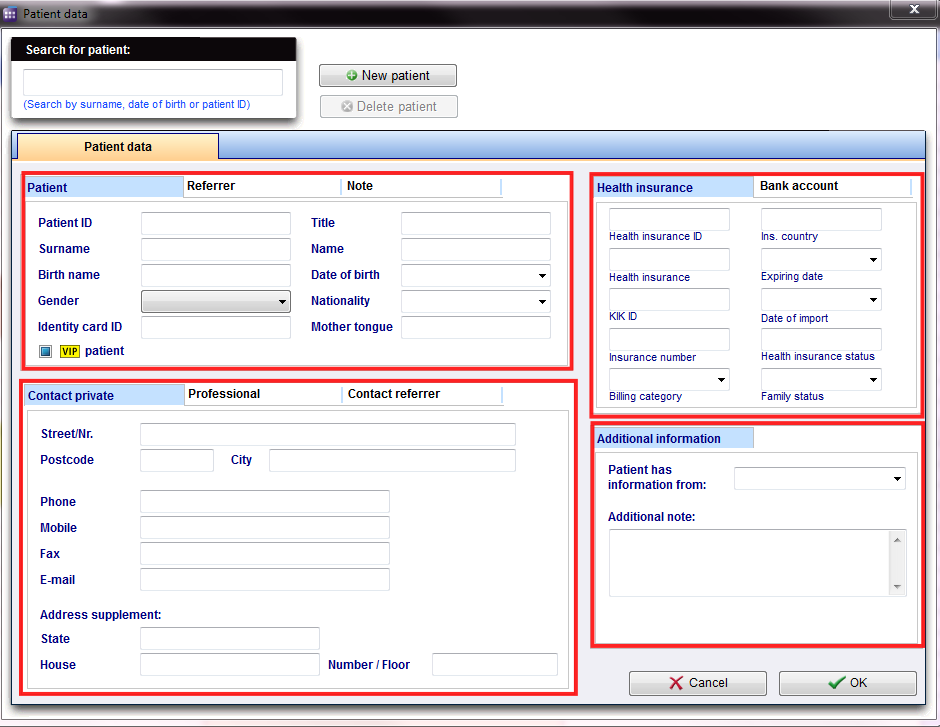 |
| <img style="display: block; margin-left: auto; margin-right: auto;" src="/images/PatientMask.png" alt="" width="550" height="192" /> |
Personal data of the patient. A special field is the patient ID. It can be specified in the <a href="/index.php?title=MedITEX_Scheduler_configuration">settings</a> whether this is entered manually, or generated automatically according to certain rules. |
| <img style="display: block; margin-left: auto; margin-right: auto;" src="/images/Referrer.png" alt="" width="550" height="195" /> |
Referrer data and a possible notification order. Here the consulting doctor will be added. In order to select a doctor, it must be in the Consulting doctors list in MEDITEX IVF. Place a checkmark if the consulting doctor should be notified. |
| <img style="display: block; margin-left: auto; margin-right: auto;" src="/images/NotesPatient.png" alt="" width="562" height="209" /> | Here, notes or important information are added. |
| <img style="display: block; margin-left: auto; margin-right: auto;" src="/images/ContactPrivate.png" alt="" width="551" height="306" /> | Personal contact data of the patient, like phone number, street, city, etc. |
| <img style="display: block; margin-left: auto; margin-right: auto;" src="/images/Professional.png" alt="" width="547" height="309" /> | Professional contact data. |
| <img style="display: block; margin-left: auto; margin-right: auto;" src="/images/ContactReferrer.png" alt="" width="552" height="197" /> |
Contact data of the consulting doctor. This information will be automatically supplemented by MedITEX IVF. |
| <img style="float: left;" src="/images/HealthInsurance.png" alt="" width="330" height="238" /> | Important data of the health insurance. |
| <img style="float: left;" src="/images/BankAccount.png" alt="" width="329" height="238" /> | Data of the bank account of the patient. |
| <img style="float: left;" src="/images/AdditionalInformation.png" alt="" width="330" height="220" /> | Additional informations. |
| <a href="/index.php?title=MedITEX_Scheduler_how_to">Back to How to</a> | <a href="#top">Back to top</a> |