How to add a new patient?
From MedITEX - Wiki
| Line 46: | Line 46: | ||
<p> </p> | <p> </p> | ||
<hr /> | <hr /> | ||
| − | |||
<table border="0" width="768" height="770"> | <table border="0" width="768" height="770"> | ||
<tbody> | <tbody> | ||
| Line 66: | Line 65: | ||
</tbody> | </tbody> | ||
</table> | </table> | ||
| − | |||
<hr /> | <hr /> | ||
| − | |||
<table border="0" width="618" height="464"> | <table border="0" width="618" height="464"> | ||
<tbody> | <tbody> | ||
| Line 81: | Line 78: | ||
</tbody> | </tbody> | ||
</table> | </table> | ||
| − | |||
| − | |||
<hr /> | <hr /> | ||
| − | |||
<table border="0" width="611" height="230"> | <table border="0" width="611" height="230"> | ||
<tbody> | <tbody> | ||
| Line 94: | Line 88: | ||
</table> | </table> | ||
<p> </p> | <p> </p> | ||
| − | |||
| − | |||
<table style="float: right;" border="0"> | <table style="float: right;" border="0"> | ||
<tbody> | <tbody> | ||
Revision as of 13:44, 8 November 2012
If you want to create a new patient, you have to proceed as follows:
Open the menu bar an empty patient mask.
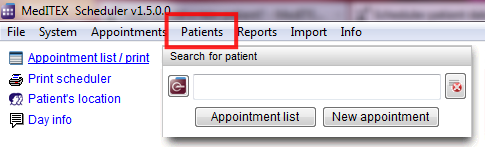 |
You can immediately begin with inserting the data.
The following sections look at each of the input fields with the appropriate tabs.
 |
| <img style="display: block; margin-left: auto; margin-right: auto;" src="/images/PatientMask.png" alt="" width="507" height="177" /> |
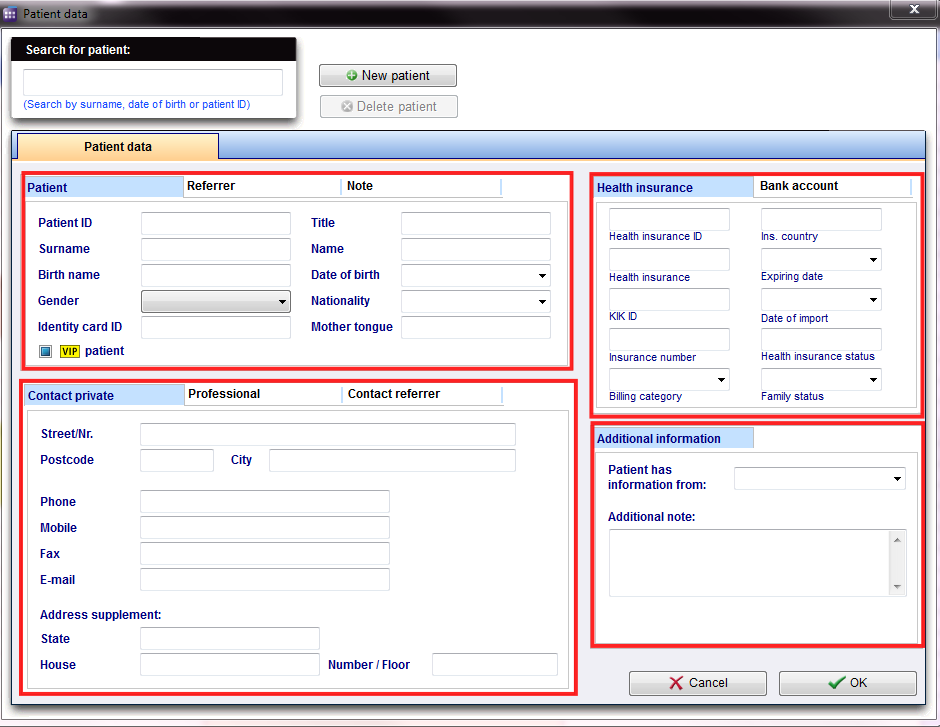
The personal datas of the patient. A special field is the patient ID. In the <a href="/index.php?title=Welcome_to_MedITEX_Scheduler">settings</a> can be specified whether they entered manually, or generated automatically according to certain rules. |
| <img style="display: block; margin-left: auto; margin-right: auto;" src="/images/Referrer.png" alt="" width="507" height="180" /> |
Referrer data and a possible notification order. Here the consulting doctor will be added. To select a doctor, it must be in the Consulting doctor list in MEDITEX IVF. Place a checkmark if the consulting doctor should be notified. |
| <img style="display: block; margin-left: auto; margin-right: auto;" src="/images/NotesPatient.png" alt="" width="507" height="188" /> | Here, notes or important information are noted. |
| <img style="display: block; margin-left: auto; margin-right: auto;" src="/images/ContactPrivate.png" alt="" width="507" height="281" /> | Personal contact data of the patient, like phone number, street, city,... |
| <img style="display: block; margin-left: auto; margin-right: auto;" src="/images/Professional.png" alt="" width="507" height="286" /> | Professional contact data. |
| <img style="display: block; margin-left: auto; margin-right: auto;" src="/images/ContactReferrer.png" alt="" width="507" height="181" /> |
Contact data of the consulting doctor. This information will be automatically supplemented by MedITEX IVF. |
| <img style="float: left;" src="/images/HealthInsurance.png" alt="" width="330" height="238" /> | Important data of the health insurance. |
| <img style="float: left;" src="/images/BankAccount.png" alt="" width="329" height="238" /> | Data of the bank account of the patient. |
| <img style="float: left;" src="/images/AdditionalInformation.png" alt="" width="330" height="220" /> | Additional informations. |
| <a href="/index.php?title=MedITEX_Scheduler_how_to...">Back to How to...</a> | <a href="#top">Back to top</a> |