Donation
From MedITEX - Wiki
| Line 1: | Line 1: | ||
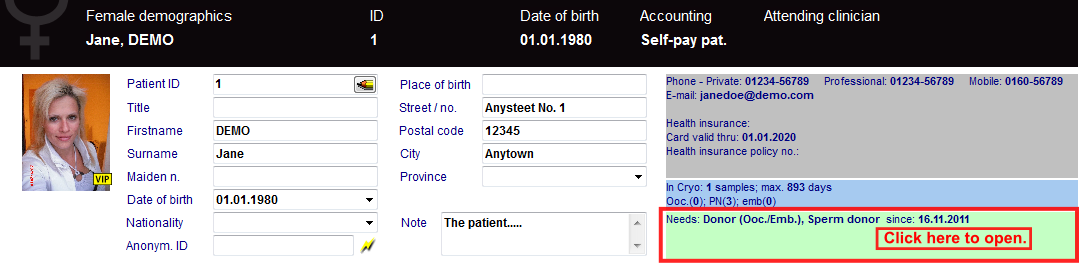
| + | <p style="text-align: justify;">The properties above can be set under each patient's overview window. From the patient's main screen, click on <a href="/index.php?title=Demographics"><strong>Demographics</strong></a>.</p> | ||
| + | <p style="text-align: justify;">Click on the green area to set donation for this patient.</p> | ||
| + | <table style="margin-left: auto; margin-right: auto;" border="0" width="10" height="24"> | ||
| + | <tbody> | ||
| + | <tr> | ||
| + | <td>[[Image:DemographicsDonorRed.png|none|740px|thumb|left|link=http://wiki.meditex-software.com/images/DemographicsDonorRed.png|]]<br /></td> | ||
| + | </tr> | ||
| + | </tbody> | ||
| + | </table> | ||
| + | <p style="text-align: left;">After donation properties have been set, this information will also be displayed on the main window.</p> | ||
| + | <table style="margin-left: auto; margin-right: auto;" border="0"> | ||
| + | <tbody> | ||
| + | <tr> | ||
| + | <td><img src="/images/MainDonorRed.png" alt="" width="277" height="331" /></td> | ||
| + | </tr> | ||
| + | </tbody> | ||
| + | </table> | ||
| + | <p style="text-align: left;"> </p> | ||
| + | <p style="text-align: left;"> </p> | ||
<table border="0"> | <table border="0"> | ||
<tbody> | <tbody> | ||
<tr> | <tr> | ||
| − | <td colspan="2">[[Image:DonationW1.png|none|740px|thumb|left|link=http://wiki.meditex-software.com/images/DonationW1.png|]]</td> | + | <td colspan="2">[[Image:DonationW1.png|none|740px|thumb|left|link=http://wiki.meditex-software.com/images/DonationW1.png|Donation]]</td> |
</tr> | </tr> | ||
<tr> | <tr> | ||
| − | <td>< | + | <td colspan="2"> |
| − | < | + | <p> </p> |
| + | <p style="text-align: justify;">Donations are a set of special functionalities in MedITEX IVF that allows <strong>donation of material and surrogacy</strong>.</p> | ||
| + | <p style="text-align: justify;">Donations are performed between<strong> two or more</strong> patients. The patient providing material (oocytes, embryos, etc.) is called <strong>Donor </strong>and the patient that receives the material is called <strong>Recipient</strong>.</p> | ||
| + | <p style="text-align: justify;">These are the types of donations possible by the program:</p> | ||
| + | <p><strong>Female</strong></p> | ||
| + | <p style="padding-left: 30px;"><span style="text-decoration: underline;"><strong>Person is:</strong></span></p> | ||
| + | <blockquote> | ||
| + | <ul> | ||
| + | <li>Donor (Ooc./Emb.)</li> | ||
| + | <li>Surrogate mother</li> | ||
| + | </ul> | ||
| + | </blockquote> | ||
| + | <p style="padding-left: 30px;"><strong><span style="text-decoration: underline;">Person needs:</span></strong></p> | ||
| + | <blockquote> | ||
| + | <ul> | ||
| + | <li>Donor (Ooc./Emb.)</li> | ||
| + | <li>Surrogate mother</li> | ||
| + | <li>Sperm donor</li> | ||
| + | </ul> | ||
| + | </blockquote> | ||
| + | <p> </p> | ||
| + | <p><strong>Male</strong></p> | ||
| + | <p style="padding-left: 30px;"><strong><span style="text-decoration: underline;">Person is:</span></strong></p> | ||
| + | <blockquote> | ||
| + | <ul> | ||
| + | <li>Sperm donor</li> | ||
| + | </ul> | ||
| + | </blockquote> | ||
| + | </td> | ||
</tr> | </tr> | ||
</tbody> | </tbody> | ||
</table> | </table> | ||
| − | |||
<h2>Buttons</h2> | <h2>Buttons</h2> | ||
<table border="0"> | <table border="0"> | ||
| Line 71: | Line 117: | ||
</ul> | </ul> | ||
<p> </p> | <p> </p> | ||
| − | < | + | <h2>Configuration</h2> |
| − | + | <table border="0"> | |
| − | + | ||
| − | + | ||
| − | + | ||
| − | <table | + | |
<tbody> | <tbody> | ||
<tr> | <tr> | ||
| − | <td> | + | <td><a href="/index.php?title=MedITEX_IVF_Settings#Donation_.2F_surrogate_motherhood"><img style="display: block; margin-left: auto; margin-right: auto;" src="/images/plus48.png" alt="" width="48" height="48" /></a></td> |
| − | + | <td><a href="/index.php?title=MedITEX_IVF_Settings#Donation_.2F_surrogate_motherhood">Click here</a> to know how to configure <strong>Donation and Surrogate motherhood.</strong></td> | |
| − | + | ||
| − | + | ||
| − | + | ||
| − | + | ||
| − | + | ||
| − | + | ||
| − | + | ||
| − | + | ||
| − | + | ||
| − | + | ||
| − | + | ||
| − | + | ||
| − | + | ||
| − | + | ||
| − | + | ||
| − | + | ||
| − | + | ||
| − | + | ||
| − | + | ||
| − | + | ||
| − | + | ||
| − | + | ||
| − | + | ||
| − | + | ||
| − | + | ||
| − | + | ||
| − | + | ||
| − | + | ||
| − | + | ||
| − | + | ||
| − | + | ||
| − | + | ||
| − | + | ||
| − | + | ||
| − | + | ||
| − | < | + | |
| − | + | ||
| − | + | ||
| − | < | + | |
| − | </ | + | |
| − | + | ||
| − | + | ||
| − | + | ||
| − | + | ||
| − | < | + | |
| − | < | + | |
| − | < | + | |
</tr> | </tr> | ||
</tbody> | </tbody> | ||
Revision as of 11:58, 13 May 2013
The properties above can be set under each patient's overview window. From the patient's main screen, click on <a href="/index.php?title=Demographics">Demographics</a>.
Click on the green area to set donation for this patient.
 |
After donation properties have been set, this information will also be displayed on the main window.
| <img src="/images/MainDonorRed.png" alt="" width="277" height="331" /> |
 |
|
|
Donations are a set of special functionalities in MedITEX IVF that allows donation of material and surrogacy. Donations are performed between two or more patients. The patient providing material (oocytes, embryos, etc.) is called Donor and the patient that receives the material is called Recipient. These are the types of donations possible by the program: Female Person is:
Person needs:
Male Person is:
|
Contents |
Buttons
| <img src="/images/AnonymID.pn.png" alt="" width="26" height="24" /> | Set today as date. |
| <a href="/index.php?title=Search_for_suitable_patient"><img src="/images/Plus.png" alt="" width="23" height="23" /></a> | Create new reservation: this button creates a new reservation in case one of the options are selected from Person is and <a href="/index.php?title=Search_for_suitable_patient">Person needs</a>. |
| <img src="/images/DeleteX.png" alt="" width="26" height="24" /> | Delete selected reservation: deletes the reservation selected on the list. |
Tabs
Personal information and reservations
| <img src="/images/DonationW4.png" alt="" width="765" height="117" /> |
|
| <img src="/images/DonationW2.png" alt="" width="400" height="171" /> |
Current reservations: this tab displays a list with all reservations made for this patient. It is possible to add a new reservation by clicking on the "+" button and delete it by clicking on the "X" button. |
| <img src="/images/DonationW3.png" alt="" width="400" height="171" /> | History: displays a log with all donations that have been completed. Click the little "+" at the beginning of the line to see the details of the donated material. |
| <img src="/images/DonationW9.png" alt="" width="576" height="65" /> | Details: displays details of the current reservation / history. |
Personal characteristics
| <img src="/images/DonationW5.png" alt="" width="765" height="124" /> |
- Physical characteristics: on this tab, you can enter the physical characteristics of the patient, such as: blood group, height, hair color, etc.
- Psychological characteristics: this tab has all psychological characteristics of the patient. It contains personality traits such as, extroverted, shy, optimistic and other talents like music, arts and sports.
- Social and other characteristics: displays information about social characteristics of the patient such as: smoking habits, alcohol, sexual orientation, etc.
Configuration
| <a href="/index.php?title=MedITEX_IVF_Settings#Donation_.2F_surrogate_motherhood"><img style="display: block; margin-left: auto; margin-right: auto;" src="/images/plus48.png" alt="" width="48" height="48" /></a> | <a href="/index.php?title=MedITEX_IVF_Settings#Donation_.2F_surrogate_motherhood">Click here</a> to know how to configure Donation and Surrogate motherhood. |
Matcher
In MedITEX IVF, donation is performed by linking patients and cycles. In order to have a donation procedure completed, we need first to set the properties described above for each patient. Secondly, we need to link those patients and their respective cycles.
This task is accomplished by Matcher. An interface that helps you create cycles and link patients.
| <img src="/images/MatcherButton.png" alt="" width="53" height="39" /> | This button opens Matcher and helps you through the necessary steps. It can have different functionalities depending on how much of the donation process has been completed. For example, if a patient do not have a donation cycle created, Matcher will first of all help you creating it, otherwise it will only link cycles. Therefore, Matcher works as a smart button that verifies the necessary steps to successfully perform a donation. |
Cell tracking
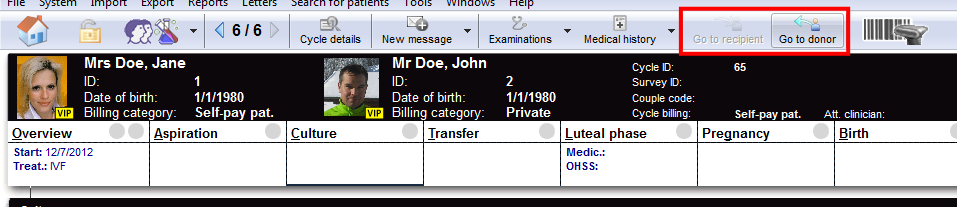
After the donation has been completed, we can open the cycle of the recipient/donor and continue cultivation. You can switch between cycles with the buttons from the image below. If a patient has more than one recipient/donor you will be asked to whom you want to switch.
 |
Another easy way of tracking donated cells is by using a special function. Select the oocyte/embryo you wish to track, right-click it and select Cell tracking. The cell you have selected will be shown in the cycle of the recipient/donor.
|
|
How to
| <img src="/images/howto48.png" alt="" width="48" height="48" /> | If you would like to know how to perform donations, please follow <a href="/index.php?title=MedITEX_IVF_how_to#Donations">this link</a> and check our How to page. |
| <a href="/index.php?title=MedITEX_IVF_manual">Back to the MedITEX IVF menu </a> | <a href="#top">Back to top</a> |