Demographics
From MedITEX - Wiki
| Line 26: | Line 26: | ||
<li>Date of birth;</li> | <li>Date of birth;</li> | ||
<li>Accounting;</li> | <li>Accounting;</li> | ||
| − | <li>Attending | + | <li>Attending clinician.</li> |
</ul> | </ul> | ||
</td> | </td> | ||
| Line 55: | Line 55: | ||
<tr> | <tr> | ||
<td><span><img style="display: block; margin-left: auto; margin-right: auto;" src="/images/delico.jpg" alt="" width="83" height="35" /></span></td> | <td><span><img style="display: block; margin-left: auto; margin-right: auto;" src="/images/delico.jpg" alt="" width="83" height="35" /></span></td> | ||
| − | <td style="text-align: justify;"><strong>Delete Person</strong>: click on this button to delete this person. A person may be deleted only if some requirements are fulfilled ( | + | <td style="text-align: justify;"><strong>Delete Person</strong>: click on this button to delete this person. A person may be deleted only if some requirements are fulfilled (e.g. no cycle is present for the patient).</td> |
</tr> | </tr> | ||
<tr> | <tr> | ||
<td><span><img style="display: block; margin-left: auto; margin-right: auto;" src="/images/printico.jpg" alt="" width="68" height="36" /></span></td> | <td><span><img style="display: block; margin-left: auto; margin-right: auto;" src="/images/printico.jpg" alt="" width="68" height="36" /></span></td> | ||
| − | <td style="text-align: justify;"><strong>Print | + | <td style="text-align: justify;"><strong>Print labels</strong>: click on this button to print labels containing <strong>Patient ID</strong>, <strong>Name </strong>and <strong>Surname </strong>of the patient, <strong>Date of birth</strong>, <strong>Name </strong>and <strong>Surname </strong>of the partner.</td> |
</tr> | </tr> | ||
<tr> | <tr> | ||
| Line 89: | Line 89: | ||
<p style="text-align: left;"> </p> | <p style="text-align: left;"> </p> | ||
<h2 style="text-align: left;">Clickable Areas</h2> | <h2 style="text-align: left;">Clickable Areas</h2> | ||
| − | <table border="0"> | + | <table style="margin-left: auto; margin-right: auto;" border="0"> |
<tbody> | <tbody> | ||
<tr> | <tr> | ||
| − | <td><img src="/images/DemoInfo.png" alt=" | + | <td><img src="/images/DemoInfo.png" alt="" /></td> |
</tr> | </tr> | ||
</tbody> | </tbody> | ||
</table> | </table> | ||
<ul> | <ul> | ||
| − | <li style="text-align: justify;"><strong>Picture of the patient | + | <li style="text-align: justify;"><strong>Picture of the patient</strong>: enlarge it with a double-click.<strong> </strong>If you wish to add a new photo to a patient, right-click the picture area and choose the appropriate option.</li> |
| − | <li style="text-align: justify;"><strong>Patient ID | + | <li style="text-align: justify;"><strong>Patient ID</strong>: if you click on <img src="/images/Pencil.png" alt="" width="27" height="21" /> at the end, a window will be opened and you can change the <strong>Patient ID</strong> manually.</li> |
| − | <li style="text-align: justify;"><strong>Title | + | <li style="text-align: justify;"><strong>Title</strong>: <span id="result_box" class="short_text" lang="en"><span class="hps">enter the</span> <span class="hps">title</span> <span class="hps">of the patient.</span></span></li> |
| − | <li style="text-align: justify;"><strong>Firstname | + | <li style="text-align: justify;"><strong>Firstname</strong>: <span id="result_box" class="short_text" lang="en"><span class="hps">set here</span> <span class="hps">the firstname of the patient</span><span>.</span></span></li> |
| − | <li style="text-align: justify;"><strong>Surname | + | <li style="text-align: justify;"><strong>Surname</strong>: add the surname.</li> |
| − | <li style="text-align: justify;"><strong>Maiden name | + | <li style="text-align: justify;"><strong>Maiden name</strong>: <span id="result_box" class="short_text" lang="en"><span class="hps">the</span> <span class="hps">birth</span> <span class="hps">name can</span> <span class="hps">be entered here.</span></span></li> |
| − | <li style="text-align: justify;"><strong>Date of birth | + | <li style="text-align: justify;"><strong>Date of birth</strong>: insert the date of birth manually or choose it out of the calendar by clicking on the arrow.</li> |
| − | <li style="text-align: justify;"><strong>Nationality | + | <li style="text-align: justify;"><strong>Nationality</strong>: select a nationality from the list provided.</li> |
| − | <li style="text-align: justify;"><strong>Anonym. ID | + | <li style="text-align: justify;"><strong>Anonym. ID</strong>: create an anonymous ID by clicking on <img src="/images/AnonymID.pn.png" alt="" width="29" height="26" />.</li> |
| − | <li style="text-align: justify;"><strong>Place of birth | + | <li style="text-align: justify;"><strong>Place of birth</strong>: add the place of birth.</li> |
| − | <li style="text-align: justify;"><strong>Street / no. | + | <li style="text-align: justify;"><strong>Street / no.</strong>: insert the street and the house number.</li> |
| − | <li style="text-align: justify;"><strong>Postal code | + | <li style="text-align: justify;"><strong>Postal code</strong>: postal code of the residence.</li> |
| − | <li style="text-align: justify;"><strong>City | + | <li style="text-align: justify;"><strong>City</strong>: <span id="result_box" class="short_text" lang="en"><span class="hps">residence of the patient</span><span>.</span></span></li> |
| − | <li style="text-align: justify;"><strong>Province | + | <li style="text-align: justify;"><strong>Province</strong>: select a province from the list.</li> |
| − | <li style="text-align: justify;"><strong>Note | + | <li style="text-align: justify;"><strong>Note</strong>: important notes and comments about the patient, e.g. intolerances, allergies, etc.</li> |
</ul> | </ul> | ||
<ul> | <ul> | ||
| Line 121: | Line 121: | ||
<tr> | <tr> | ||
<td><a href="/index.php?title=Demographics#Additional_patient_data"><img src="/images/gray.png" alt="" width="408" height="105" /></a></td> | <td><a href="/index.php?title=Demographics#Additional_patient_data"><img src="/images/gray.png" alt="" width="408" height="105" /></a></td> | ||
| − | <td style="text-align: justify;"><strong>Additional patient data | + | <td style="text-align: justify;"><strong>Additional patient data</strong>: if you wish to add further contact details, health insurance data, or if you wish to add referrers, click the grey box in the upper right corner. A window will open and you will be able to insert more data, such as: telephone number, billing category, marital status, professional info and referrers.</td> |
</tr> | </tr> | ||
<tr> | <tr> | ||
<td><a href="/index.php?title=Cryo_storage"><img src="/images/InCryo.png" alt="" width="410" height="32" /></a></td> | <td><a href="/index.php?title=Cryo_storage"><img src="/images/InCryo.png" alt="" width="410" height="32" /></a></td> | ||
| − | <td style="text-align: justify;"><strong>Cryo </strong><strong>overview | + | <td style="text-align: justify;"><strong>Cryo </strong><strong>overview</strong>: to get an overview of the <strong>Cryo Gyn</strong> click on the blue box. A window will open and you can insert new straws, thaw selected items, open contracts and invoices and get and overview about the currently storage items and a history of storage changes.</td> |
</tr> | </tr> | ||
<tr> | <tr> | ||
<td><a href="/index.php?title=Donation"><img src="/images/DonorInfo.png" alt="" width="415" height="50" /></a></td> | <td><a href="/index.php?title=Donation"><img src="/images/DonorInfo.png" alt="" width="415" height="50" /></a></td> | ||
| − | <td style="text-align: justify;"><strong>Donation information</ | + | <td style="text-align: justify;"><strong>Donation information</strong>: to see the details of donation of this patient, click on the green box. A window will be opened and you can see all the details about the person and the donor information. <span id="result_box" lang="en"><span class="hps">Reservations for</span> <span class="hps">possible</span> <span class="hps">donor sperm</span> <span class="hps">can</span> <span class="hps">be entered here.</span></span><span style="font-size: small;"><strong> </strong></span></td> |
</tr> | </tr> | ||
</tbody> | </tbody> | ||
| Line 154: | Line 154: | ||
</ul> | </ul> | ||
<p> </p> | <p> </p> | ||
| − | + | <p>If you double-click a row at the right side, the document will be opened. You can also see the status and the document attached.</p> | |
| − | <p>If you double-click a | + | |
<h3>Communication</h3> | <h3>Communication</h3> | ||
<table border="0"> | <table border="0"> | ||
| Line 165: | Line 164: | ||
</table> | </table> | ||
<p>In this area you can find all sent SMS.</p> | <p>In this area you can find all sent SMS.</p> | ||
| − | <p>If you double-click a | + | <p>If you double-click a row, the SMS-document will be opened. You can also see the logging, date, type, subject, status, creator, attachment and the text of the SMS.</p> |
<h2>Additional patient data</h2> | <h2>Additional patient data</h2> | ||
| − | <p>A new screen will open | + | <p>A new screen will open and you can enter contact, health insurance and referrer details.</p> |
<table border="0"> | <table border="0"> | ||
<tbody> | <tbody> | ||
| Line 175: | Line 174: | ||
</tbody> | </tbody> | ||
</table> | </table> | ||
| − | <p style="text-align: justify;"><strong>The personal contact | + | <p style="text-align: justify;"><strong>The personal contact data of the patient:</strong></p> |
<ul> | <ul> | ||
| − | <li> | + | <li>These areas contain <strong>personal data of a patient</strong>.</li> |
</ul> | </ul> | ||
<ul> | <ul> | ||
| − | <li> | + | <li>On the other tabs, you can add <strong>personal</strong> or <strong>professional data</strong> of the patient, the<strong> referrer data</strong> and a possible <strong>web portal usage</strong>.</li> |
</ul> | </ul> | ||
<p> </p> | <p> </p> | ||
| Line 190: | Line 189: | ||
<p><strong>Further information:</strong></p> | <p><strong>Further information:</strong></p> | ||
<ul> | <ul> | ||
| − | <li> | + | <li>Check the box <strong>VIP patient </strong>to assign special or important patients as a <strong>VIP</strong>. This information will appear in addition to the patient's name in the search window.</li> |
</ul> | </ul> | ||
<p> </p> | <p> </p> | ||
| Line 198: | Line 197: | ||
</ul> | </ul> | ||
<ul> | <ul> | ||
| − | <li>You can assign a maximum of three referrers to each patient. | + | <li>You can assign a maximum of three referrers to each patient. Referrers can be managed and added on the top menu under <strong>System -> Referrers</strong>.</li> |
</ul> | </ul> | ||
<ul> | <ul> | ||
| − | <li> | + | <li>Check the box <strong>Notification </strong>if the doctor should be notified.</li> |
</ul> | </ul> | ||
<ul> | <ul> | ||
| − | <li>New referrers can be <strong>selected from the list</strong> of available doctors by clicking the arrow | + | <li>New referrers can be <strong>selected from the list</strong> of available doctors by clicking on the arrow symbol.</li> |
</ul> | </ul> | ||
<p> </p> | <p> </p> | ||
| Line 221: | Line 220: | ||
</ul> | </ul> | ||
<ul> | <ul> | ||
| − | <li>Here you can | + | <li>Here you can specify the <strong>couple identification code</strong>.</li> |
</ul> | </ul> | ||
<ul> | <ul> | ||
| Line 227: | Line 226: | ||
</ul> | </ul> | ||
<ul> | <ul> | ||
| − | <li> | + | <li>You can <strong>reassign </strong>partnerships. To prevent accidental changes of current partnerships, a <strong>security message</strong> will be opened.</li> |
</ul> | </ul> | ||
<p> </p> | <p> </p> | ||
| Line 234: | Line 233: | ||
<tr> | <tr> | ||
<td><a href="/index.php?title=How_to_create_a_new_patient%3F"><img src="/images/NewP.png" alt="" width="154" height="31" /></a></td> | <td><a href="/index.php?title=How_to_create_a_new_patient%3F"><img src="/images/NewP.png" alt="" width="154" height="31" /></a></td> | ||
| − | <td><strong>New | + | <td><strong>New person</strong>: add a new patient in the database.</td> |
</tr> | </tr> | ||
</tbody> | </tbody> | ||
</table> | </table> | ||
| − | |||
<table style="float: right;" border="0"> | <table style="float: right;" border="0"> | ||
<tbody> | <tbody> | ||
Revision as of 15:16, 20 December 2012
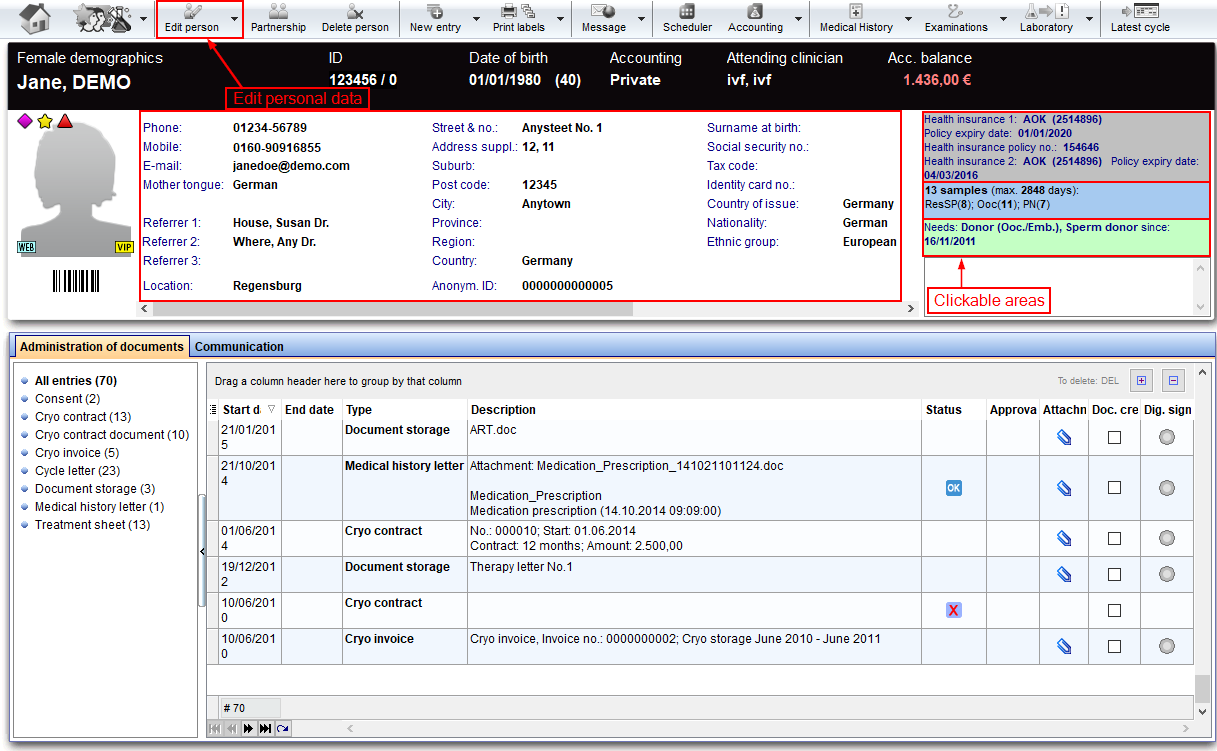 |
The Demographic page is divided in two main parts:
- The upper part contains patient's personal data, a summary on additional <a href="/index.php?title=Demographics#Additional_patient_data">personal data</a> (grey box), a summary related to <a href="/index.php?title=Cryo_storage">cryostored materials</a> (blue box) and a summary related to <a href="/index.php?title=Donation">donor information</a> (green box). The section related to donor information may not be available if donation is not allowed in the user country.
- The bottom part contains a section with the list of the documents archived (Administration of documents) and a section with the list of messages sent/received related to the selected patient (Communication). It is also possible to select the documents grouped by type simply selecting the type in the left column.
| <img src="/images/overviewDemo.png" alt="" width="765" height="53" /> |
At the top of the page, a black bar is shown with the following information:
|
Contents |
Buttons
Some buttons have special functionalities. Click on it to have more information.
| <a href="/index.php?title=MedITEX_IVF_main_page"><img style="display: block; margin-left: auto; margin-right: auto;" src="/images/homeico.jpg" alt="" width="70" height="37" /></a> | Home: click on this button to go to the starting window. |
| <a href="/index.php?title=Free / QM fields"><img style="display: block; margin-left: auto; margin-right: auto;" src="/images/QMico.jpg" alt="" width="83" height="35" /></a> | QM / free fields: click on this button to access the QM field section related to this area or on the right arrow to block the QM fields or to see the change log. |
| <a href="/index.php?title=Demographics#Set_partnership"><img style="display: block; margin-left: auto; margin-right: auto;" src="/images/Partnership.png" alt="" width="67" height="35" /></a> | Partnership: set a new partnership. |
| <a href="/index.php?title=How_to_create_a_new_patient%3F"><img style="display: block; margin-left: auto; margin-right: auto;" src="/images/newpatico.jpg" alt="" width="74" height="36" /></a> | New Patient: click on this button to add a new patient. |
| <img style="display: block; margin-left: auto; margin-right: auto;" src="/images/delico.jpg" alt="" width="83" height="35" /> | Delete Person: click on this button to delete this person. A person may be deleted only if some requirements are fulfilled (e.g. no cycle is present for the patient). |
| <img style="display: block; margin-left: auto; margin-right: auto;" src="/images/printico.jpg" alt="" width="68" height="36" /> | Print labels: click on this button to print labels containing Patient ID, Name and Surname of the patient, Date of birth, Name and Surname of the partner. |
| <a href="/index.php?title=Create a new entry in demographics"><img style="display: block; margin-left: auto; margin-right: auto;" src="/images/newentrico.jpg" alt="" width="83" height="36" /></a> | New entry: click on this button to create a new document, like letters, reports, contracts, photos, etc. |
| <img style="float: left;" src="/images/NewMessage.png" alt="" width="106" height="39" /> | New message: click on this button to send a message to the patient. This message can be an SMS, an email or a web portal message. |
| <img style="display: block; margin-left: auto; margin-right: auto;" src="/images/HIico.jpg" alt="" width="78" height="35" /> | Read HI card: interface to read HI cards. |
| <img style="display: block; margin-left: auto; margin-right: auto;" src="/images/MedITEXBilling.png" alt="" width="88" height="38" /> | MedITEX Billing: button to open MedITEX Billing. |
| <img style="display: block; margin-left: auto; margin-right: auto;" src="/images/gotoparico.jpg" alt="" width="80" height="35" /> | Go to partner: click here to go to the partner's patient data. |
| <img style="display: block; margin-left: auto; margin-right: auto;" src="/images/PM.png" alt="" width="65" height="27" /> | With these two buttons you can decide how many rows you see on the list. (Expand all rows, Collapse all rows) |
Clickable Areas
| <img src="/images/DemoInfo.png" alt="" /> |
- Picture of the patient: enlarge it with a double-click. If you wish to add a new photo to a patient, right-click the picture area and choose the appropriate option.
- Patient ID: if you click on <img src="/images/Pencil.png" alt="" width="27" height="21" /> at the end, a window will be opened and you can change the Patient ID manually.
- Title: enter the title of the patient.
- Firstname: set here the firstname of the patient.
- Surname: add the surname.
- Maiden name: the birth name can be entered here.
- Date of birth: insert the date of birth manually or choose it out of the calendar by clicking on the arrow.
- Nationality: select a nationality from the list provided.
- Anonym. ID: create an anonymous ID by clicking on <img src="/images/AnonymID.pn.png" alt="" width="29" height="26" />.
- Place of birth: add the place of birth.
- Street / no.: insert the street and the house number.
- Postal code: postal code of the residence.
- City: residence of the patient.
- Province: select a province from the list.
- Note: important notes and comments about the patient, e.g. intolerances, allergies, etc.
These clickable areas have special functionalities. Click on it to have more information.
| <a href="/index.php?title=Demographics#Additional_patient_data"><img src="/images/gray.png" alt="" width="408" height="105" /></a> | Additional patient data: if you wish to add further contact details, health insurance data, or if you wish to add referrers, click the grey box in the upper right corner. A window will open and you will be able to insert more data, such as: telephone number, billing category, marital status, professional info and referrers. |
| <a href="/index.php?title=Cryo_storage"><img src="/images/InCryo.png" alt="" width="410" height="32" /></a> | Cryo overview: to get an overview of the Cryo Gyn click on the blue box. A window will open and you can insert new straws, thaw selected items, open contracts and invoices and get and overview about the currently storage items and a history of storage changes. |
| <a href="/index.php?title=Donation"><img src="/images/DonorInfo.png" alt="" width="415" height="50" /></a> | Donation information: to see the details of donation of this patient, click on the green box. A window will be opened and you can see all the details about the person and the donor information. Reservations for possible donor sperm can be entered here. |
Tabs with lists on the bottom of the page
Administration of documents
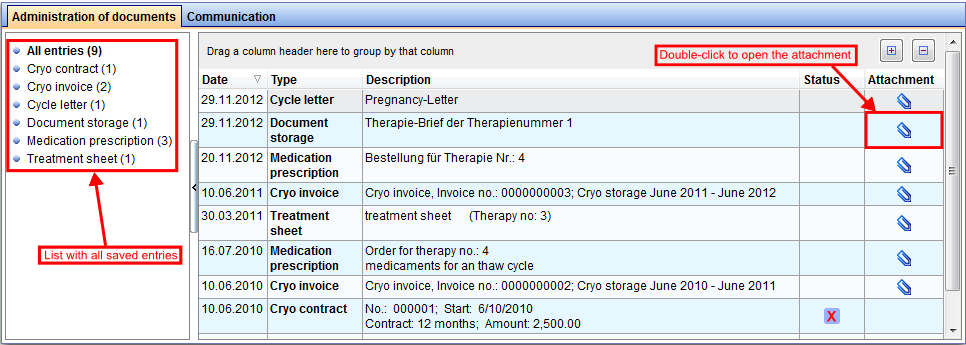 |
In this area you can find all kinds of documents of one patient. They are divided into different types:
- All entries
- Cryo contract
- Cryo invoice
- Cycle letter
- Document storage
- Medication prescription
- Treatment sheet
If you double-click a row at the right side, the document will be opened. You can also see the status and the document attached.
Communication
 |
In this area you can find all sent SMS.
If you double-click a row, the SMS-document will be opened. You can also see the logging, date, type, subject, status, creator, attachment and the text of the SMS.
Additional patient data
A new screen will open and you can enter contact, health insurance and referrer details.
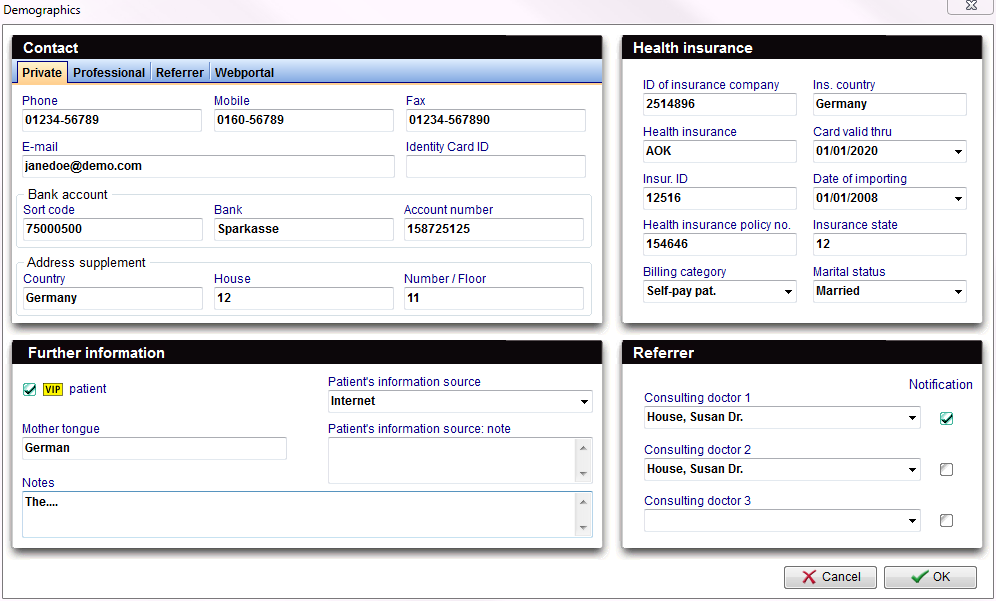 |
The personal contact data of the patient:
- These areas contain personal data of a patient.
- On the other tabs, you can add personal or professional data of the patient, the referrer data and a possible web portal usage.
Health insurance:
- Here you can find important data of the health insurance and the billing category of the patient.
Further information:
- Check the box VIP patient to assign special or important patients as a VIP. This information will appear in addition to the patient's name in the search window.
Referrer data and a possible notification order:
- Here the consulting doctor will be added.
- You can assign a maximum of three referrers to each patient. Referrers can be managed and added on the top menu under System -> Referrers.
- Check the box Notification if the doctor should be notified.
- New referrers can be selected from the list of available doctors by clicking on the arrow symbol.
Set partnership
 |
- This window displays all important information of the partnership.
- Here you can specify the couple identification code.
- In the list you can see which patients are present in your database and which status they have. (Has partners)
- You can reassign partnerships. To prevent accidental changes of current partnerships, a security message will be opened.
| <a href="/index.php?title=How_to_create_a_new_patient%3F"><img src="/images/NewP.png" alt="" width="154" height="31" /></a> | New person: add a new patient in the database. |
| <a href="/index.php?title=MedITEX_IVF_manual">Back to the MedITEX IVF menu </a> | <a href="#top">Back to top</a> |