Demographics
From MedITEX - Wiki
(Difference between revisions)
| Line 6: | Line 6: | ||
</tbody> | </tbody> | ||
</table> | </table> | ||
| − | <p style="text-align: | + | <p style="text-align: justify;"><strong>The Demographic page is divided in two main parts:</strong></p> |
<ul> | <ul> | ||
| − | <li> The upper part contains <strong>patient's personal data</strong>, a summary on additional <strong>personal data</strong> (grey box), a <strong>summary related to <a href="/index.php?title=Cryo_storage">cryostored materials</a></strong> (blue box) and a summary related to <strong>donor information</strong> (green box). </li> | + | <li style="text-align: justify;"> The upper part contains <strong>patient's personal data</strong>, a summary on additional <strong>personal data</strong> (grey box), a <strong>summary related to <a href="/index.php?title=Cryo_storage">cryostored materials</a></strong> (blue box) and a summary related to <strong>donor information</strong> (green box). </li> |
</ul> | </ul> | ||
<ul> | <ul> | ||
| − | <li>The bottom part contains a section with the <strong>list of the documents archived</strong> (Administration of documents) and a section with the <strong>list of messages sent/received</strong> related to the selected patient (Comunication). It is possible to show the documents grouped by type simply selecting the type in the left column.</li> | + | <li style="text-align: justify;">The bottom part contains a section with the <strong>list of the documents archived</strong> (Administration of documents) and a section with the <strong>list of messages sent/received</strong> related to the selected patient (Comunication). It is possible to show the documents grouped by type simply selecting the type in the left column.</li> |
</ul> | </ul> | ||
| − | <p style="text-align: | + | <p style="text-align: justify;"><em>Note: the section related to donor information may be not available if donation is not allowed in user's country.</em></p> |
<table border="0"> | <table border="0"> | ||
<tbody> | <tbody> | ||
| Line 20: | Line 20: | ||
</tr> | </tr> | ||
<tr> | <tr> | ||
| − | <td>At the top of the page, a black bar with important data is appropriated:<br /> | + | <td><strong>At the top of the page, a black bar with important data is appropriated:</strong><br /> |
<ul> | <ul> | ||
<li>Picture of the patient</li> | <li>Picture of the patient</li> | ||
| Line 45: | Line 45: | ||
<tr> | <tr> | ||
<td><span><img style="display: block; margin-left: auto; margin-right: auto;" src="/images/QMico.jpg" alt="" width="83" height="35" /></span></td> | <td><span><img style="display: block; margin-left: auto; margin-right: auto;" src="/images/QMico.jpg" alt="" width="83" height="35" /></span></td> | ||
| − | <td><strong>QM / free fields:</strong> Click on this icon to access the <strong>QM field</strong> section related to this area or on the right arrow to block the QM fields or to see the change log.</td> | + | <td style="text-align: justify;"><strong>QM / free fields:</strong> Click on this icon to access the <strong>QM field</strong> section related to this area or on the right arrow to block the QM fields or to see the change log.</td> |
</tr> | </tr> | ||
<tr> | <tr> | ||
| Line 57: | Line 57: | ||
<tr> | <tr> | ||
<td><span><img style="display: block; margin-left: auto; margin-right: auto;" src="/images/delico.jpg" alt="" width="83" height="35" /></span></td> | <td><span><img style="display: block; margin-left: auto; margin-right: auto;" src="/images/delico.jpg" alt="" width="83" height="35" /></span></td> | ||
| − | <td><strong>Delete Person:</strong> Click on this icon to delete the person. The person may be deleted only if some requirements are fulfilled (eg. no therapy is present for the patient).</td> | + | <td style="text-align: justify;"><strong>Delete Person:</strong> Click on this icon to delete the person. The person may be deleted only if some requirements are fulfilled (eg. no therapy is present for the patient).</td> |
</tr> | </tr> | ||
<tr> | <tr> | ||
<td><span><img style="display: block; margin-left: auto; margin-right: auto;" src="/images/printico.jpg" alt="" width="68" height="36" /></span></td> | <td><span><img style="display: block; margin-left: auto; margin-right: auto;" src="/images/printico.jpg" alt="" width="68" height="36" /></span></td> | ||
| − | <td><strong>Print lables:</strong> Click on this icon to print labels containing: patient ID, name and surname of the patient, date of birth f the patient, name and surname of the partner.</td> | + | <td style="text-align: justify;"><strong>Print lables:</strong> Click on this icon to print labels containing: patient ID, name and surname of the patient, date of birth f the patient, name and surname of the partner.</td> |
</tr> | </tr> | ||
<tr> | <tr> | ||
| Line 96: | Line 96: | ||
</table> | </table> | ||
<ul> | <ul> | ||
| − | <li><strong>Patient ID:</strong> If you click on the "pencil" <img src="/images/Pencil.png" alt="" width="27" height="21" /> at the end of the line, a window will be opened and you can change the Patient ID manually.</li> | + | <li style="text-align: justify;"><strong>Patient ID:</strong> If you click on the "pencil" <img src="/images/Pencil.png" alt="" width="27" height="21" /> at the end of the line, a window will be opened and you can change the Patient ID manually.</li> |
| − | <li><strong>Title:</strong> <span id="result_box" class="short_text" lang="en"><span class="hps">Enter the</span> <span class="hps">title</span> <span class="hps">of the patient.</span></span></li> | + | <li style="text-align: justify;"><strong>Title:</strong> <span id="result_box" class="short_text" lang="en"><span class="hps">Enter the</span> <span class="hps">title</span> <span class="hps">of the patient.</span></span></li> |
| − | <li><strong>Firstname: </strong><span id="result_box" class="short_text" lang="en"><span class="hps">Set here</span> <span class="hps">the firstname of the patient</span><span>.</span></span></li> | + | <li style="text-align: justify;"><strong>Firstname: </strong><span id="result_box" class="short_text" lang="en"><span class="hps">Set here</span> <span class="hps">the firstname of the patient</span><span>.</span></span></li> |
| − | <li><strong>Surname:</strong> Add the Surename.</li> | + | <li style="text-align: justify;"><strong>Surname:</strong> Add the Surename.</li> |
| − | <li><strong>Maiden name:</strong> <span id="result_box" class="short_text" lang="en"><span class="hps">The</span> <span class="hps">birth</span> <span class="hps">name can</span> <span class="hps">be entered here.</span></span></li> | + | <li style="text-align: justify;"><strong>Maiden name:</strong> <span id="result_box" class="short_text" lang="en"><span class="hps">The</span> <span class="hps">birth</span> <span class="hps">name can</span> <span class="hps">be entered here.</span></span></li> |
| − | <li><strong>Date of birth:</strong> Insert the Date of birth manually or choose it out of the calendar by clicking at the arrow.</li> | + | <li style="text-align: justify;"><strong>Date of birth:</strong> Insert the Date of birth manually or choose it out of the calendar by clicking at the arrow.</li> |
| − | <li><strong>Nationality:</strong> Select a Nationality from the list provided.</li> | + | <li style="text-align: justify;"><strong>Nationality:</strong> Select a Nationality from the list provided.</li> |
| − | <li><strong>Anonym. ID:</strong> Create an anonymous ID through clicking at the flash <img src="/images/AnonymID.pn.png" alt="" width="29" height="26" /> .</li> | + | <li style="text-align: justify;"><strong>Anonym. ID:</strong> Create an anonymous ID through clicking at the flash <img src="/images/AnonymID.pn.png" alt="" width="29" height="26" /> .</li> |
| − | <li><strong>Place of birth:</strong> Add here the place of birth.</li> | + | <li style="text-align: justify;"><strong>Place of birth:</strong> Add here the place of birth.</li> |
| − | <li><strong>Street / no.:</strong> Insert the street and the house number.</li> | + | <li style="text-align: justify;"><strong>Street / no.:</strong> Insert the street and the house number.</li> |
| − | <li><strong>Postal code:</strong> Postal code of the residence.</li> | + | <li style="text-align: justify;"><strong>Postal code:</strong> Postal code of the residence.</li> |
| − | <li><strong>City: </strong><span id="result_box" class="short_text" lang="en"><span class="hps">Residence of the patient</span><span>.</span></span></li> | + | <li style="text-align: justify;"><strong>City: </strong><span id="result_box" class="short_text" lang="en"><span class="hps">Residence of the patient</span><span>.</span></span></li> |
| − | <li><strong>Province:</strong> Select a province from the list.</li> | + | <li style="text-align: justify;"><strong>Province:</strong> Select a province from the list.</li> |
| − | <li><strong>Note: </strong>Important notes and comments about the patient, e.g. Intolerances, allergies, etc.</li> | + | <li style="text-align: justify;"><strong>Note: </strong>Important notes and comments about the patient, e.g. Intolerances, allergies, etc.</li> |
</ul> | </ul> | ||
<ul> | <ul> | ||
| Line 118: | Line 118: | ||
<tr> | <tr> | ||
<td><img src="/images/gray.png" alt="" width="408" height="105" /></td> | <td><img src="/images/gray.png" alt="" width="408" height="105" /></td> | ||
| − | <td><strong>Additional patient data:</strong> To insert other patient data click on the grey box. A window will open in which will be possible to insert many more data such as telephone number, biling category, marital status, professional info and referrers.</td> | + | <td style="text-align: justify;"><strong>Additional patient data:</strong> To insert other patient data click on the grey box. A window will open in which will be possible to insert many more data such as telephone number, biling category, marital status, professional info and referrers.</td> |
</tr> | </tr> | ||
<tr> | <tr> | ||
<td><img src="/images/InCryo.png" alt="" width="410" height="32" /></td> | <td><img src="/images/InCryo.png" alt="" width="410" height="32" /></td> | ||
| − | <td><strong>Cryo </strong><strong>overview: </strong>To get an overview at the Cryo Gyn click on the blue box. A window will open in which you can insert new straw(s), thaw selected items, open contracts and invoices and get and overview about the currently storage items and the history of storage.</td> | + | <td style="text-align: justify;"><strong>Cryo </strong><strong>overview: </strong>To get an overview at the Cryo Gyn click on the blue box. A window will open in which you can insert new straw(s), thaw selected items, open contracts and invoices and get and overview about the currently storage items and the history of storage.</td> |
</tr> | </tr> | ||
<tr> | <tr> | ||
<td><img src="/images/DonorInfo.png" alt="" width="415" height="50" /></td> | <td><img src="/images/DonorInfo.png" alt="" width="415" height="50" /></td> | ||
| − | <td><strong>Donation information</strong><strong>: </strong>To see the details of donation of this patient click on the green box. A window will be open in which you can see all the details about the person and donor information.<span id="result_box" lang="en"><span class="hps">Reservations for</span> <span class="hps">possible</span> <span class="hps">donor sperm</span> <span class="hps">can</span> <span class="hps">be entered here.</span></span><span style="font-size: small;"><strong> </strong></span></td> | + | <td style="text-align: justify;"><strong>Donation information</strong><strong>: </strong>To see the details of donation of this patient click on the green box. A window will be open in which you can see all the details about the person and donor information.<span id="result_box" lang="en"><span class="hps">Reservations for</span> <span class="hps">possible</span> <span class="hps">donor sperm</span> <span class="hps">can</span> <span class="hps">be entered here.</span></span><span style="font-size: small;"><strong> </strong></span></td> |
</tr> | </tr> | ||
</tbody> | </tbody> | ||
Revision as of 15:22, 3 December 2012
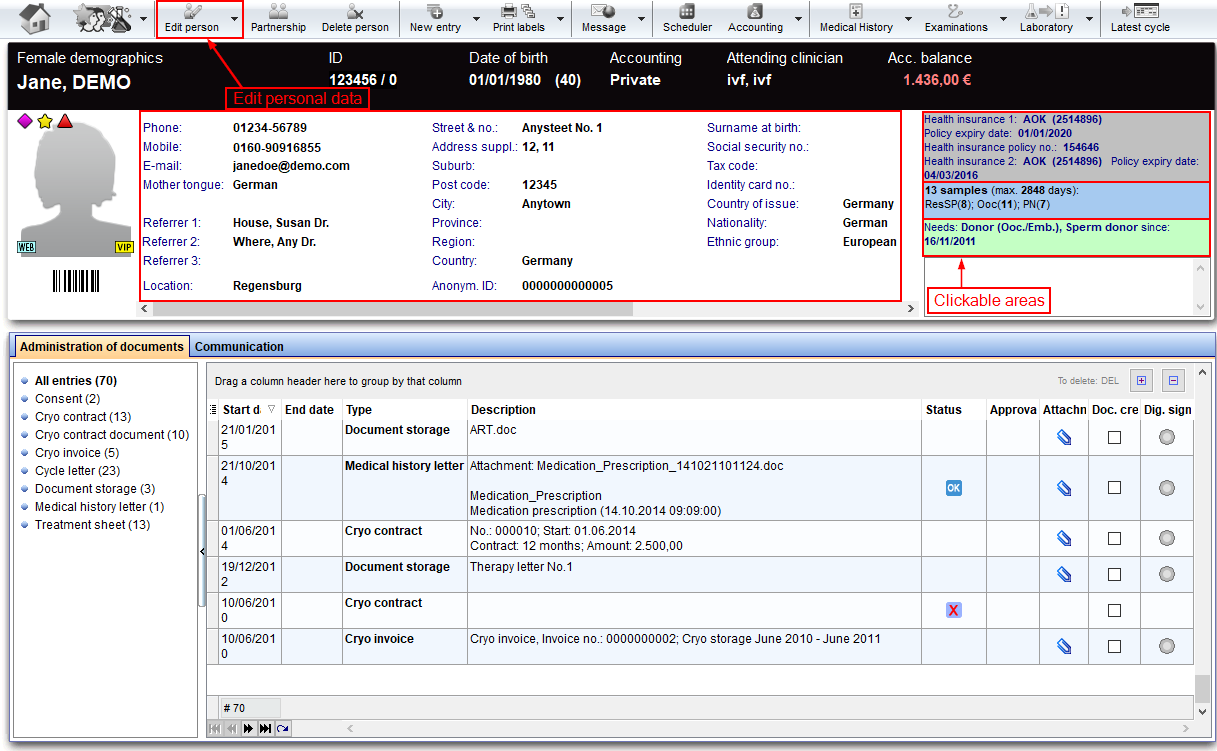 |
The Demographic page is divided in two main parts:
- The upper part contains patient's personal data, a summary on additional personal data (grey box), a summary related to <a href="/index.php?title=Cryo_storage">cryostored materials</a> (blue box) and a summary related to donor information (green box).
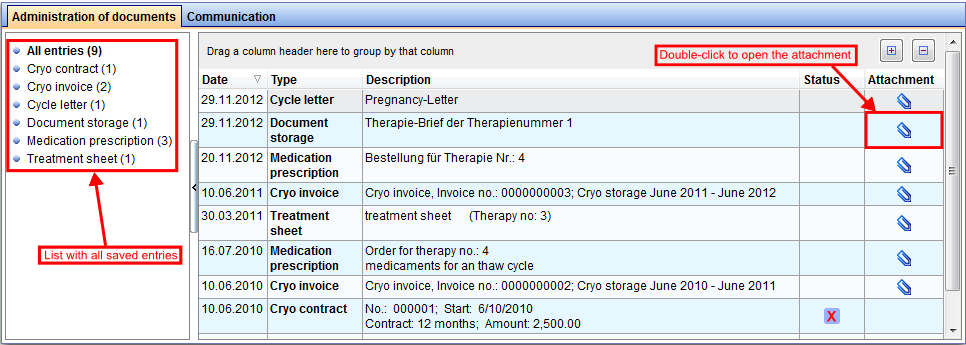
- The bottom part contains a section with the list of the documents archived (Administration of documents) and a section with the list of messages sent/received related to the selected patient (Comunication). It is possible to show the documents grouped by type simply selecting the type in the left column.
Note: the section related to donor information may be not available if donation is not allowed in user's country.
| <img src="/images/overviewDemo.png" alt="" width="765" height="53" /> |
At the top of the page, a black bar with important data is appropriated:
|
Buttons
Some buttons have special functionalities. Click on it to have more information.
| <a href="/index.php?title=Starting_mask"><img style="display: block; margin-left: auto; margin-right: auto;" src="/images/homeico.jpg" alt="" width="70" height="37" /></a> | "Home" button: Click on this icon to go to the starting window. |
| <img style="display: block; margin-left: auto; margin-right: auto;" src="/images/QMico.jpg" alt="" width="83" height="35" /> | QM / free fields: Click on this icon to access the QM field section related to this area or on the right arrow to block the QM fields or to see the change log. |
| <img style="display: block; margin-left: auto; margin-right: auto;" src="/images/Partnership.png" alt="" width="67" height="35" /> | Partnership: |
| <a href="/index.php?title=Starting_mask#Creating_a_new_patient"><img style="display: block; margin-left: auto; margin-right: auto;" src="/images/newpatico.jpg" alt="" width="74" height="36" /></a> | New Patient: Click on this icon to add a new patient. |
| <img style="display: block; margin-left: auto; margin-right: auto;" src="/images/delico.jpg" alt="" width="83" height="35" /> | Delete Person: Click on this icon to delete the person. The person may be deleted only if some requirements are fulfilled (eg. no therapy is present for the patient). |
| <img style="display: block; margin-left: auto; margin-right: auto;" src="/images/printico.jpg" alt="" width="68" height="36" /> | Print lables: Click on this icon to print labels containing: patient ID, name and surname of the patient, date of birth f the patient, name and surname of the partner. |
| <a href="/index.php?title=Patient_data#Creating_a_new_document"><img style="display: block; margin-left: auto; margin-right: auto;" src="/images/newentrico.jpg" alt="" width="83" height="36" /></a> | New entry: Click on this icon to create a new document. |
| <img style="float: left;" src="/images/NewMessage.png" alt="" width="106" height="39" /> | New message: |
| <img style="display: block; margin-left: auto; margin-right: auto;" src="/images/HIico.jpg" alt="" width="78" height="35" /> | Read HI card: |
| <img style="display: block; margin-left: auto; margin-right: auto;" src="/images/MedITEXBilling.png" alt="" width="88" height="38" /> | MedITEX Billing: |
| <img style="display: block; margin-left: auto; margin-right: auto;" src="/images/gotoparico.jpg" alt="" width="80" height="35" /> | Go to partner: Click here to go to the partner's patient data. |
Clickable Areas
Some clickable areas have special functionalities. Click on it to have more information.
| <img src="/images/DemoInfo.png" alt="" width="656" height="197" /> |
- Patient ID: If you click on the "pencil" <img src="/images/Pencil.png" alt="" width="27" height="21" /> at the end of the line, a window will be opened and you can change the Patient ID manually.
- Title: Enter the title of the patient.
- Firstname: Set here the firstname of the patient.
- Surname: Add the Surename.
- Maiden name: The birth name can be entered here.
- Date of birth: Insert the Date of birth manually or choose it out of the calendar by clicking at the arrow.
- Nationality: Select a Nationality from the list provided.
- Anonym. ID: Create an anonymous ID through clicking at the flash <img src="/images/AnonymID.pn.png" alt="" width="29" height="26" /> .
- Place of birth: Add here the place of birth.
- Street / no.: Insert the street and the house number.
- Postal code: Postal code of the residence.
- City: Residence of the patient.
- Province: Select a province from the list.
- Note: Important notes and comments about the patient, e.g. Intolerances, allergies, etc.
| <img src="/images/gray.png" alt="" width="408" height="105" /> | Additional patient data: To insert other patient data click on the grey box. A window will open in which will be possible to insert many more data such as telephone number, biling category, marital status, professional info and referrers. |
| <img src="/images/InCryo.png" alt="" width="410" height="32" /> | Cryo overview: To get an overview at the Cryo Gyn click on the blue box. A window will open in which you can insert new straw(s), thaw selected items, open contracts and invoices and get and overview about the currently storage items and the history of storage. |
| <img src="/images/DonorInfo.png" alt="" width="415" height="50" /> | Donation information: To see the details of donation of this patient click on the green box. A window will be open in which you can see all the details about the person and donor information.Reservations for possible donor sperm can be entered here. |
Tabs with lists on the bottom of the page
 |
 |
| <a href="/index.php?title=MedITEX_IVF_manual">Back to the MedITEX IVF menu </a> | <a href="/index.php?title=MedITEX_IVF_main_page">Back to the main page overview</a> | <a href="#top">Back to top</a> |