Cycles
From MedITEX - Wiki
| Line 21: | Line 21: | ||
</table> | </table> | ||
<p> </p> | <p> </p> | ||
| − | <table style="margin-left: auto; margin-right: auto;" border="0" width=" | + | <table style="margin-left: auto; margin-right: auto;" border="0" width="501" height="190"> |
<tbody> | <tbody> | ||
<tr> | <tr> | ||
<td><a href="/index.php?title=How_to_create_a_new_cycle%3F"><img src="/images/howto48.png" alt="" width="48" height="48" /></a></td> | <td><a href="/index.php?title=How_to_create_a_new_cycle%3F"><img src="/images/howto48.png" alt="" width="48" height="48" /></a></td> | ||
<td><a href="/index.php?title=How_to_create_a_new_cycle%3F">Click here</a> to learn more about adding a new cycle.<br /></td> | <td><a href="/index.php?title=How_to_create_a_new_cycle%3F">Click here</a> to learn more about adding a new cycle.<br /></td> | ||
| + | </tr> | ||
| + | <tr> | ||
| + | <td rowspan="2"><img src="/images/plus48.png" alt="" width="48" height="48" /></td> | ||
| + | <td><a href="/index.php?title=Cycle_Details"><img style="border: 2px dotted blue;" src="/images/CycleDetails.png" alt="" width="144" height="25" /></a> Click on <strong>Cycle details</strong> to review information of the selected cycle.</td> | ||
| + | </tr> | ||
| + | <tr> | ||
| + | <td> | ||
| + | <p><img style="border: 2px dotted blue;" src="/images/FemMedHis.png" alt="" width="177" height="29" /> <img style="border: 2px dotted blue;" src="/images/MaleMedHis.png" alt="" width="178" height="27" /></p> | ||
| + | <p>Click on these buttons to open female or male medical history associated to the selected cycle.</p> | ||
| + | </td> | ||
| + | </tr> | ||
| + | </tbody> | ||
| + | </table> | ||
| + | <p> </p> | ||
| + | <p> </p> | ||
| + | <hr /> | ||
| + | <p> </p> | ||
| + | <p> </p> | ||
| + | <table style="margin-left: auto; margin-right: auto;" border="0"> | ||
| + | <tbody> | ||
| + | <tr> | ||
| + | <td><img src="/images/hint48.png" alt="" width="48" height="48" /></td> | ||
| + | <td>To open a cycle, <strong>double-click</strong> its entry on the list.<br /></td> | ||
| + | </tr> | ||
| + | </tbody> | ||
| + | </table> | ||
| + | <p> </p> | ||
| + | <p>Once the window has refreshed, it will display the <strong>Overview </strong>tab of the cycle. These tabs, displayed below, work similar to a timeline. They are specially positioned to recreate the normal workflow of cycles. These tabs, also referred to as summaries, will always stay on the top part of the window and they will change according to the cycle created.</p> | ||
| + | <table style="margin-left: auto; margin-right: auto;" border="0"> | ||
| + | <tbody> | ||
| + | <tr> | ||
| + | <td>[[Image:CycleTimeline.png|none|740px|thumb|left|link=http://wiki.meditex-software.com/images/CycleTimeline.png|]]</td> | ||
</tr> | </tr> | ||
</tbody> | </tbody> | ||
</table> | </table> | ||
<p> </p> | <p> </p> | ||
| + | <p>The <strong>summaries </strong>show the <strong>different treatment steps</strong> and have the following functions:</p> | ||
<ul> | <ul> | ||
| − | <li> | + | <li>They display the most important data.</li> |
| + | <li>They show the status of the data and the their plausibility. These are indicated by round color symbols. If the symbol is <span style="color: #ff0000;"><strong>red</strong></span>, put the mouse over it to know the reason.</li> | ||
| + | <li>Click the different summaries to change between stages of the cycle.</li> | ||
</ul> | </ul> | ||
| + | <p> </p> | ||
| + | <table style="margin-left: auto; margin-right: auto;" border="0"> | ||
| + | <tbody> | ||
| + | <tr> | ||
| + | <td><img src="/images/hint48.png" alt="" width="48" height="48" /></td> | ||
| + | <td> | ||
<ul> | <ul> | ||
| − | <li> | + | <li>Summaries are generated dynamically and adjusted according to treatment type.</li> |
| + | <li>The cycle is plausible if information has been entered in all relevant treatment steps and only green warnings are visible.</li> | ||
</ul> | </ul> | ||
| + | </td> | ||
| + | </tr> | ||
| + | </tbody> | ||
| + | </table> | ||
<p> </p> | <p> </p> | ||
<h2>Overview</h2> | <h2>Overview</h2> | ||
| Line 47: | Line 93: | ||
</tbody> | </tbody> | ||
</table> | </table> | ||
| − | |||
| − | |||
| − | |||
| − | |||
| − | |||
| − | |||
| − | |||
| − | |||
| − | |||
| − | |||
| − | |||
| − | |||
<p> </p> | <p> </p> | ||
| − | <p>All the information presented in the | + | <p>All the information presented in the <strong>cycle overview</strong> can be easily interpreted. Entries in four different groups can be made along a timeline containing every single day:</p> |
<table style="margin-left: auto; margin-right: auto;" border="0"> | <table style="margin-left: auto; margin-right: auto;" border="0"> | ||
<tbody> | <tbody> | ||
Revision as of 12:38, 6 February 2013
In the bottom part of the <a href="/index.php?title=MedITEX_IVF_main_page">starting window</a>, all cycles related to the selected patient are displayed.
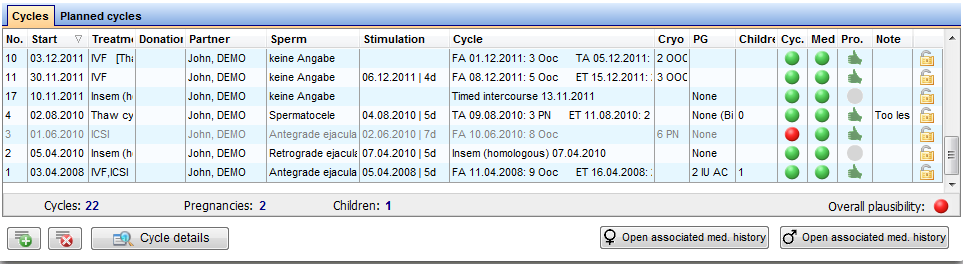 |
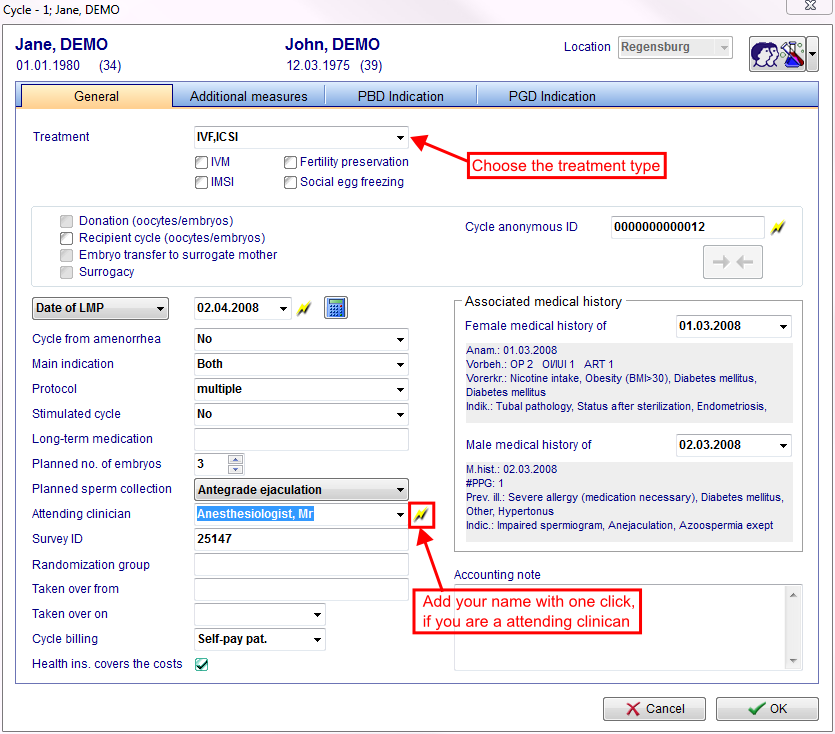
To add a new cycle, click on the Plus button at the bottom left corner of the screen. The following window will open:
 |
| <a href="/index.php?title=How_to_create_a_new_cycle%3F"><img src="/images/howto48.png" alt="" width="48" height="48" /></a> | <a href="/index.php?title=How_to_create_a_new_cycle%3F">Click here</a> to learn more about adding a new cycle. |
| <img src="/images/plus48.png" alt="" width="48" height="48" /> | <a href="/index.php?title=Cycle_Details"><img style="border: 2px dotted blue;" src="/images/CycleDetails.png" alt="" width="144" height="25" /></a> Click on Cycle details to review information of the selected cycle. |
|
<img style="border: 2px dotted blue;" src="/images/FemMedHis.png" alt="" width="177" height="29" /> <img style="border: 2px dotted blue;" src="/images/MaleMedHis.png" alt="" width="178" height="27" /> Click on these buttons to open female or male medical history associated to the selected cycle. |
| <img src="/images/hint48.png" alt="" width="48" height="48" /> | To open a cycle, double-click its entry on the list. |
Once the window has refreshed, it will display the Overview tab of the cycle. These tabs, displayed below, work similar to a timeline. They are specially positioned to recreate the normal workflow of cycles. These tabs, also referred to as summaries, will always stay on the top part of the window and they will change according to the cycle created.
 |
The summaries show the different treatment steps and have the following functions:
- They display the most important data.
- They show the status of the data and the their plausibility. These are indicated by round color symbols. If the symbol is red, put the mouse over it to know the reason.
- Click the different summaries to change between stages of the cycle.
| <img src="/images/hint48.png" alt="" width="48" height="48" /> |
|
Contents |
Overview
 |
All the information presented in the cycle overview can be easily interpreted. Entries in four different groups can be made along a timeline containing every single day:
| <img src="/images/LeftColumn.png" alt="" width="128" height="498" /> |
|
Events
 |
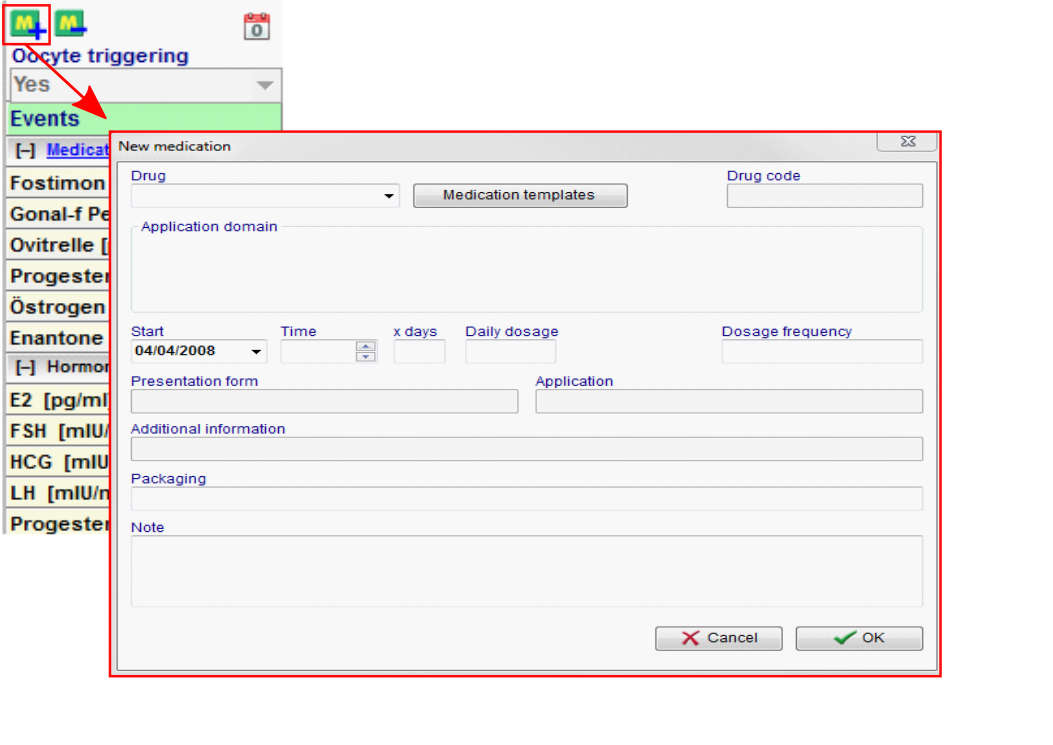
Medication
 |
MedITEX IVF provides you with a list of all main drugs that are used in reproductive-medical treatments. Additional drugs can be individually defined in the <a href="/index.php?title=MedITEX_IVF_Settings#Drugs">system settings</a>.
 |
|
To extend the time of taking drugs do the following:
- select the last medication field
-
concurrently press the "Strg button" on your keyboard and click with your mouse on the required date in your calendar.
Hormones
 |
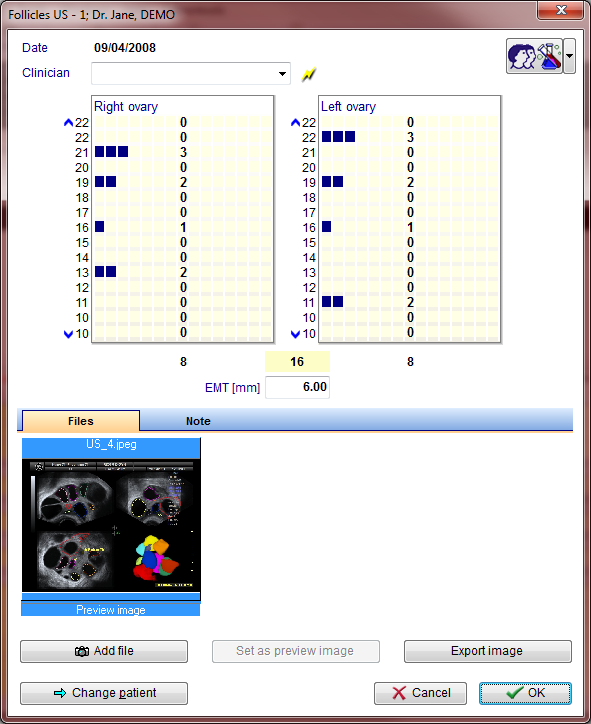
Ultrasound
 |
Aspiration
 |
OI-IUI
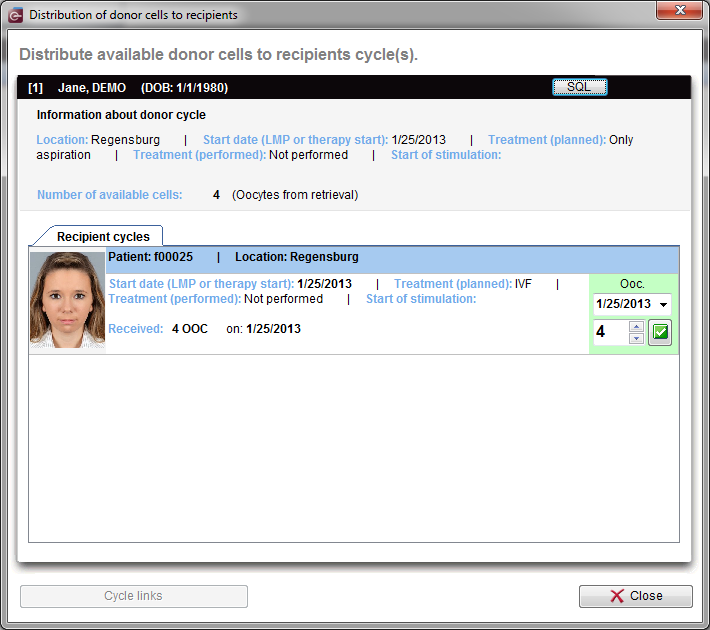
Cryo / Donation
 |
Culture
Precise documentation of every single oocyte.
Every egg cell is unique. Several methods have been developed to evaluate the development potential on cell and cleavage level. Cells are extracted, undergo a treatment, are frozen if necessary, transported, stored, thawed, cultivated again and transferred. Enough reasons to create documentation on cell level. The EU Directive "Cells and Tissue" also requires documentation on identifiability and traceability of each oocyte.
MedITEX IVF allows detailed documentation of all development stages and manipulations of each egg cell – exact to the day, including photos, scores, comments, performed analysis etc.
MedITEX IVF for the first time allows you to document complex laboratory processes realistically, for example post maturing of individual egg cells, adding of thawed oocytes or performing fertilization on the following day.
Every single obtained egg cell will be represented visually in a graphical overview. It allows entries for a maximum of ten cultivation days, although more then 5 to 6 days will most likely never be necessary. In the overview, development stages and manipulations such as insemination and injections, assisted hatching, polar body diagnosis, freezing and thawing processes, embryo transfer and more, can be assigned exact to the cell and day. All this can be done with a few mouse-clicks on the corresponding cells.
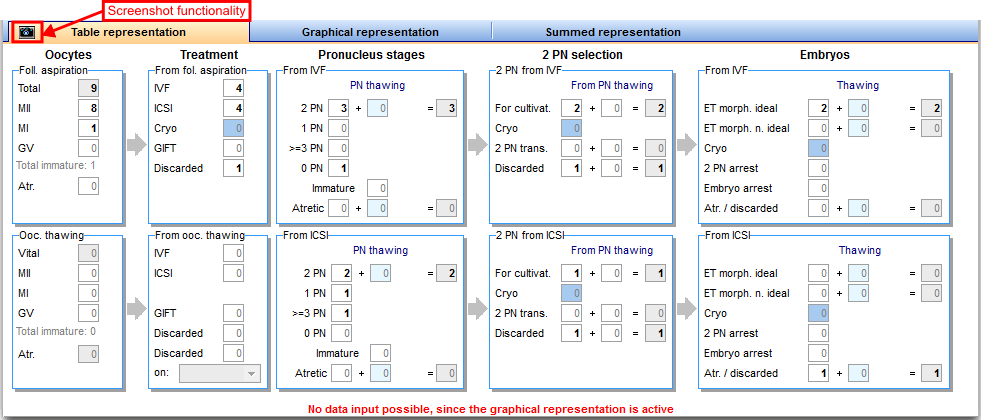
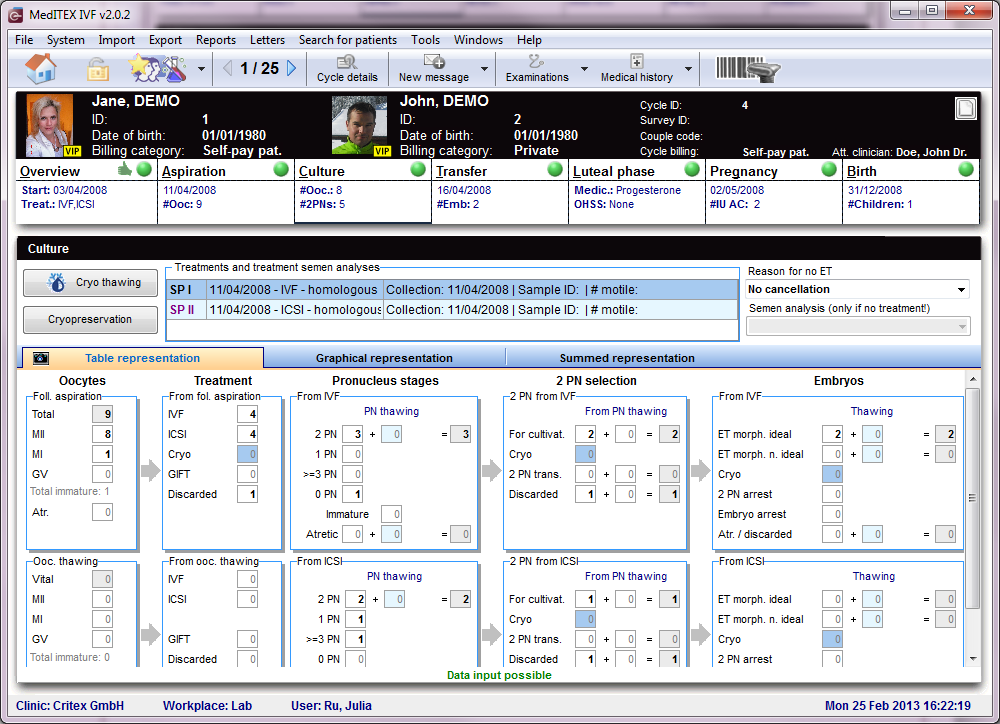
Table representation
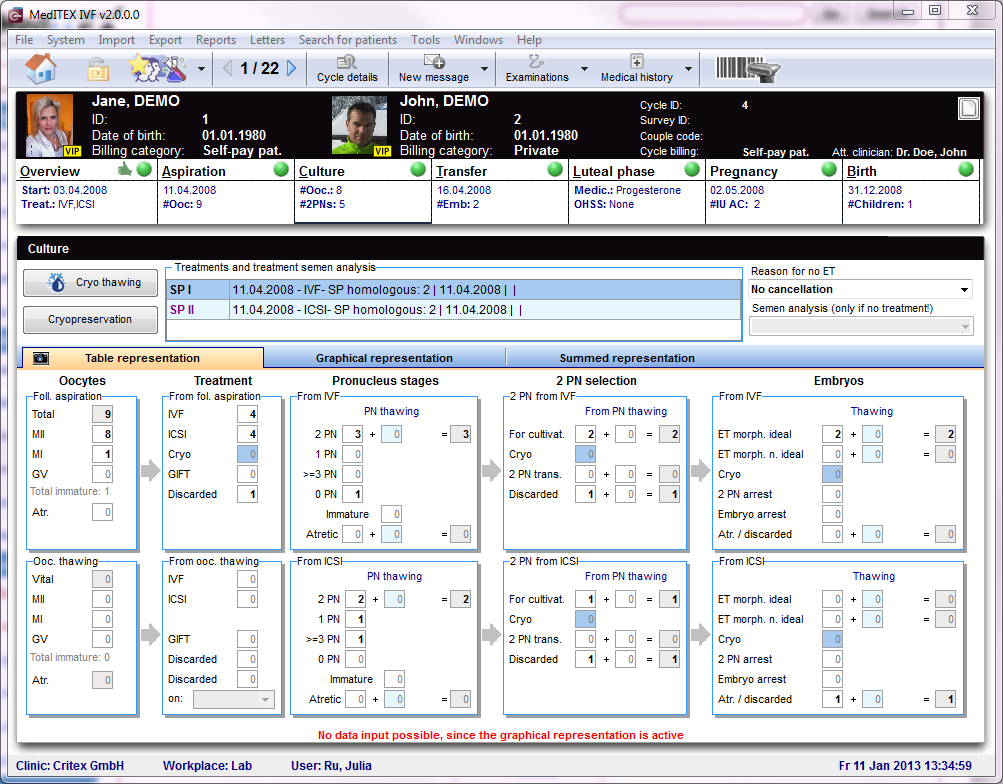 |
Before entering data you should consider if you wish to put the focus of your documentation on summarized entries, or also on the individual egg cells. In the first case you should enter the data only in the table view, while in the second you should use the graphical representation. The graphical representation can also be used to "fine-tune” entries made in the tabular view.
The table and graphical representations are linked logically. Changes made in one of the two views will also be represented in the other.
| <a href="/index.php?title=Cryo thawing"><img style="display: block; margin-left: auto; margin-right: auto; border: 2px dotted blue;" src="/images/CryoThawing.png" alt="" width="139" height="35" /></a> | |
| <img src="/images/Cryopre.png" alt="" width="137" height="31" /> |
| <img style="display: block; margin-left: auto; margin-right: auto;" src="/images/Reason.png" alt="" width="232" height="81" /> | |
| <a href="/index.php?title=Treatments and treatment semen analysis"><img style="display: block; margin-left: auto; margin-right: auto; border: 2px dotted blue;" src="/images/TreatCul.png" alt="" width="592" height="86" /></a> |
 |
Graphical representation
 |
If that appears too complex, you can quickly insert data within a table overview. There you only need to enter summarized information about obtained, treated, fertilized and transferred egg cells.
The table and graphical representations are linked logically. Changes made in one of the two views will also be represented in the other
The graphical representation can also be used to "fine-tune” entries made in the tabular view.
Summed representation
 |
An additional summed representation provides a quick overview of the culture processes. The tabs allow you to change between the views with a single mouse click.
Transfer
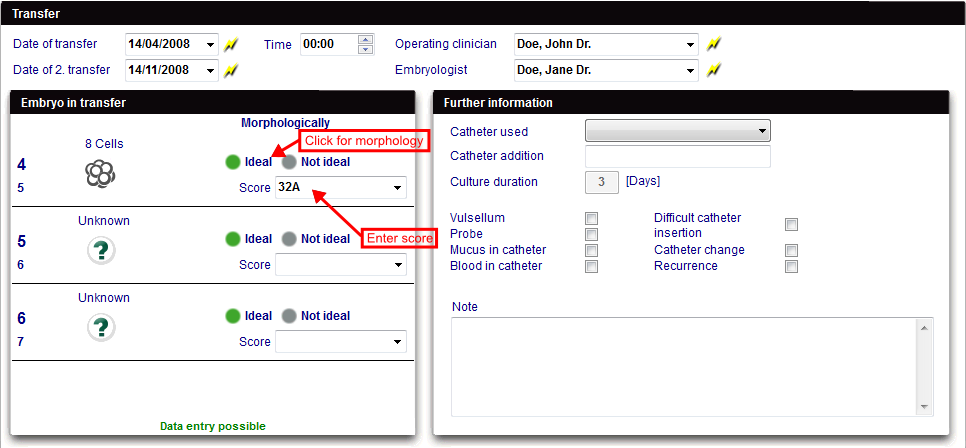 |
Luteal phase
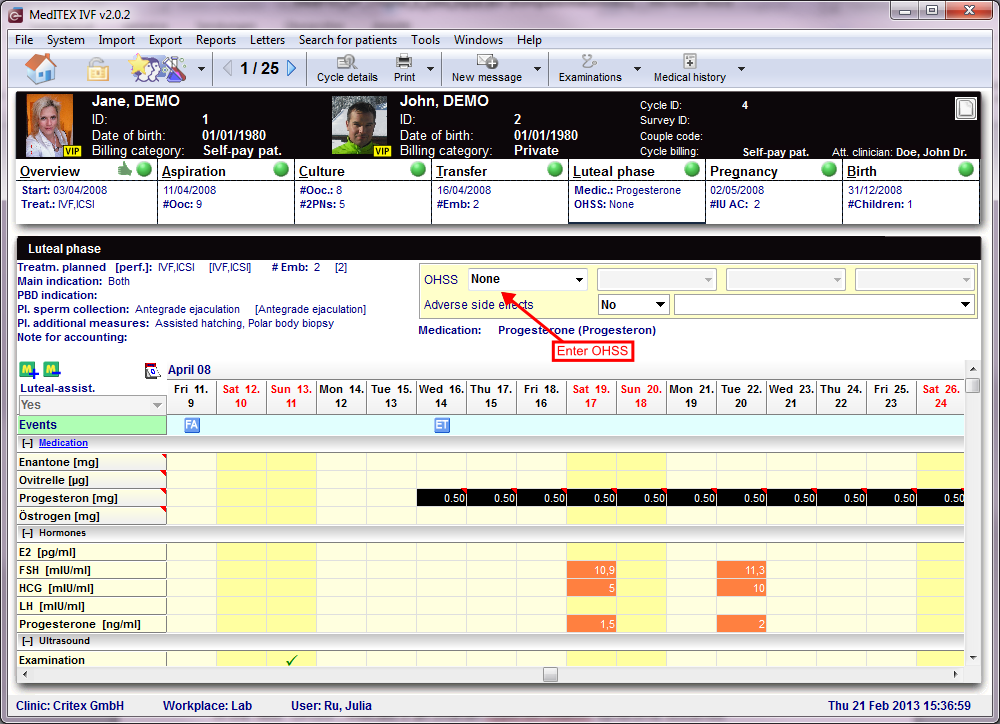 |
Pregnancy
 |
Birth
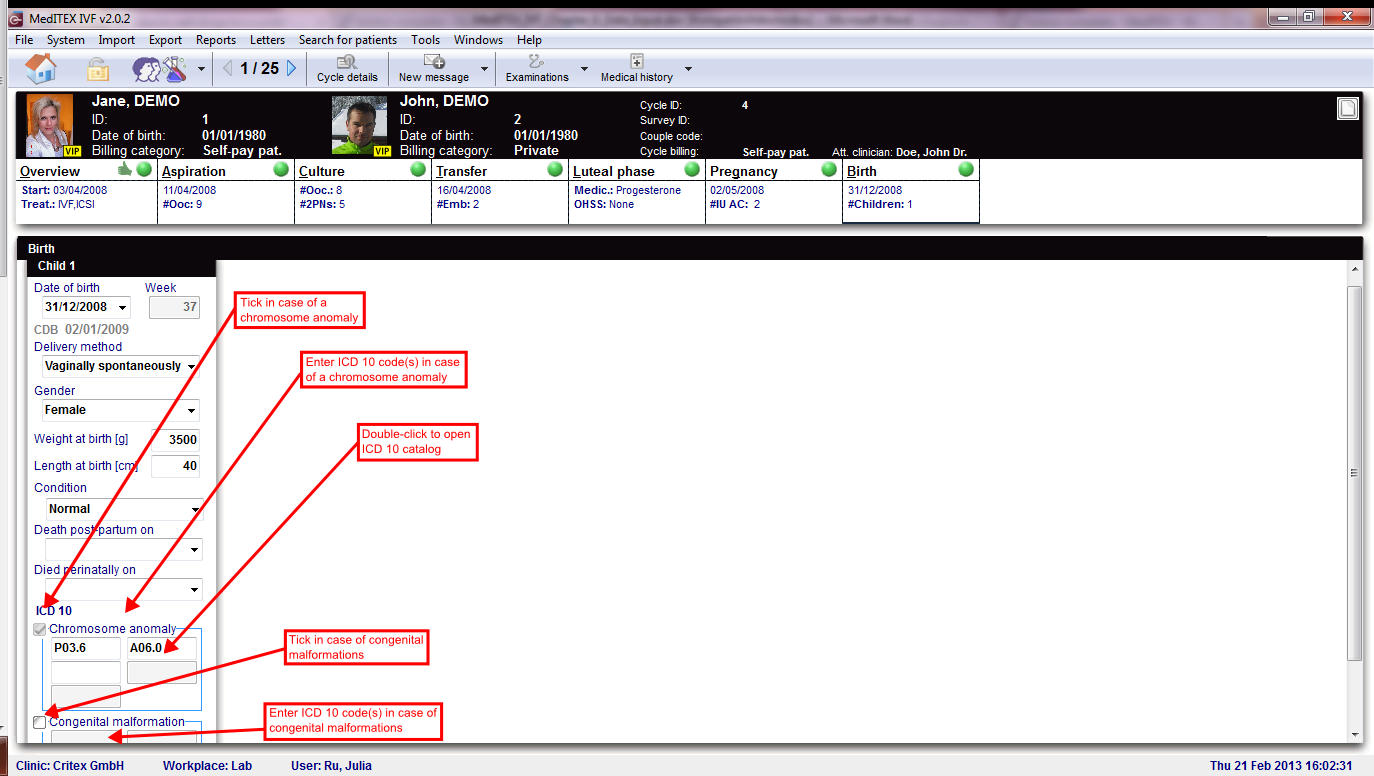 |
ICD10
| <img src="/images/ICD10.png" alt="" width="578" height="530" /> | |
| <a href="/index.php?title=MedITEX_IVF_manual">Back to the MedITEX IVF menu </a> | <a href="#top">Back to top</a> |