Cycles
From MedITEX - Wiki
| (109 intermediate revisions by 2 users not shown) | |||
| Line 1: | Line 1: | ||
| − | <p> | + | <p>At the <strong>bottom section of the <a href="/index.php?title=MedITEX_IVF_main_page">starting window</a></strong>, all cycles related to the selected patient are displayed.</p> |
<table style="margin-left: auto; margin-right: auto;" border="0"> | <table style="margin-left: auto; margin-right: auto;" border="0"> | ||
<tbody> | <tbody> | ||
| Line 8: | Line 8: | ||
</table> | </table> | ||
<p> </p> | <p> </p> | ||
| + | <p>__TOC__</p> | ||
| + | <p> </p> | ||
| + | <h2>Functionalities at the cycle area</h2> | ||
<p>Buttons with a blue dotted frame have special functionalities. Click on it to have more information.</p> | <p>Buttons with a blue dotted frame have special functionalities. Click on it to have more information.</p> | ||
| − | <table border="0"> | + | <table style="margin-left: auto; margin-right: auto;" border="0"> |
<tbody> | <tbody> | ||
| + | <tr> | ||
| + | <td style="text-align: center;"><a href="/index.php?title=Cycle_Details"><img style="display: block; margin-left: auto; margin-right: auto; border: 2px dotted blue;" src="/images/Plus.png" alt="" /></a></td> | ||
| + | <td><strong>Create/Plan new cycle</strong>: adds a new cycle.</td> | ||
| + | </tr> | ||
| + | <tr> | ||
| + | <td style="text-align: center;"><img style="display: block; margin-left: auto; margin-right: auto;" src="/images/DeleteX.png" alt="" width="26" height="24" /></td> | ||
| + | <td><strong>Delete selected cycle/planning</strong>: deletes the selected cycle from the list. This action is not easily performed as many factors can influence the deletion of a cycle. Dialogue messages will indicate possible problems.</td> | ||
| + | </tr> | ||
<tr> | <tr> | ||
<td style="text-align: center;"><a href="/index.php?title=Cycle_Details"><img style="border: 2px dotted blue;" src="/images/CycleDetails.png" alt="" /></a></td> | <td style="text-align: center;"><a href="/index.php?title=Cycle_Details"><img style="border: 2px dotted blue;" src="/images/CycleDetails.png" alt="" /></a></td> | ||
| − | <td> | + | <td><strong>Cycle details</strong>: opens a window containing the summary of the selected cycle.</td> |
</tr> | </tr> | ||
<tr> | <tr> | ||
<td><a href="/index.php?title=Create_a_new_entry_in_medical_history#Creating_a_male_Medical_History"><img style="border: 2px dotted blue; display: block; margin-left: auto; margin-right: auto;" src="/images/MaleMedHis.png" alt="" /></a></td> | <td><a href="/index.php?title=Create_a_new_entry_in_medical_history#Creating_a_male_Medical_History"><img style="border: 2px dotted blue; display: block; margin-left: auto; margin-right: auto;" src="/images/MaleMedHis.png" alt="" /></a></td> | ||
| − | <td> | + | <td><strong>Open associated male med. history</strong>: opens the male medical history.</td> |
</tr> | </tr> | ||
<tr> | <tr> | ||
| − | <td><a href="/index.php?title=Create_a_new_entry_in_medical_history#Creating_a_female_Medical_History"><img style="border: 2px dotted blue; display: block; margin-left: auto; margin-right: auto;" src="/images/FemMedHis.png" alt="" width=" | + | <td><a href="/index.php?title=Create_a_new_entry_in_medical_history#Creating_a_female_Medical_History"><img style="border: 2px dotted blue; display: block; margin-left: auto; margin-right: auto;" src="/images/FemMedHis.png" alt="" /></a></td> |
| − | <td> | + | <td><strong>Open associated female med. history</strong>: opens the female medical history.</td> |
| + | </tr> | ||
| + | <tr> | ||
| + | <td><img style="display: block; margin-left: auto; margin-right: auto;" src="/images/hint48.png" alt="" width="48" height="48" /></td> | ||
| + | <td>To open a cycle, <strong>double-click</strong> its entry on the list.</td> | ||
</tr> | </tr> | ||
<tr> | <tr> | ||
<td><a href="/index.php?title=How_to_create_a_new_cycle%3F"><img style="display: block; margin-left: auto; margin-right: auto;" src="/images/howto48.png" alt="" width="48" height="48" /></a></td> | <td><a href="/index.php?title=How_to_create_a_new_cycle%3F"><img style="display: block; margin-left: auto; margin-right: auto;" src="/images/howto48.png" alt="" width="48" height="48" /></a></td> | ||
<td><a href="/index.php?title=How_to_create_a_new_cycle%3F">Click here</a> to learn more about <strong>adding a new cycle</strong>.</td> | <td><a href="/index.php?title=How_to_create_a_new_cycle%3F">Click here</a> to learn more about <strong>adding a new cycle</strong>.</td> | ||
| − | |||
| − | |||
| − | |||
| − | |||
</tr> | </tr> | ||
</tbody> | </tbody> | ||
</table> | </table> | ||
<p> </p> | <p> </p> | ||
| − | <h2> | + | <h2>Types of cycles</h2> |
| + | <p>The most important entry at the creation of a new cycle is the type of the treatment.</p> | ||
| + | <p>These are all available <strong>Treatments</strong>.</p> | ||
<table border="0"> | <table border="0"> | ||
<tbody> | <tbody> | ||
<tr> | <tr> | ||
| − | <td | + | <td><img src="/images/newtreat1.png" alt="" width="316" height="281" /></td> |
| + | <td> | ||
| + | <p> </p> | ||
| + | <p>Click on individual treatments to get more information about their structure, processes and possible inputs.</p> | ||
| + | <p> </p> | ||
| + | <ul> | ||
| + | <li><a href="/index.php?title=IVF, ICSI, IVF ICSI, GIFT">IVF</a></li> | ||
| + | <li><a href="/index.php?title=IVF, ICSI, IVF ICSI, GIFT">ICSI</a></li> | ||
| + | <li><a href="/index.php?title=IVF,_ICSI,_IVF_ICSI,_GIFT">IVF, ICSI</a></li> | ||
| + | <li><a href="/index.php?title=IVF, ICSI, IVF ICSI, GIFT">GIFT</a></li> | ||
| + | <li><a href="/index.php?title=Thaw_and_Reception_only_cycles">Thaw cycle</a></li> | ||
| + | <li><a href="/index.php?title=Timed intercourse, Insemination">Timed intercourse</a></li> | ||
| + | <li><a href="/index.php?title=Timed intercourse, Insemination">Insem (homologous)</a></li> | ||
| + | <li><a href="/index.php?title=Timed intercourse, Insemination">Insem (heterologous)</a></li> | ||
| + | <li><a href="/index.php?title=Diagnostic cycle">Diag. cycle</a></li> | ||
| + | <li><a href="/index.php?title=Only aspiration">Only aspiration</a></li> | ||
| + | <li><a href="/index.php?title=Thaw_and_Reception_only_cycles">Only reception</a></li> | ||
| + | <li><a href="/index.php?title=Ovarian tissue removal">Ovarian tissue removal</a></li> | ||
| + | </ul> | ||
| + | </td> | ||
</tr> | </tr> | ||
</tbody> | </tbody> | ||
</table> | </table> | ||
<p> </p> | <p> </p> | ||
| − | < | + | <h2>Top section</h2> |
<table style="margin-left: auto; margin-right: auto;" border="0"> | <table style="margin-left: auto; margin-right: auto;" border="0"> | ||
<tbody> | <tbody> | ||
<tr> | <tr> | ||
| − | <td>[[Image: | + | <td colspan="2">[[Image:Cycle2+.png|none|740px|thumb|left|link=http://wiki.meditex-software.com/images/Cycle2+.png| ]]<br /></td> |
| − | + | ||
| − | + | ||
| − | + | ||
| − | + | ||
| − | + | ||
| − | + | ||
| − | + | ||
| − | + | ||
| − | + | ||
| − | + | ||
| − | + | ||
| − | + | ||
| − | + | ||
| − | + | ||
| − | + | ||
| − | + | ||
| − | + | ||
| − | + | ||
| − | + | ||
| − | + | ||
| − | </td> | + | |
</tr> | </tr> | ||
</tbody> | </tbody> | ||
</table> | </table> | ||
<p> </p> | <p> </p> | ||
| + | <p>Once you <strong>create </strong>or <strong>select a cycle</strong> from the starting window, the window is refreshed to <strong>display this cycle's information</strong>.</p> | ||
| + | <p>Some other buttons will be displayed depending on the selected tab and they will be described separately in each tab.</p> | ||
<h3>Buttons</h3> | <h3>Buttons</h3> | ||
| − | |||
<p>Buttons with a blue dotted frame have special functionalities. Click on them to have further information.</p> | <p>Buttons with a blue dotted frame have special functionalities. Click on them to have further information.</p> | ||
<table style="margin-left: auto; margin-right: auto;" border="0"> | <table style="margin-left: auto; margin-right: auto;" border="0"> | ||
| Line 91: | Line 103: | ||
<a href="/index.php?title=Free_/_QM_fields"><img style="display: block; margin-left: auto; margin-right: auto; border: 2px dotted blue;" src="/images/QMIconContent.png" alt="" width="88" height="35" /></a></td> | <a href="/index.php?title=Free_/_QM_fields"><img style="display: block; margin-left: auto; margin-right: auto; border: 2px dotted blue;" src="/images/QMIconContent.png" alt="" width="88" height="35" /></a></td> | ||
<td> | <td> | ||
| − | <p><strong>QM / free fields</strong>: click on this button to access the <strong>QM field</strong> section related to this area. Or click on the right arrow to block <strong>QM fields</strong> | + | <p><strong>QM / free fields</strong>: click on this button to access the <strong>QM field</strong> section related to this area. Or click on the right arrow to block <strong>QM fields,</strong> to see the change log or scan a barcode.</p> |
| − | <p>< | + | <p> </p> |
| + | <p>The <strong>star </strong>on the left corner of this icon indicates that information is <strong>included </strong>in the <strong>QM field</strong>.</p> | ||
</td> | </td> | ||
</tr> | </tr> | ||
<tr> | <tr> | ||
<td style="text-align: left;"><img style="display: block; margin-left: auto; margin-right: auto;" src="/images/LeftRightArrows.png" alt="" width="38" height="25" /></td> | <td style="text-align: left;"><img style="display: block; margin-left: auto; margin-right: auto;" src="/images/LeftRightArrows.png" alt="" width="38" height="25" /></td> | ||
| − | <td>Go one cycle back/forward.</td> | + | <td>Go one cycle <strong>back/forward</strong>.</td> |
</tr> | </tr> | ||
<tr> | <tr> | ||
| Line 112: | Line 125: | ||
</tr> | </tr> | ||
<tr> | <tr> | ||
| − | <td><a href="/index.php?title= | + | <td><a href="/index.php?title=Examinations#Examination_Overview"><img style="display: block; margin-left: auto; margin-right: auto; border: 2px dotted blue;" src="/images/ExamBigger.png" alt="" width="95" height="35" /></a></td> |
<td><strong>Examinations</strong>: opens the last examination. Click on the arrow to see all past evaluations.<br /></td> | <td><strong>Examinations</strong>: opens the last examination. Click on the arrow to see all past evaluations.<br /></td> | ||
</tr> | </tr> | ||
| Line 122: | Line 135: | ||
</table> | </table> | ||
<p> </p> | <p> </p> | ||
| − | < | + | <h3>Tabs</h3> |
| + | <p>The<strong> top section</strong> of this screen <strong>does not change</strong>. You will always see the buttons displayed on top, the patient's information and <strong>tabs</strong>. These tabs (image below), <strong>work similar to a time-line</strong>. They are specially positioned to recreate the <strong>normal work-flow </strong>of a particular cycle. They are also referred to as summaries and will change according to the cycle created.</p> | ||
<table style="margin-left: auto; margin-right: auto;" border="0"> | <table style="margin-left: auto; margin-right: auto;" border="0"> | ||
<tbody> | <tbody> | ||
<tr> | <tr> | ||
| − | <td> | + | <td><a href="/index.php?title=Cycles#Overview"><img src="/images/CycleTimeline.png" alt="" width="765" height="52" /></a><br /></td> |
| − | < | + | |
| − | </td> | + | |
</tr> | </tr> | ||
| − | |||
| − | |||
| − | |||
| − | |||
| − | |||
| − | |||
<tr> | <tr> | ||
| − | |||
| − | |||
| − | |||
| − | |||
| − | |||
| − | |||
| − | |||
| − | |||
| − | |||
| − | |||
| − | |||
| − | |||
| − | |||
| − | |||
<td> | <td> | ||
| + | <p>The <strong>summaries </strong>show the <strong>different treatment steps</strong> and have the following functions:</p> | ||
<ul> | <ul> | ||
| − | <li><strong> | + | <li>They <strong>display </strong>the<strong> most important data</strong>.</li> |
| + | <li>They <strong>show the status </strong>of the data and their <strong>plausibility</strong>. These are indicated by <strong>round colour symbols</strong>. If the symbol is <span style="color: #ff0000;"><strong>red</strong></span>, put the <strong>mouse over </strong>it to know the reason.</li> | ||
| + | <li><strong>Click </strong>the different summaries<strong> to change between</strong> stages of the cycle.</li> | ||
| + | <li>Summaries are generated <strong>dynamically </strong>and adjusted according to <strong>treatment type</strong>.</li> | ||
| + | <li>The cycle is <strong>plausible </strong>if information has been entered in <strong>all relevant treatment steps</strong> and only green warnings are visible. Also, the information needs to be filled in a certain time frame. This is called <strong> prospectivity</strong>. A cycle is said to be prospective if it displays a green thumbs up. These are the symbols used for <strong>prospectivity </strong>and <strong> plausibility</strong>: <img src="/images/ProspectivityPlausability.png" alt="" width="34" height="16" />.</li> | ||
</ul> | </ul> | ||
| − | + | </td> | |
| − | + | ||
| − | + | ||
| − | + | ||
| − | + | ||
| − | + | ||
| − | + | ||
| − | + | ||
| − | + | ||
| − | + | ||
| − | + | ||
| − | + | ||
| − | + | ||
</tr> | </tr> | ||
</tbody> | </tbody> | ||
</table> | </table> | ||
<p> </p> | <p> </p> | ||
| + | <p>More information about <strong>tabs </strong>can be accessed from the <strong>Types of cycles</strong> above. Alternatively, here is full list of all <strong>cycle tabs</strong>:</p> | ||
<table style="margin-left: auto; margin-right: auto;" border="0"> | <table style="margin-left: auto; margin-right: auto;" border="0"> | ||
<tbody> | <tbody> | ||
<tr> | <tr> | ||
| − | <td><img src="/images/ | + | <td><img src="/images/plus129.png" alt="" width="129" height="129" /></td> |
| − | + | ||
| − | + | ||
| − | + | ||
| − | + | ||
| − | + | ||
| − | + | ||
| − | + | ||
| − | + | ||
| − | + | ||
| − | + | ||
| − | + | ||
| − | + | ||
| − | + | ||
| − | + | ||
| − | + | ||
| − | + | ||
| − | + | ||
| − | + | ||
| − | + | ||
| − | + | ||
| − | + | ||
| − | + | ||
| − | + | ||
| − | + | ||
| − | + | ||
| − | + | ||
| − | + | ||
| − | + | ||
| − | + | ||
| − | + | ||
| − | + | ||
| − | + | ||
| − | + | ||
| − | + | ||
| − | + | ||
| − | + | ||
| − | + | ||
| − | + | ||
| − | + | ||
| − | + | ||
| − | + | ||
| − | + | ||
| − | + | ||
| − | + | ||
<td> | <td> | ||
<ul> | <ul> | ||
| − | <li> | + | <li><a href="/index.php?title=Cycle_Overview">Overview</a></li> |
| − | </ | + | <li><a href="/index.php?title=Cycle_Aspiration">Aspiration</a></li> |
| − | < | + | <li><a href="/index.php?title=Cycle_Culture">Culture</a></li> |
| − | <li> | + | <li><a href="/index.php?title=Cycle_Transfer">Transfer</a></li> |
| − | < | + | <li><a href="/index.php?title=Cycle_Luteal_phase">Luteal phase</a></li> |
| − | </li> | + | <li><a href="/index.php?title=Cycle_Pregnancy">Pregnancy</a></li> |
| − | </ | + | <li><a href="/index.php?title=Cycle_Birth">Birth</a></li> |
| − | < | + | <li><a href="/index.php?title=Cycle_OI-IUI">OI-IUI</a></li> |
| − | <li>< | + | <li><a href="/index.php?title=Cycle_Cryo">Cryo</a></li> |
| − | <li> | + | <li><a href="/index.php?title=Cycle_Removal">Removal</a></li> |
</ul> | </ul> | ||
</td> | </td> | ||
| Line 237: | Line 179: | ||
</tbody> | </tbody> | ||
</table> | </table> | ||
| − | |||
| − | |||
| − | |||
| − | |||
| − | |||
| − | |||
| − | |||
| − | |||
| − | |||
| − | |||
| − | |||
| − | |||
| − | |||
| − | |||
| − | |||
| − | |||
| − | |||
| − | |||
| − | |||
| − | |||
| − | |||
| − | |||
| − | |||
| − | |||
| − | |||
| − | |||
| − | |||
| − | |||
| − | |||
| − | |||
| − | |||
| − | |||
| − | |||
| − | |||
| − | |||
| − | |||
| − | |||
| − | |||
| − | |||
| − | |||
| − | |||
| − | |||
| − | |||
| − | |||
| − | |||
| − | |||
| − | |||
| − | |||
| − | |||
| − | |||
| − | |||
| − | |||
| − | |||
| − | |||
| − | |||
| − | |||
| − | |||
| − | |||
| − | |||
| − | |||
| − | |||
| − | |||
| − | |||
<p> </p> | <p> </p> | ||
<table style="margin-left: auto; margin-right: auto;" border="0"> | <table style="margin-left: auto; margin-right: auto;" border="0"> | ||
<tbody> | <tbody> | ||
<tr> | <tr> | ||
| − | <td | + | <td><img src="/images/plus48.png" alt="" width="48" height="48" /></td> |
| − | < | + | <td> |
| − | </ | + | <p>Press the <strong>QM button</strong> to add staff, material, times or free fields.</p> |
| − | < | + | <p>You need to define QM domains in the <a href="/index.php?title=MedITEX_IVF_Settings#Free_.2F_QM_fields">settings</a> before you can use them.</p> |
| − | < | + | <p>More informations about using <strong>QM fields</strong> can be found <a href="/index.php?title=Free_/_QM_fields">here</a>.</p> |
| − | + | </td> | |
</tr> | </tr> | ||
</tbody> | </tbody> | ||
</table> | </table> | ||
| − | |||
| − | |||
| − | |||
| − | |||
| − | |||
| − | |||
| − | |||
| − | |||
| − | |||
| − | |||
| − | |||
| − | |||
| − | |||
| − | |||
| − | |||
| − | |||
| − | |||
| − | |||
| − | |||
| − | |||
| − | |||
| − | |||
| − | |||
| − | |||
| − | |||
| − | |||
| − | |||
| − | |||
| − | |||
| − | |||
| − | |||
| − | |||
| − | |||
| − | |||
| − | |||
| − | |||
| − | |||
| − | |||
| − | |||
| − | |||
| − | |||
| − | |||
| − | |||
| − | |||
| − | |||
| − | |||
| − | |||
| − | |||
| − | |||
| − | |||
| − | |||
| − | |||
| − | |||
| − | |||
| − | |||
| − | |||
| − | |||
| − | |||
| − | |||
| − | |||
| − | |||
| − | |||
| − | |||
| − | |||
| − | |||
| − | |||
| − | |||
| − | |||
| − | |||
| − | |||
| − | |||
| − | |||
| − | |||
| − | |||
| − | |||
| − | |||
| − | |||
| − | |||
| − | |||
| − | |||
| − | |||
| − | |||
| − | |||
| − | |||
| − | |||
| − | |||
| − | |||
| − | |||
| − | |||
| − | |||
| − | |||
| − | |||
| − | |||
| − | |||
| − | |||
| − | |||
| − | |||
| − | |||
| − | |||
<table style="float: right;" border="0"> | <table style="float: right;" border="0"> | ||
<tbody> | <tbody> | ||
| Line 420: | Line 200: | ||
</tbody> | </tbody> | ||
</table> | </table> | ||
| − | |||
Latest revision as of 14:03, 17 June 2013
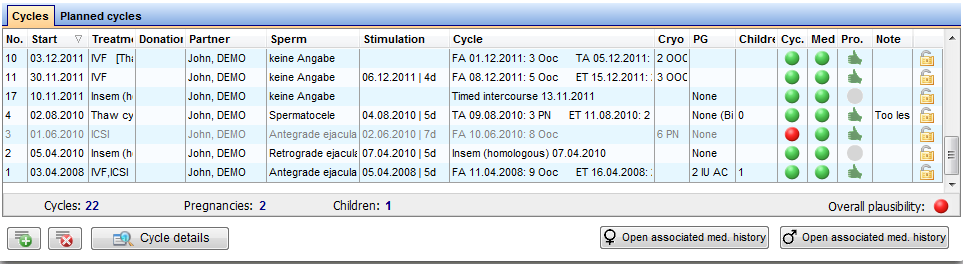
At the bottom section of the <a href="/index.php?title=MedITEX_IVF_main_page">starting window</a>, all cycles related to the selected patient are displayed.
 |
Contents |
Functionalities at the cycle area
Buttons with a blue dotted frame have special functionalities. Click on it to have more information.
| <a href="/index.php?title=Cycle_Details"><img style="display: block; margin-left: auto; margin-right: auto; border: 2px dotted blue;" src="/images/Plus.png" alt="" /></a> | Create/Plan new cycle: adds a new cycle. |
| <img style="display: block; margin-left: auto; margin-right: auto;" src="/images/DeleteX.png" alt="" width="26" height="24" /> | Delete selected cycle/planning: deletes the selected cycle from the list. This action is not easily performed as many factors can influence the deletion of a cycle. Dialogue messages will indicate possible problems. |
| <a href="/index.php?title=Cycle_Details"><img style="border: 2px dotted blue;" src="/images/CycleDetails.png" alt="" /></a> | Cycle details: opens a window containing the summary of the selected cycle. |
| <a href="/index.php?title=Create_a_new_entry_in_medical_history#Creating_a_male_Medical_History"><img style="border: 2px dotted blue; display: block; margin-left: auto; margin-right: auto;" src="/images/MaleMedHis.png" alt="" /></a> | Open associated male med. history: opens the male medical history. |
| <a href="/index.php?title=Create_a_new_entry_in_medical_history#Creating_a_female_Medical_History"><img style="border: 2px dotted blue; display: block; margin-left: auto; margin-right: auto;" src="/images/FemMedHis.png" alt="" /></a> | Open associated female med. history: opens the female medical history. |
| <img style="display: block; margin-left: auto; margin-right: auto;" src="/images/hint48.png" alt="" width="48" height="48" /> | To open a cycle, double-click its entry on the list. |
| <a href="/index.php?title=How_to_create_a_new_cycle%3F"><img style="display: block; margin-left: auto; margin-right: auto;" src="/images/howto48.png" alt="" width="48" height="48" /></a> | <a href="/index.php?title=How_to_create_a_new_cycle%3F">Click here</a> to learn more about adding a new cycle. |
Types of cycles
The most important entry at the creation of a new cycle is the type of the treatment.
These are all available Treatments.
| <img src="/images/newtreat1.png" alt="" width="316" height="281" /> |
Click on individual treatments to get more information about their structure, processes and possible inputs.
|
Top section
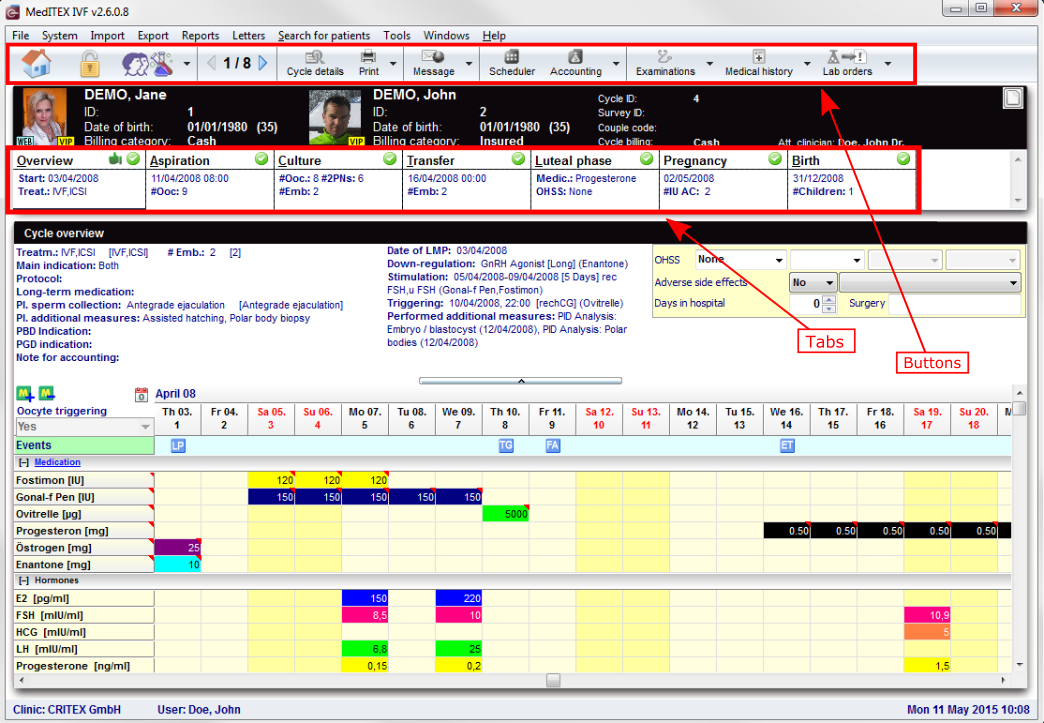 |
Once you create or select a cycle from the starting window, the window is refreshed to display this cycle's information.
Some other buttons will be displayed depending on the selected tab and they will be described separately in each tab.
Buttons
Buttons with a blue dotted frame have special functionalities. Click on them to have further information.
| <a href="/index.php?title=MedITEX_IVF_main_page"><img style="display: block; margin-left: auto; margin-right: auto; border: 2px dotted blue;" src="/images/homeico.jpg" alt="" /></a> | Home: click on this button to go to the starting window. |
| <a href="/index.php?title=Locking_of_data"><img style="display: block; margin-left: auto; margin-right: auto; border: 2px dotted blue;" src="/images/LockIco.png" alt="" width="48" height="36" /></a> | Lock cycle: click on this button to complete lock this cycle from editing. |
| <a href="/index.php?title=Free_/_QM_fields"><img style="display: block; margin-left: auto; margin-right: auto; border: 2px dotted blue;" src="/images/QMIcon.png" alt="" width="88" height="36" /></a>
<a href="/index.php?title=Free_/_QM_fields"><img style="display: block; margin-left: auto; margin-right: auto; border: 2px dotted blue;" src="/images/QMIconContent.png" alt="" width="88" height="35" /></a> |
QM / free fields: click on this button to access the QM field section related to this area. Or click on the right arrow to block QM fields, to see the change log or scan a barcode.
The star on the left corner of this icon indicates that information is included in the QM field. |
| <img style="display: block; margin-left: auto; margin-right: auto;" src="/images/LeftRightArrows.png" alt="" width="38" height="25" /> | Go one cycle back/forward. |
| <a href="/index.php?title=Cycle_Details"><img style="display: block; margin-left: auto; margin-right: auto; border: 2px dotted blue;" src="/images/CycleDetailsBigger.png" alt="" width="77" height="35" /></a> | Cycle details: opens a window containing the summary of the selected cycle. |
| <img style="display: block; margin-left: auto; margin-right: auto;" src="/images/PrintSmaller.png" alt="" width="53" height="35" /> | Print: click the arrow to choose one of the printing options. |
| <img style="display: block; margin-left: auto; margin-right: auto;" src="/images/NewMessage.png" alt="" /> | New message: click on this button to send a message to the patient. This message can be an SMS or a web portal message. |
| <a href="/index.php?title=Examinations#Examination_Overview"><img style="display: block; margin-left: auto; margin-right: auto; border: 2px dotted blue;" src="/images/ExamBigger.png" alt="" width="95" height="35" /></a> | Examinations: opens the last examination. Click on the arrow to see all past evaluations. |
| <a href="/index.php?title=Create_a_new_entry_in_medical_history#Creating_a_Medical_History"><img style="display: block; margin-left: auto; margin-right: auto; border: 2px dotted blue;" src="/images/MedicalHistoryBigger.png" alt="" width="104" height="35" /></a> | Medical history: by default this button opens the female patient medical history. Click on the arrow to select the male. |
Tabs
The top section of this screen does not change. You will always see the buttons displayed on top, the patient's information and tabs. These tabs (image below), work similar to a time-line. They are specially positioned to recreate the normal work-flow of a particular cycle. They are also referred to as summaries and will change according to the cycle created.
| <a href="/index.php?title=Cycles#Overview"><img src="/images/CycleTimeline.png" alt="" width="765" height="52" /></a> |
|
The summaries show the different treatment steps and have the following functions:
|
More information about tabs can be accessed from the Types of cycles above. Alternatively, here is full list of all cycle tabs:
| <img src="/images/plus129.png" alt="" width="129" height="129" /> |
|
| <img src="/images/plus48.png" alt="" width="48" height="48" /> |
Press the QM button to add staff, material, times or free fields. You need to define QM domains in the <a href="/index.php?title=MedITEX_IVF_Settings#Free_.2F_QM_fields">settings</a> before you can use them. More informations about using QM fields can be found <a href="/index.php?title=Free_/_QM_fields">here</a>. |
| <a href="/index.php?title=MedITEX_IVF_manual">Back to the MedITEX IVF menu </a> | <a href="#top">Back to top</a> |