Creare una nuova voce in Anamnesi
From MedITEX - Wiki
| Line 90: | Line 90: | ||
<tr> | <tr> | ||
<td><a href="/index.php?title=Campi_liberi_/_QM"><img style="display: block; margin-left: auto; margin-right: auto; border: 2px dotted blue;" src="/images/QMButton.png" alt="" width="73" height="41" /></a></td> | <td><a href="/index.php?title=Campi_liberi_/_QM"><img style="display: block; margin-left: auto; margin-right: auto; border: 2px dotted blue;" src="/images/QMButton.png" alt="" width="73" height="41" /></a></td> | ||
| − | <td style="text-align: justify;"> | + | <td style="text-align: justify;">Accesso ai campi <strong>QM </strong>relativi a quest'area o cliccando sulla freccina è possibile accedere al blocco della sezione o al log delle modifiche.</td> |
</tr> | </tr> | ||
<tr> | <tr> | ||
Revision as of 16:42, 19 April 2016
| <img src="/images/creare_Anam_1_IT.png" alt="" width="353" height="195" /> |
Per creare una nuova Anamnesi, una nota o un messaggio di Attenzione cliccare sul freccia alla destra dell'icona Nuovo elemento e scegliere l'opzione desiderata. La lista può essere estesa indefinatmente. E' possibile aggiungere nuove voci nella lista nelle impostazioni --><a href="/index.php?title=MedITEX_IVF_Impostazioni#Tabelle_di_sistema">Tabelle di sistema</a>. Per modificare le voci dell'Anamnesi:
|
Contents |
Creare una Nota o un messaggio di Attenzione
Quando vengono selezionate le opzioni Note o Attenzione si aprirà la seguente finestra (l'unica differenza sarà l'intestazione):
| <img src="/images/creare_Anam_2_IT.png" alt="" width="750" height="775" /> |
Spiegazione dei campi/icone:
- Data: data della registrazione del documento. Cliccando il fulmine giallo comparirà la data corrente.
- Da: autore del documento o della nota.
- QM: l'icona dei campi QM permette l'accesso ai campi QM associati a quel documento.
- Naviga: cliccando sulle frecce è possibile passare da un documento all'altro relativi a quel paziente.
- Area Testo: sezione in cui è possibile inserire testo libero/note.
- Riquadro per documenti da allegare: è possibile trascinre documenti o immagini all'interno della nota/Attenzione nel campo sul fondo della finestra. Questi documenti allegati possono essere aperti facendo doppio click sull'icona con la lente di ingrandimento.
- Apri directory paziente: aprire la directory che contiene tutti i file relativi a quel paziente.
- Aggiungi documento: permette di sfogliare le varie directory per aggiungere un singolo documento.
- E' possibile assegnare note/attenzione a tutti i pazienti. Queste sono voci di testo libero in cui è possibile inserire la data, lo status (Normal/Anormale), nome dell'autore e un file allegato.
- Le note o i messaggi che sono particolarmente importanti, clinicamente rilevanti o devo essere modificati possono essere evidenziati con lo status "Anormale".
- Nelle overview dell' Anamnesi sono visibili tutte le note e i messaggi ordinati per data. I loro rispettivi status possono essere visualizzati nella parte destra dell' overview.
- Le voci nell' overview possono essere ordinate e filtrate cliccando nell'intestazione della colonna per cui si vuole ordinare. Possono essere anche raggruppate trascinando le intestazioni nella posizione desiderata. I cambiamenti possono essere salvati e non si perdono.
- Le note /messaggi possono essere modificate facendo doppio click nella riga relativa; è possibile cancellare una nota selezionando la riga relativa e premendo Canc nella tastiera.
| <img src="/images/creare_Anam_3_IT.png" alt="" width="306" height="91" /> |
Cliccando su OK le Note/messaggi di Attenzione si creeranno e verranno pubblicati nella pagina principale. I messaggi di Attenzione saranno visualizzati in rosso mentre le note saranno visualizzate in nero. |
Creare un Consulto preserv. fertilità / congelamento "sociale"
Nella sezione Anamnesi è possibile trovare una voce per il consulto per la preservazione della fertilità/Congelamento sociale. Queste voci sono visibili nella pagina principale della tab messaggi.
| <img src="/images/creare_Anam_4_IT.png" alt="" width="713" height="707" /> |
Per assegnare ai cicli gli scopi di preservazione della fertilità o congelamento sociale è necessario selezionare le opzione relative in Dettagli ciclo sotto il campo che identifica il tipo di trattamento. E' possibile saperne di più nella sezione "<a href="/index.php?title=Dettagli_Ciclo">nuovo ciclo</a>".
Creare un' Anamnesi
La finestra relativa all' Anamnesi è diversa nel caso del paziente uomo e della paziente donna.
Creare un'anamnesi femminile
Se si seleziona Anamnesi quando il paziente è una donna si aprirà la seguente finestra:
| <img src="/images/creare_Anam_5_IT.png" alt="" width="750" height="679" /> |
I pulsanti circondati da puntini blu in questa Wiki hanno funzionalità speciali. Cliccare sopra per avere maggiori informazioni su quella particolare sezione del programma.
| <a href="/index.php?title=Campi_liberi_/_QM"><img style="display: block; margin-left: auto; margin-right: auto; border: 2px dotted blue;" src="/images/QMButton.png" alt="" width="73" height="41" /></a> | Accesso ai campi QM relativi a quest'area o cliccando sulla freccina è possibile accedere al blocco della sezione o al log delle modifiche. |
| <a href="/index.php?title=Create_a_new_entry_in_medical_history#Documenting_previous_pregnancies"><img style="display: block; margin-left: auto; margin-right: auto; border: 2px dotted blue;" src="/images/GravidaParaRed.png" alt="" width="321" height="32" /></a> | Document previous pregnancies outcome. |
| <a href="/index.php?title=Create_a_new_entry_in_medical_history#Documenting_examination_findings"><img style="display: block; margin-left: auto; margin-right: auto; border: 2px dotted blue;" src="/images/Exam.png" alt="" /></a> | Document examinations findings related to the Medical History. |
- The fields with red backgrounds have to be filled as a requirement.
- From this page it is possible to access to the previous pregnancies section and to to the examination section.
- When all the data you need to document are inserted just press OK.
- If at least one previous Medical History exists, the system will ask if the user wants to retrieve data from the most recent Medical History.
- If the date of the new Medical History is left empty or is prior to the date of an existing Medical History, the system will ask if the date of the Initial consultation should be updated to the date of this new Medical History.
| <img style="display: block; margin-left: auto; margin-right: auto;" src="/images/plus48.png" alt="" width="48" height="48" /> |
You can edit the options for the previous illnesses and sterility factors in the settings under <a href="/index.php?title=MedITEX_IVF_Settings#System_tables">system tables</a>. |
Documenting previous pregnancies
Clicking on the "Gravida: Para:" area, the following window:
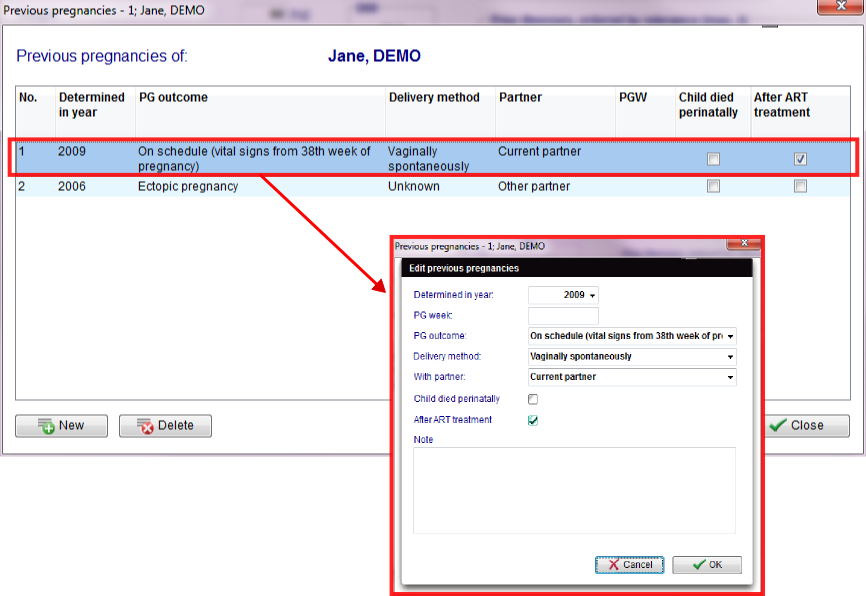 |
- In this new window, you will see a list of all pregnancies assigned to this Medical History.
- To document a pregnancy just click on the button New.
- If you want to edit a pregnancy, double click it.
- It is also possible to remove a mistakenly documented pregnancy. Select it and click on Delete.
| <img src="/images/hint48.png" alt="" width="48" height="48" /> | Previous pregnancies information is only editable if you open this window from inside a Medical history. |
If the Medical history entries are correct, a green circle will appear on the right side in the column Status. Otherwise, a red warning symbol will appear. Put the mouse over the red circle to check the incorrect information.
Documenting examination findings
It is possible to link examination findings to a Medical History. In order to do that, click on the button Examination located at the bottom of the Medical history window. The following window will open:
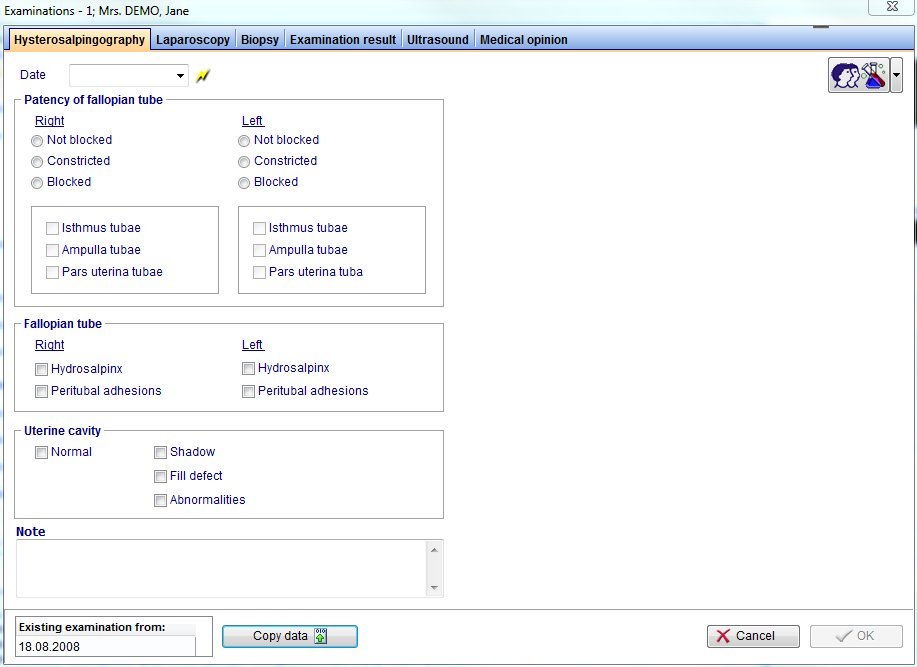 |
In the examination section it is possible to document several exams. If you want to import data from an existing examination, select the desired examination and press the Copy data button. When all the data you need to document are inserted, press OK.
| <img src="/images/ExDocument.png" alt="" width="32" height="22" /> | If you document data in a examination you will see this sign in the status column at the examination window. |
Creating a male Medical History
If Medical History is selected when the selected patient is a man the following window will open:
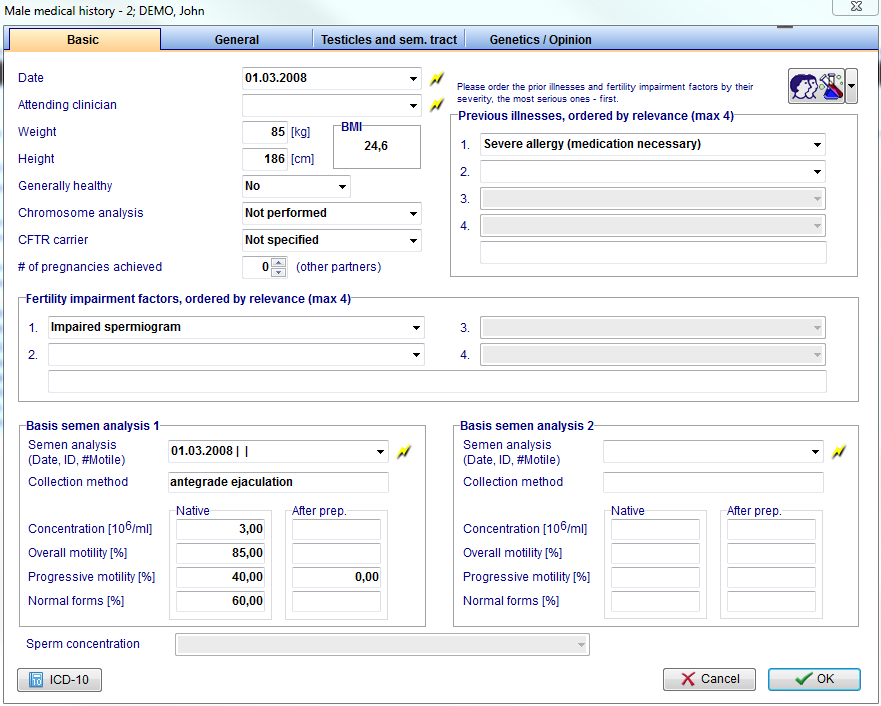 |
Buttons with a blue dotted frame have special functionalities. Click on it to have more information.
| <a href="/index.php?title=Free_/_QM_fields"><img style="display: block; margin-left: auto; margin-right: auto; border: 2px dotted blue;" src="/images/QMButton.png" alt="" width="73" height="41" /></a> | Access the QM field section related to this area or click on the right arrow to block the QM fields or to see the change log. |
| <a href="/index.php?title=Documenting_a_new_sample#Documenting_a_semen_analysis"><img style="display: block; margin-left: auto; margin-right: auto; border: 2px dotted blue;" src="/images/Semen1.png" alt="" /></a> |
A maximum of two basis semen analysis can be assigned to each Medical history. There are two ways to do this: Double click on the empty field or press the lightning icon to create a new semen analysis and link it to the Medical History. Click on Sperm concentration if no semen analysis is available. |
- The fields with red backgrounds have to be filled as a requirement.
- When all the data you need to document are inserted, press OK.
- If at least one previous Medical History exists, the system will ask if the user wants to retrieve data from the most recent Medical History.
- If the date of the new Medical History is left empty or is prior to the date of an existing Medical History, the system will ask if the date of the Initial consultation should be updated to the date of this new Medical History.
If the Medical history entries are correct, a green circle will appear on the right side in the column Status. Otherwise, a red warning symbol will appear. Put the mouse over the red circle to check the incorrect information.
| <img style="display: block; margin-left: auto; margin-right: auto;" src="/images/plus48.png" alt="" width="48" height="48" /> |
You can edit the options for the fertility impairment factors and previous illnesses in the settings under <a href="/index.php?title=MedITEX_IVF_Settings#System_tables">system tables</a>. |
| <a href="/index.php?title=MedITEX_IVF_manual">Back to the MedITEX IVF menu </a> | <a href="#top">Back to top</a> |