Come donare ovociti o embrioni crioconservati?
From MedITEX - Wiki
| Line 1: | Line 1: | ||
| − | <p> | + | <p>Per donare ovociti a fresco, sono necessari alcuni prerequisiti che devono essere impostati. </p> |
| − | <h3> | + | <h3>Donatrice</h3> |
| − | <p> | + | <p>L'opzione<strong><span> La persona è:</span> Donatrice (Ovo/Embr.)</strong> deve essere impostata per la donatrice di ovociti. Seguendo questi passaggi:<strong><br /></strong></p> |
<ul> | <ul> | ||
| − | <li> | + | <li>Cliccare su <strong>Anagrafica</strong> (femminile) poi fare doppio click nel riquadro verde sulla destra dello schermo. </li> |
</ul> | </ul> | ||
| − | <table | + | <table border="0"> |
<tbody> | <tbody> | ||
<tr> | <tr> | ||
| − | <td> | + | <td><img src="/images/Come_donatrice_1_IT.png" alt="" width="770" height="220" /></td> |
</tr> | </tr> | ||
</tbody> | </tbody> | ||
</table> | </table> | ||
<ul> | <ul> | ||
| − | <li> | + | <li>Si aprirà la pagina <strong>Informazioni persona e donatrice</strong>, selezionare l'opzione <strong>Donatrice (ovo/Embr.)</strong> nella sezione<span><strong> La persona è:</strong></span></li> |
</ul> | </ul> | ||
| − | <table | + | <table border="0"> |
<tbody> | <tbody> | ||
<tr> | <tr> | ||
| − | <td><img src="/images/ | + | <td><img src="/images/Come_donatrice_2_IT.png" alt="" width="770" height="228" /></td> |
</tr> | </tr> | ||
</tbody> | </tbody> | ||
</table> | </table> | ||
<p> </p> | <p> </p> | ||
| − | <p> | + | <p>Andare alla paziente ricevente.</p> |
<p> </p> | <p> </p> | ||
| − | <h3> | + | <h3>Ricevente</h3> |
| − | <p> | + | <p>L'opzione <strong><span>La persona necessita</span>: Donatrice (Ovo/Embr.)</strong> deve essere selezionata per la ricevente di ovociti. Questi sono i passaggi:</p> |
<ul> | <ul> | ||
| − | <li> | + | <li>Cliccare su <strong>Anagrafica</strong> (femminile) poi fare doppio click nel riquadro verde sulla destra dello schermo.</li> |
</ul> | </ul> | ||
| − | <table | + | <table border="0"> |
<tbody> | <tbody> | ||
<tr> | <tr> | ||
| − | <td> | + | <td><img src="/images/Come_necessita_d_1_IT.png" alt="" width="770" height="221" /></td> |
</tr> | </tr> | ||
</tbody> | </tbody> | ||
</table> | </table> | ||
<ul> | <ul> | ||
| − | <li> | + | <li>Si aprirà la pagina <strong>Informazioni persona e donatrice</strong>, selezionare solo l'opzione <strong>Donatrice (ovo/Embr.)</strong> nella sezione<strong> La persona necessita:</strong></li> |
</ul> | </ul> | ||
| − | <table | + | <table border="0"> |
<tbody> | <tbody> | ||
<tr> | <tr> | ||
| − | <td><img src="/images/ | + | <td><img src="/images/Come_necessita_d_2_IT.png" alt="" width="770" height="223" /></td> |
</tr> | </tr> | ||
</tbody> | </tbody> | ||
</table> | </table> | ||
| − | < | + | <h3><span style="font-size: 1.5em;">Ciclo Donatrice</span></h3> |
| − | + | <p>Per creare un ciclo premere sul '<strong>+</strong>' nell'angolo in basso a sinistra della finestra principale della paziente.</p> | |
| − | <p> | + | |
<table style="margin-left: auto; margin-right: auto;" border="0"> | <table style="margin-left: auto; margin-right: auto;" border="0"> | ||
<tbody> | <tbody> | ||
| Line 58: | Line 57: | ||
</table> | </table> | ||
<p> </p> | <p> </p> | ||
| − | <p> | + | <p>Creare il ciclo <strong>Solo Pick Up</strong> o <strong>FIVET, ICSI o FIVET/ICSI</strong> e selezionare l'opzione <strong>Donazione (ovo/emb)</strong>.</p> |
<table style="margin-left: auto; margin-right: auto;" border="0"> | <table style="margin-left: auto; margin-right: auto;" border="0"> | ||
<tbody> | <tbody> | ||
| Line 69: | Line 68: | ||
</table> | </table> | ||
<p> </p> | <p> </p> | ||
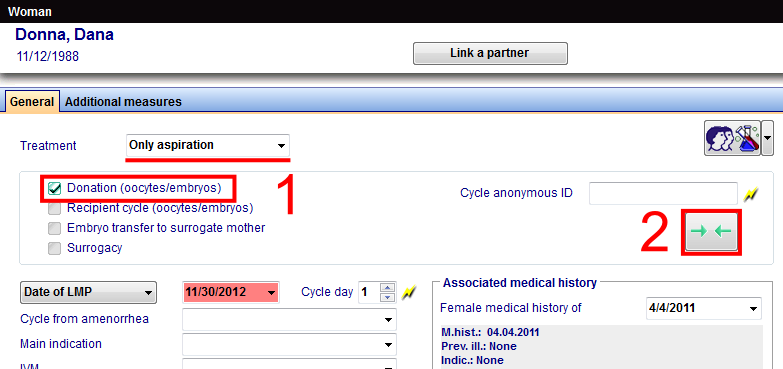
| − | <p> | + | <p>Dopo aver creato il ciclo selezionare la tab <strong>Pick Up</strong> e inseire il numero di ovociti prelevati.</p> |
| − | <p> | + | <p>Successivamente selezionare la tab <strong>Crio/Donazione</strong>. Attivare la <strong>Rappresentazione Grafica</strong> e selezionare le cellule desiderate (1). Con il tasto destro del mpuse scegliere l'opzione <strong>Crioconservazione</strong>. La finestra di crioconservazione si aprirà e sara necessario inserire tuttl le informazioni necessarie e selezionare l'opzione <strong>Per donazione</strong> (2).</p> |
<table style="margin-left: auto; margin-right: auto;" border="0"> | <table style="margin-left: auto; margin-right: auto;" border="0"> | ||
<tbody> | <tbody> | ||
| Line 81: | Line 80: | ||
</table> | </table> | ||
<p> </p> | <p> </p> | ||
| − | |||
<table style="margin-left: auto; margin-right: auto;" border="0"> | <table style="margin-left: auto; margin-right: auto;" border="0"> | ||
<tbody> | <tbody> | ||
| Line 90: | Line 88: | ||
</table> | </table> | ||
<p style="text-align: center;"> </p> | <p style="text-align: center;"> </p> | ||
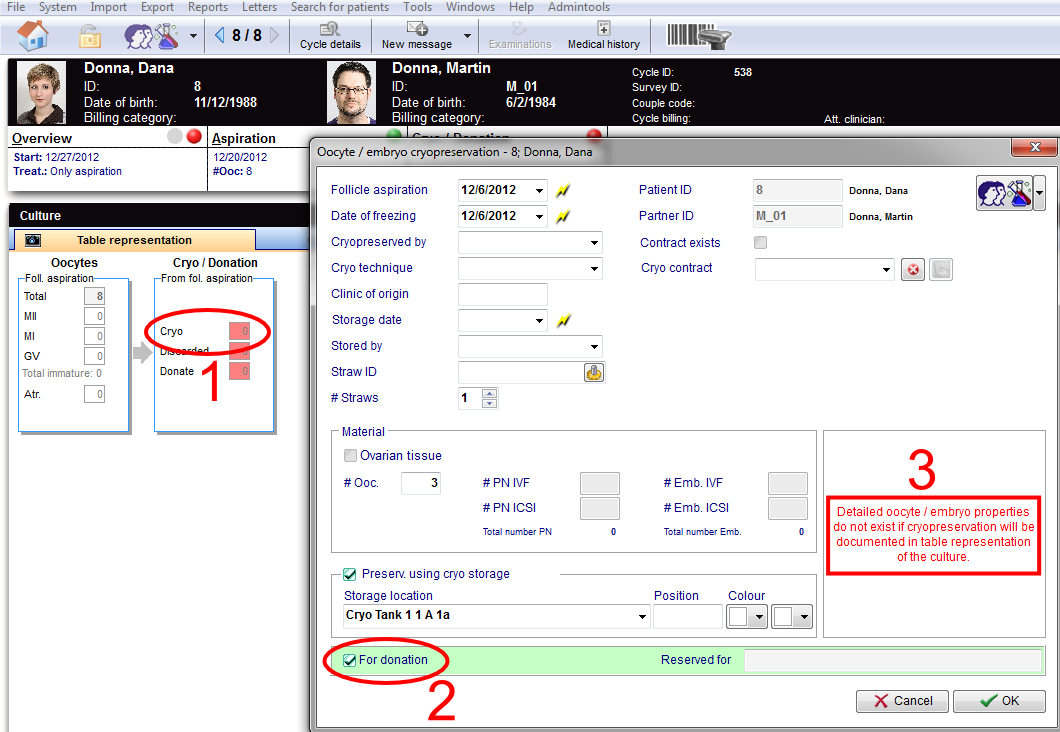
| − | <p> | + | <p>Un altro modo per crioconservare le cellule aspirate è attraverso la <strong>Rappresentazione tabellare</strong>. Facendo doppio-click sulla cella rossa <strong>Crio </strong>(1). La finestra di crioconservazione si aprirà e sara necessario inserire tuttl le informazioni necessarie e selezionare l'opzione <strong>Per donazione</strong> (2).</p> |
| − | <p><em> | + | <p><em>Nota: utilizzando la rappresentazione tabellare non sarà possibile registrare informazioni per le singole cellule (3). </em></p> |
<table style="margin-left: auto; margin-right: auto;" border="0"> | <table style="margin-left: auto; margin-right: auto;" border="0"> | ||
<tbody> | <tbody> | ||
| Line 102: | Line 100: | ||
</table> | </table> | ||
<p> </p> | <p> </p> | ||
| − | |||
<table style="margin-left: auto; margin-right: auto;" border="0"> | <table style="margin-left: auto; margin-right: auto;" border="0"> | ||
<tbody> | <tbody> | ||
| Line 111: | Line 108: | ||
</table> | </table> | ||
<p> </p> | <p> </p> | ||
| − | <h2> | + | <h2>Riservare pailette</h2> |
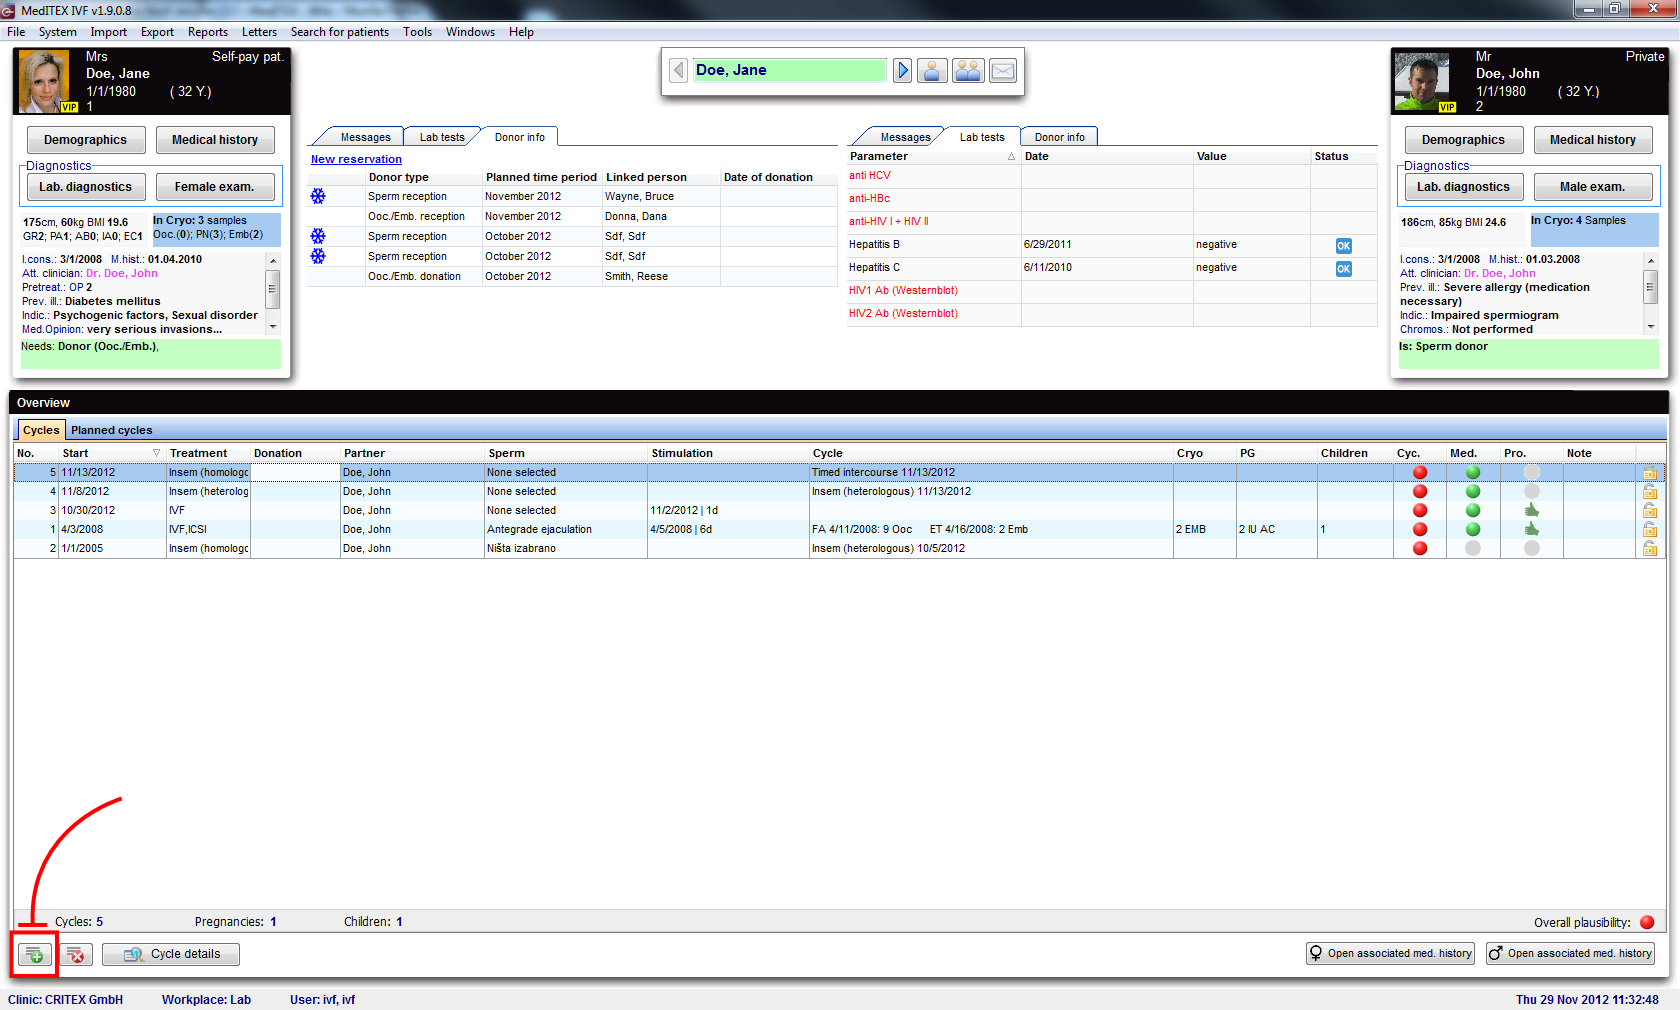
| − | <p> | + | <p>Dopo aver crioconservato il materiale, è necessario riservare le pailette per continuare con il processo di donazione.</p> |
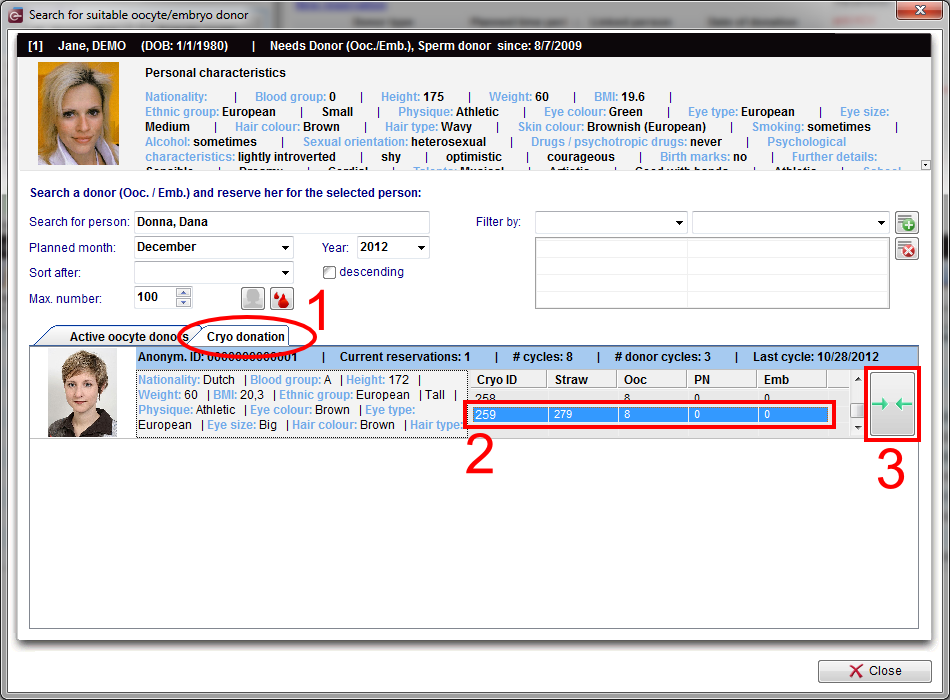
| − | <p> | + | <p>Nell'overview della ricevente, aprire la tab <strong>Info Donatore-->Nuova prenotazione</strong>. Scegliere la tab <strong>Donazione Crio</strong> (1) cercare la donatrice e selezionare le pailette da riservare (2). Cliccare sul pulsante di collegamento (3).</p> |
<table style="margin-left: auto; margin-right: auto;" border="0"> | <table style="margin-left: auto; margin-right: auto;" border="0"> | ||
<tbody> | <tbody> | ||
| Line 124: | Line 121: | ||
</table> | </table> | ||
<p> </p> | <p> </p> | ||
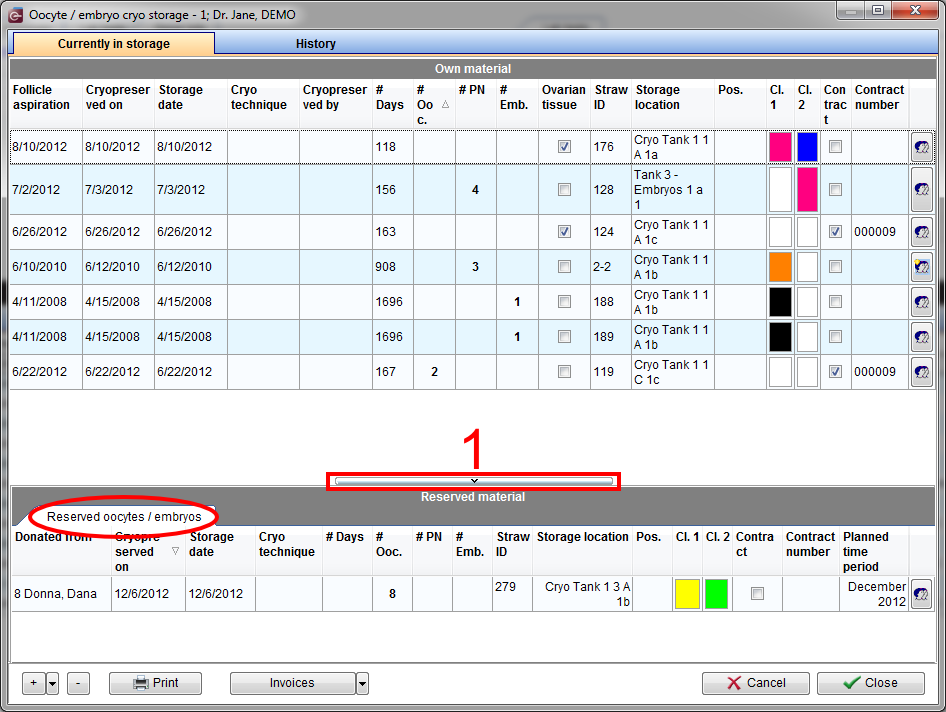
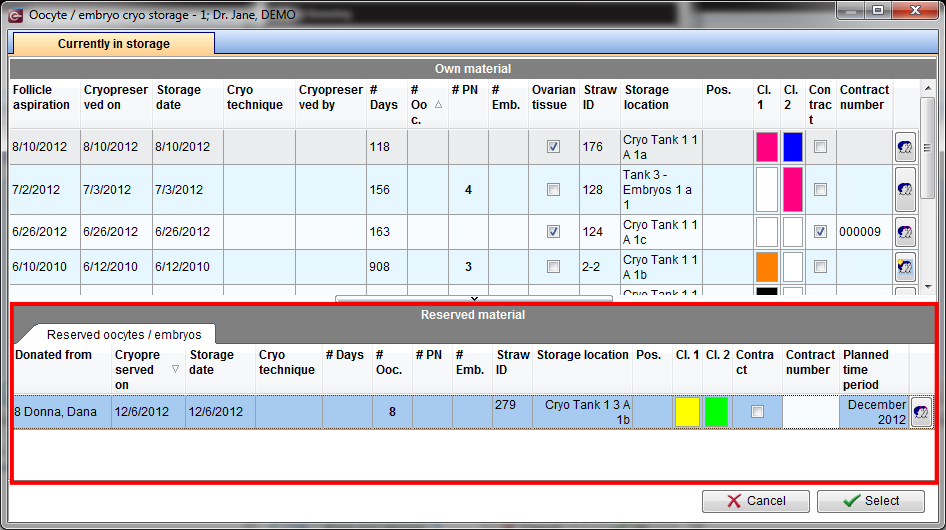
| − | <p> | + | <p>Le pailette così riservate saranno visibili dalla sezione crio della ricevente. Dall'overview della paziente fare doppio-click sulla sezione blu.</p> |
<table style="margin-left: auto; margin-right: auto;" border="0"> | <table style="margin-left: auto; margin-right: auto;" border="0"> | ||
<tbody> | <tbody> | ||
| Line 134: | Line 131: | ||
<p style="text-align: center;"> </p> | <p style="text-align: center;"> </p> | ||
<p> </p> | <p> </p> | ||
| − | <p> | + | <p>Se la sezione <strong>Materiale riservato</strong> non è visibile, cliccare la barra sul fondo della finestra(1).</p> |
<table style="margin-left: auto; margin-right: auto;" border="0"> | <table style="margin-left: auto; margin-right: auto;" border="0"> | ||
<tbody> | <tbody> | ||
| Line 145: | Line 142: | ||
</table> | </table> | ||
<p> </p> | <p> </p> | ||
| − | <h2> | + | <h2>Ciclo da scongelamento della Ricevente</h2> |
| − | <p> | + | <p>Ora è necessario creare il ciclo della Ricevente.</p> |
| − | <p> | + | <p>Cliccare nuovamente sul '<strong>+</strong>' nell'angolo in basso a sinistra della finestra principale della paziente. Scegliete <strong>Scong./Transfer da Scong</strong> e selezionare l'opzione <strong>Ric (OVO/EMB)</strong>.</p> |
<table style="margin-left: auto; margin-right: auto;" border="0"> | <table style="margin-left: auto; margin-right: auto;" border="0"> | ||
<tbody> | <tbody> | ||
| Line 156: | Line 153: | ||
</table> | </table> | ||
<p> </p> | <p> </p> | ||
| − | <p> | + | <p>Dal ciclo appena creato selezionare la tab <strong>Coltura</strong>, e attivare la <strong>Rappresentazione Grafica</strong>. Cliccare <strong>Scongelamento</strong> e tre finestre si apriranno contemporaneamente.</p> |
<table style="margin-left: auto; margin-right: auto;" border="0"> | <table style="margin-left: auto; margin-right: auto;" border="0"> | ||
<tbody> | <tbody> | ||
| Line 165: | Line 162: | ||
</table> | </table> | ||
<p> </p> | <p> </p> | ||
| − | <p> | + | <p>Sulla prima finestra, selezionare le pailette riservate dalla sezione <strong>Materiale riservate </strong>e confermare premendo <strong>Seleziona</strong>.</p> |
<table style="margin-left: auto; margin-right: auto;" border="0"> | <table style="margin-left: auto; margin-right: auto;" border="0"> | ||
<tbody> | <tbody> | ||
| Line 176: | Line 173: | ||
</table> | </table> | ||
<p> </p> | <p> </p> | ||
| − | <p> | + | <p>La finestra successiva sarà automaticamente riempita con le informazioni delle pailette scongelate. Inserire le informazioni mancanti e cliccare <strong>OK</strong>.</p> |
<table style="margin-left: auto; margin-right: auto;" border="0"> | <table style="margin-left: auto; margin-right: auto;" border="0"> | ||
<tbody> | <tbody> | ||
| Line 185: | Line 182: | ||
</table> | </table> | ||
<p> </p> | <p> </p> | ||
| − | <p> | + | <p>L'ultima finestra mostrerà lo storico delle pailette precedentemente scongelate per la paziente in questo ciclo. Chiudere la finestra e le cellule appariranno sulla coltura del ciclo.</p> |
<table style="margin-left: auto; margin-right: auto;" border="0"> | <table style="margin-left: auto; margin-right: auto;" border="0"> | ||
<tbody> | <tbody> | ||
| Line 194: | Line 191: | ||
</table> | </table> | ||
<p> </p> | <p> </p> | ||
| − | <p> | + | <p>Per scongelare ulteriori pailette ripetere i passi precedenti.</p> |
<p> </p> | <p> </p> | ||
| − | <h2> | + | <h2>Tracciabilità cellule</h2> |
<table style="margin-left: auto; margin-right: auto;" border="0"> | <table style="margin-left: auto; margin-right: auto;" border="0"> | ||
<tbody> | <tbody> | ||
<tr> | <tr> | ||
<td><img src="/images/plus48.png" alt="" width="48" height="48" /></td> | <td><img src="/images/plus48.png" alt="" width="48" height="48" /></td> | ||
| − | <td> | + | <td>La tracciabilità delle cellule funziona anche in cicli da scongelamento. <a href="/index.php?title=Donazioni#Tracciabilit.C3.A0_cellula">Cliccare qui</a> per ulteriori informazioni.</td> |
</tr> | </tr> | ||
</tbody> | </tbody> | ||
| Line 210: | Line 207: | ||
<tbody> | <tbody> | ||
<tr> | <tr> | ||
| − | <td style="text-align: right;"><a href="/index.php?title= | + | <td style="text-align: right;"><a href="/index.php?title=MedITEX_IVF_come_fare">Torna a Come Fare</a></td> |
| − | <td style="text-align: right;"><a href="#top"> | + | <td style="text-align: right;"><a href="#top">Inizio pagina</a></td> |
</tr> | </tr> | ||
</tbody> | </tbody> | ||
</table> | </table> | ||
Revision as of 18:00, 2 May 2016
Per donare ovociti a fresco, sono necessari alcuni prerequisiti che devono essere impostati.
Contents |
Donatrice
L'opzione La persona è: Donatrice (Ovo/Embr.) deve essere impostata per la donatrice di ovociti. Seguendo questi passaggi:
- Cliccare su Anagrafica (femminile) poi fare doppio click nel riquadro verde sulla destra dello schermo.
| <img src="/images/Come_donatrice_1_IT.png" alt="" width="770" height="220" /> |
- Si aprirà la pagina Informazioni persona e donatrice, selezionare l'opzione Donatrice (ovo/Embr.) nella sezione La persona è:
| <img src="/images/Come_donatrice_2_IT.png" alt="" width="770" height="228" /> |
Andare alla paziente ricevente.
Ricevente
L'opzione La persona necessita: Donatrice (Ovo/Embr.) deve essere selezionata per la ricevente di ovociti. Questi sono i passaggi:
- Cliccare su Anagrafica (femminile) poi fare doppio click nel riquadro verde sulla destra dello schermo.
| <img src="/images/Come_necessita_d_1_IT.png" alt="" width="770" height="221" /> |
- Si aprirà la pagina Informazioni persona e donatrice, selezionare solo l'opzione Donatrice (ovo/Embr.) nella sezione La persona necessita:
| <img src="/images/Come_necessita_d_2_IT.png" alt="" width="770" height="223" /> |
Ciclo Donatrice
Per creare un ciclo premere sul '+' nell'angolo in basso a sinistra della finestra principale della paziente.
 |
Creare il ciclo Solo Pick Up o FIVET, ICSI o FIVET/ICSI e selezionare l'opzione Donazione (ovo/emb).
 |
Dopo aver creato il ciclo selezionare la tab Pick Up e inseire il numero di ovociti prelevati.
Successivamente selezionare la tab Crio/Donazione. Attivare la Rappresentazione Grafica e selezionare le cellule desiderate (1). Con il tasto destro del mpuse scegliere l'opzione Crioconservazione. La finestra di crioconservazione si aprirà e sara necessario inserire tuttl le informazioni necessarie e selezionare l'opzione Per donazione (2).
 |
| <img src="/images/DonationCryo4.png" alt="" width="495" height="498" /> |
Un altro modo per crioconservare le cellule aspirate è attraverso la Rappresentazione tabellare. Facendo doppio-click sulla cella rossa Crio (1). La finestra di crioconservazione si aprirà e sara necessario inserire tuttl le informazioni necessarie e selezionare l'opzione Per donazione (2).
Nota: utilizzando la rappresentazione tabellare non sarà possibile registrare informazioni per le singole cellule (3).
 |
| <img src="/images/DonationCryo2.png" alt="" width="268" height="208" /> |
Riservare pailette
Dopo aver crioconservato il materiale, è necessario riservare le pailette per continuare con il processo di donazione.
Nell'overview della ricevente, aprire la tab Info Donatore-->Nuova prenotazione. Scegliere la tab Donazione Crio (1) cercare la donatrice e selezionare le pailette da riservare (2). Cliccare sul pulsante di collegamento (3).
 |
Le pailette così riservate saranno visibili dalla sezione crio della ricevente. Dall'overview della paziente fare doppio-click sulla sezione blu.
| <img src="/images/DonationCryo7Red.png" alt="" width="277" height="321" /> |
Se la sezione Materiale riservato non è visibile, cliccare la barra sul fondo della finestra(1).
 |
Ciclo da scongelamento della Ricevente
Ora è necessario creare il ciclo della Ricevente.
Cliccare nuovamente sul '+' nell'angolo in basso a sinistra della finestra principale della paziente. Scegliete Scong./Transfer da Scong e selezionare l'opzione Ric (OVO/EMB).
| <img src="/images/DonationCryo8Red.png" alt="" width="291" height="179" /> |
Dal ciclo appena creato selezionare la tab Coltura, e attivare la Rappresentazione Grafica. Cliccare Scongelamento e tre finestre si apriranno contemporaneamente.
| <img src="/images/DonationCryo9Red.png" alt="" width="210" height="120" /> |
Sulla prima finestra, selezionare le pailette riservate dalla sezione Materiale riservate e confermare premendo Seleziona.
 |
La finestra successiva sarà automaticamente riempita con le informazioni delle pailette scongelate. Inserire le informazioni mancanti e cliccare OK.
| <img src="/images/DonationCryo11Red.png" alt="" width="451" height="599" /> |
L'ultima finestra mostrerà lo storico delle pailette precedentemente scongelate per la paziente in questo ciclo. Chiudere la finestra e le cellule appariranno sulla coltura del ciclo.
| <img src="/images/DonationCryo12.png" alt="" width="414" height="581" /> |
Per scongelare ulteriori pailette ripetere i passi precedenti.
Tracciabilità cellule
| <img src="/images/plus48.png" alt="" width="48" height="48" /> | La tracciabilità delle cellule funziona anche in cicli da scongelamento. <a href="/index.php?title=Donazioni#Tracciabilit.C3.A0_cellula">Cliccare qui</a> per ulteriori informazioni. |
| <a href="/index.php?title=MedITEX_IVF_come_fare">Torna a Come Fare</a> | <a href="#top">Inizio pagina</a> |