Come creare una nuova query?
From MedITEX - Wiki
| (4 intermediate revisions by one user not shown) | |||
| Line 3: | Line 3: | ||
<tbody> | <tbody> | ||
<tr> | <tr> | ||
| − | <td colspan="2"><img style="display: block; margin-left: auto; margin-right: auto;" src="/images/ | + | <td colspan="2"><img style="display: block; margin-left: auto; margin-right: auto;" src="/images/Report_Editor_1_IT.png" alt="" width="462" height="289" /></td> |
</tr> | </tr> | ||
<tr> | <tr> | ||
<td><img style="display: block; margin-left: auto; margin-right: auto;" src="/images/plus48.png" alt="" width="48" height="48" /></td> | <td><img style="display: block; margin-left: auto; margin-right: auto;" src="/images/plus48.png" alt="" width="48" height="48" /></td> | ||
| − | <td><a href="/index.php?title= | + | <td><a href="/index.php?title=Queries_di_Report_editor">Cliccare qui</a> per ulteriori informazioni su report editor.</td> |
</tr> | </tr> | ||
</tbody> | </tbody> | ||
| Line 16: | Line 16: | ||
<tbody> | <tbody> | ||
<tr> | <tr> | ||
| − | <td>[[Image: | + | <td>[[Image:Come_creare_query_1_IT.png|none|740px|thumb|left|link=http://wiki.meditex-software.com/images/Come_creare_query_1_IT.png| ]]</td> |
</tr> | </tr> | ||
</tbody> | </tbody> | ||
</table> | </table> | ||
<p>__TOC__</p> | <p>__TOC__</p> | ||
| − | <h2> | + | <h2>Selezionare i campi desiderati</h2> |
| − | <p> | + | <p>Per selezionare i campi al fine di creare una <strong>query</strong> sarà necessario controllare il contenuto dei sottogruppi.</p> |
| − | <p> | + | <p>Facendo <strong>doppio-click su un gruppo</strong> tutti i <strong>sottogruppi disponibili </strong>verranno visualizzati.</p> |
| − | <p><strong> | + | <p>Facendo un<strong> doppio-click </strong>su un<strong> sotto-gruppo</strong> tutti <strong>i campi </strong>appartenenti a quel sottogruppo saranno visualizzati.</p> |
<table style="margin-left: auto; margin-right: auto;" border="0"> | <table style="margin-left: auto; margin-right: auto;" border="0"> | ||
<tbody> | <tbody> | ||
<tr> | <tr> | ||
| − | <td>[[Image: | + | <td>[[Image:Report_Editor_3_IT.png|none|740px|thumb|left|link=http://wiki.meditex-software.com/images/Report_Editor_3_IT.png| ]]</td> |
</tr> | </tr> | ||
</tbody> | </tbody> | ||
</table> | </table> | ||
<p> </p> | <p> </p> | ||
| − | <p> | + | <p>In alternativa è possibile ricercare i campi desiderati attraverso il <strong>campo di ricerca</strong>.</p> |
| − | <p> | + | <p>Per esempio, Per creare una query con i dati anagrafici della coppia, uno dei campi desiderati sarà il nome della paziente:</p> |
| − | + | ||
<table style="margin-left: auto; margin-right: auto;" border="0"> | <table style="margin-left: auto; margin-right: auto;" border="0"> | ||
<tbody> | <tbody> | ||
<tr> | <tr> | ||
| − | <td><img src="/images/ | + | <td><img src="/images/Come_creare_query_2_IT.png" alt="" width="587" height="409" /></td> |
</tr> | </tr> | ||
</tbody> | </tbody> | ||
</table> | </table> | ||
<p> </p> | <p> </p> | ||
| − | <p> | + | <p>Sarà sufficiente digitare <strong>nome</strong> nel <strong>campo di ricerca </strong>e premere <strong>Invio</strong>. Nel menù a tendina che comparirà saranno elencati tutti i campi contenente la parola nome con relativi gruppi e sottogruppi. Scegliere il campo desiderato e cliccandoci sopra.</p> |
| − | <p> | + | <p>Il gruppo contentente il campo si aprirà.</p> |
| − | <p> | + | <p>Una volta trovato il sottogruppo contentente il campo desiderato <strong>trascinarlo </strong>dalla sezione Gruppi alla sezione delle Query.</p> |
<table style="margin-left: auto; margin-right: auto;" border="0"> | <table style="margin-left: auto; margin-right: auto;" border="0"> | ||
<tbody> | <tbody> | ||
<tr> | <tr> | ||
| − | <td><img src="/images/ | + | <td><img src="/images/Come_creare_query_3_IT.png" alt="" width="700" height="249" /></td> |
</tr> | </tr> | ||
</tbody> | </tbody> | ||
</table> | </table> | ||
<p> </p> | <p> </p> | ||
| − | <p> | + | <p>Per selezionare il<strong> campo</strong> (es: Il <strong>Nome</strong>) selezionare il <strong>quadratino vuoto</strong>. </p> |
<table style="margin-left: auto; margin-right: auto;" border="0" width="51" height="24"> | <table style="margin-left: auto; margin-right: auto;" border="0" width="51" height="24"> | ||
<tbody> | <tbody> | ||
<tr> | <tr> | ||
| − | <td><img src="/images/ | + | <td><img src="/images/Come_creare_query_4_IT.png" alt="" width="700" height="500" /><br /></td> |
</tr> | </tr> | ||
</tbody> | </tbody> | ||
</table> | </table> | ||
<p> </p> | <p> </p> | ||
| − | <p> | + | <p>Se nel sottogruppo <strong>Paziente non sono presenti tutti i campi necessari</strong> per la costruzione della nostra query, sarà necessario <strong>collegare</strong> al sottogruppo Paziente un altro <strong>sottogruppo</strong> contenente i campi desiderati, ad esempio <strong>l'Anamnesi Donna</strong>. Per far questo sarà necessario selezionare il sottogruppo dalla sezione dei gruppi e trascinarlo nella sezione Query come spiegato precedentemente.</p> |
| − | + | <p>Ora i campi dell' Anamnesi Donna potranno essere selezionati. Una volta che tutti i campi necessari dell'anamnesi donna sono stati selezionati un altro sottogruppo può essere collegato sempre tramite trascinamento. Questo processo và ripetuto fino alla selezione di tutti i campi necessari per la creazione della query in questione.</p> | |
| − | <p> | + | |
<table style="margin-left: auto; margin-right: auto;" border="0"> | <table style="margin-left: auto; margin-right: auto;" border="0"> | ||
<tbody> | <tbody> | ||
<tr> | <tr> | ||
| − | <td><img style="display: block; margin-left: auto; margin-right: auto;" src="/images/ | + | <td><img style="display: block; margin-left: auto; margin-right: auto;" src="/images/Come_creare_query_7_IT.png" alt="" width="609" height="199" /></td> |
</tr> | </tr> | ||
<tr> | <tr> | ||
<td> | <td> | ||
<ul> | <ul> | ||
| − | <li> | + | <li>Tenere presente che l' <strong>ordine con cui i sottogruppi vengono inseriti </strong>nella query <strong>ha un effetto</strong> sui <strong>risultati</strong> ("cascata logica"). Nel nostro esempio nei risultati saranno presenti tutti i pazienti, sia maschi che femmine, ma solamente le femmine che hanno un'anamnesi inserita in MedITEX avranno i campi del secondo sottogruppo riemtpiti. Se avessimo collegato i gruppi in ordine opposto avrei ottenuto la lista di tutte le anamnesi femminili inserite in MedITEX con i relativi campi anagrafici collegati.</li> |
</ul> | </ul> | ||
<ul> | <ul> | ||
| − | <li> | + | <li>Se un <strong>campo QM </strong>è stato creato, ma mai utilizzato non comparirà nella lista dei campi disponibili nei vari sottogruppi.</li> |
</ul> | </ul> | ||
</td> | </td> | ||
| Line 85: | Line 83: | ||
</table> | </table> | ||
<p> </p> | <p> </p> | ||
| − | <h2> | + | <h2>Definire condizioni per campi</h2> |
| − | <p>In | + | <p>In alcuni casi è utile filtrare i risultati del campo selezionato prima di eseguire la query.</p> |
| − | <p><strong> | + | <p><strong>Per Esempio,</strong> sarebbe utile restringere i dati solamente alle pazienti Donne.</p> |
| − | <p> | + | <p>Facendo <strong>Doppio-click</strong> sul campo desiderato la seguente finestra si aprirà:</p> |
<table style="margin-left: auto; margin-right: auto;" border="0"> | <table style="margin-left: auto; margin-right: auto;" border="0"> | ||
<tbody> | <tbody> | ||
<tr> | <tr> | ||
| − | <td><img src="/images/ | + | <td><img src="/images/Come_creare_query_5_IT.png" alt="" width="396" height="410" /></td> |
<td colspan="2"> | <td colspan="2"> | ||
| − | <p> | + | <p>Premere il <strong>pulsante "+" </strong>per inserire un nuovo filtro o condizione.</p> |
| − | <p> | + | <p>Nel nostro esempio, selezionerò il campo Sesso e restringerò i risultati a Femminile.</p> |
| − | <p> | + | <p>In alcuni casi è possibile <strong>aggiungere più di una condizione</strong> premendo di nuovo il tasto "+" e inserendo l'informazione. Per <strong>eliminare</strong> una condizione è sufficiente selezionarla e prenere il <strong>pulsante "-".</strong></p> |
| − | + | ||
</td> | </td> | ||
</tr> | </tr> | ||
<tr> | <tr> | ||
| − | <td rowspan="3"><img src="/images/ | + | <td rowspan="3"><img src="/images/Come_creare_query_6_IT.png" alt="" width="393" height="555" /></td> |
| − | <td colspan="2"><strong> | + | <td colspan="2"><strong>Le condizioni applicabili ai campi sono:</strong></td> |
</tr> | </tr> | ||
<tr> | <tr> | ||
<td> | <td> | ||
| − | <p><strong> | + | <p><strong>Condizioni:</strong></p> |
| − | <p> | + | <p>è uguale</p> |
| − | <p> | + | <p>è diverso</p> |
| − | <p> | + | <p>è maggiore</p> |
| − | <p> | + | <p>è minore</p> |
| − | <p> | + | <p>è non vuoto</p> |
| − | <p> | + | <p>è vuoto</p> |
| − | <p> | + | <p>Contiene</p> |
| − | <p> | + | <p>Non contiene</p> |
</td> | </td> | ||
<td> | <td> | ||
| − | <p><strong> | + | <p><strong>Esempio</strong></p> |
| − | <p> | + | <p>Sesso: Femminile</p> |
| − | <p> | + | <p>CAP: 12345</p> |
| − | <p> | + | <p>Numero bambini: 0</p> |
<p>BMI: 25</p> | <p>BMI: 25</p> | ||
| − | <p> | + | <p>Gravidanze precedenti</p> |
| − | <p> | + | <p>Anomalia cromosomica</p> |
| − | <p> | + | <p>Cognome: Rossi</p> |
| − | <p> | + | <p>Cognome: Rossi</p> |
</td> | </td> | ||
</tr> | </tr> | ||
<tr> | <tr> | ||
| − | <td colspan="2"> | + | <td colspan="2">Se il campo selezionato è un <strong>Campo QM</strong>, è possibile scegliere quali informazioni visualizzare nei risultati (Valore, data di inizio e fine).</td> |
</tr> | </tr> | ||
</tbody> | </tbody> | ||
</table> | </table> | ||
<ul> | <ul> | ||
| − | <li> | + | <li>Se per uno stesso campo si sono inserite più condizione esse possono essere collegate con una <strong>E (AND logica)</strong> o <strong>O (OR logica)</strong>.</li> |
| − | <li> | + | <li>Se si deselezionea l'opzione <strong>"e deve apparire nella lista dei risultati"</strong>, la query sarà filtrata ma il campo stesso non apparirà nella lista dei risultati.</li> |
| − | <li> | + | <li>I risultati possono inoltre essere <strong>raggruppati automaticamente rispetto un pariticolare campo</strong>. Per far questo sarà sufficiente selezionare l'opzione <strong>"e i risultati devono essere raggruppati per questo campo"</strong>.</li> |
| − | <li> | + | <li>Se invece si seleziona <strong>"campo da gestire come parametro",</strong> al momento dell'esecuzione della query verrà chiesto di inserire il valore del campo in questione. Il valore del parametro andrà inserito nella finestra sottostante.</li> |
</ul> | </ul> | ||
<table style="margin-left: auto; margin-right: auto;" border="0"> | <table style="margin-left: auto; margin-right: auto;" border="0"> | ||
<tbody> | <tbody> | ||
<tr> | <tr> | ||
| − | <td><img src="/images/ | + | <td><img src="/images/Come_creare_query_8_IT.png" alt="" width="640" height="243" /></td> |
</tr> | </tr> | ||
</tbody> | </tbody> | ||
</table> | </table> | ||
<p> </p> | <p> </p> | ||
| − | <h2> | + | <h2>Possibile passi successivi</h2> |
| − | <p> | + | <p>Pulsanti contornati da una linea tratteggiata blu hanno particolari funzionalità. Cliccare per ottenere ulteriori informazioni.</p> |
<table border="0"> | <table border="0"> | ||
<tbody> | <tbody> | ||
<tr> | <tr> | ||
| − | <td style="text-align: center;"><a href="/index.php?title= | + | <td style="text-align: center;"><a href="/index.php?title=Gestione_risultati"><img style="display: block; margin-left: auto; margin-right: auto; border: 2px dotted blue;" src="/images/Report_Editor_5_IT.png" alt="" width="63" height="36" /></a></td> |
<td> | <td> | ||
| − | <p><strong> | + | <p><strong>Esegui:</strong></p> |
| − | + | <p>Una volta aver selezionato tutti i campi di interesse, è possibile eseguire la query premendo su questo pulsante. La <a href="/index.php?title=Gestione_risultati"><strong>Finestra dei risultati</strong></a> si aprirà.</p> | |
| + | </td> | ||
</tr> | </tr> | ||
<tr> | <tr> | ||
| − | <td><img style="display: block; margin-left: auto; margin-right: auto;" src="/images/ | + | <td><img style="display: block; margin-left: auto; margin-right: auto;" src="/images/Report_Editor_6_IT.png" alt="" width="63" height="35" /></td> |
<td> | <td> | ||
| − | <p><strong> | + | <p><strong>Nuovo:</strong></p> |
| − | <p> | + | <p>Tutti i sottogruppi inseriti nella sezione query verranno eliminati. Sarà possibile iniziare una nuova query.</p> |
</td> | </td> | ||
</tr> | </tr> | ||
<tr> | <tr> | ||
| − | <td><a href="/index.php?title= | + | <td><a href="/index.php?title=Come_caricare_una_query%3F"><img style="display: block; margin-left: auto; margin-right: auto; border: 2px dotted blue;" src="/images/Report_Editor_7_IT.png" alt="" width="63" height="36" /></a></td> |
<td> | <td> | ||
| − | <p><strong> | + | <p><strong>Caricare una query:</strong></p> |
| − | <p> | + | <p>Una query precedentemente creata e salvata può essere caricata premendo sul tasto <strong>Apri</strong>. La finestra <strong>Query Salvate</strong> si aprirà; per ulteriori informazioni <a href="/index.php?title=Come_caricare_una_query%3F">cliccare qui.</a></p> |
</td> | </td> | ||
</tr> | </tr> | ||
<tr> | <tr> | ||
| − | <td><a href="/index.php?title= | + | <td><a href="/index.php?title=Come_salvare_una_query%3F"><img style="display: block; margin-left: auto; margin-right: auto; border: 2px dotted blue;" src="/images/Report_Editor_8_IT.png" alt="" width="111" height="84" /></a></td> |
<td> | <td> | ||
| − | <p><strong> | + | <p><strong>Salvare una Query:</strong></p> |
| − | <p> | + | <p>Una query può essere salvata per uso futuro cliccando sul punsante <strong>Salva</strong>. Se la query in questione è stata creata partendo da una query già esistente, è possibile scegliere l'opzione <strong><a href="/index.php?title=Come_salvare_una_query%3F">Salva come</a></strong>, per associare un nuovo nome alla nuova query. </p> |
</td> | </td> | ||
</tr> | </tr> | ||
<tr> | <tr> | ||
| − | <td><img style="display: block; margin-left: auto; margin-right: auto;" src="/images/ | + | <td><img style="display: block; margin-left: auto; margin-right: auto;" src="/images/Report_Editor_9_IT.png" alt="" width="148" height="94" /></td> |
<td> | <td> | ||
| − | <p><strong> | + | <p><strong>Record Risultati:</strong></p> |
| − | + | <p>In questa sezione è possibile selezionare il numero di risultati da visualizzare.</p> | |
| − | <p>& | + | |
</td> | </td> | ||
</tr> | </tr> | ||
| Line 191: | Line 188: | ||
<tbody> | <tbody> | ||
<tr> | <tr> | ||
| − | <td style="text-align: right;"><a href="/index.php?title= | + | <td style="text-align: right;"><a href="/index.php?title=MedITEX_IVF_come_fare">Torna a Come fare</a></td> |
| − | <td style="text-align: right;"><a href="#top"> | + | <td style="text-align: right;"><a href="#top">Inizio pagina</a></td> |
</tr> | </tr> | ||
</tbody> | </tbody> | ||
</table> | </table> | ||
<p><span class="mw-headline"><br /></span></p> | <p><span class="mw-headline"><br /></span></p> | ||
Latest revision as of 10:03, 27 April 2016
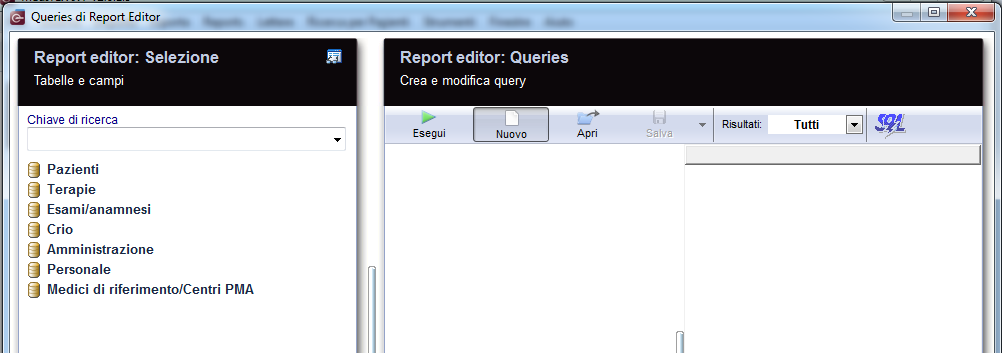
Per aprire Report editor, cliccare su Reports -> Report editor nella barra dei menù.
| <img style="display: block; margin-left: auto; margin-right: auto;" src="/images/Report_Editor_1_IT.png" alt="" width="462" height="289" /> | |
| <img style="display: block; margin-left: auto; margin-right: auto;" src="/images/plus48.png" alt="" width="48" height="48" /> | <a href="/index.php?title=Queries_di_Report_editor">Cliccare qui</a> per ulteriori informazioni su report editor. |
Report editor si aprirà.
 |
Contents |
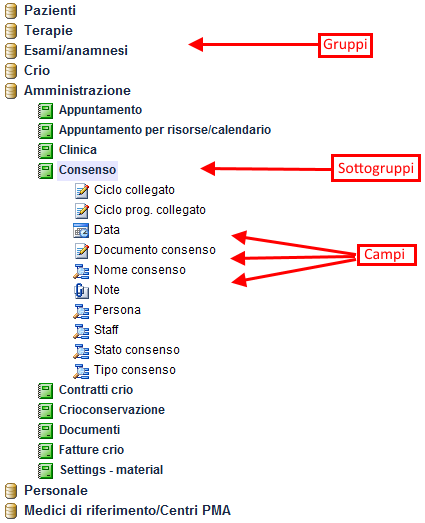
Selezionare i campi desiderati
Per selezionare i campi al fine di creare una query sarà necessario controllare il contenuto dei sottogruppi.
Facendo doppio-click su un gruppo tutti i sottogruppi disponibili verranno visualizzati.
Facendo un doppio-click su un sotto-gruppo tutti i campi appartenenti a quel sottogruppo saranno visualizzati.
 |
In alternativa è possibile ricercare i campi desiderati attraverso il campo di ricerca.
Per esempio, Per creare una query con i dati anagrafici della coppia, uno dei campi desiderati sarà il nome della paziente:
| <img src="/images/Come_creare_query_2_IT.png" alt="" width="587" height="409" /> |
Sarà sufficiente digitare nome nel campo di ricerca e premere Invio. Nel menù a tendina che comparirà saranno elencati tutti i campi contenente la parola nome con relativi gruppi e sottogruppi. Scegliere il campo desiderato e cliccandoci sopra.
Il gruppo contentente il campo si aprirà.
Una volta trovato il sottogruppo contentente il campo desiderato trascinarlo dalla sezione Gruppi alla sezione delle Query.
| <img src="/images/Come_creare_query_3_IT.png" alt="" width="700" height="249" /> |
Per selezionare il campo (es: Il Nome) selezionare il quadratino vuoto.
| <img src="/images/Come_creare_query_4_IT.png" alt="" width="700" height="500" /> |
Se nel sottogruppo Paziente non sono presenti tutti i campi necessari per la costruzione della nostra query, sarà necessario collegare al sottogruppo Paziente un altro sottogruppo contenente i campi desiderati, ad esempio l'Anamnesi Donna. Per far questo sarà necessario selezionare il sottogruppo dalla sezione dei gruppi e trascinarlo nella sezione Query come spiegato precedentemente.
Ora i campi dell' Anamnesi Donna potranno essere selezionati. Una volta che tutti i campi necessari dell'anamnesi donna sono stati selezionati un altro sottogruppo può essere collegato sempre tramite trascinamento. Questo processo và ripetuto fino alla selezione di tutti i campi necessari per la creazione della query in questione.
| <img style="display: block; margin-left: auto; margin-right: auto;" src="/images/Come_creare_query_7_IT.png" alt="" width="609" height="199" /> |
|
Definire condizioni per campi
In alcuni casi è utile filtrare i risultati del campo selezionato prima di eseguire la query.
Per Esempio, sarebbe utile restringere i dati solamente alle pazienti Donne.
Facendo Doppio-click sul campo desiderato la seguente finestra si aprirà:
| <img src="/images/Come_creare_query_5_IT.png" alt="" width="396" height="410" /> |
Premere il pulsante "+" per inserire un nuovo filtro o condizione. Nel nostro esempio, selezionerò il campo Sesso e restringerò i risultati a Femminile. In alcuni casi è possibile aggiungere più di una condizione premendo di nuovo il tasto "+" e inserendo l'informazione. Per eliminare una condizione è sufficiente selezionarla e prenere il pulsante "-". |
|
| <img src="/images/Come_creare_query_6_IT.png" alt="" width="393" height="555" /> | Le condizioni applicabili ai campi sono: | |
|
Condizioni: è uguale è diverso è maggiore è minore è non vuoto è vuoto Contiene Non contiene |
Esempio Sesso: Femminile CAP: 12345 Numero bambini: 0 BMI: 25 Gravidanze precedenti Anomalia cromosomica Cognome: Rossi Cognome: Rossi |
|
| Se il campo selezionato è un Campo QM, è possibile scegliere quali informazioni visualizzare nei risultati (Valore, data di inizio e fine). | ||
- Se per uno stesso campo si sono inserite più condizione esse possono essere collegate con una E (AND logica) o O (OR logica).
- Se si deselezionea l'opzione "e deve apparire nella lista dei risultati", la query sarà filtrata ma il campo stesso non apparirà nella lista dei risultati.
- I risultati possono inoltre essere raggruppati automaticamente rispetto un pariticolare campo. Per far questo sarà sufficiente selezionare l'opzione "e i risultati devono essere raggruppati per questo campo".
- Se invece si seleziona "campo da gestire come parametro", al momento dell'esecuzione della query verrà chiesto di inserire il valore del campo in questione. Il valore del parametro andrà inserito nella finestra sottostante.
| <img src="/images/Come_creare_query_8_IT.png" alt="" width="640" height="243" /> |
Possibile passi successivi
Pulsanti contornati da una linea tratteggiata blu hanno particolari funzionalità. Cliccare per ottenere ulteriori informazioni.
| <a href="/index.php?title=Gestione_risultati"><img style="display: block; margin-left: auto; margin-right: auto; border: 2px dotted blue;" src="/images/Report_Editor_5_IT.png" alt="" width="63" height="36" /></a> |
Esegui: Una volta aver selezionato tutti i campi di interesse, è possibile eseguire la query premendo su questo pulsante. La <a href="/index.php?title=Gestione_risultati">Finestra dei risultati</a> si aprirà. |
| <img style="display: block; margin-left: auto; margin-right: auto;" src="/images/Report_Editor_6_IT.png" alt="" width="63" height="35" /> |
Nuovo: Tutti i sottogruppi inseriti nella sezione query verranno eliminati. Sarà possibile iniziare una nuova query. |
| <a href="/index.php?title=Come_caricare_una_query%3F"><img style="display: block; margin-left: auto; margin-right: auto; border: 2px dotted blue;" src="/images/Report_Editor_7_IT.png" alt="" width="63" height="36" /></a> |
Caricare una query: Una query precedentemente creata e salvata può essere caricata premendo sul tasto Apri. La finestra Query Salvate si aprirà; per ulteriori informazioni <a href="/index.php?title=Come_caricare_una_query%3F">cliccare qui.</a> |
| <a href="/index.php?title=Come_salvare_una_query%3F"><img style="display: block; margin-left: auto; margin-right: auto; border: 2px dotted blue;" src="/images/Report_Editor_8_IT.png" alt="" width="111" height="84" /></a> |
Salvare una Query: Una query può essere salvata per uso futuro cliccando sul punsante Salva. Se la query in questione è stata creata partendo da una query già esistente, è possibile scegliere l'opzione <a href="/index.php?title=Come_salvare_una_query%3F">Salva come</a>, per associare un nuovo nome alla nuova query. |
| <img style="display: block; margin-left: auto; margin-right: auto;" src="/images/Report_Editor_9_IT.png" alt="" width="148" height="94" /> |
Record Risultati: In questa sezione è possibile selezionare il numero di risultati da visualizzare. |
| <a href="/index.php?title=MedITEX_IVF_come_fare">Torna a Come fare</a> | <a href="#top">Inizio pagina</a> |