Demographics
From MedITEX - Wiki
Back to MedITEX IVF Manual home page
| INSERT HERE THE UPDATED IMAGE RELATED TO PATIENT DATA "HOMEPAGE" | Click on this icon to go to the Homepage |
||
| Click on this icon to access the QM field section related to this area or on the right arrow to block the QM fields or to see the change log. | |||
| Click on this icon to add a new patient |
|||
| |
Click on this icon to assign a new partner to this patient. The procedure to assign the partner is the same seen for the creation of a new couple except for that one of the partner is just selected. |
||
| |
Click on this icon to delete the person. The person may be deleted only if some requirements are fulfilled (eg. no therapy is present for the patient). |
||
| |
Click on this icon to print labels containing: patient ID, name and surname of the patient, date of birth f the patient, name and surname of the partner | ||
| |
Click on this icon to create a new document | ||
| INSERT HERE UPDATED COMMUNICATION ICON |
INSERT ICON DESCRIPTION |
||
| |
INSERT ICON DESCRIPTION | ||
| |
Click here to go to the partner's patient data |
The Patient data page is divided in two main parts. The upper contains patient's personal data, a summary on additional personal data (grey box), a summary related to cryostored materials (blue box) and a summary related to donor information (green box). The bottom part contains a section with the list of the documents archived (Administration of documents) and a section with the list of messages sent/received related to the selected patient (Comunication). It is possible to show the documents grouped by type simply selecting the type in the left column.
Note: the section related to donor information may be not available if donation is not allowed in user's country
Contents |
Additional patient data
 To insert other patient data click on the grey box. A window will open in which will be possible to insert many more data such as telephone number, biling category, marital status, professional info and referrers.
Creating a new document

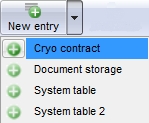
In order to create a new document click on the arrow at the right of the "New entry" icon. A menu will appear showing at least two options: Cryo contract and Document storage.
Cryo contract
If the Cryo contract is selected will be possible to create a new contract.
Document storage
If "Document storage" is selected the following window will open:

Explaination of the fields/icons:
- Date: date of the registration of the document. If the lightning icon is clicked will be selected the current date.
- By: author of the document or of the notes
- QM: QM field icon can be used to access the QM fields associated to this document
- Browse: clicking on the arrows will scroll the documents archived upwards or downwards
- Text area: a "WordPad" like tool that can be used to input a text.
- Container for pictures and documents: pictures and files can be easily linked to the document by dragging and dropping them into the blue box. Then they can be opened doble clicking on the icon.
- Open patient directory: opens the directory that contains all the files related to the patient
- Add document: allows to browse the directories and to add a single document
- Open document: always to open the document added.
Other documents
Other types of documents may be created by means of the related system table. Once a type of document is created (in the example above were created two new types "System table" and "System table 2") it will be available in the "New entry" menu. If a new type of document is selected a window equal to the "Document storage" window will open.