Notebook / screenshots
From MedITEX - Wiki
| (11 intermediate revisions by 2 users not shown) | |||
| Line 2: | Line 2: | ||
<tbody> | <tbody> | ||
<tr> | <tr> | ||
| − | |||
<td> | <td> | ||
| − | <p><strong> | + | <p>[[Image:Notebook.png|none|550px|thumb|left|link=http://wiki.meditex-software.com/images/Notebook.png| ]]</p> |
| + | </td> | ||
| + | <td> | ||
| + | <p><strong>Buttons:</strong></p> | ||
<ul> | <ul> | ||
<li>Font/size and colour</li> | <li>Font/size and colour</li> | ||
| Line 13: | Line 15: | ||
<li>Text background</li> | <li>Text background</li> | ||
<li>Left-justified</li> | <li>Left-justified</li> | ||
| − | <li> | + | <li>Centred</li> |
<li>Right-justified</li> | <li>Right-justified</li> | ||
<li>Cut</li> | <li>Cut</li> | ||
| Line 31: | Line 33: | ||
</tbody> | </tbody> | ||
</table> | </table> | ||
| − | <p><strong><span id="result_box" class="short_text" lang="en"><span class="hps alt-edited"> | + | <p><strong><span id="result_box" class="short_text" lang="en"><span class="hps alt-edited"> </span></span></strong></p> |
| − | <p> | + | <p><strong><span id="result_box" class="short_text" lang="en"><span class="hps alt-edited">Important</span> <span class="hps">buttons</span>:</span></strong></p> |
| − | < | + | <p>Most of the buttons on the notepad have only visual functionalities like text colour or alignment. The buttons below however, have very important functionalities.</p> |
| − | < | + | <ul> |
| − | < | + | <li><strong>Save</strong>: saves your document for future use;</li> |
| + | <li><strong>Open</strong>: opens saved notes and screenshots;</li> | ||
| + | <li><strong>Edit with MS Word</strong>: opens the present text in MS Word;</li> | ||
| + | <li><strong>Email to hotline</strong>: sends your screenshot to the <strong>MedITEX hotline</strong>. Your email program will be automatically opened.</li> | ||
| + | </ul> | ||
<p> </p> | <p> </p> | ||
| + | <p><strong>Screenshot functionality</strong>:</p> | ||
| + | <p>If you check the option <strong>Use screenshot key </strong>in the <a href="/index.php?title=MedITEX_IVF_Settings#General_2">system settings</a>, you can use the screenshot key (<strong>ALT + Print screen</strong>) for notebook. All generated screenshots will be displayed in the notebook, if this is in use.</p> | ||
<p> </p> | <p> </p> | ||
| + | <table border="0" width="419" height="24"> | ||
| + | <tbody> | ||
| + | <tr> | ||
| + | <td><img style="display: block; margin-left: auto; margin-right: auto;" src="/images/hint48.png" alt="" width="48" height="48" /></td> | ||
| + | <td>You have the possibility to add <strong>any number of screenshots</strong> to <strong>one form</strong>.</td> | ||
| + | </tr> | ||
| + | </tbody> | ||
| + | </table> | ||
<table style="float: right;" border="0"> | <table style="float: right;" border="0"> | ||
<tbody> | <tbody> | ||
Latest revision as of 10:04, 3 May 2013
|
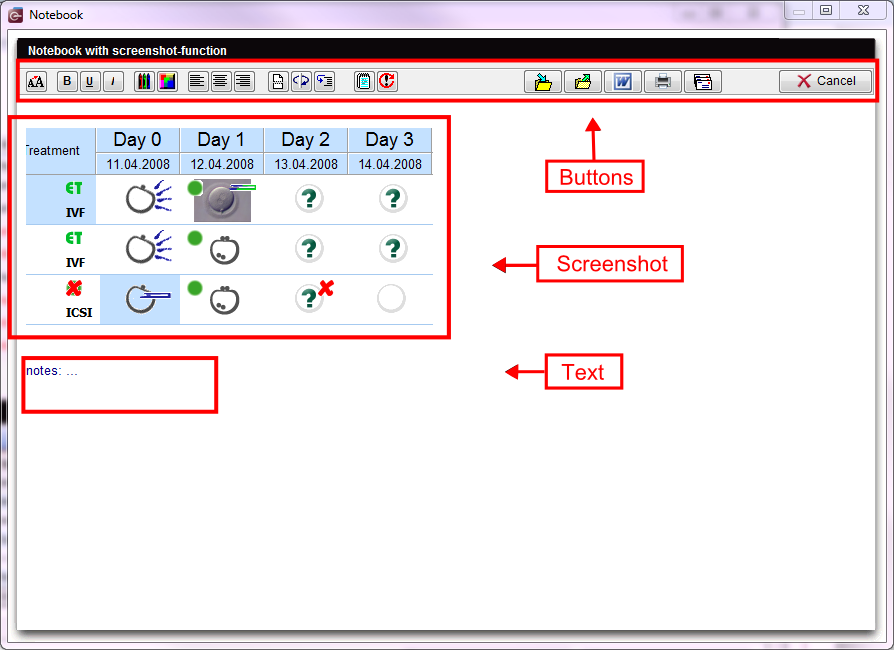
Buttons:
|
Important buttons:
Most of the buttons on the notepad have only visual functionalities like text colour or alignment. The buttons below however, have very important functionalities.
- Save: saves your document for future use;
- Open: opens saved notes and screenshots;
- Edit with MS Word: opens the present text in MS Word;
- Email to hotline: sends your screenshot to the MedITEX hotline. Your email program will be automatically opened.
Screenshot functionality:
If you check the option Use screenshot key in the <a href="/index.php?title=MedITEX_IVF_Settings#General_2">system settings</a>, you can use the screenshot key (ALT + Print screen) for notebook. All generated screenshots will be displayed in the notebook, if this is in use.
| <img style="display: block; margin-left: auto; margin-right: auto;" src="/images/hint48.png" alt="" width="48" height="48" /> | You have the possibility to add any number of screenshots to one form. |
| <a href="/index.php?title=MedITEX_IVF_manual">Back to the MedITEX IVF menu </a> | <a href="#top">Back to top</a> |
