Cycle Birth
From MedITEX - Wiki
| Line 32: | Line 32: | ||
<tr> | <tr> | ||
<td><img src="/images/ICD10.png" alt="" width="578" height="530" /></td> | <td><img src="/images/ICD10.png" alt="" width="578" height="530" /></td> | ||
| + | </tr> | ||
| + | </tbody> | ||
| + | </table> | ||
| + | <table border="0"> | ||
| + | <tbody> | ||
| + | <tr> | ||
| + | <td><img src="/images/plus48.png" alt="" width="48" height="48" /></td> | ||
| + | <td> | ||
| + | <p>Press the QM field to add staff, material, times or free fields.</p> | ||
| + | <p>You need to define QM domains in the <a href="/index.php?title=MedITEX_IVF_Settings#Free_.2F_QM_fields">settings</a> before you can use them.</p> | ||
| + | <p>Get more Informations about using QM fields <a href="/index.php?title=Free_/_QM_fields">here</a>.</p> | ||
| + | </td> | ||
</tr> | </tr> | ||
</tbody> | </tbody> | ||
| Line 39: | Line 51: | ||
<tr> | <tr> | ||
<td style="text-align: right;"><a href="/index.php?title=MedITEX_IVF_manual">Back to the MedITEX IVF menu </a></td> | <td style="text-align: right;"><a href="/index.php?title=MedITEX_IVF_manual">Back to the MedITEX IVF menu </a></td> | ||
| − | <td style="text-align: right;"><a href="/index.php?title=Cycles">Back to the | + | <td style="text-align: right;"><a href="/index.php?title=Cycles">Back to the cycles</a></td> |
<td style="text-align: right;"><a href="#top">Back to top</a></td> | <td style="text-align: right;"><a href="#top">Back to top</a></td> | ||
</tr> | </tr> | ||
</tbody> | </tbody> | ||
</table> | </table> | ||
Revision as of 13:20, 7 March 2013
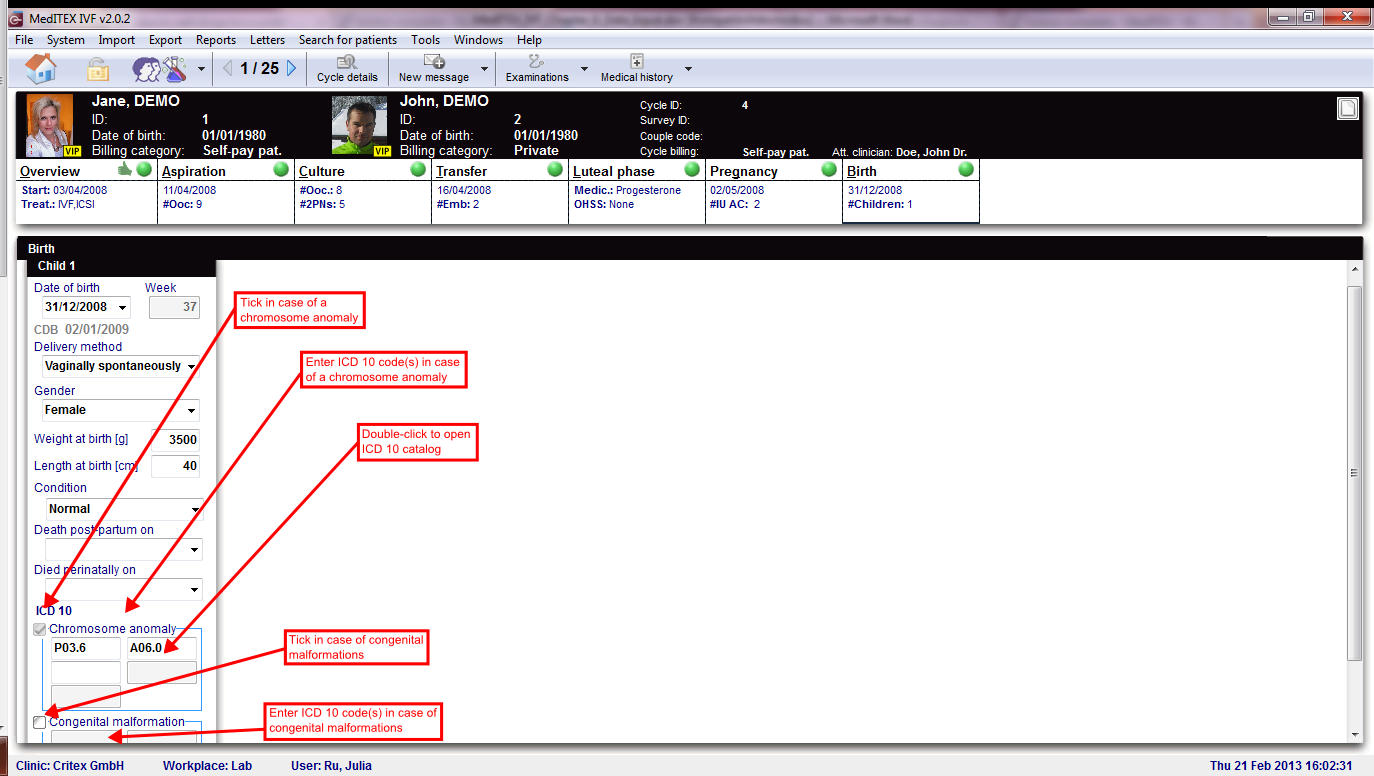
For every embryo that has been documented as continuous pregnancy, MedITEX IVF will create a data column in the tab Birth.
| <img src="/images/hint48.png" alt="" width="48" height="48" /> |
If you cannot see the data columns or if there are data columns missing for born children, open the mask <a href="/index.php?title=Cycle_Pregnancy">Pregnancy </a>again and correct the entries. |
- Enter all necessary data regarding birth and born children.
- In case of chromosome anomalies or congenital malformations of the born children, please tick the corresponding boxes.
- Double-click the respective fields to enter the diagnoses as ICD 10 code. You can enter a maximum of five ICD 10 codes per area.
The window ICD 10 will open:
| <img src="/images/ICD10.png" alt="" width="578" height="530" /> |
| <img src="/images/plus48.png" alt="" width="48" height="48" /> |
Press the QM field to add staff, material, times or free fields. You need to define QM domains in the <a href="/index.php?title=MedITEX_IVF_Settings#Free_.2F_QM_fields">settings</a> before you can use them. Get more Informations about using QM fields <a href="/index.php?title=Free_/_QM_fields">here</a>. |
| <a href="/index.php?title=MedITEX_IVF_manual">Back to the MedITEX IVF menu </a> | <a href="/index.php?title=Cycles">Back to the cycles</a> | <a href="#top">Back to top</a> |
