How to donate frozen oocytes or embryos?
From MedITEX - Wiki
| Line 1: | Line 1: | ||
| − | a | + | <p>In order to donate frozen oocytes/embryos, a few prerequisites need to be fulfilled.</p> |
| + | <h3>Donor</h3> | ||
| + | <p>The option <strong><span style="text-decoration: underline;">Person is:</span> Donor (Ooc./Emb.) </strong>needs to be checked for the donor of the oocytes/embryos. These are the steps:<strong><br /></strong></p> | ||
| + | <ul> | ||
| + | <li>Click on <strong>Demographics </strong>(female) then, double-click the green area on the right.</li> | ||
| + | </ul> | ||
| + | <table style="margin-left: auto; margin-right: auto;" border="0"> | ||
| + | <tbody> | ||
| + | <tr> | ||
| + | <td>[[Image:DemographicsDonorRed.png|none|740px|thumb|left|link=http://wiki.meditex-software.com/images/DemographicsDonorRed.png|]]</td> | ||
| + | </tr> | ||
| + | </tbody> | ||
| + | </table> | ||
| + | <ul> | ||
| + | <li>On the opened window <strong>Person and donor information</strong>, you need to check that the <strong><span style="text-decoration: underline;">Person is:</span> Donor (Ooc./Emb.)</strong>.</li> | ||
| + | </ul> | ||
| + | <table style="margin-left: auto; margin-right: auto;" border="0"> | ||
| + | <tbody> | ||
| + | <tr> | ||
| + | <td><img src="/images/PandDInfo1.1Red.png" alt="" width="612" height="184" /></td> | ||
| + | </tr> | ||
| + | </tbody> | ||
| + | </table> | ||
| + | <p> </p> | ||
| + | <p>Change to the recipient patient.</p> | ||
| + | <p> </p> | ||
| + | <h3>Recipient</h3> | ||
| + | <p>The option <strong><span style="text-decoration: underline;">Person needs:</span></strong> <strong>Donor (Ooc./Emb.) </strong>needs to be checked for the recipient of the oocytes/embryos. These are the steps:</p> | ||
| + | <ul> | ||
| + | <li>Click on <strong>Demographics </strong>(female) then, double-click the green area on the right.</li> | ||
| + | </ul> | ||
| + | <table style="margin-left: auto; margin-right: auto;" border="0"> | ||
| + | <tbody> | ||
| + | <tr> | ||
| + | <td>[[Image:DemographicsDonorRed.png|none|740px|thumb|left|link=http://wiki.meditex-software.com/images/DemographicsDonorRed.png|]]</td> | ||
| + | </tr> | ||
| + | </tbody> | ||
| + | </table> | ||
| + | <ul> | ||
| + | <li>On the opened window <strong>Person and donor information</strong>, you need to check that the <strong><span style="text-decoration: underline;">Person needs:</span></strong> <strong>Donor (Ooc./Emb.)</strong>.</li> | ||
| + | </ul> | ||
| + | <table style="margin-left: auto; margin-right: auto;" border="0"> | ||
| + | <tbody> | ||
| + | <tr> | ||
| + | <td><img src="/images/PandDInfo1.3Red.png" alt="" width="612" height="184" /></td> | ||
| + | </tr> | ||
| + | </tbody> | ||
| + | </table> | ||
| + | <p> </p> | ||
| + | <h2>Donor's cycle</h2> | ||
| + | <p>To create a cycle, click on the '<strong>+</strong>' button at the bottom left corner of the main patient's window.</p> | ||
| + | <table style="margin-left: auto; margin-right: auto;" border="0"> | ||
| + | <tbody> | ||
| + | <tr> | ||
| + | <td>[[Image:MainWindowNewCycleRed.png|none|740px|thumb|left|link=http://wiki.meditex-software.com/images/MainWindowNewCycleRed.png|]]</td> | ||
| + | </tr> | ||
| + | </tbody> | ||
| + | </table> | ||
| + | <p> </p> | ||
| + | <p>Create either <strong>Only aspiration</strong> or any <strong>IVF/ICSI</strong> cycles and check <strong>Donation (Ooc/Emb)</strong>.</p> | ||
| + | <table style="margin-left: auto; margin-right: auto;" border="0"> | ||
| + | <tbody> | ||
| + | <tr> | ||
| + | <td> | ||
| + | <p>[[Image:DonationCycleMatchingDonorRed.png|none|740px|thumb|left|link=http://wiki.meditex-software.com/images/DonationCycleMatchingDonorRed.png|]]</p> | ||
| + | </td> | ||
| + | </tr> | ||
| + | </tbody> | ||
| + | </table> | ||
| + | <p> </p> | ||
| + | <p>After creating the cycle, switch to <strong>Aspiration</strong> and select the amount of oocytes collected.</p> | ||
| + | <p> </p> | ||
| + | <h3>Only aspiration</h3> | ||
| + | <p>In <strong>Cryo/Donation</strong>, double-click the red cell for <strong>Cryo </strong>(1). The cryopreservation window will open and you must check <strong>For donation</strong> (2).</p> | ||
| + | <p> </p> | ||
| + | <h2>Donation</h2> | ||
| + | <p>In a donor’s cycle, click on the <strong>Cryo/Donation</strong> tab. Double-click the last red cell next to <strong>Donate</strong>. The <strong>Distribution</strong> window will open.</p> | ||
| + | <table style="margin-left: auto; margin-right: auto;" border="0"> | ||
| + | <tbody> | ||
| + | <tr> | ||
| + | <td><img src="/images/DonateNumberOfOocytesRed.png" alt="" width="279" height="405" /></td> | ||
| + | </tr> | ||
| + | </tbody> | ||
| + | </table> | ||
| + | <p> </p> | ||
| + | <p>Now that we have linked recipient’s cycle, we need to distribute oocytes and confirm pressing the green button.</p> | ||
| + | <table style="margin-left: auto; margin-right: auto;" border="0"> | ||
| + | <tbody> | ||
| + | <tr> | ||
| + | <td><img src="/images/DonationConfirmationRed.png" alt="" width="654" height="276" /></td> | ||
| + | </tr> | ||
| + | </tbody> | ||
| + | </table> | ||
| + | <p> </p> | ||
| + | <p>After the donation has been completed, we can open the cycle of the recipient and continue cultivation. You can switch between cycles with the buttons from the image below. If a patient has more than one recipient/donor a message will ask you to whom you want to switch.</p> | ||
| + | <table style="margin-left: auto; margin-right: auto;" border="0"> | ||
| + | <tbody> | ||
| + | <tr> | ||
| + | <td> | ||
| + | <p>[[Image:DonorRecipientButtonRed.png|none|740px|thumb|left|link=http://wiki.meditex-software.com/images/DonorRecipientButtonRed.png|]]</p> | ||
| + | </td> | ||
| + | </tr> | ||
| + | </tbody> | ||
| + | </table> | ||
| + | <p> </p> | ||
| + | <h2>New recipient</h2> | ||
| + | <p>If we need to donate to another recipient simultaneously, we can click on the <strong>Cycle links</strong> button (in the <strong>Distribution</strong> window).</p> | ||
| + | <table style="margin-left: auto; margin-right: auto;" border="0"> | ||
| + | <tbody> | ||
| + | <tr> | ||
| + | <td><img src="/images/DonationOocyteDistributionRed.png" alt="" width="710" height="630" /></td> | ||
| + | </tr> | ||
| + | </tbody> | ||
| + | </table> | ||
| + | <p> </p> | ||
| + | <p>For this case, <strong>Matcher</strong> will open and you can repeat matching procedures from the beginning, but this time, using another recipient.</p> | ||
| + | <table style="margin-left: auto; margin-right: auto;" border="0"> | ||
| + | <tbody> | ||
| + | <tr> | ||
| + | <td><img src="/images/MultipleDonation.png" alt="" width="710" height="630" /></td> | ||
| + | </tr> | ||
| + | </tbody> | ||
| + | </table> | ||
| + | <p> </p> | ||
| + | <p>You can have as many recipients/donors attached as you need.</p> | ||
| + | <table style="float: right;" border="0"> | ||
| + | <tbody> | ||
| + | <tr> | ||
| + | <td style="text-align: right;"><a href="/index.php?title=MedITEX_IVF_how_to">Back to the How to</a></td> | ||
| + | <td style="text-align: right;"><a href="#top">Back to top</a></td> | ||
| + | </tr> | ||
| + | </tbody> | ||
| + | </table> | ||
Revision as of 14:05, 6 December 2012
In order to donate frozen oocytes/embryos, a few prerequisites need to be fulfilled.
Contents |
Donor
The option Person is: Donor (Ooc./Emb.) needs to be checked for the donor of the oocytes/embryos. These are the steps:
- Click on Demographics (female) then, double-click the green area on the right.
- On the opened window Person and donor information, you need to check that the Person is: Donor (Ooc./Emb.).
| <img src="/images/PandDInfo1.1Red.png" alt="" width="612" height="184" /> |
Change to the recipient patient.
Recipient
The option Person needs: Donor (Ooc./Emb.) needs to be checked for the recipient of the oocytes/embryos. These are the steps:
- Click on Demographics (female) then, double-click the green area on the right.
- On the opened window Person and donor information, you need to check that the Person needs: Donor (Ooc./Emb.).
| <img src="/images/PandDInfo1.3Red.png" alt="" width="612" height="184" /> |
Donor's cycle
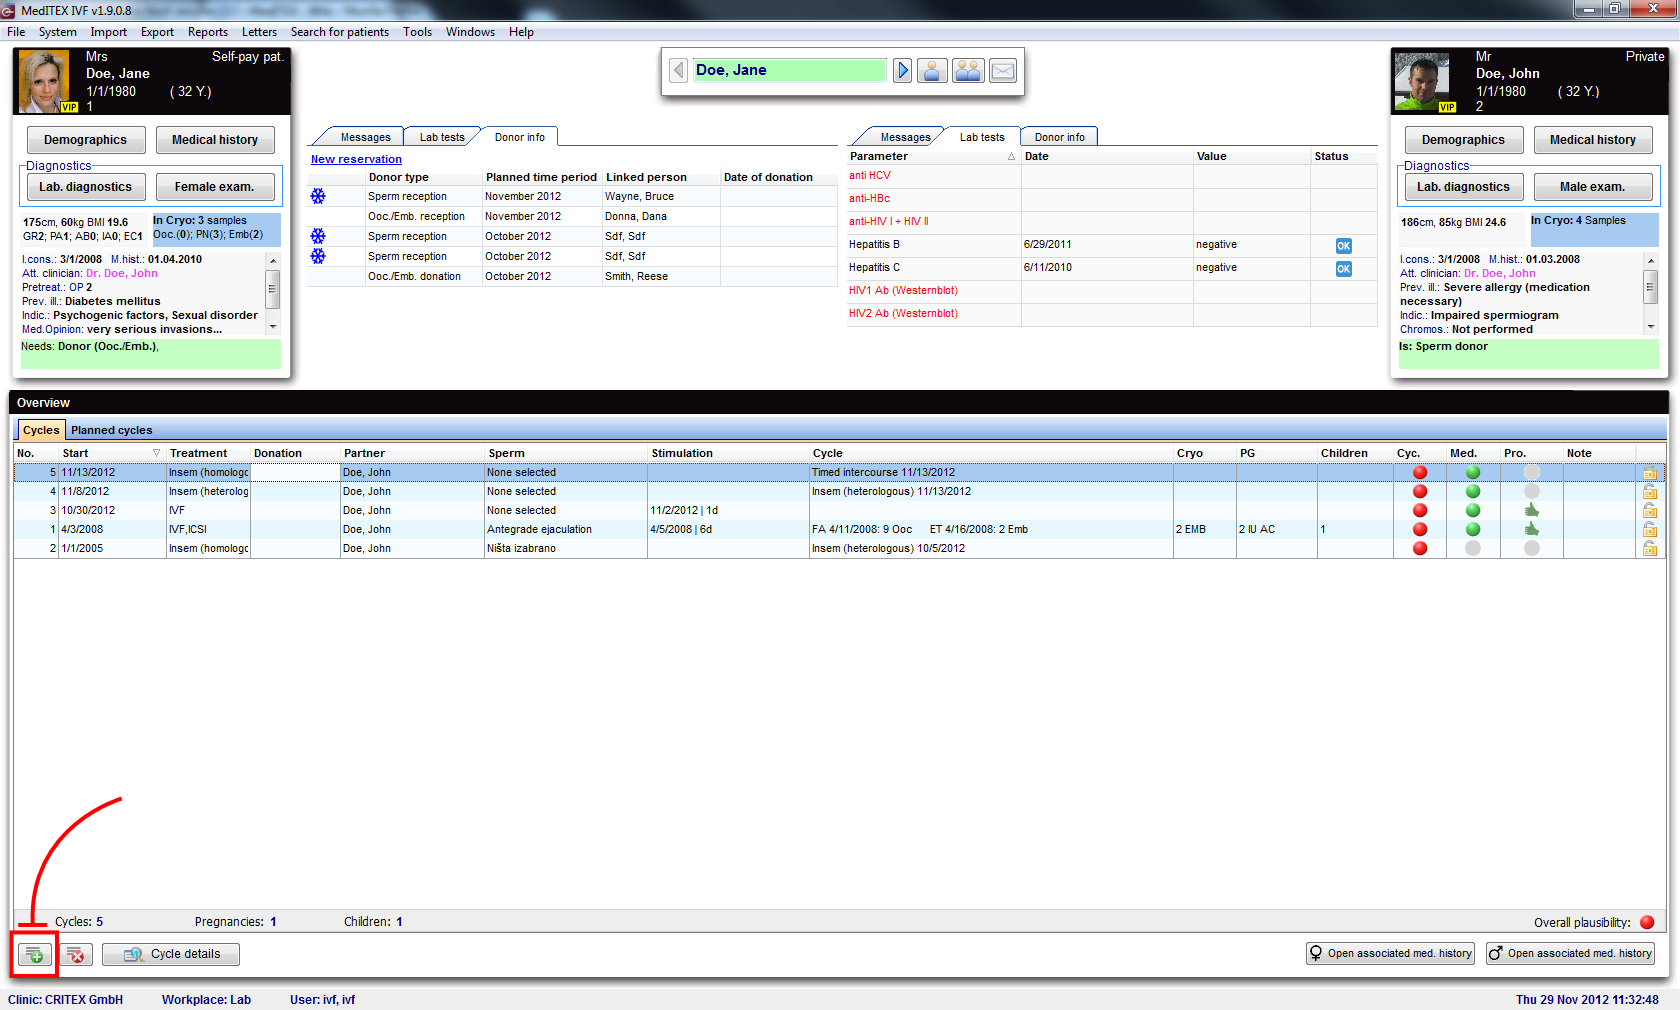
To create a cycle, click on the '+' button at the bottom left corner of the main patient's window.
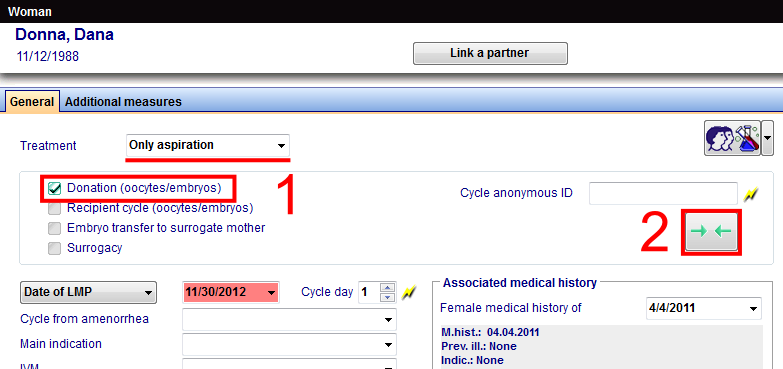
Create either Only aspiration or any IVF/ICSI cycles and check Donation (Ooc/Emb).
After creating the cycle, switch to Aspiration and select the amount of oocytes collected.
Only aspiration
In Cryo/Donation, double-click the red cell for Cryo (1). The cryopreservation window will open and you must check For donation (2).
Donation
In a donor’s cycle, click on the Cryo/Donation tab. Double-click the last red cell next to Donate. The Distribution window will open.
| <img src="/images/DonateNumberOfOocytesRed.png" alt="" width="279" height="405" /> |
Now that we have linked recipient’s cycle, we need to distribute oocytes and confirm pressing the green button.
| <img src="/images/DonationConfirmationRed.png" alt="" width="654" height="276" /> |
After the donation has been completed, we can open the cycle of the recipient and continue cultivation. You can switch between cycles with the buttons from the image below. If a patient has more than one recipient/donor a message will ask you to whom you want to switch.
New recipient
If we need to donate to another recipient simultaneously, we can click on the Cycle links button (in the Distribution window).
| <img src="/images/DonationOocyteDistributionRed.png" alt="" width="710" height="630" /> |
For this case, Matcher will open and you can repeat matching procedures from the beginning, but this time, using another recipient.
| <img src="/images/MultipleDonation.png" alt="" width="710" height="630" /> |
You can have as many recipients/donors attached as you need.
| <a href="/index.php?title=MedITEX_IVF_how_to">Back to the How to</a> | <a href="#top">Back to top</a> |


