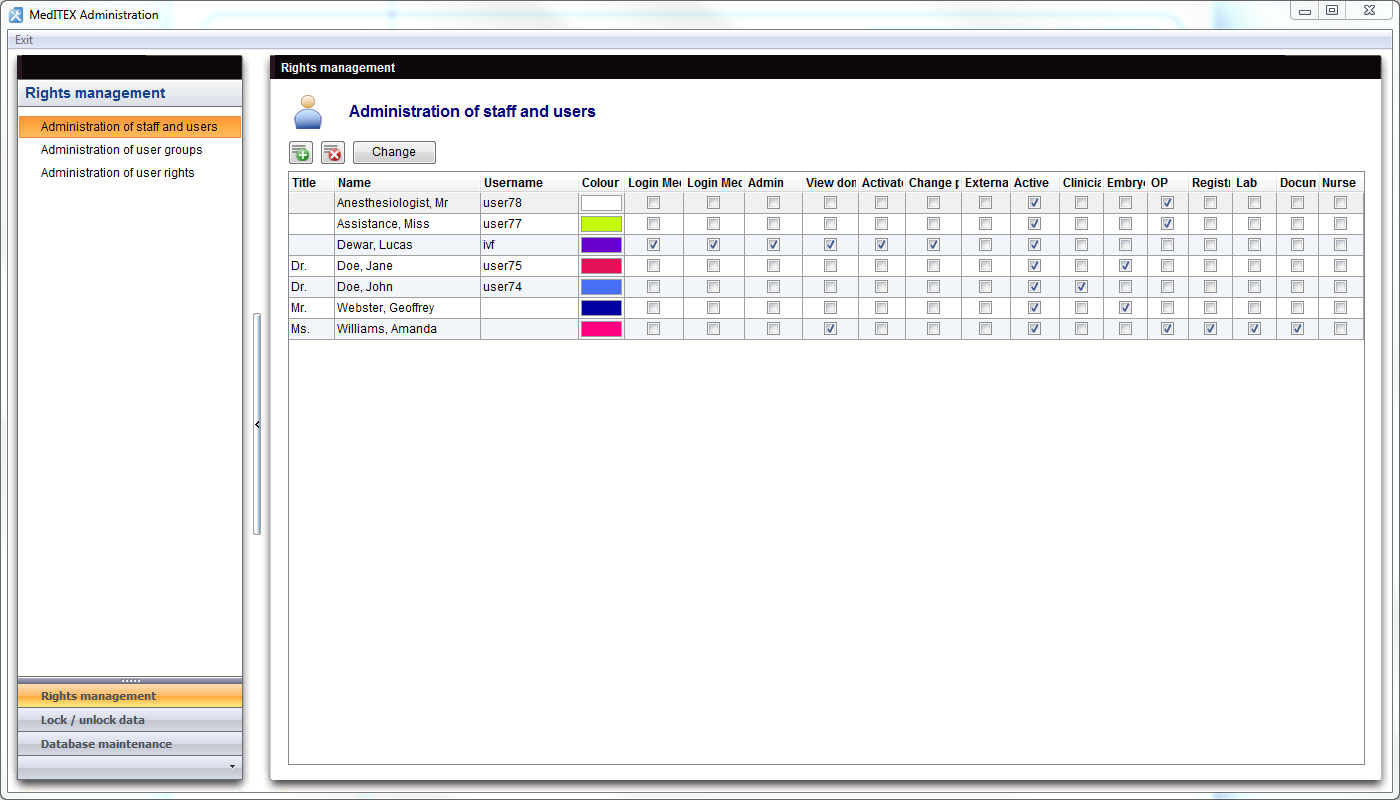
Administration of staff and users
From MedITEX - Wiki
| Line 88: | Line 88: | ||
</tbody> | </tbody> | ||
</table> | </table> | ||
| + | <h2>Import/synchronization of users from Active directory</h2> | ||
| + | <p>The import of users from <strong>Active Directory</strong> is done by the <strong>Synchronize users from Active directory</strong> button.</p> | ||
| + | <p>[[Image:active_directory_5.png|none|740px|thumb|middle|link=http://wiki.meditex-software.com/images/active_directory_5.png|]]</p> | ||
| + | <p>If a user already exists in MedITEX, MedITEX checks if he belongs to other groups and assigns it the according login rights.</p> | ||
| + | <p>If a user doesn’t exist in MedITEX yet, MedITEX would create a new one during synchronization. Name, surname and title would be taken over from <strong>Active Directory</strong> to MedITEX. The username of the MedITEX user will be the same one from <strong>Active Directory.</strong> MedITEX doesn't support all special characters though, as they are restrictions for the database username (Firebird username). In order to complete the import, new usernames without special characters must be created. These usernames will only be used internally and are not required for logging in. At the end of the synchronization, a list contains all users imported with special characters and a suggestion for the internal username (MedITEX username) is shown. Usernames can be customized in the list. Users will be able to connect to MedITEX using their Active Directory usernames with special characters.</p> | ||
| + | <p>The easiest way would be to avoid special characters already in Active directory.</p> | ||
| + | <p>The synchronization can take a while, because of the connection to the AD server.</p> | ||
| + | <p>It is recommended that whenever a change is done on the <strong>AD</strong> server (new users, updated groups, etc.), a synchronisation in MedITEX Administration should be done.</p> | ||
| + | <p> </p> | ||
<table style="float: right;" border="0"> | <table style="float: right;" border="0"> | ||
<tbody> | <tbody> | ||
Revision as of 16:17, 29 January 2019
Contents |
Buttons
Buttons with a blue dotted frame have special functionalities. Click on it to have more information.
| <a href="/index.php?title=Administration_of_staff_and_users#Enter_new_person_.2F_Change"><img style="display: block; margin-left: auto; margin-right: auto; border: 2px dotted blue;" src="/images/Plus.png" alt="" /></a> | New person: click here to add a new person to the list. |
| <img src="/images/DeleteX.png" alt="" width="26" height="24" /> | Delete person: click here to delete the selected person from the list. Confirmation is required. |
| <a href="/index.php?title=Administration_of_staff_and_users#Enter_new_person_.2F_Change"><img style="display: block; margin-left: auto; margin-right: auto; border: 2px dotted blue;" src="/images/ChangeButton.png" alt="" width="86" height="27" /></a> | Edit person: click here to edit information of the selected person |
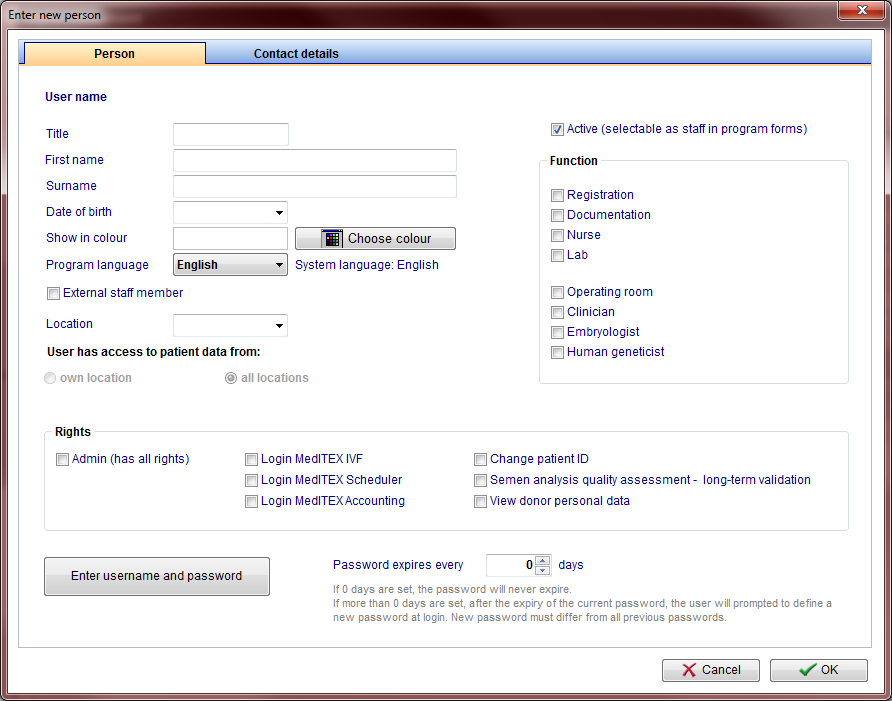
Enter new person / Change
By double-clicking a row from the list, by clicking on "New person" or by clicking on "Change", this window will be displayed. Here you can add or edit information of the patient.
Buttons
| <img src="/images/ChooseColour.png" alt="" width="150" height="28" /> | Choose colour: to add or change the label colour of this person. |
| <img src="/images/ChangePassword.png" alt="" width="231" height="30" /> | Change password: this button only appears in case information of a person is being edited. |
| <img style="display: block; margin-left: auto; margin-right: auto;" src="/images/EnterUsernameAndPAssword.png" alt="" width="232" height="29" /> | Enter username and password: this button only appears in case a person is being added. |
Tabs
|
User name: displays the username when editing a person. If a new person is being added, this field will be blank. Show in colour: this is the colour that will be displayed for this user throughout all MedITEX programs. Program language: language displayed to this user when MedITEX tools are started. External staff member: select this box for external members working for the clinic. Location: in case of multiple locations, this setting identify which one this user is allocated to. Leave if blank if this user should be visible in all locations. User has access to patient data from: in case of multiple locations, allows users to see patient data from all locations, not only to the one he/she is allocated to. Active: this check box allows this person to be selectable throughout program forms. For example: if Dr. Johnson does not have this box checked, he will not be able to be selected for a treatment. Function: type of work done by this person. Rights: these are the permissions of this person. |
| <img src="/images/NewPersonContacts.png" alt="" width="540" height="682" /> |
| Contact information about this person. |
| <img style="display: block; margin-left: auto; margin-right: auto;" src="/images/howto48.png" alt="" width="48" height="48" /> | If you would like to get more information, please follow <a href="/index.php?title=MedITEX_Administration_how_to">this link</a> and check our How to page. |
Import/synchronization of users from Active directory
The import of users from Active Directory is done by the Synchronize users from Active directory button.
If a user already exists in MedITEX, MedITEX checks if he belongs to other groups and assigns it the according login rights.
If a user doesn’t exist in MedITEX yet, MedITEX would create a new one during synchronization. Name, surname and title would be taken over from Active Directory to MedITEX. The username of the MedITEX user will be the same one from Active Directory. MedITEX doesn't support all special characters though, as they are restrictions for the database username (Firebird username). In order to complete the import, new usernames without special characters must be created. These usernames will only be used internally and are not required for logging in. At the end of the synchronization, a list contains all users imported with special characters and a suggestion for the internal username (MedITEX username) is shown. Usernames can be customized in the list. Users will be able to connect to MedITEX using their Active Directory usernames with special characters.
The easiest way would be to avoid special characters already in Active directory.
The synchronization can take a while, because of the connection to the AD server.
It is recommended that whenever a change is done on the AD server (new users, updated groups, etc.), a synchronisation in MedITEX Administration should be done.
| <a href="/index.php?title=MedITEX_Administration_manual">Back to MedITEX Administration manual </a> |
<a href="#top">Back to top</a> |


