MedITEX IVF Impostazioni
From MedITEX - Wiki
| Line 91: | Line 91: | ||
<p><strong>Criteri di ricerca</strong></p> | <p><strong>Criteri di ricerca</strong></p> | ||
<ul> | <ul> | ||
| − | <li>Da questa sezione è possibile selezionare i criteri di ricerca dei pazienti: | + | <li>Da questa sezione è possibile selezionare i criteri di ricerca dei pazienti: |
<ul> | <ul> | ||
<li>ID Paziente</li> | <li>ID Paziente</li> | ||
| Line 599: | Line 599: | ||
</ul> | </ul> | ||
<ul style="text-align: justify;"> | <ul style="text-align: justify;"> | ||
| − | <li><strong><a href="/index.php?title=Cycle_Culture">Coltura</a>:</strong> | + | <li><strong><a href="/index.php?title=Cycle_Culture">Coltura</a>:</strong> |
<ul> | <ul> | ||
<li>Selezionare il numero di giorni presenti nella rappresentazione grafica.</li> | <li>Selezionare il numero di giorni presenti nella rappresentazione grafica.</li> | ||
| Line 991: | Line 991: | ||
<tbody> | <tbody> | ||
<tr> | <tr> | ||
| − | <td>[[Image: | + | <td>[[Image:Impostazioni_50_IT.png|none|740px|thumb|left|link=http://wiki.meditex-software.com/images/Impostazioni_50_IT.png| List of lab values.]]</td> |
</tr> | </tr> | ||
</tbody> | </tbody> | ||
| Line 1,012: | Line 1,012: | ||
<tbody> | <tbody> | ||
<tr> | <tr> | ||
| − | <td>[[Image: | + | <td>[[Image:Impostazioni_51_IT.png|none|740px|thumb|left|link=http://wiki.meditex-software.com/images/Impostazioni_51_IT.png| Lab order templates.]]<br /><br /></td> |
</tr> | </tr> | ||
</tbody> | </tbody> | ||
| Line 1,029: | Line 1,029: | ||
</tr> | </tr> | ||
<tr> | <tr> | ||
| − | <td style="text-align: center;"><img src="/images/ | + | <td style="text-align: center;"><img src="/images/Impostazioni_52_IT.png" alt="" width="225" height="32" /></td> |
<td>Through this button all changed parameters units are adjusted to the value of the reference units.</td> | <td>Through this button all changed parameters units are adjusted to the value of the reference units.</td> | ||
</tr> | </tr> | ||
| Line 1,059: | Line 1,059: | ||
<tbody> | <tbody> | ||
<tr> | <tr> | ||
| − | <td>[[Image: | + | <td>[[Image:Impostazioni_53_IT.png|none|740px|thumb|left|link=http://wiki.meditex-software.com/images/Impostazioni_53_IT.png| Cryo storage dimensioning.]]</td> |
</tr> | </tr> | ||
</tbody> | </tbody> | ||
| Line 1,073: | Line 1,073: | ||
</tr> | </tr> | ||
<tr> | <tr> | ||
| − | <td style="text-align: center;"><img src="/images/ | + | <td style="text-align: center;"><img src="/images/Impostazioni_54_IT.png" alt="" width="319" height="23" /></td> |
<td>Here you can switch between your different cryo storage locations, if you have more then one.</td> | <td>Here you can switch between your different cryo storage locations, if you have more then one.</td> | ||
</tr> | </tr> | ||
| Line 1,092: | Line 1,092: | ||
</tr> | </tr> | ||
<tr> | <tr> | ||
| − | <td style="text-align: center;"><img src="/images/ | + | <td style="text-align: center;"><img src="/images/Impostazioni_55_IT.png" alt="" width="589" height="28" /></td> |
<td>Enter here the maximum number of frozen straws in the last level. It helps you for searching an empty place, if you are freeze a new straw in the freezing section.</td> | <td>Enter here the maximum number of frozen straws in the last level. It helps you for searching an empty place, if you are freeze a new straw in the freezing section.</td> | ||
</tr> | </tr> | ||
| Line 1,101: | Line 1,101: | ||
<tbody> | <tbody> | ||
<tr> | <tr> | ||
| − | <td colspan="2">[[Image: | + | <td colspan="2">[[Image:Impostazioni_56_IT.png|none|740px|thumb|left|link=http://wiki.meditex-software.com/images/Impostazioni_56_IT.png| Storage dimensioning example.]]<br /></td> |
</tr> | </tr> | ||
</tbody> | </tbody> | ||
| Line 1,107: | Line 1,107: | ||
<p style="text-align: justify;"><strong>Storage dimensioning:</strong></p> | <p style="text-align: justify;"><strong>Storage dimensioning:</strong></p> | ||
<ul style="text-align: justify;"> | <ul style="text-align: justify;"> | ||
| − | <li>When a new unit is created, the following fields have to be filled: | + | <li>When a new unit is created, the following fields have to be filled: |
<ul> | <ul> | ||
<li>Description</li> | <li>Description</li> | ||
| Line 1,143: | Line 1,143: | ||
<tbody> | <tbody> | ||
<tr> | <tr> | ||
| − | <td>[[Image: | + | <td>[[Image:Impostazioni_57_IT.png|none|740px|thumb|left|link=http://wiki.meditex-software.com/images/Impostazioni_57_IT.png| Incubator settings.]]</td> |
</tr> | </tr> | ||
</tbody> | </tbody> | ||
| Line 1,156: | Line 1,156: | ||
<li><strong>Incubator no</strong>: enter a number to each incubator in order to distinguish them.</li> | <li><strong>Incubator no</strong>: enter a number to each incubator in order to distinguish them.</li> | ||
</ul> | </ul> | ||
| − | < | + | <table border="0"> |
| + | <tbody> | ||
| + | <tr> | ||
| + | <td>[[Image:Impostazioni_58_IT.png|none|740px|thumb|left|link=http://wiki.meditex-software.com/images/Impostazioni_58_IT.png| Incubator settings.]]<br /></td> | ||
| + | </tr> | ||
| + | </tbody> | ||
| + | </table> | ||
<p style="text-align: justify;"><strong>Incubator documents:</strong></p> | <p style="text-align: justify;"><strong>Incubator documents:</strong></p> | ||
<p style="text-align: justify;">You can see the documents of a selected incubator.<strong><br /></strong></p> | <p style="text-align: justify;">You can see the documents of a selected incubator.<strong><br /></strong></p> | ||
| Line 1,195: | Line 1,201: | ||
<tbody> | <tbody> | ||
<tr> | <tr> | ||
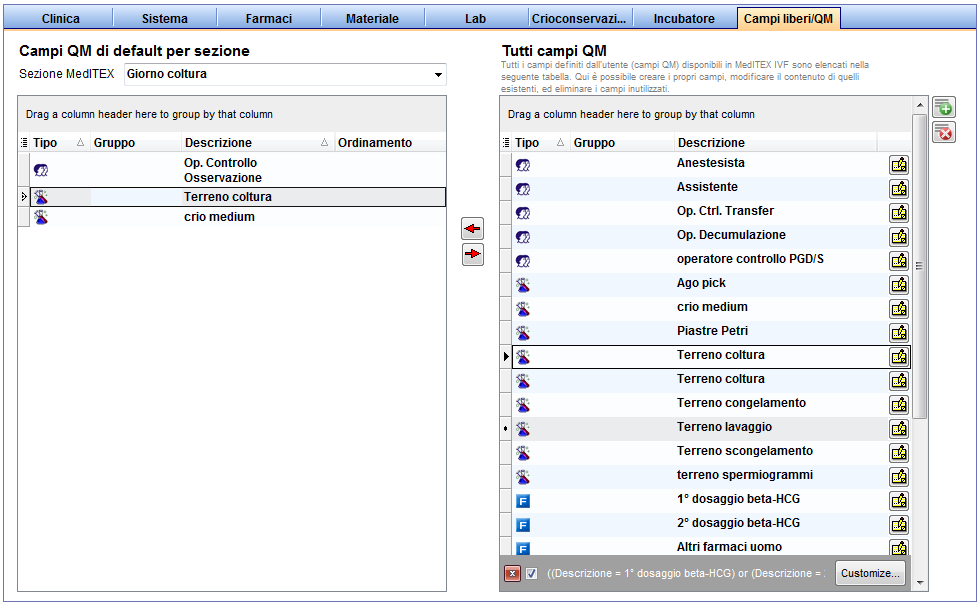
| − | <td>[[Image: | + | <td>[[Image:Impostazioni_59_IT.png|none|740px|thumb|left|link=http://wiki.meditex-software.com/images/Impostazioni_59_IT.png| Settings of free / QM fields.]]</td> |
</tr> | </tr> | ||
</tbody> | </tbody> | ||
| Line 1,241: | Line 1,247: | ||
<tbody> | <tbody> | ||
<tr> | <tr> | ||
| − | <td><img style="display: block; margin-left: auto; margin-right: auto;" src="/images/ | + | <td><img style="display: block; margin-left: auto; margin-right: auto;" src="/images/Impostazioni_60_IT.png" alt="" width="444" height="556" /></td> |
<td> | <td> | ||
<p><strong>QM fields:</strong></p> | <p><strong>QM fields:</strong></p> | ||
| Line 1,256: | Line 1,262: | ||
</tr> | </tr> | ||
<tr> | <tr> | ||
| − | <td><img src="/images/ | + | <td><img src="/images/Impostazioni_61_IT.png" alt="" width="438" height="558" /></td> |
<td> | <td> | ||
<p style="text-align: justify;"><strong>Items assigned to the selected QM field:</strong></p> | <p style="text-align: justify;"><strong>Items assigned to the selected QM field:</strong></p> | ||
| Line 1,270: | Line 1,276: | ||
</tr> | </tr> | ||
<tr> | <tr> | ||
| − | <td><img style="display: block; margin-left: auto; margin-right: auto;" src="/images/ | + | <td><img style="display: block; margin-left: auto; margin-right: auto;" src="/images/Impostazioni_62_IT.png" alt="" width="469" height="559" /></td> |
<td> | <td> | ||
<p style="text-align: justify;"><strong>Pool of all available items:</strong></p> | <p style="text-align: justify;"><strong>Pool of all available items:</strong></p> | ||
Revision as of 11:29, 15 April 2016
 |
Definire la propria struttura.
Le Impostazioni MedITEX IVF sono della massima importanza. Essi consentono di adattare il programma alle condizioni e circostanze specifiche del Centro.
Questo include l'aggiunta o la modifica di farmaci, la gestione dei materiali utilizzati e le interfacce con programmi di laboratorio e di fatturazione, la definizione degli incubatori e l'organizzazione della criobanca. In questa sezione è anche possibile definire campi liberi/QM e il contenuto di particolari tabelle di sistema.
La definizione completa e corretta delle impostazioni è un'attività cruciale da svolgere prima di cominciare ad utilizzare MedITEX IVF.
Contents |
Clinica
Per modificare le impostazioni della clinica è sufficiente cliccare su Sistema -> Configurazione/Amministrazione -> Impostazioni -> Clinica.
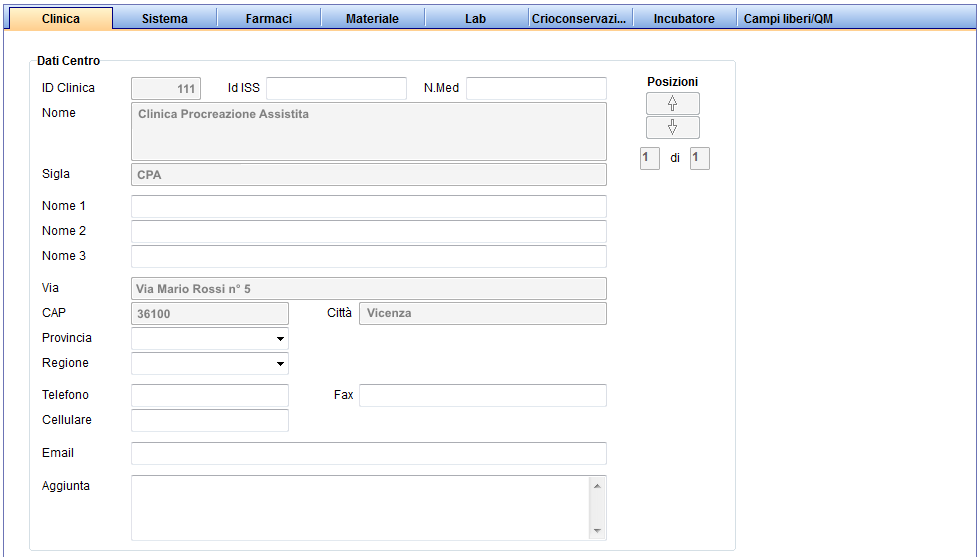 |
- Qui si possono inserire i dettagli di contatto del centro e visualizzare l'ID della clinica.
- Inserire e modificare l'alias della clinica, il nome del medico responsabile del centro e altri dati.
- Se nel Database sono impostate diverse cliniche, è possibile passare da una all'altra premendo il pulsante "Posizione".
- I campi disabilitati sono riempiti automaticamente al momento dell'installazione. Se si desidera modificarli contattare l'assistenza.
| <a href="#top">Inizio pagina</a> |
Sistema
Per modificare le impostazioni di sistema cliccare su Sistema -> Configurazione/Amministrazione -> Impostazioni -> Sistema-> Generale.
Generale
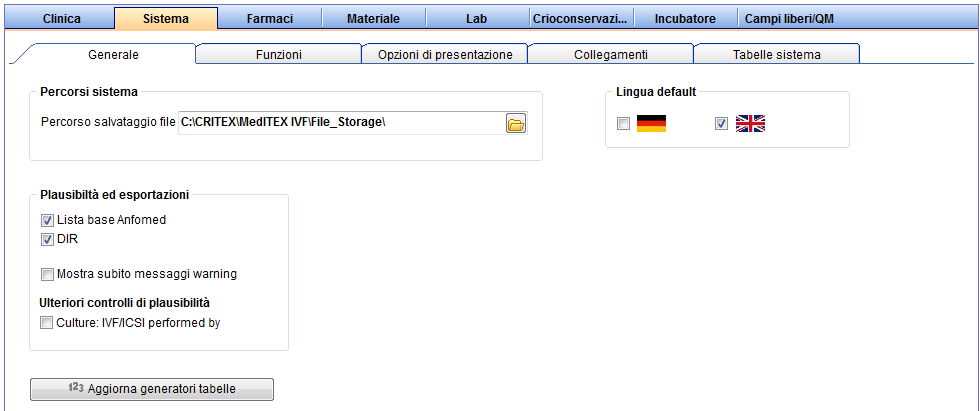 |
- Percorsi Sistema: Qui è possibile definire il percorso utilizzato dalle interfacce esterne di programmi di fatturazione e laboratorio e da MedITEX per la conservazione dei file word utilizzabili nel programma e documenti digitali stampati per ogni singolo paziente. Per modificare questo percorso è sufficiente cliccare sull'icone di "cartella" posta sulla destra del campo in questione. Dalla finestra di dialogo che si apre sarà possibile selezionare il nuovo percorso.
- Aggiorna generatori tabelle: Cliccando su questo pulsante i generatori delle tabelle che costituiscono il Database di MedITEX verranno aggiornati. Prima di utilizzare questa funzione è necessario accertarsi che nessuno stia utilizzando il software e che tutti gli utenti abbiano effettuato il logoff.
- Plausibilità ed esportazioni: Da questa sezione è possibile impostare i messaggi di plausibilità che verranno mostrati nelle varie sezione del programma (per esempio “Lista base Anfomed”). L'opzione DIR (Registro IVF Tedesco) contiene messaggi di plausibilità rilevanti solamente per centri con sede nel territorio Tedesco.
Le opzioni selezionate in questa sezione rappresenterano l'insieme dei messaggi di plausibilità, evidenziati attraverso semafori di color rosso, nelle varie sezioni del programma in caso di informazioni mancanti o erroneamente documentate.
MedITEX IVF controlla i dati in tempo reale, permettendo la visualizzazione automatica dei messaggi di plausibilità al passaggio da una maschera di input all'altra. Se si deseleziona l'opzione "Mostra subito messaggi di warning" questa feature può essere disabilitata.
- Importante: Modifiche alle impostazioni di plausibilità possono causare la documentazione di informazioni incorrette.
| <a href="#top">Inizio pagina</a> |
Funzioni
Generale
Per modificare le impostazioni di funzioni generali cliccare su Sistema -> Configurazione/Amministrazione -> Impostazioni -> Sistema-> Funzioni ->Generale
 |
| <img src="/images/Impostazioni_5_IT.png" alt="" width="490" height="160" /> |
Criteri di ricerca
|
| <img src="/images/Impostazioni_6_IT.png" alt="" width="485" height="81" /> |
Anamnesi
|
| <img src="/images/Impostazioni_7_IT.png" alt="" width="489" height="104" /> |
Anteprima / Blocco note
|
| <img src="/images/Impostazioni_8_IT.png" alt="" width="424" height="473" /> |
Stampante etichette per Barcode / RFID MedITEX permette:
|
| <img src="/images/Impostazioni_9_IT.png" alt="" /> |
Impostazioni Mediaplayer
|
| <a href="#top">Inizio pagina</a> |
Generazione ID automatica
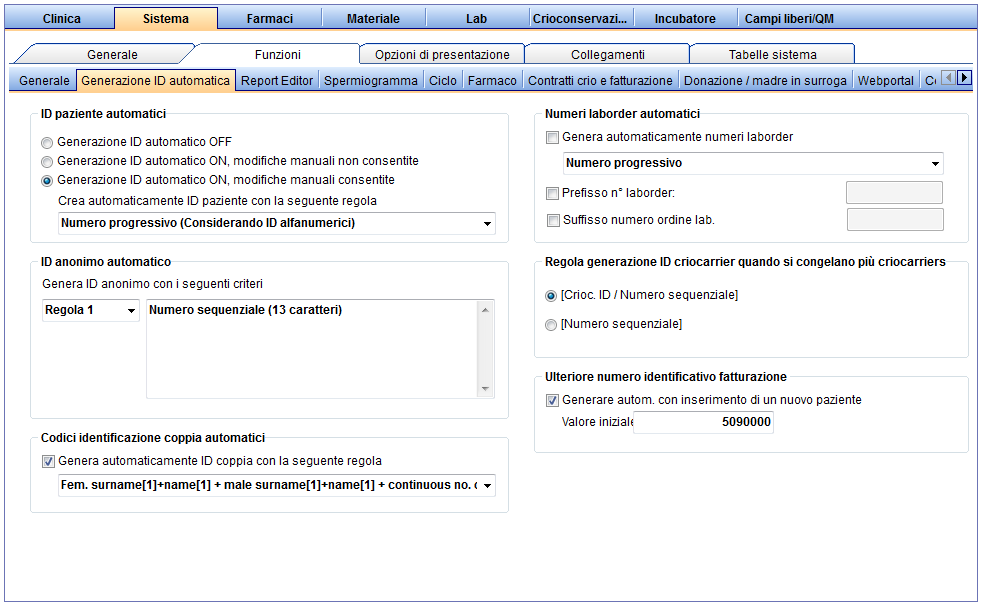
Per modificare i criteri di generazione automatica di particolari ID cliccare su Sistema -> Configurazione/Amministrazione -> Impostazioni -> Sistema-> Funzioni -> Generazione ID automatica
 |
| <img style="float: left;" src="/images/Impostazioni_11_IT.png" alt="" width="487" height="143" /> |
ID paziente automatici
|
| <img style="float: left;" src="/images/Impostazioni_12_IT.png" alt="" width="485" height="171" /> |
ID anonimo automatico
|
| <img style="float: left;" src="/images/Impostazioni_13_IT.png" alt="" width="489" height="89" /> |
Codice identificazione coppia automatici
|
| <img style="float: left;" src="/images/Impostazioni_14_IT.png" alt="" width="444" height="142" /> |
Numeri laborder automatici
|
| <img style="float: left;" src="/images/Impostazioni_15_IT.png" alt="" width="443" height="109" /> |
Regola generazione ID criocarrier quando si congelano più criocarriers
|
| <img style="float: left;" src="/images/Impostazioni_16_IT.png" alt="" width="444" height="94" /> |
Ulteriore numero identificativo fatturazione
|
Report editor
Questa sezione descrive le impostazione per Report editor.
| <a href="/index.php?title=Queries_of_Report_editor"><img src="/images/plus48.png" alt="" width="48" height="48" /></a> | <a href="/index.php?title=Queries_of_Report_editor">Cliccare qui</a> per avere ulteriori informazioni sulle query. |
Per modificare le Impostazioni di Report editor cliccare su Sistema -> Configurazione/Amministrazione -> Impostazioni -> Sistema-> Funzioni-> Report editor.
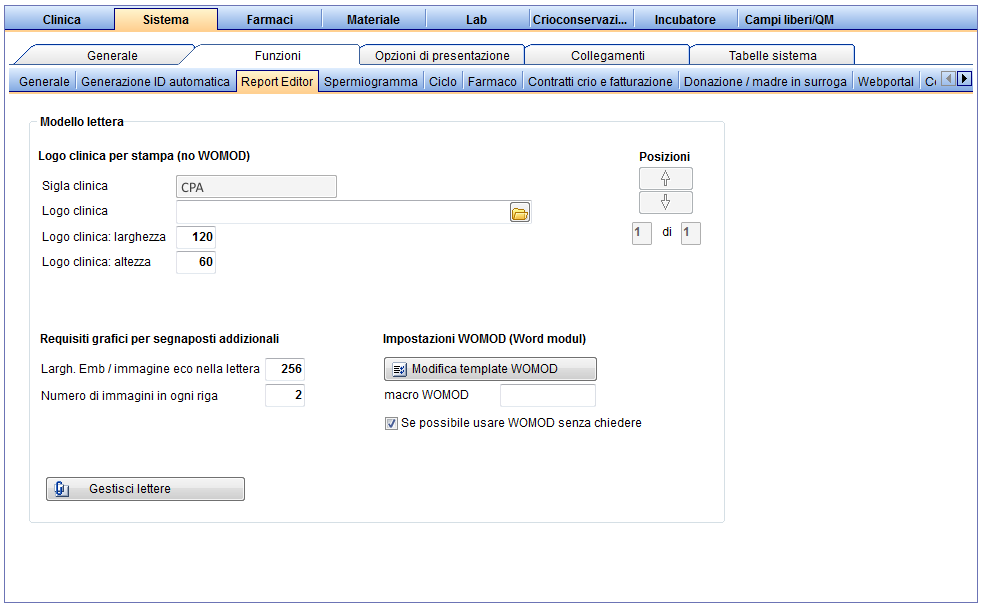 |
Template Lettere: In questa sezione è possibile definire le proprietà del logo della clinica che potrà essere inserito nei template delle lettere create con report editor.
- Sigla Clinica: Se il centro opera in diverse sedi è possibile creare templete personalizzati per ogniuna delle sedi. I tasti di posizione permettono di selezionare le varie sedi.
- Requisiti grafici per segnaposti addizionali: è possibile definire le dimensioni delle immagini di cellule ed ecografie utilizzate nelle lettere e il numero di immagini per riga, permettendo di ottenere sempre un modello uguale di referto.
- Impostazioni WOMOD (Moduli word): Creare/Modificare il template di default.
- Gestisci lettere: Permette di visualizzare la sezione di amministrazione di tutte le lettere gestite dal programma.
| <a href="/index.php?title=Result_management#Administrate_letters"><img src="/images/plus48.png" alt="" width="48" height="48" /></a> | <a href="/index.php?title=Result_management#Administrate_letters">Cliccare qui</a> per avere ulteriori informazioni su Gestisci lettere. |
| <a href="#top">Inizio pagina</a> |
Spermiogramma
Per modificare le impostazioni degli spermiogrammi cliccare su Sistema -> Configurazione/Amministrazione -> Impostazioni -> Sistema-> Funzioni -> Spermiogramma.
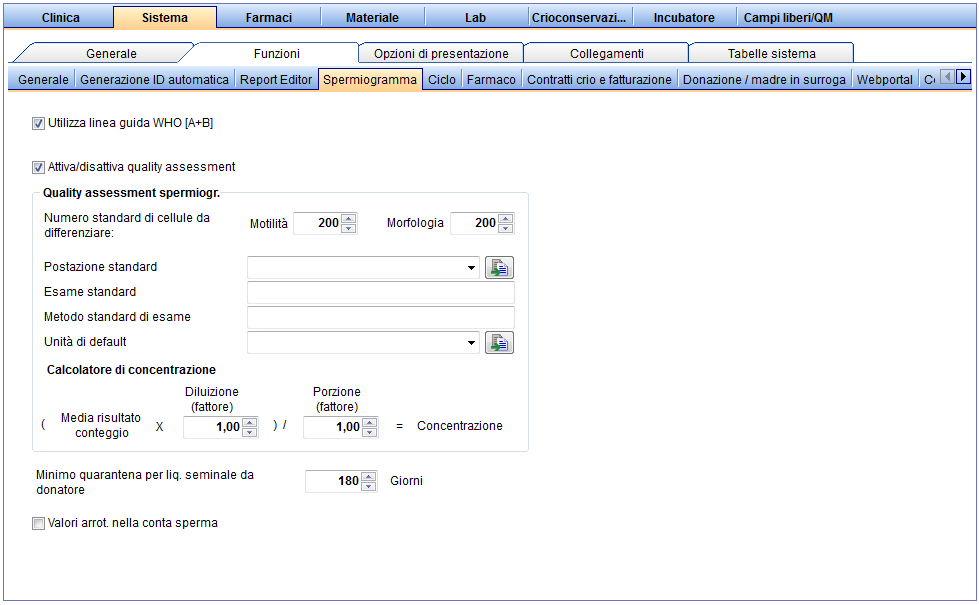 |
-
Utilizza linea guida WHO [A+B]: Permette di scegliere tra l'utilizzo di tre o quattro parametri per la motilità - motilità prograssiva (PR), motilità locale (NP) e immotilità (IM) come specificato dalla linea guida WHO attuale per l'analisi del liquido seminale (parametri A e B insieme per calcolo PR, C e D separati per calcolo di NP e IM).
- Quality assessment spermiogr.: Attivazione della quality assessment con relativa aggiunta automatica dei dati di default inseriti
- Le informazioni su Postazione, esame e metodo d'esame, necessarie per il calcolo e la validazione del liquido seminale, possono essere inserite qui.
- Inoltre se necessario è possibile scegliere l'unità di calcolo e adattare il fattore di diluizione e il fattore porzione.
- <a href="/index.php?title=MedITEX_IVF_Settings#System_tables"><img style="border: 2px dotted blue; float: left;" src="/images/EditSemen.png" alt="" width="31" height="26" /></a> Permette di spostarsi nella sezione delle tabelle di sistema per aggiungere o modificare postazioni/unità. Successivamente le nuove opzioni potranno essere scelte nella sezione di quality assesment.
- Periodo minimo di quarantena per liquido seminale: Giorni di quarantena per il liquido seminale crioconservato. Liquidi seminali di donatori con valori di HEP B, HEP C, TPHA e HIV positivi, o quelli che non hanno raggiunto il periodo minimo di quarantena non possono essere scongelati o utilizzati.
| <a href="/index.php?title=Documenting_a_new_sample#Documenting_a_semen_analysis"><img src="/images/plus48.png" alt="" width="48" height="48" /></a> | <a href="/index.php?title=Documenting_a_new_sample#Documenting_a_semen_analysis">Cliccare qui</a> per avere ulteriori informazioni sulla documentazione di spermiogrammi. |
| <a href="#top">Inizio pagina</a> |
Ciclo
Per modificare le impostazioni dei Cicli cliccare su Sistema -> Configurazione/Amministrazione -> Impostazioni -> Sistema-> Funzioni ->Ciclo
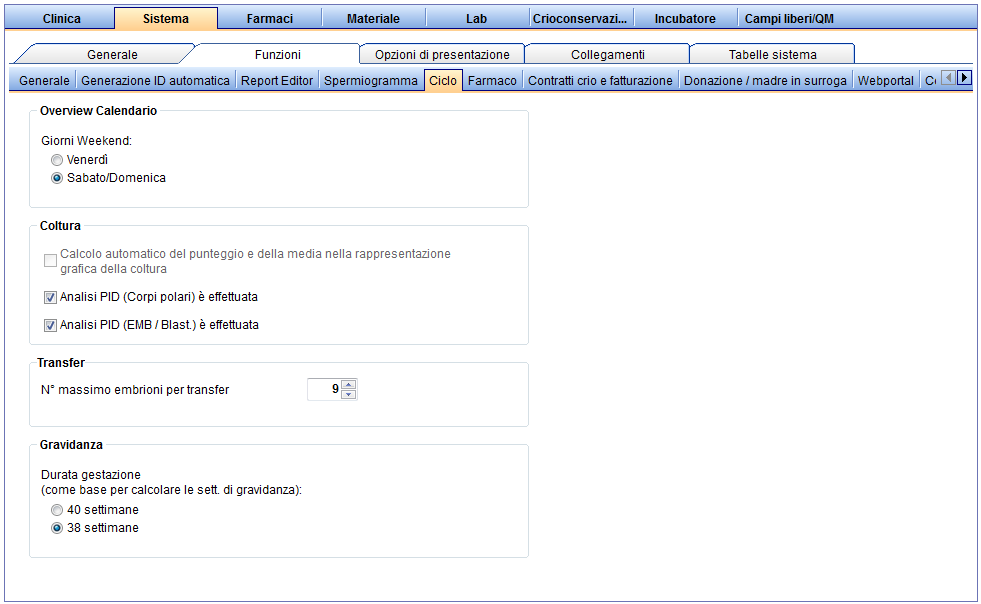 |
- Overview Calendario: è possibile impostare i giorni di weekend
- <a href="/index.php?title=Cycle_Culture">Coltura</a>: Attivare il calcolo automatico del punteggio e della media nella <a href="/index.php?title=Cycle_Culture#Graphical_representation">Rappresentazione Grafica</a> della coltura.
- <a href="/index.php?title=Cycle_Pregnancy">Gravidanza</a>: La settimana gestionale verrà calcolata basandosi sull'opzione scelta in questa sezione. Si possono scegliere 40 o 38 settimane.
- <a href="/index.php?title=Cycle_Transfer">Transfer</a>: Seguendo le disposizioni di legge del proprio paese è possibile impostare il numero massimo di embrioni da trasferire.
| <a href="#top">Inizio pagina</a> |
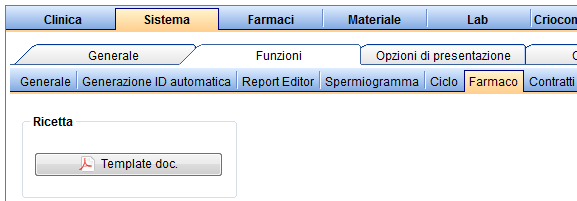
Farmaco
 |
Contratti crio e fatturazione
Per modificare le impostazioni dei Crio contratti e fatture cliccare su Sistema -> Configurazione/Amministrazione -> Impostazioni -> Sistema-> Funzioni ->Contratti crio e fatturazione.
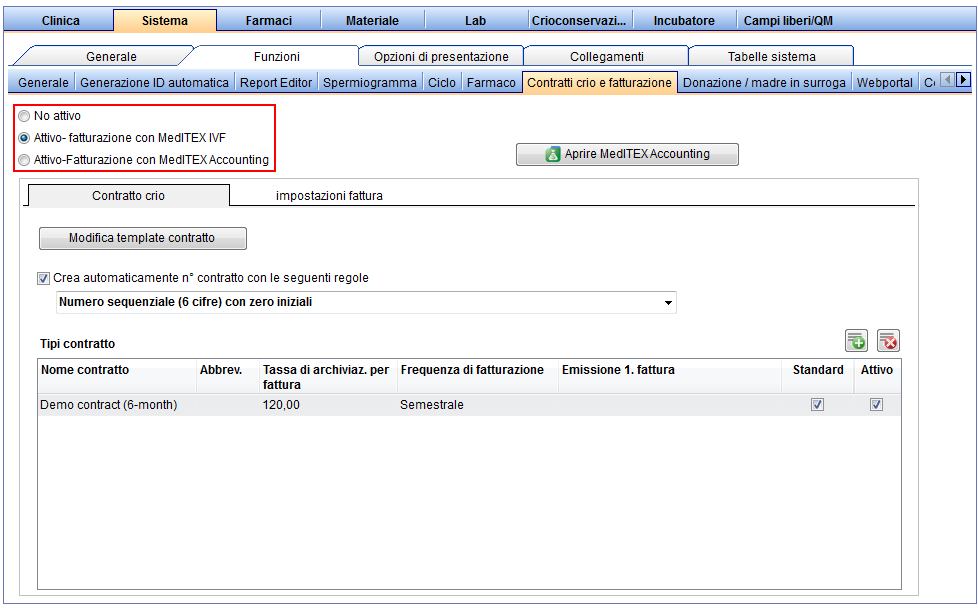 |
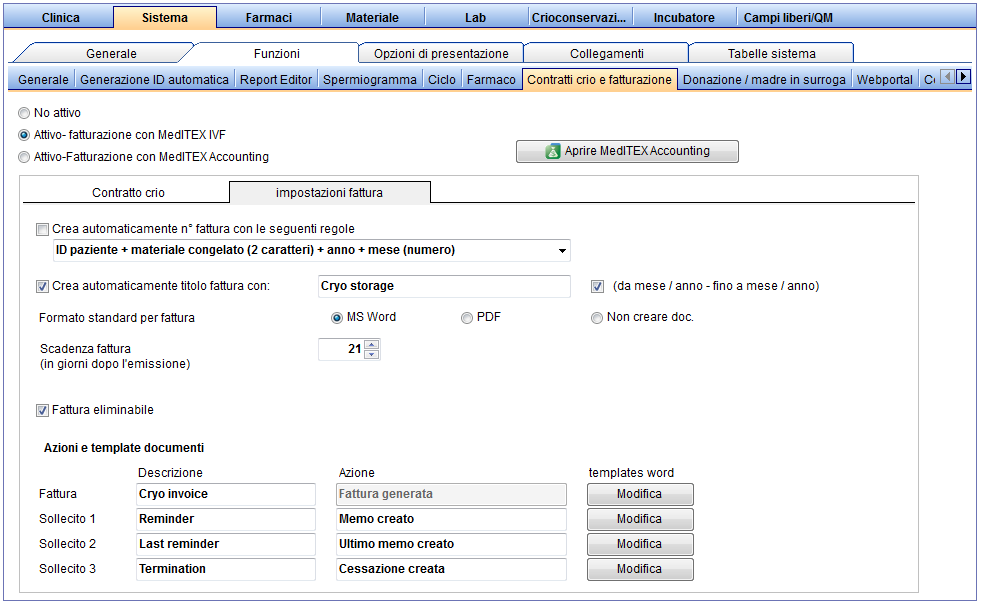
- Attivo-Fatturazione con MedITEX IVF o Accounting: L'opzione Fatturazione con MedITEX IVF è selezionata di default. Permette la creazione di criocontratti e fatture per i pazienti. Se l'opzione è deselezionata, tutte le funzionalità riguardanti i contratti e la fatturazione saranno disabilitate nel programma.
 |
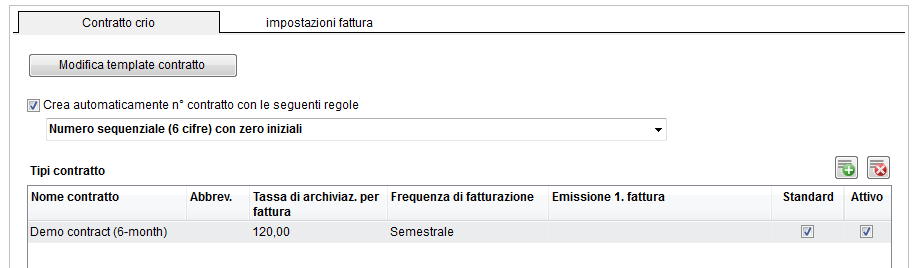 |
- Creazione automatica numero contratto: Se opzione selezionata, ogniqualvolta un <a href="/index.php?title=Create_a_new_entry_in_demographics">criocontratto</a> viene generato in <a href="/index.php?title=Demographics">anagrafica</a>, il numero verrà automaticamente generato secondo la regola scelta.
-
Tipo contratti: lista contenente tutti i tipi di contratto stipulabili. Attraverso il pulsante "Più" è possibile aggiungere un nuovo tipo di contratto, specificando il nome, la frequenza e l'importo. In questa sezione è inoltre possibile impostare il contratto come Standard (Modello utilizzato per tutti i contratti) o Attivo (Modello selezionabile nella maschera di creazione di criocontratti). Per modificare un contratto già esistente è sufficiente fare doppio-click sulla riga desiderata. Per eliminare un contratto, esso non deve mai essere stato utilizzato.
- Modifica template contratto: Premendo questo pulsante sarà possibile creare, modificare, rinominare e cancellare template per i modelli di contratto. Nel file Word che si aprirà è importante ricordare di non modificare le proprietà dei segnalibri (rettangoli grigi) automaticamente caricati sul file per il corretto trasferimento dei dati da MedITEX.
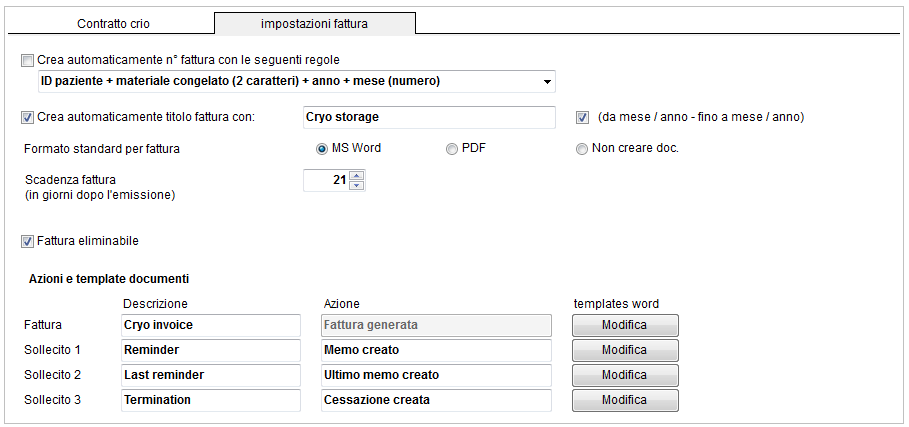 |
| Creazione automatica numero fattura: Se opzione selezionata, ogniqualvolta una <a href="/index.php?title=How_to_create_a_new_cryo_invoice%3F">fattura viene creata</a> il numero verrà automaticamente generato secondo la regola scelta. |
Azioni e template documenti:
- Fatture:prima fattura creata.
- Sollecito 1: primo documento stampato se pagamento non effettuato.
- Sollecito 2: secondo documento stampato se pagamento non effettuato.
- Sollecito 3: terzo documento stampato se pagamento non effettuato.
- Descrizione: descrive il contenuto del documento. Questa informazione apparirà nella sezione Amministrazione documenti del paziente.
- Azione: descrive l'azione compiuta alla stampa del documento. TQuesta informazione apparirà nella sezione Fatture inevase e sulle fatture dei pazienti.
- Template Word: Sezione per la creazione e la modifica dei template dei documenti. Cliccando il pulsante Modifica sarà possibile creare un nuovo documento inserendo il nome del modello e modificando il file Word che si apre, modificare, eliminare e rinominare modelli già presenti.
- <strong>Creazione automatica nome fattura</strong>: permete di impostare il nome standard assegnato alle fatture generate. Se l'opzione non è selezionata, nessun nome sarà assegnato alle fatture generate, ma sarà comunque possibile inserire il nome manualmente o generare il nome standard premeno il pulsante di generazione auotomatica. Se opzione (da mese / anno – a mese / anno) è selezionata, queste informazioni saranno aggiunte al nome della fattura.
-
Formato standard per fattura: permette di scegliere il formato standard delle fatture (MS Word, PDF o nessun documento generato).
-
Sacdenza fattura: tempo perchè il pagamento venga effettuato.
| <img src="/images/plus48.png" alt="" width="48" height="48" /> | <a href="/index.php?title=MedITEX_IVF_Settings#Cryo_storage">Cliccare qui</a> per avere più informazioni sulle impostazioni della Criobanca. |
| <a href="/index.php?title=Cryo_storage">Cliccare qui</a> per avere più informazioni sulla Criobanca. | |
| <a href="/index.php?title=Cryo_contracts_and_accounting">Cliccare qui</a> per avere più informazioni su Crio contratti e fatturazione. | |
| <a href="/index.php?title=MedITEX_IVF_how_to#Cryo_contracts_and_invoicing"><img src="/images/howto48.png" alt="" width="48" height="48" /></a> | <a href="/index.php?title=MedITEX_IVF_come_fare#Contratti_Crio_e_Fatturazione">Cliccare qui</a> per raggiungere la pagina Come Fare. |
| <a href="#top">Inizio pagina</a> |
Donazione/madre in surroga
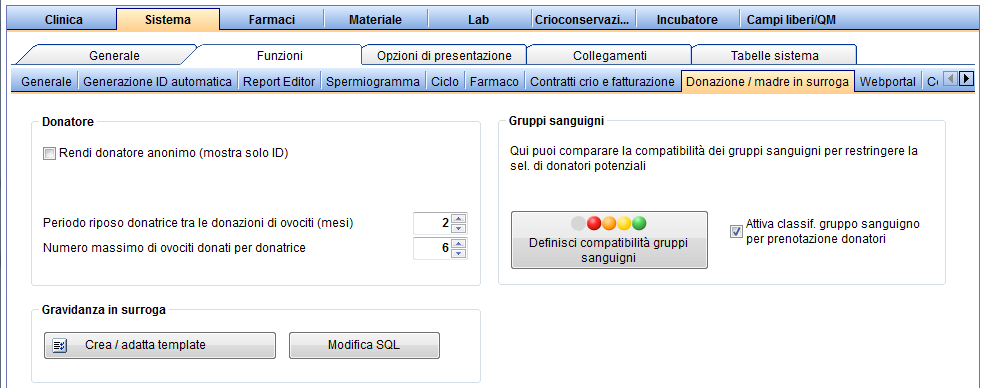
Per modificare le impostazioni di Donazione/madre in surroga cliccare su Sistema -> Configurazione/Amministrazione -> Impostazioni -> Sistema-> Funzioni ->Donazione/madre in surroga.
 |
| <img style="display: block; margin-left: auto; margin-right: auto;" src="/images/Impostazioni_26_IT.png" alt="" width="461" height="181" /> |
Donatore:
|
| <img style="display: block; margin-left: auto; margin-right: auto;" src="/images/Impostazioni_27_IT.png" alt="" width="239" height="75" /> |
Contratto per madre in surroga:
|
| <img style="display: block; margin-left: auto; margin-right: auto;" src="/images/Impostazioni_28_IT.png" alt="" width="456" height="179" /> |
Classificazione gruppo sanguigno prenotazioni: attiva la classificazione del gruppo sanguigno per prenotazione di campioni da donazione. Collegando Donatore a ricevente è possibile visualizzare il grado di compatibilità dei gruppi sanguigni. Definire la compatibilità dei gruppi sanguigni. Cliccando il pilsante sarà possibile accedere alla finestra di seguito e scegliere i gradi di compatibilità dei gruppi sanguigni. |
| <img style="display: block; margin-left: auto; margin-right: auto;" src="/images/Impostazioni_29_IT.png" alt="" width="699" height="521" />
Compatibilità: impostare il grado di compatibilità attraverso i colori. La legenda è presente nell'angolo in alto a destra della finestra. Cliccare sulle celle della tabella e selezionare dal menù a tendina il colore appropriato. |
|
| <img style="display: block; margin-left: auto; margin-right: auto;" src="/images/Impostazioni_30_IT.png" alt="" width="421" height="112" /> | Inizializza: con questo pulsante sarà possibile inizializzare la tabella. Senza impostazioni eliminerà tutte le compatibilità inserite. Con impostazioni inserirà la massima compatibilità nella diagonale. Imposta tutte le combinazioni con riepirà la tabella con il colore scelto, o la diagonale verde e il resto della tabella con buona compatibilità se viene scelto Standard. |
| <img style="display: block; margin-left: auto; margin-right: auto;" src="/images/Impostazioni_31_IT.png" alt="" /> | Capovolgi le modifiche automaticamente: modifiche riportate sulla sezione di tabella sotto la diagonale, verranno inserite automaticamente nella sezione sopra alla diagonale, a specchio |
| <img style="display: block; margin-left: auto; margin-right: auto;" src="/images/plus48.png" alt="" width="48" height="48" /> | <a href="/index.php?title=Search_for_suitable_patient#Search_area">Cliccare qui</a> per visualizzare il manuale della ricerca di donatori, dove questa feature viene utilizzata. |
| <a href="#top">Inizio pagina</a> |
Opzioni di presentazione
Generale
Per modificare le opzioni di presentazione cliccare su Sistema -> Configurazione/Amministrazione -> Impostazioni -> Sistema-> Opzioni di presentazione->Generale
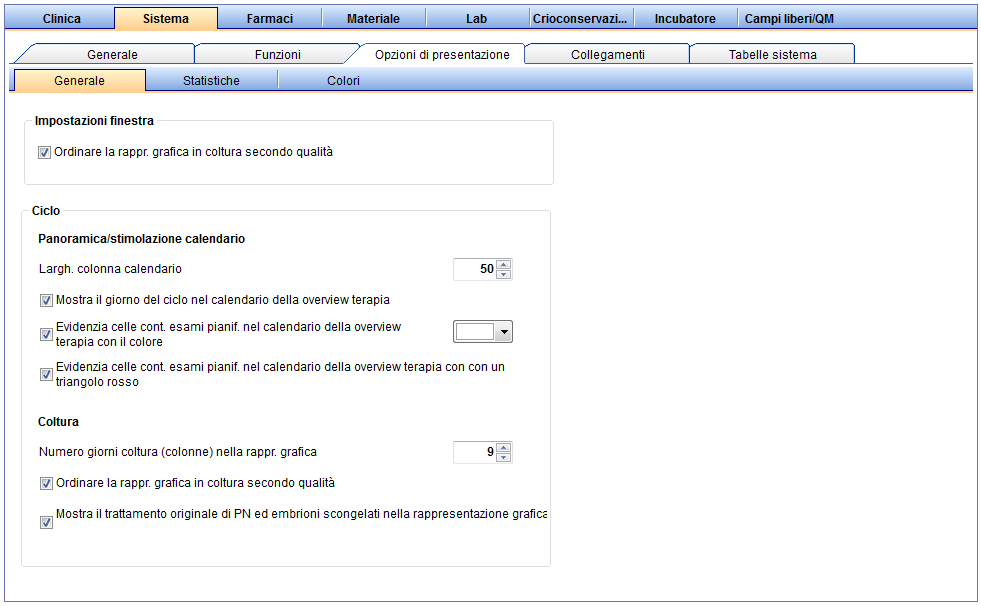 |
- Impostazioni finestra: ogni utente può salvare la visualizzazione della finestra principale (altezza, larghezza, posizione), al momento della chiusura dell'applicazione.
- <a href="/index.php?title=Cycle_Overview">Ciclo</a>: impostazioni riguardanti il formato del calendario.
- <a href="/index.php?title=Cycle_Culture">Coltura</a>:
- Selezionare il numero di giorni presenti nella rappresentazione grafica.
- Selezionare l'ordinamento delle cellule nella rappresentazione grafica. Si può sceglere tra l'ordinamento per qualità (il migiore per primo) o l'odinamento per ID cellula.
- Visualizzare il trattamento originale per PN e EMB scongelati, nella rappresentazione grafica.
| <a href="#top">Inizio pagina</a> |
Statistiche
Per modificare le opzioni di presentazione cliccare su Sistema -> Configurazione/Amministrazione -> Impostazioni -> Sistema-> Opzioni di presentazione->Statistiche
 |
|
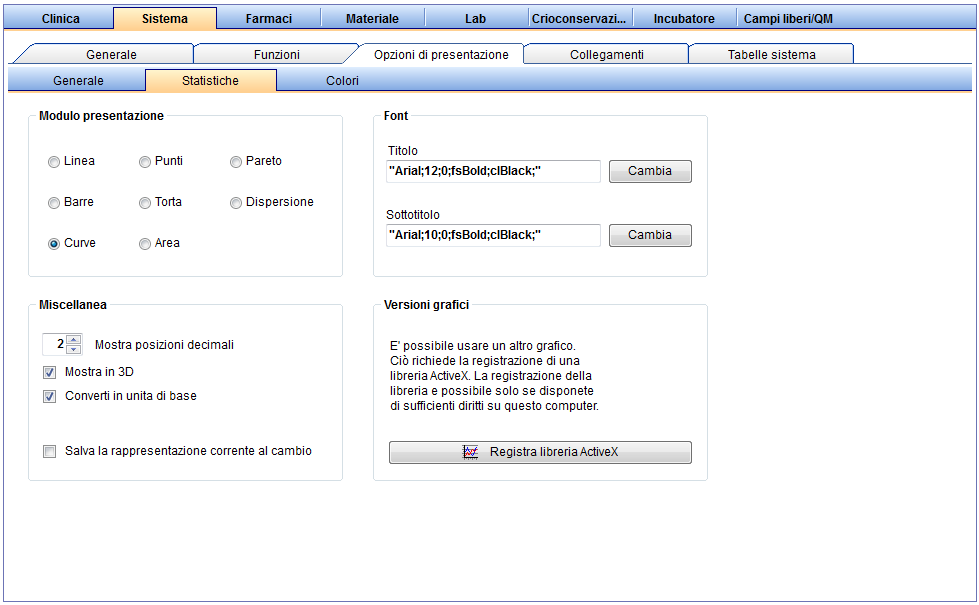
Nella sezione Statistiche, è possibile impostare il formato dei grafici nel report per ottenere report sempre uguali. |
| <a href="#top">Inizio pagina</a> |
Colori
Per modificare le opzioni di presentazione cliccare su Sistema -> Configurazione/Amministrazione -> Impostazioni -> Sistema-> Opzioni di presentazione->Colori
You can use colours in the different sections of MedITEX IVF, for example in the section <a href="/index.php?title=Cryo_storage">Cryo storage</a>.
 |
|
| <img style="display: block; margin-left: auto; margin-right: auto;" src="/images/ColourUse.png" alt="" width="180" height="27" /> | Check this option if you wish to use custom colours only. |
Choose a colour:
- You can choose a colour by scrolling through the entire colour palette. If you wish to use standardized colour values, you can enter RGB values numerically. The currently selected colour will be shown in a small preview window.
- Click OK and the colour will be displayed in the list on the left side. The colour code of your operating system will be used for the description of the colour.
- To change the description, click on the text next to the colour.
| <a href="#top">Back to top</a> |
Interfaces
Only change the interface settings if you are sure what these changes will do in the program. Otherwise there may be functionality errors or complete failure of certain functions.
Internal
To edit the Settings of Internal interfaces click on the menu item System -> Configuration / administration -> Settings -> System -> Interfaces -> Internal.
 |
| In order to change file paths, click the directory symbol on the right side of the respective row. A dialog window will open and you can change the file path accordingly. |
External
To edit the Settings of External interfaces click on the menu item System -> Configuration / administration -> Settings -> System -> Interfaces -> External.
 |
|
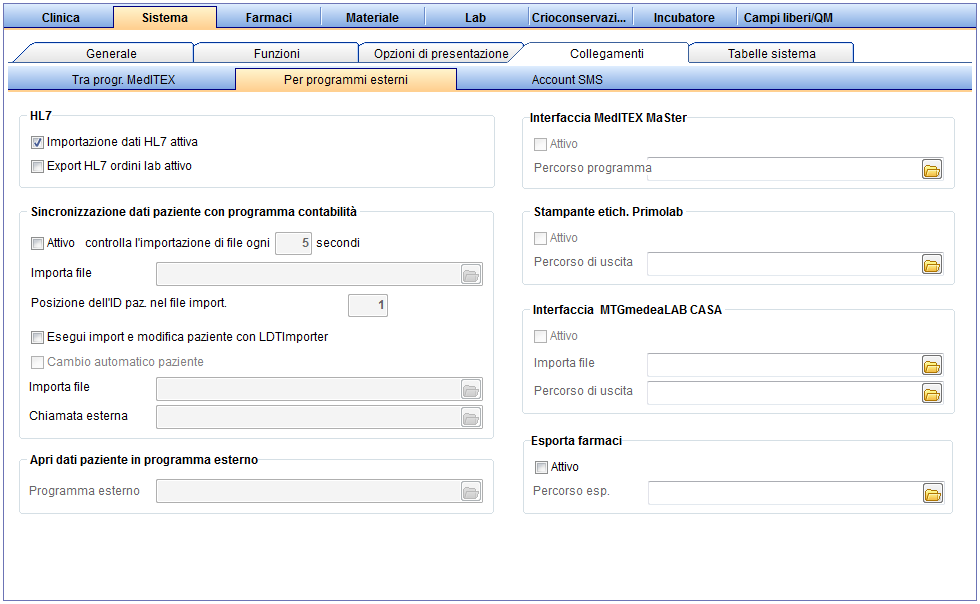
On this page you should include the path for importing or exporting Data from different programs. In order to change file paths, click the directory button on the right side of the respective row. A dialog window will open and you can change the file path accordingly. |
| <a href="#top">Back to top</a> |
SMS Account
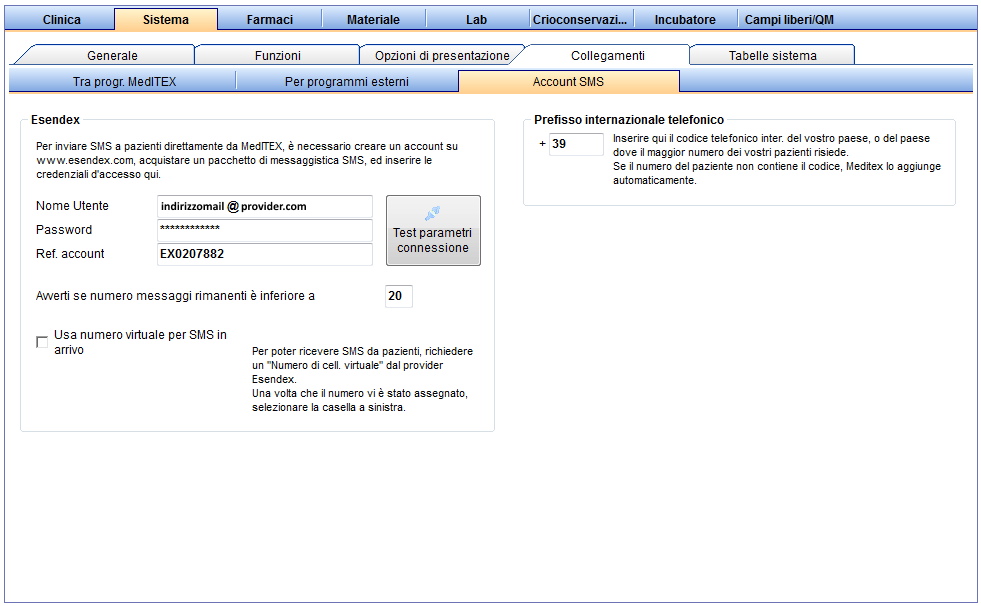 |
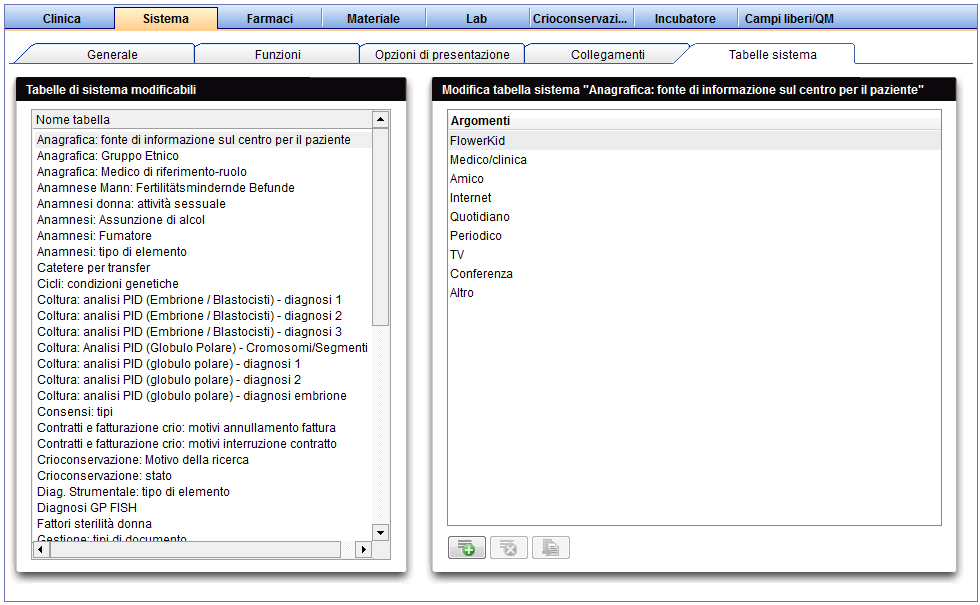
Tabelle di sistema
To edit the Settings of System tables click on the menu item System -> Configuration / administration -> Settings -> System -> System tables.
In the section System tables you can modify different values within the program accordingly. You can, for example, define additional measures for a cycle. These can then be shown as a selection field in the cycle.
 |
| <img style="display: block; margin-left: auto; margin-right: auto;" src="/images/Plus.png" alt="" width="23" height="23" /> |
Press New entry and enter the additional measure in the new line. Subsequently, the new additional measure will be displayed. The program will order the list alphabetically. |
| <img style="display: block; margin-left: auto; margin-right: auto;" src="/images/EditSemen.png" alt="" width="28" height="26" /> <img style="display: block; margin-left: auto; margin-right: auto;" src="/images/DeleteX.png" alt="" width="28" height="24" /> |
You can edit or delete the contents of the tables at any time. However, the predefined entries cannot be edited or deleted. |
There is one exception:
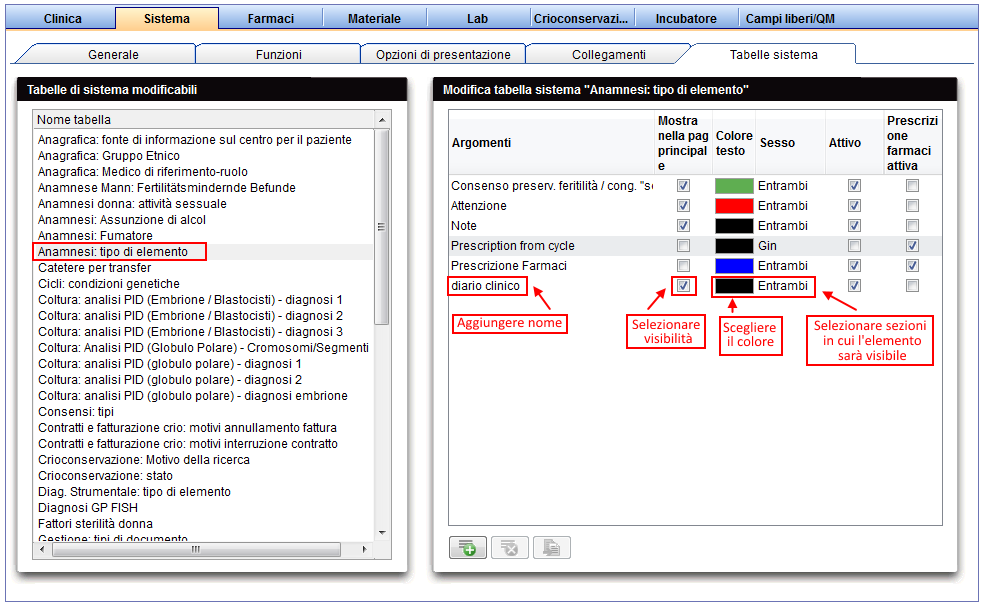 |
At the table Medical history: entry type you have more functionalities, as in the others. Here you can add additionally a text colour and if the Item should be shown in the main window.
| <img src="/images/Impostazioni_42_IT.png" alt="" width="382" height="104" /> | Here we are in the main window. You can see the different types of informations in their colours. |
You can also go to the system tables from the medical history page:
| <img src="/images/Impostazioni_43_IT.png" alt="" width="349" height="221" /> |
To edit the entries of medical history
In this list you can see all existing possibilities for entries at the medical history area. |
| <a href="#top">Back to top</a> |
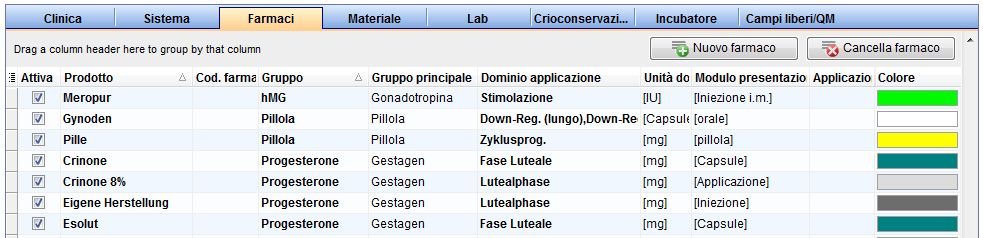
Drugs
To edit the Settings of Drugs click on the menu item System -> Configuration / administration -> Settings -> Drugs.
The section Drugs contains a fixed list of the most important products used in the field of reproductive medicine.
Besides, you can also define additional long-term and pill products that are used in your medical centre.
 |
| <img style="display: block; margin-left: auto; margin-right: auto;" src="/images/Impostazioni_45_IT.png" alt="" width="155" height="26" /> |
New drug: add a new drug. |
| <img style="display: block; margin-left: auto; margin-right: auto;" src="/images/Impostazioni_46_IT.png" alt="" width="155" height="30" /> |
Delete drug: only drugs you have added yourself can be deleted by pressing this button. |
- The list of drugs contains products in the groups Gonadotropin, GnRH Analogon, hCG, Progesterone, Gestagen, Estrogen, Antiestrogen and Pill according to the current Red List®.
- The list of drugs is provided and updated by CRITEX and cannot be changed by the user.
- If you do not wish to use this drug, uncheck the box Active or double-click on the drug to open the drug editor. There you can uncheck the box Active. Now, the drug will not be available for selection in any window of the program.
- Press the column header to sort the entries according to their names, to reverse the sorting or to filter the list. <a href="/index.php?title=Welcome_to_MedITEX_IVF#Managing_Lists">Read here</a> how to manage lists.
 |
| <a href="/index.php?title=How_to_add_new_drugs%3F"><img src="/images/howto48.png" alt="" width="48" height="48" /></a> | <a href="/index.php?title=How_to_add_new_drugs%3F">Click here</a> to read more about adding new drugs. |
| <a href="#top">Back to top</a> |
Material
To edit the Settings of Material click on the menu item System -> Configuration / administration -> Settings -> Material.
In the section Material you can enter data concerning material groups, manufacturers and products. You can also create different batches and activate them for a certain period of time.
Articles / Batches
To edit the Settings of Articles / Batches click on the menu item System -> Configuration / administration -> Settings -> Material -> Articles / Batches.
On this tab, you can add the needed materials to the list and make them available for the creation of QM fields.
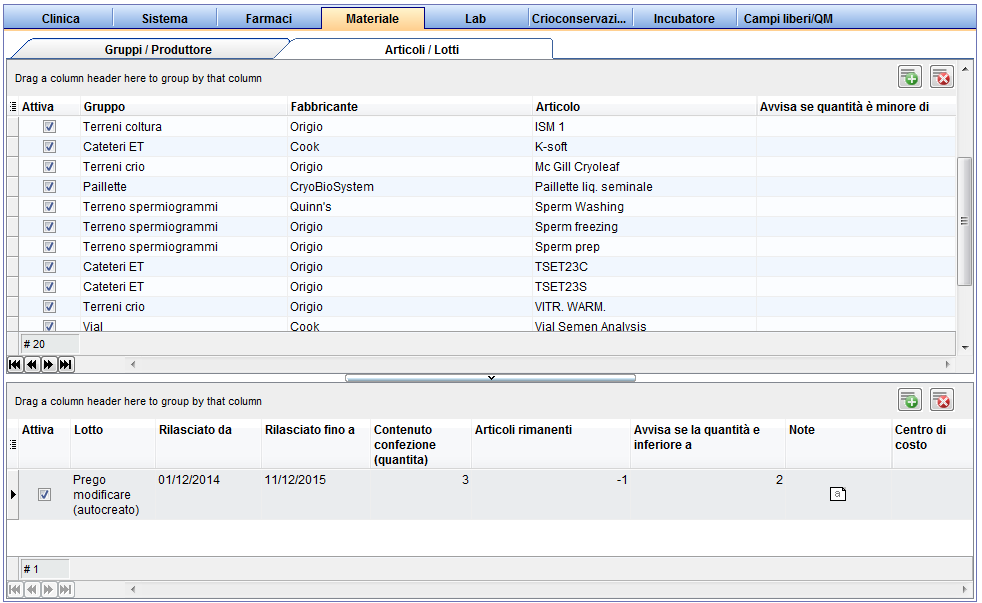 |
| <img style="display: block; margin-left: auto; margin-right: auto;" src="/images/Plus.png" alt="" /> | Press this button on the right to add a new article/batch. |
| <img style="display: block; margin-left: auto; margin-right: auto;" src="/images/DeleteX.png" alt="" width="26" height="24" /> |
Delete it with this button. This is only possible if articles have not been assigned to QM fields or are being used. Should this be the case, deactivate the item by unchecking the box Active. This data will then be hidden without being deleted. Articles can only be deleted if they have not yet been used. |
| <a href="/index.php?title=How_to_add_material_articles_/_batches%3F"><img src="/images/howto48.png" alt="" width="48" height="48" /></a> | <a href="/index.php?title=How_to_add_material_articles_/_batches%3F">Click here</a> to read more about adding new material and articles. |
Manufacturer
To edit the Settings of Manufacturer click on the menu item System -> Configuration / administration -> Settings -> Material -> Manufacturer.
You can see a list of all existing manufactures on the tab Manufacturer.
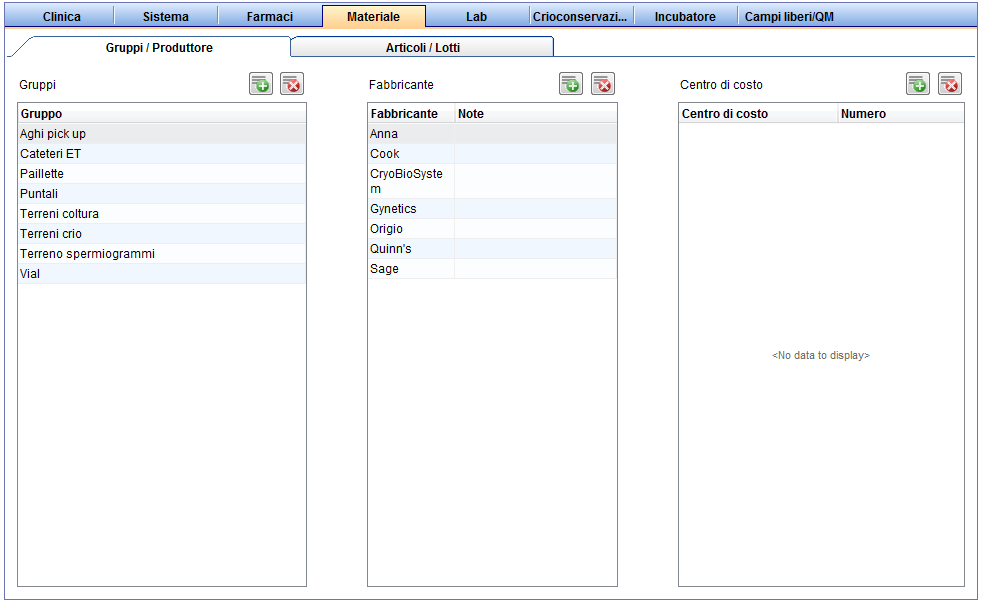 |
| <img style="display: block; margin-left: auto; margin-right: auto;" src="/images/Plus.png" alt="" /> | Press this button on the top right to add a new manufacturer. |
| <img style="display: block; margin-left: auto; margin-right: auto;" src="/images/DeleteX.png" alt="" width="26" height="24" /> |
Delete it with this button. This is only possible if manufactures have not been assigned to QM fields or are being used. Should this be the case, deactivate the item by unchecking the box Active. This data will then be hidden without being deleted. Manufacturers can only be deleted if they have not yet been used. |
| <a href="/index.php?title=How_to_add_material_manufacturer%3F"><img src="/images/howto48.png" alt="" width="48" height="48" /></a> | <a href="/index.php?title=How_to_add_material_manufacturer%3F">Click here</a> to read more about adding new manufacturers. |
Groups
To edit the Settings of Groups click on the menu item System -> Configuration / administration -> Settings -> Material -> Groups.
On this tab, you can create a new material group, for example probes. Here you can see a list of all existing groups.
| |
| <img style="display: block; margin-left: auto; margin-right: auto;" src="/images/Plus.png" alt="" /> | Press this button on the top right to create a new group. |
| <img style="display: block; margin-left: auto; margin-right: auto;" src="/images/DeleteX.png" alt="" width="26" height="24" /> |
Delete a group with this button. This is only possible if groups have not been assigned to QM fields or are being used. Should this be the case, deactivate the item by unchecking the box Active. This data will then be hidden without being deleted. Groups can only be deleted if they have not yet been used. |
| <a href="/index.php?title=How_to_add_material_groups%3F"><img src="/images/howto48.png" alt="" width="48" height="48" /></a> | <a href="/index.php?title=How_to_add_material_groups%3F">Click here</a> to read more about adding new manufacturers. |
| <a href="#top">Back to top</a> |
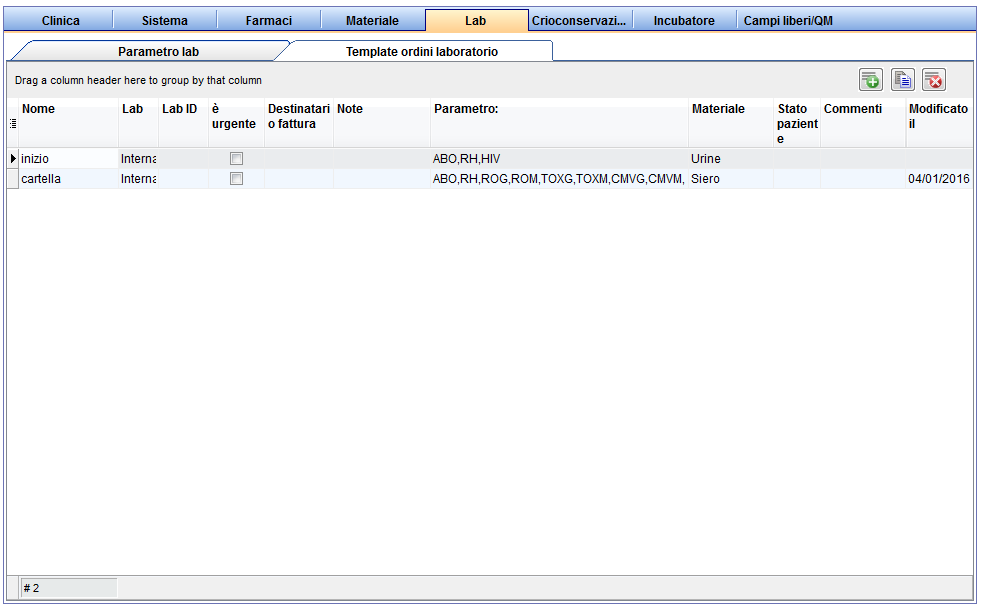
Lab
To edit the Settings of Lab click on the menu item System -> Configuration / administration -> Settings -> Lab.
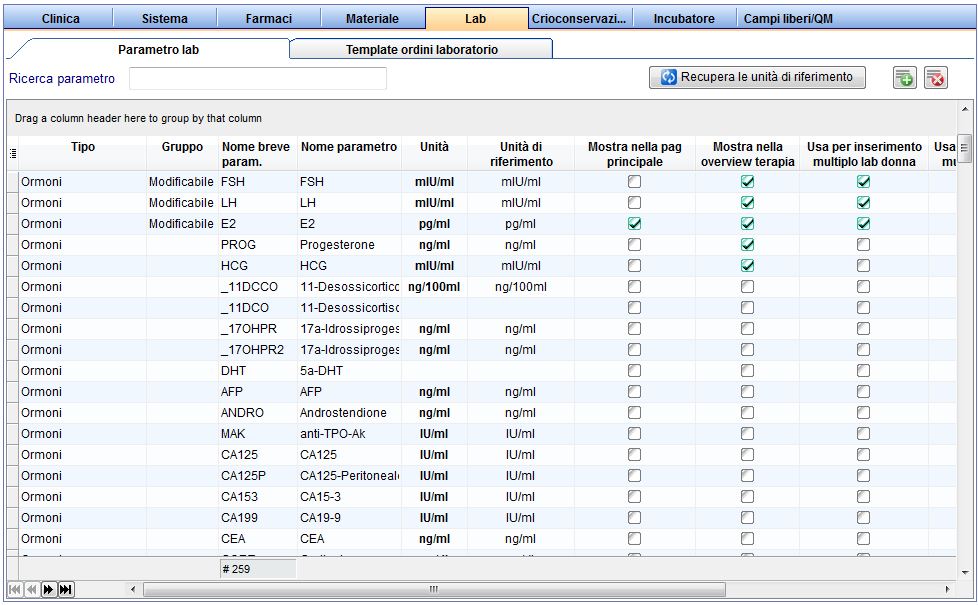 |
Explanation of the columns:
- Area: type of the lab value like: Hormones, Serology, Clinical chemistry, Genetics or Microbiology.
- Group: defines the groups of laboratory values as: Blood count, Coagulation, Genotype, Family history, etc.
- Param. short name: abbreviation of the parameter name.
- Parameter name: full name of the parameter.
- Unit: value specified unit. This can be customized in the laboratory parameter editor.
- Reference unit: through the button Restore reference units all changed parameters units are adjusted to the value of the reference units.
- Show in main window: if this box is checked, the laboratory value is displayed in the Lab test in the main window.
- Show in cycle overview: if this box is checked, the laboratory value is displayed in the Cycle overview.
- Use for multiple entry in female lab: when activating this field, the parameter appears in the list of female multiple entry.
- Use for multiple entry in male lab: when activating this field, the parameter appears in the list of male multiple entry.
- Finding validity period: decide here on the findings validity of the selected parameters.
 |
| <img style="display: block; margin-left: auto; margin-right: auto;" src="/images/Plus.png" alt="" /> | Press this button on the top right to add a new laboratory value. |
| <img src="/images/DeleteX.png" alt="" width="26" height="24" /> | Delete an existing laboratory value with this button. |
| <img src="/images/Impostazioni_52_IT.png" alt="" width="225" height="32" /> | Through this button all changed parameters units are adjusted to the value of the reference units. |
| <a href="/index.php?title=How_to_add_/_edit_a_laboratory_parameter%3F"><img src="/images/howto48.png" alt="" width="48" height="48" /></a> | <a href="/index.php?title=How_to_add_/_edit_a_laboratory_parameter%3F">Click here</a> to read more about adding laboratory parameters. |
| <a href="#top">Back to top</a> |
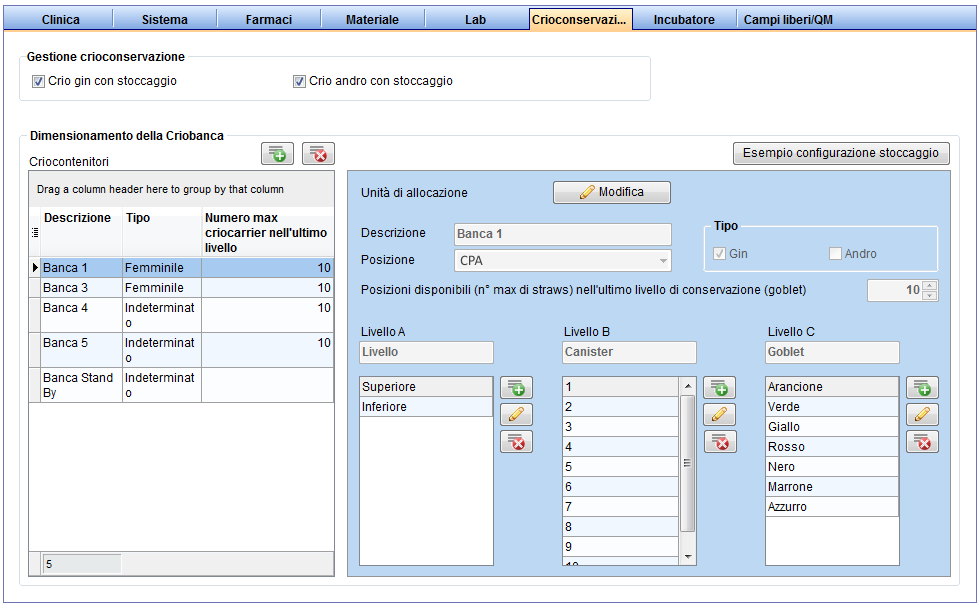
Cryo storage
To edit the Settings of Cryo storage click on the menu item System -> Configuration / administration -> Settings -> Cryo storage.
In the section Cryo storage you can manage all cryo canisters and their storage system. You can define up to three hierarchic storage levels per canister. Their filling level can be checked in the freezing section to determine free space.
 |
| <img src="/images/CryoFreeze.png" alt="" /> |
Freeze with cryo storage: You can choose which type you will freeze in your cryostorage: samples of women, samples of men, or both. This information is important because it is displayed in the <a href="/index.php?title=Cryo_storage#Cryostorage_overview">Cryo storage Overview</a>. |
| <img src="/images/Impostazioni_54_IT.png" alt="" width="319" height="23" /> | Here you can switch between your different cryo storage locations, if you have more then one. |
| <img src="/images/ChangeLocation.png" alt="" width="44" height="27" /> | Modify the location of the selected container. |
| <img style="display: block; margin-left: auto; margin-right: auto;" src="/images/Plus.png" alt="" /> |
Press this button to add a new unit. For more information about adding a new unit, read <a href="/index.php?title=How_to_add_a_new_canister_to_the_cryo_storage%3F">here</a>. |
| <img style="display: block; margin-left: auto; margin-right: auto;" src="/images/DeleteX.png" alt="" width="26" height="24" /> | Select the unit you wish to delete and click this button. |
| <img src="/images/Impostazioni_55_IT.png" alt="" width="589" height="28" /> | Enter here the maximum number of frozen straws in the last level. It helps you for searching an empty place, if you are freeze a new straw in the freezing section. |
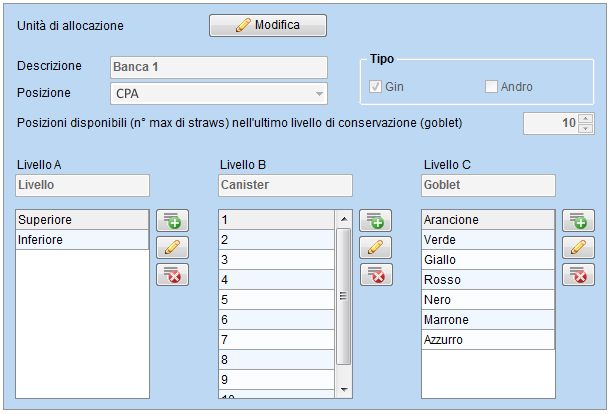 |
Storage dimensioning:
- When a new unit is created, the following fields have to be filled:
- Description
- Type
- Storage levels
- Type: you can also determine whether oocytes and embryos ("Ooc./emb.") or sperms (“Sperm”) will be stored in a given unit.
- It is possible to modify the name of the allocation units. Select an existing unit by clicking on it in the column Allocation unit and edit Description, Type and Storage levels accordingly.
| <a href="/index.php?title=How_to_add_a_new_canister_to_the_cryo_storage%3F"><img src="/images/howto48.png" alt="" width="48" height="48" /></a> | <a href="/index.php?title=How_to_add_a_new_canister_to_the_cryo_storage%3F">Click here</a> to learn how to add a new canister to the Cryo storage. |
| <a href="#top">Back to top</a> |
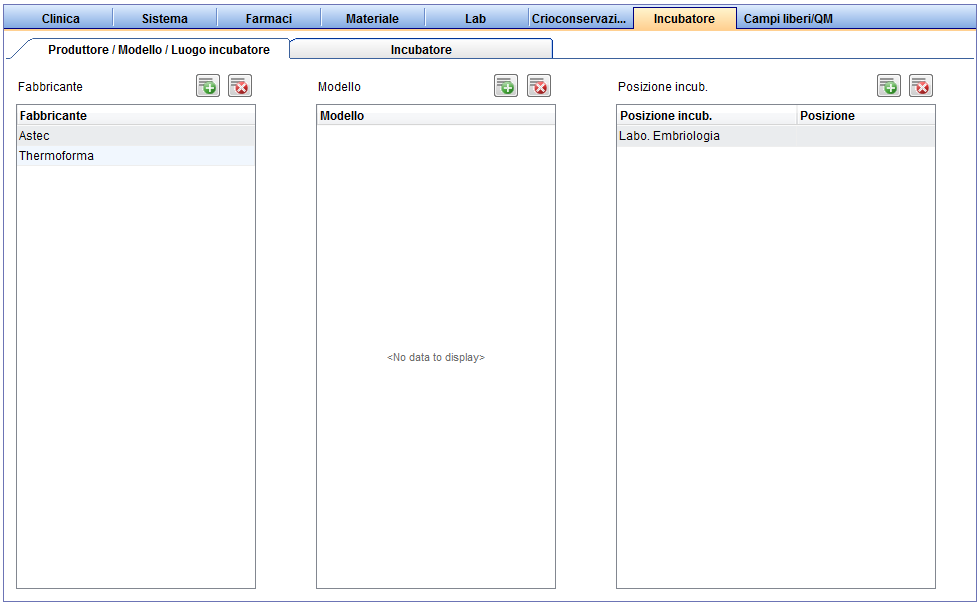
Incubator
To edit the Settings of Incubator click on the menu item System -> Configuration / administration -> Settings -> Incubator -> Incubator.
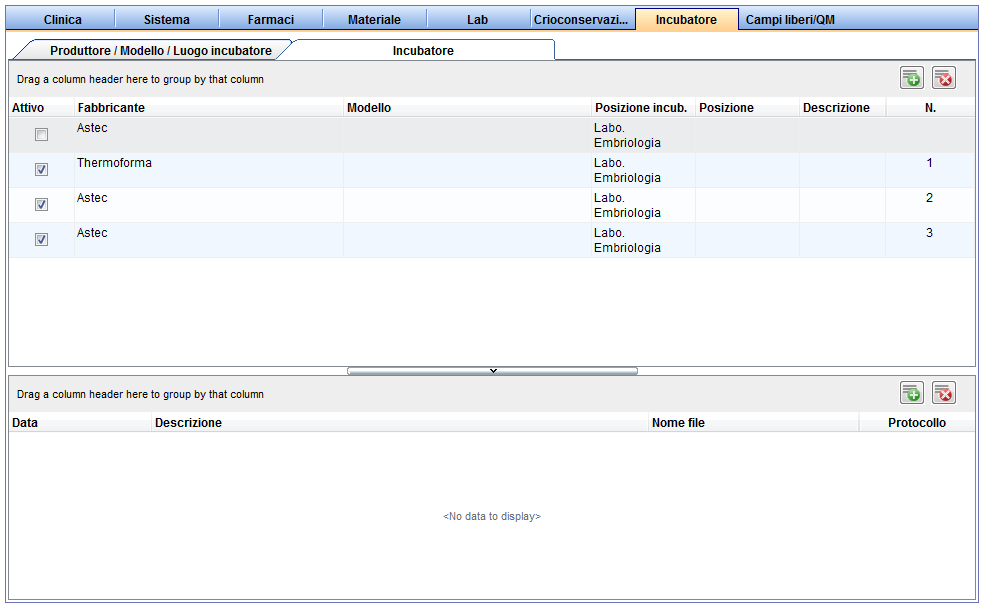 |
Incubator administration:
- Active: here you can see whether the incubator is set to Active.
- Manufacturer: registered Manufacturer of the incubator.
- Model: model/type of the incubator.
- Location of incubator: the place where the incubator is used.
- Description: special or specific notes about the incubator.
- Incubator no: enter a number to each incubator in order to distinguish them.
 |
Incubator documents:
You can see the documents of a selected incubator.
- Date: creation date of the document.
- Description: short description with important information.
- Filename: name of the stored protocol.
- Protocol: stored notes.
Get more information about the adding and editing an incubator, .
| <a href="/index.php?title=How_to_add_/_edit_an_incubator%3F"><img src="/images/howto48.png" alt="" width="48" height="48" /></a> | <a href="/index.php?title=How_to_add_/_edit_an_incubator%3F">Click here</a> to read more about adding incubators. |
| <a href="#top">Back to top</a> |
Free / QM fields
To edit the Settings of Free / QM fields click on the menu item System -> Configuration / administration -> Settings -> Free / QM fields.
- Here you can configure all QM and free fields. QM stands for Quality Management and gives you an option to document all the extra information relevant to you with the help of QM fields.
- Staff, material, times and further free fields can be assigned to any QM field – and therefore every associated input area - in the settings.
 |
Buttons with a blue dotted frame have special functionalities. Click on it to have more information.
| <img style="display: block; margin-left: auto; margin-right: auto;" src="/images/Plus.png" alt="" /> | This button is placed at the QM assignment selection. It allows you to define or add new sub items. |
| <img style="display: block; margin-left: auto; margin-right: auto;" src="/images/DeleteX.png" alt="" /> | This button is placed at the QM assignment selection. You can delete articles from this area. |
| <img style="display: block; margin-left: auto; margin-right: auto;" src="/images/LeftRight.png" alt="" width="29" height="64" /> | Use this buttons between QM domain assignment and QM assignment selection to assign a selected entry (right) to a QM field (left) or delete an entry from the QM domain assignment (left). |
| <a href="/index.php?title=How_to_configure_items%3F"><img style="display: block; margin-left: auto; margin-right: auto; border: 2px dotted blue;" src="/images/QMEdit.png" alt="" width="24" height="23" /></a> | Configuration: add or edit members of staff, material or values. |
| Three QM types: | |
| <img style="display: block; margin-left: auto; margin-right: auto;" src="/images/O.png" alt="" /> | Staff: type of personnel. |
| <img style="display: block; margin-left: auto; margin-right: auto;" src="/images/L.png" alt="" /> | Material: materials and batch numbers. |
| <img style="display: block; margin-left: auto; margin-right: auto;" src="/images/F.png" alt="" /> | Free fields: any additional information. |
| <img style="display: block; margin-left: auto; margin-right: auto;" src="/images/Impostazioni_60_IT.png" alt="" width="444" height="556" /> |
QM fields:
|
| <img src="/images/Impostazioni_61_IT.png" alt="" width="438" height="558" /> |
Items assigned to the selected QM field:
|
| <img style="display: block; margin-left: auto; margin-right: auto;" src="/images/Impostazioni_62_IT.png" alt="" width="469" height="559" /> |
Pool of all available items:
|
Press the column header to sort the items by their names, type or description.
| <a href="/index.php?title=MedITEX_IVF_how_to#QM_.2F_free_fields"><img src="/images/howto48.png" alt="" width="48" height="48" /></a> |
There are several options available to edit the items assigned to a QM field. Read more about it on our <a href="/index.php?title=MedITEX_IVF_how_to#QM_.2F_free_fields">How to</a> section. |
| <img src="/images/hint48.png" alt="" width="48" height="48" /> |
Tips for managing QM fields:
|
| <a href="/index.php?title=MedITEX_IVF_manual">Back to the MedITEX IVF menu </a> | <a href="#top">Back to top</a> |
Slim Marwen Jouini