Cycle Culture
From MedITEX - Wiki

Precise documentation of every single oocyte/embryo.
Every oocyte is unique. Several methods have been developed to evaluate the development potential on cell and cleavage level. Oocytes/embryos are extracted, undergo a treatment, are frozen if necessary, transported, stored, thawed, cultivated again and transferred. Enough reasons to create documentation on oocyte/embryo level. The EU Directive "Cells and Tissue" also requires documentation on identifiability and traceability of each oocyte/embryo.
Every single obtained oocyte/embryo will be represented visually in a graphical overview. It allows entries for a maximum of ten cultivation days, although more then 5 to 6 days will most likely never be necessary. In the overview, development stages and manipulations such as insemination and injections, assisted hatching, polar body diagnosis, freezing and thawing processes, embryo transfer and more, can be assigned exact to the cell and day. All this can be done with a few mouse-clicks on the corresponding cells.
Contents |
Before entering data you should consider if you wish to put the focus of your documentation
- on summarized entries,
- or also on the individual oocyte/embryo.
In the first case you should enter the data only in the table view, while in the second you should use the graphical representation. The graphical representation can also be used to "fine-tune” entries made in the tabular view.
The table and graphical representations are linked logically. Changes made in one of the two views will also be represented in the other.
Treatments and treatment semen analysis
 |
| Press this button to start the thawing process. | |
|
With this button you can go to the cryo storage and freeze the wished number of oocytes/embryos. |
|
 |
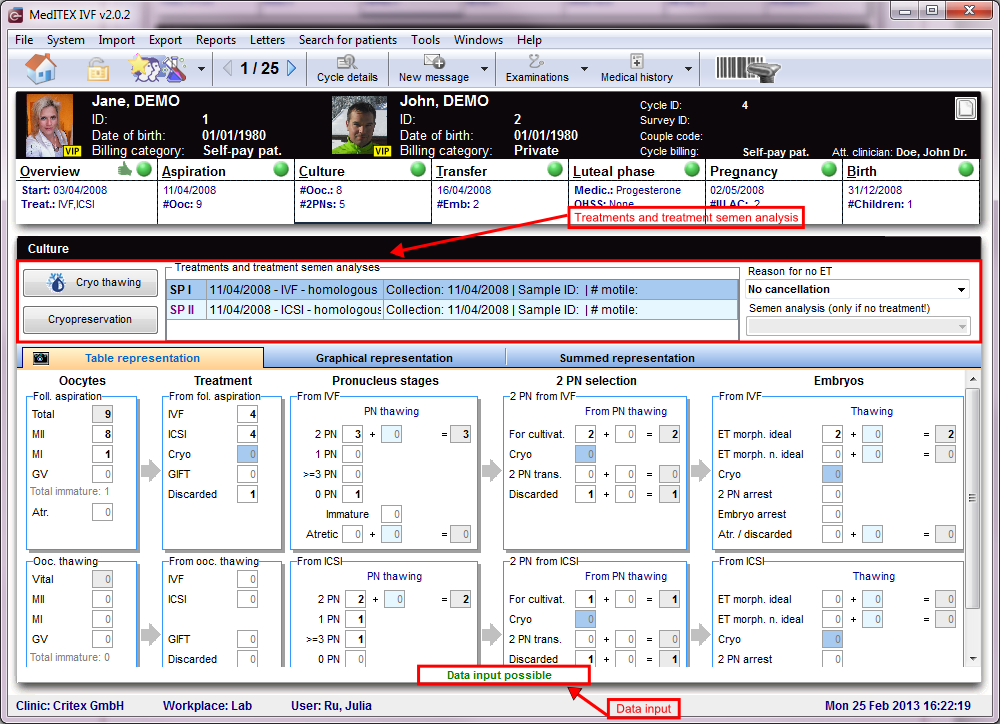
Reason for cancelation before ET. Change the options for reason for no ET in the system tables in the settings. |
 |
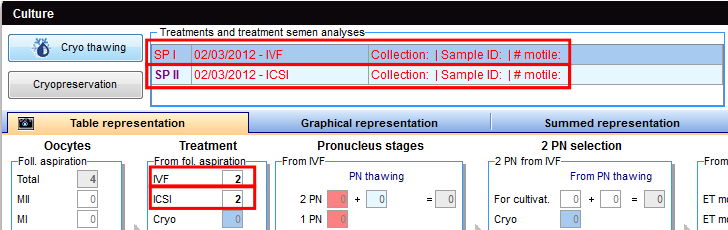
Treatment(s) and semen analysis: Double-click to see treatment semen analysis. You don't need a semen analysis for thaw cycles. |
|
|
To unlock a view, click on the text in the lower part of the screen |
|
|
Data input is now possible and the text changes |
| You can edit the options for reason for not performed ET in the settings under system tables. |
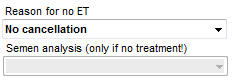
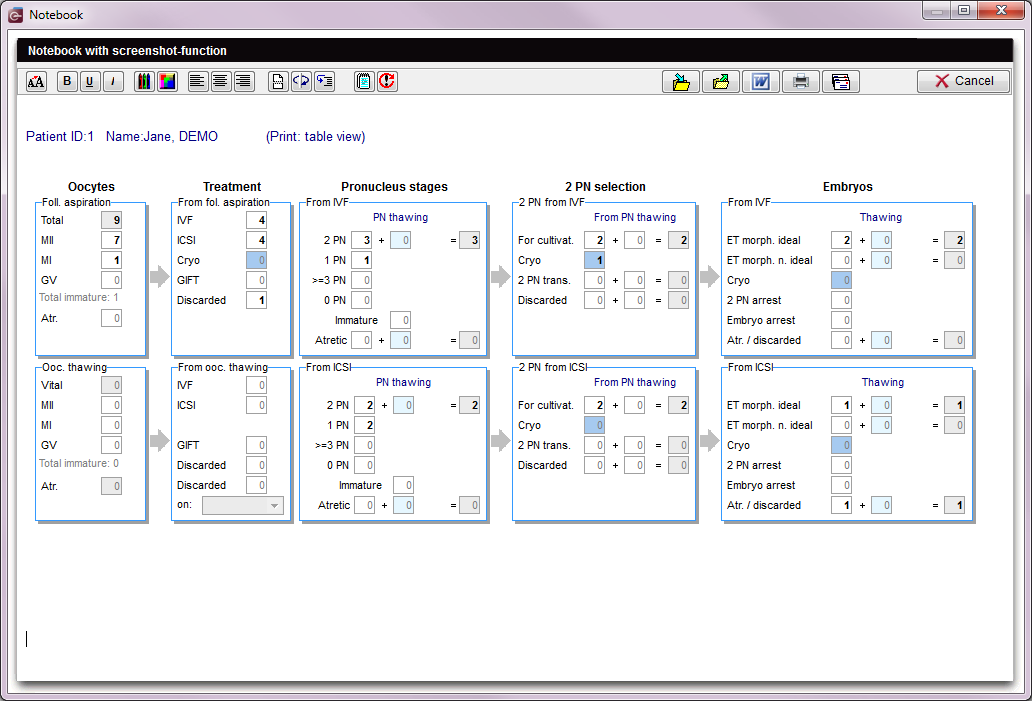
Table representation
This table allows you to efficiently and quickly enter all culture types. You can document aspiration cycles (IVF/ICSI), thawing cycles, conservation processes and alle possible combinations of these three.
 |
|
| Advantages: Fast | |
| Disadvantages: Documentation of sums only, not on cell level | |
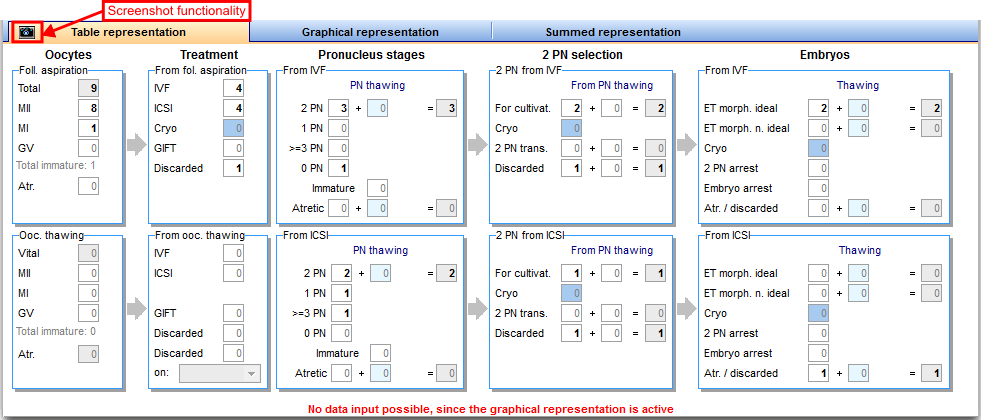
Options of cryopreservation
You have three options (without the cryopreservation button) to freeze oocytes/embryos from the culture:
 |
1. If you enter the number of oocytes, PNs or embryos, the program will transfer it automaticaly in the correct field of the cryo conservation window. Example: 2 PN selection IVF --> Cryo field #PN IVF |
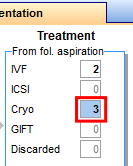 |
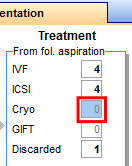
2. You can also go to the cryo storage, if you double click on the number of oocytes for cryo in the table view. |
 |
3. If you click on an empty cryo field, the oocyte/embryo cryopreservation will be opened. Now you can enter the number of oocytes/embryos at their state. |
 |
Read more about the cultivation of oocytes with the table overview in the how to. |
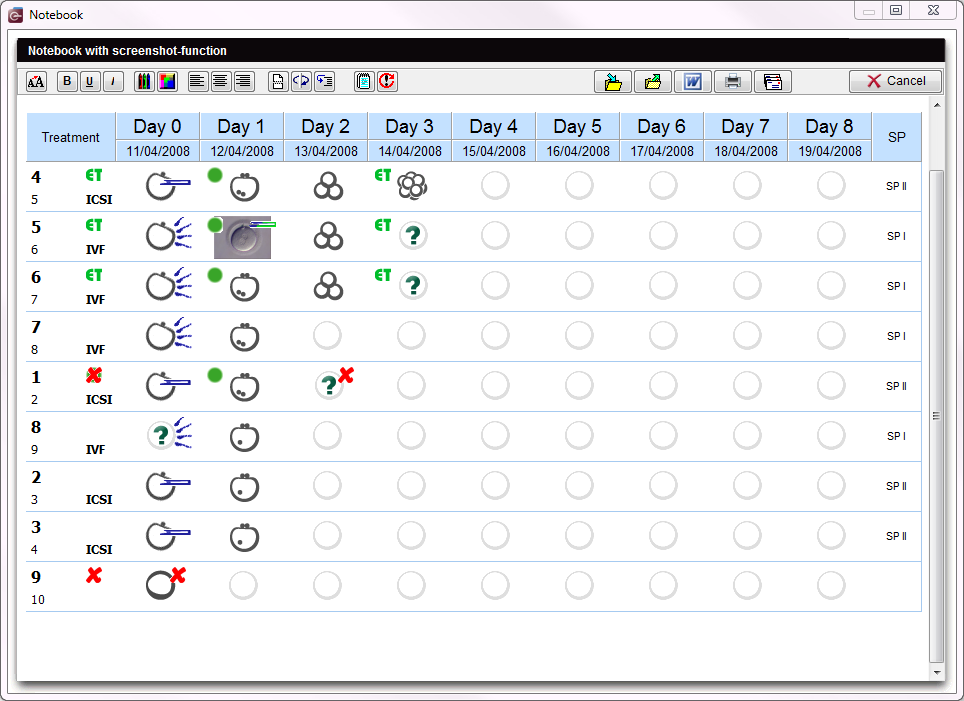
Graphical representation
The graphical representation allows a documentation of each oocyte/embryo, its development status and oocyte-specific processes on all culture days.
If that appears too complex, you can quickly insert data within the table overview. There you only need to enter summarized information about obtained, treated, fertilized and transferred oocytes/embryos.
The table and graphical representations are linked logically. Changes made in one of the two views will also be represented in the other.
You can document a maximum of 10 culture days. MedITEX IVF add oocytes/embryos to the matrix that have been obtain by follicle aspiration or thawing.
 |
|
| Advantages: You can document each individual oocyte/embryo on all culture days; you can enter assisted hatching, polar body diagnostics, preimplantation genetic diagnosis and used incubators. |
|
| Disadvantages: More time-consuming in the case of a large number of oocytes/embryos. | |
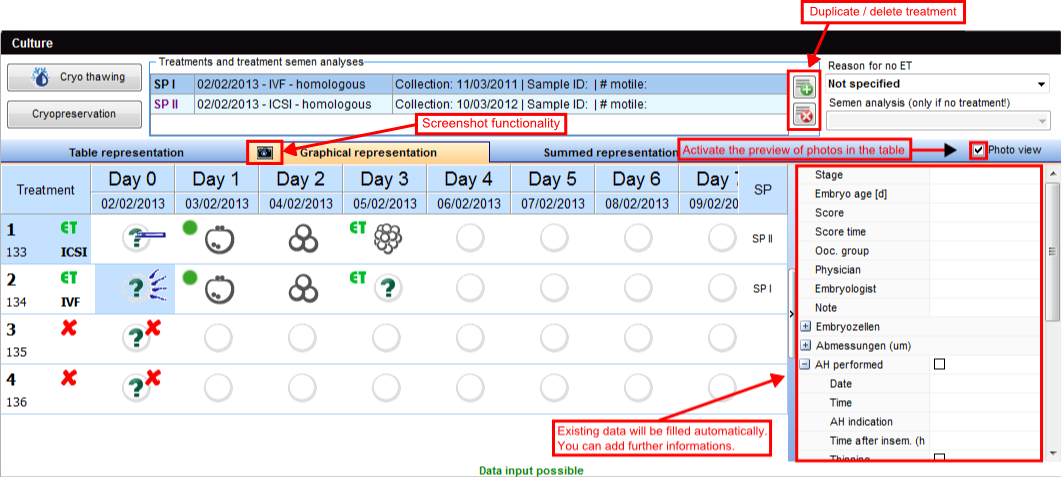
Duplicate / delete treatment
 |
If you use the oocytes/embryos at different treatments (IVF and ICSI), two semen analysis are required. You have to add them first at the tabele view. |
 |
At the graphical view (if the data input possible) you can also duplicate semen analysis if you will use different samples for oocytes/embryos. |
 |
Here you can see the duplicate result (SPIII). |
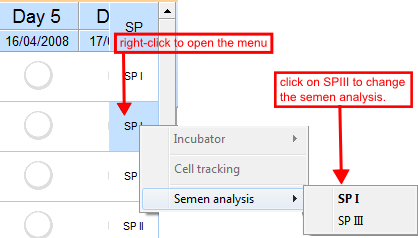 |
Now you can assign the third treatment to a PN or embryo development line. The current used semen analysis is bold marked. |
Editing oocytes / embryos
Within the matrix you have three options to edit the oocytes/embryos:
1. Edit one or more fields with the vertical grid
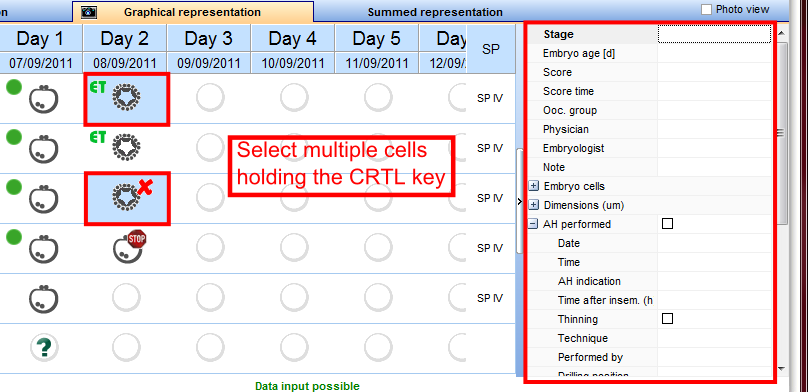 |
This is the quickest input option in this area. You can see all existing data of the selected oocyte / embryo.
Every data, which you can enter in the next two options, you can also enter in the grid at the right side.
Already entered data are visible in the right table.
Read more about the possibilities to select several fields of one day in the next section Select several oocytes/embryos.
2. Double-click to enter development stages, scores, notes, photos, assisted hatching, preimplantation genetic diagnosis, polar body diagnostics and used incubators.
A new window will open in which you can enter different information:
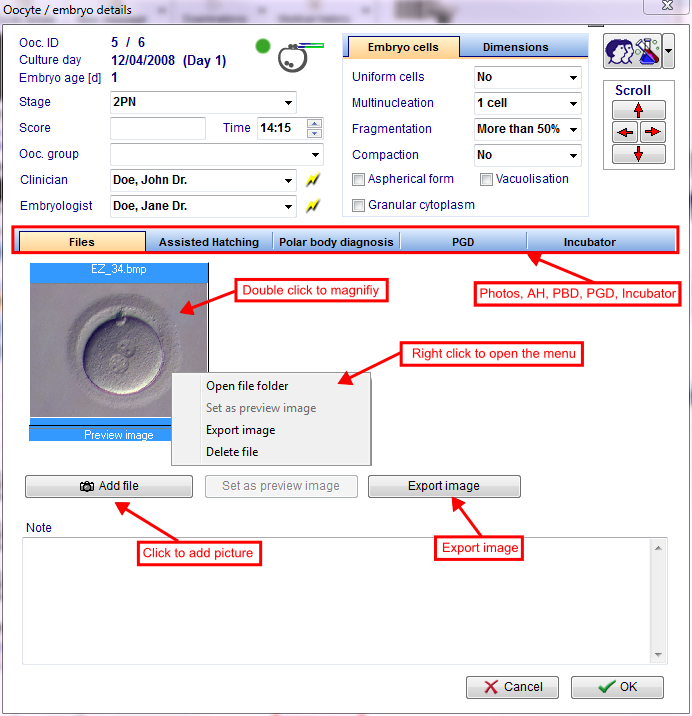 |
| Read more about the cultivation of oocytes with the graphical overview in the how to. |
3. Right-click to enter treatments, stages, incubators and modifications.
After right-clicking the oocyte/embryo, a context menu will open, in which you can select the modifications and the development stage for the oocyte/embryo.
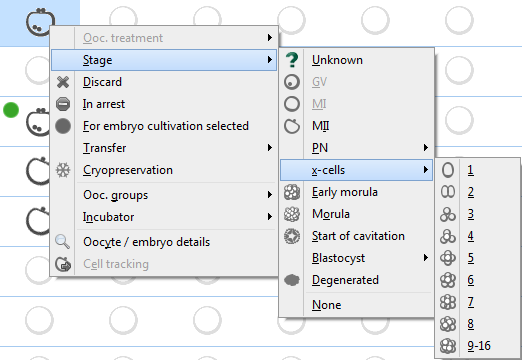 |
All changes that are made here will be represented in the table view! Therefore, check if fields have a red background again and correct your entries accordingly. |
| Read more about the cultivation of oocytes with the graphical overview in the how to. |
States of oocytes
 |
Discarded oocyte: Discarded oocytes are marked with a red cross in the matrix. |
|
Frozen oocyte: Those that are to bei frozen are marked with a snowflake symbol. |
|
|
Selected for transfer: Pronucleus stages that are selected for an embryo transfer are marked with a green circle. |
|
|
Transfered embryo: Those that are to be trasfered are marked with the symbol "ET". |
|
|
PBD conducted: Oocytes that have been subject to a polar body diagnosis are marked with a probe symbol. |
|
 |
Assisted hatching conducted: Embryos subject to assisted hatching are marked with a laser symbol. |
|
|
| Read more about the cultivation of oocytes with the graphical overview in the how to. |
Select several oocytes / embryos
Two options for selecting several oocytes / embryos at the same time:
You can use this functionality only for one day (one column). Edit the oocytes of every day separately.
This functionality is a considerable time-saving if you froze oocytes / embryos or give all (a lot of) oocytes / embryos the same state.
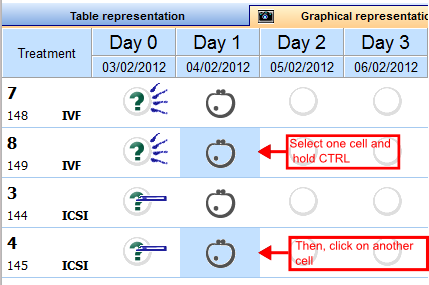 |
1. Press the Ctrl key and select the wished oocytes of one day. |
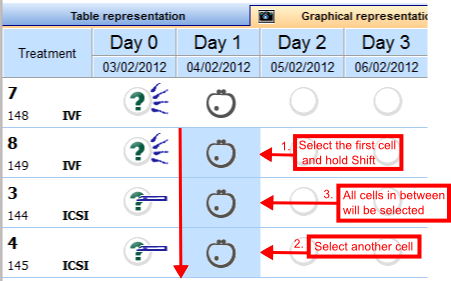 |
2. Click the first oocyte, press the shift key and click at the last wished oocyte. Every oocyte between both will be selected too. |
Photo view
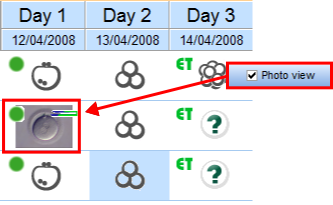 |
In Photo view mode, imported images are displayed when available. To import images, double-click the desired cell and click on Add file from the new window. |
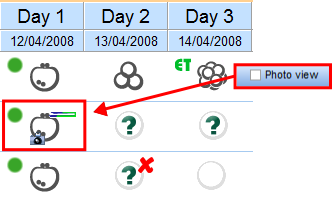 |
If Photo view is not active, a small camera icon will indicate that an image is available for viewing. |
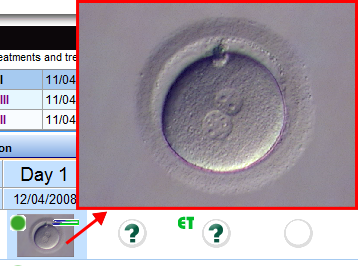 |
For both modes, you can view an enlarged image by moving your move over the cell. |
Screenshot functionality
 |
Click on the camera symbol to export the current representation into the notebook. The following window opens:
 |
 |
If you not close the notebook window, your second screenshot will automatically added behind the first one.
In the notebook screen, you have a lot of functionalities. You can write something, save the file or upload another one, use different colours, print it, etc.
Summed representation
 |
An additional summed representation provides a quick overview of the culture processes. The tabs allow you to change between the views with a single mouse click.
Datainput is not possible here.
| Read more about the using in the how to. |
| Back to the MedITEX IVF menu | Back to the cycles | Back to top |