Cycle Culture
From MedITEX - Wiki
| Click here for Cryo/Donation cycle. |
 |
Every single oocyte/embryo can be documented in MedITEX IVF. The tab Culture allows entries for a maximum of ten cultivation days, although more than 5 to 6 days will most likely never be necessary. In the overview, development stages and manipulations such as insemination and injections, assisted hatching, polar body diagnosis, freezing and thawing processes, embryo transfer and more, can be assigned to a specific date and stage.
Contents |
Before entering data, you should consider the focus of you documentation.
MedITEX IVF provides two possibilities:
- A more simplified and summarized documentation, called Table representation;
- And a more complete version – Graphical representation.
The table and graphical representations are linked logically. Therefore, changes made in one of the two views will also be represented in the other.
|
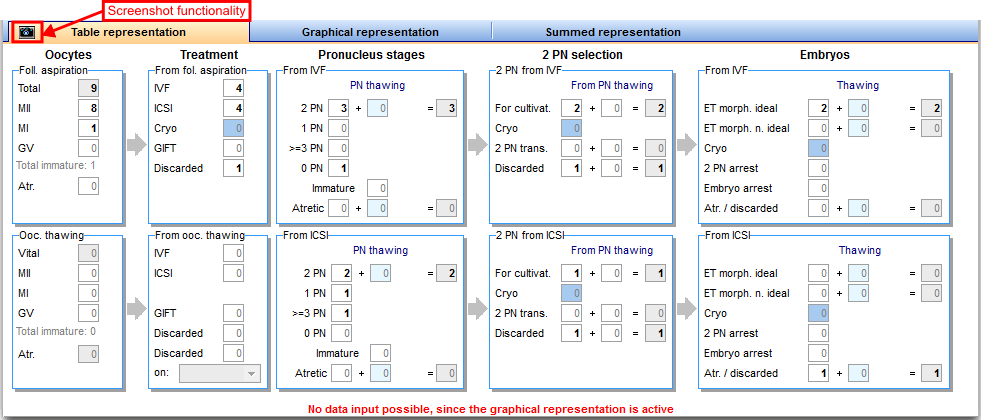
You can only input data in one of the representations. If you are documenting oocytes/embryos in Table representation, Graphical representation will be locked. You can lock/unlock these sections by clicking on the red or green text at the bottom of this screen. |
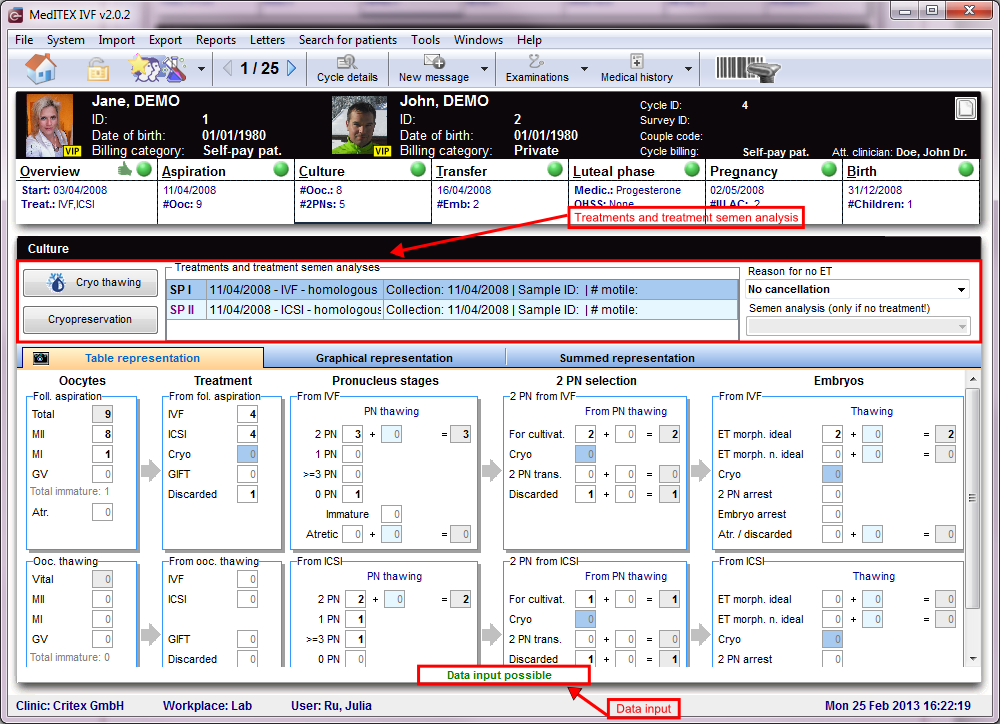
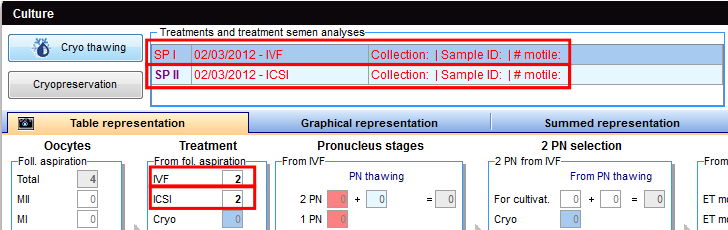
Treatments and treatment semen analysis
 |
 |
Starts the thawing process. |
 |
Opens cryo storage so you can freeze oocytes/embryos. |
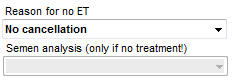 |
Documents the reason why there was no embryo transfer for this cycle. You can edit the options available here at the system tables in the settings. |
 |
Treatments and semen analysis: Double-click to see treatment and semen analysis. You do not need a semen analysis for thawed cycles. |
| This indicates that either the Table or Graphical representation are locked and cannot be changed. Click the text to unlock. | |
| Indicates that this section is unlocked and can be edited. |
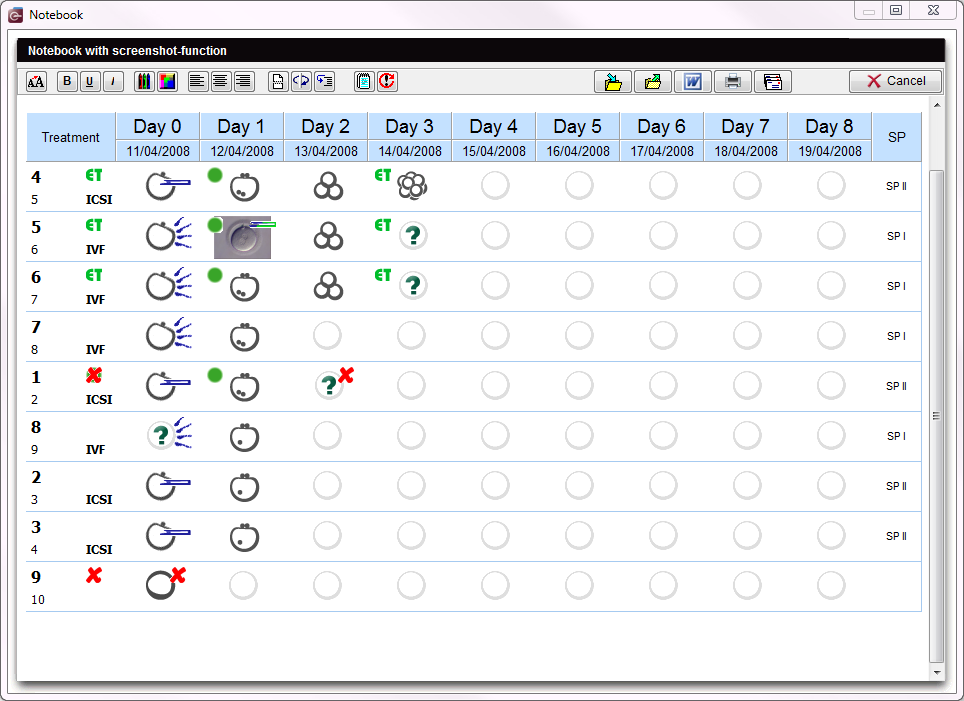
Table representation
This table allows you to efficiently and quickly document all types of cycles: aspiration (IVF/ICSI), thawing, etc.
 |
|
|
Advantages: faster and simpler. Disadvantages: documentation of sums only, not on a cell level. |
|
Options for cryopreservation
From the Culture tab, you have three options for freezing oocytes/embryos:
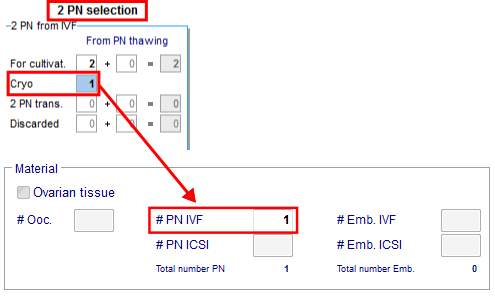 |
1. If you enter the number of oocytes, PNs or embryos, the program will automatically transfer it to the correct field of the cryo preservation window. |
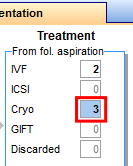 |
2. You can also open the cryo storage, if you double-click the number of oocytes for Cryo in the table view. |
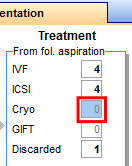 |
3. If you click on an empty cryo field, the oocyte/embryo cryopreservation will be opened. Now you can enter the number of oocytes/embryos to cryopreserve. |
 |
Click here to read more about the cultivation of oocytes/embryos with the Table representation view. |
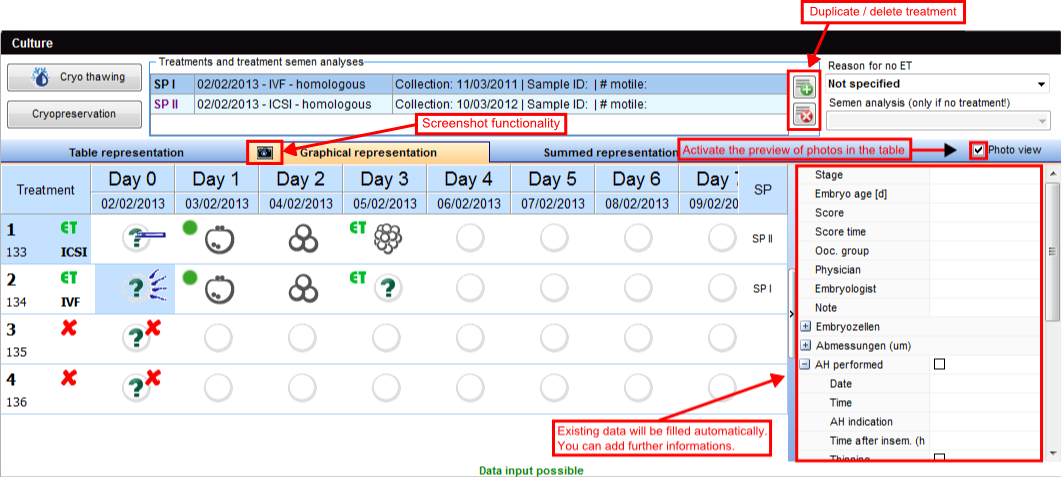
Graphical representation
The graphical representation allows the documentation of individual oocytes/embryos, its development status and oocyte-specific processes on all culture days.
The table and graphical representations are logically linked . Meaning that, changes made in one of the views will also be represented in the other. Keep in mind that you can only make changes into one representation at a time and, to switch the representation method, you need to unlock the desired one by clicking the red text at the bottom of the window.
After performing the follicle aspiration procedure, the same exact amount of follicles will be available for cultivation here on the Graphical representation. Ten days are available for you to document the growth progress.
 |
|
|
Advantages: you can document progress on each individual oocyte/embryo on all culture days; you can enter assisted hatching, polar body diagnostics, pre-implantation genetic diagnosis and used incubators. Disadvantages: may be time-consuming in case of a large number of oocytes/embryos. Click here to learn how to select multiple cells and here to learn how to edit multiple cells. |
|
Duplicate / delete treatment
 |
|
If you use oocytes/embryos for different treatments (IVF and ICSI), two semen analysis are required. Then, add them at the Table representation view. |
 |
| At the Graphical representation, you can also duplicate semen analysis if you plan to use different samples for oocytes/embryos. |
 |
| Here you can see the duplicate result - SPIII. |
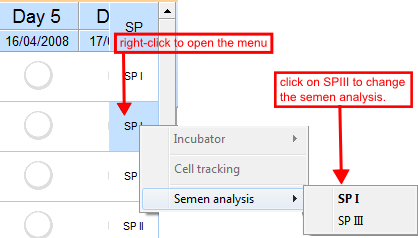 |
|
Now you can assign it to a PN or embryo. The semen analysis with bold letters indicates that it is currently selected for that oocyte/embryo. |
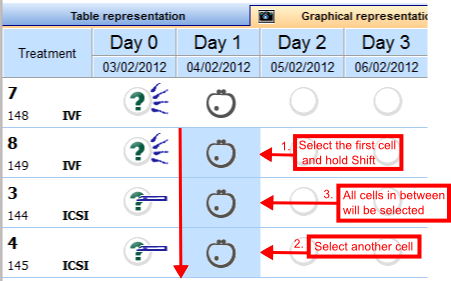
Select several oocytes / embryos
There are two ways of selecting several oocytes/embryos at the same time.
|
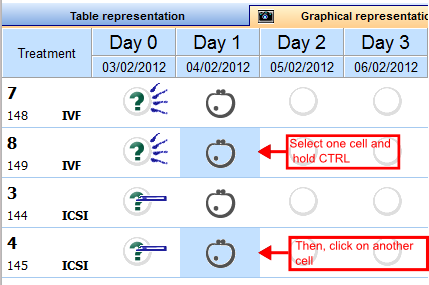 |
Hold the Ctrl key and select multiple cells on the same day. |
 |
|
Editing oocytes / embryos
Within the matrix you have three options to edit the oocytes/embryos:
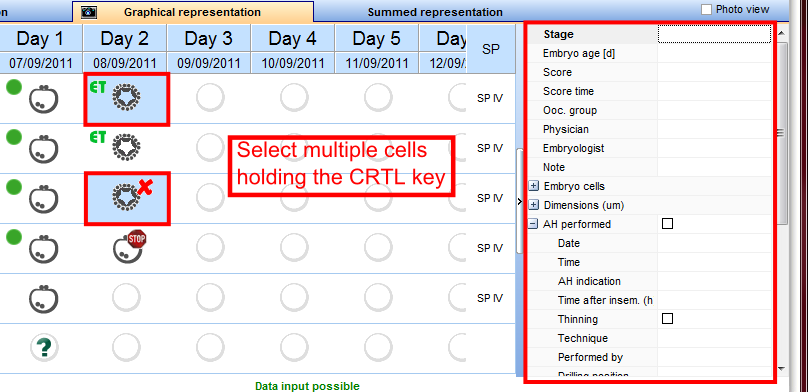
1. Right-panel.
This is the quickest way of entering data. You can see all existing data of the selected oocyte/embryo and editing this information is simply performed by changing the related fields.
To edit the information for oocytes/embryos, select a cell from the Graphical representation view and add the relevant data to the Right-panel.
You can also edit multiple oocytes/embryos at the same time. Simply select several of them holding the CTRL or Shift keys (they must be in the same culture day). Keep in mind that the information added will be the same for all selected oocytes/embryos.
 |
| Click here to read more about selecting several oocytes/embryos. |
2. Double-click
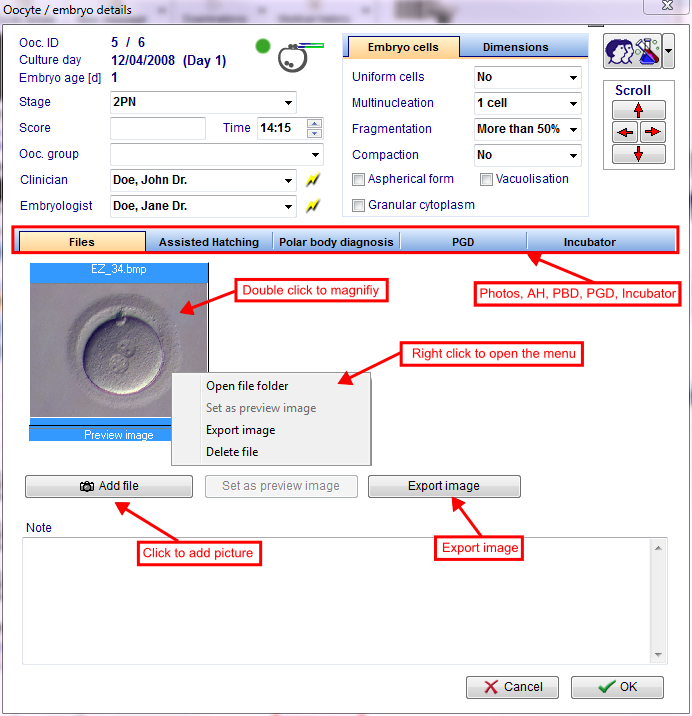
Double-click an oocyte/embryo to enter development stages, scores, notes, photos, assisted hatching, pre-implantation genetic diagnosis, polar body diagnostics and used incubators.
A new window will open in which you can enter different information:
 |
| Read more about the cultivation of oocytes with the graphical overview in the how to. |
3. Right-click
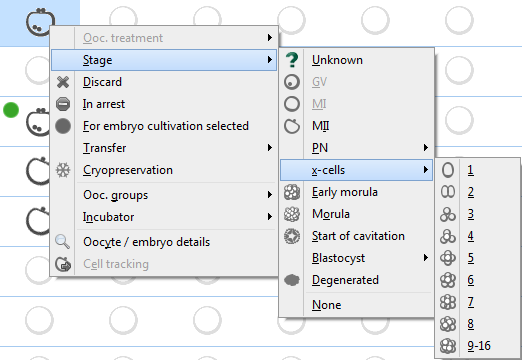
Right-click an oocyte/embryo to enter treatments, stages, incubators, etc.
After right-clicking the oocyte/embryo, a context menu will open, in which you can select the modifications and the development stage for the oocyte/embryo.
 |
All changes that are made here will be represented in the Table representation view! However, check if fields have a red background and correct your entries accordingly. |
| Click here to read more about cultivating oocytes/embryos in the Graphical representation view. |
States of oocytes
|
Unknown: Oocytes that did not have their stage selected. |
|
 |
Discarded: Discarded oocytes are marked with a red cross. |
 |
Frozen: Frozen oocytes are marked with a snowflake symbol. |
|
Thawed: Thawed oocytes are marked with a melting snowflake symbol. |
|
 |
Selected for transfer: Pro-nucleus stages that are selected for an embryo transfer are marked with a green circle. |
|
Oocyte groups: If there is any colored bar on the left, the oocyte is part of an embryo / oocyte group. |
|
 |
Transferred ideal: Those that are to be transferred are marked with the ET (green) symbol. |
|
Transferred not ideal : Those that are to be transferred are marked with the ET (orange) symbol. |
|
 |
In arrest: Oocytes that stopped developing. |
|
Donation - Donated: Oocytes that have been donated are marked with an arrow right to the oocyte. |
|
|
Donation - Received: Oocytes that have been received from a donation are marked with an arrow left to the oocyte. |
|
 |
PBD: Oocytes that have been subjected to a polar body diagnosis. |
|
PGD: Oocytes that have been subjected to a pre-implantation genetic diagnosis. |
|
 |
Assisted hatching: Embryos subjected to assisted hatching. |
|
IVF: Indicates the insemination method used. |
|
|
ICSI: Indicates the insemination method used. |
|
|
| Click here to read more about cultivating oocytes/embryos in the Graphical representation view. |
Photo view
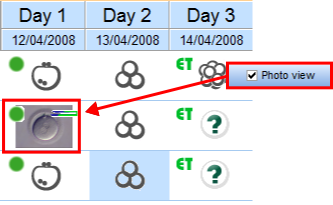 |
In Photo view mode, imported images are displayed when available. To import images, double-click the desired cell and click on Add file from the new window. |
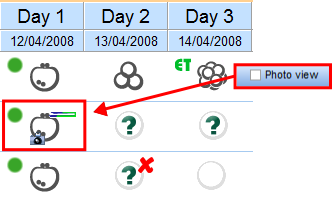 |
If Photo view is not active, a small camera icon will indicate that an image is available for viewing. |
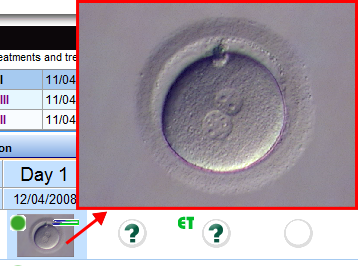 |
For both modes, you can view an enlarged image by moving your mouse over the cell. |
Screenshot functionality
 |
Click on the camera symbol to export the current representation into the Notebook tool. The following window will open:
 |
 |
If you do not close the notebook window and you take a second screenshot, it will automatically be added below the first one.
| Click here to read more about the Notebook / screenshots tool. |
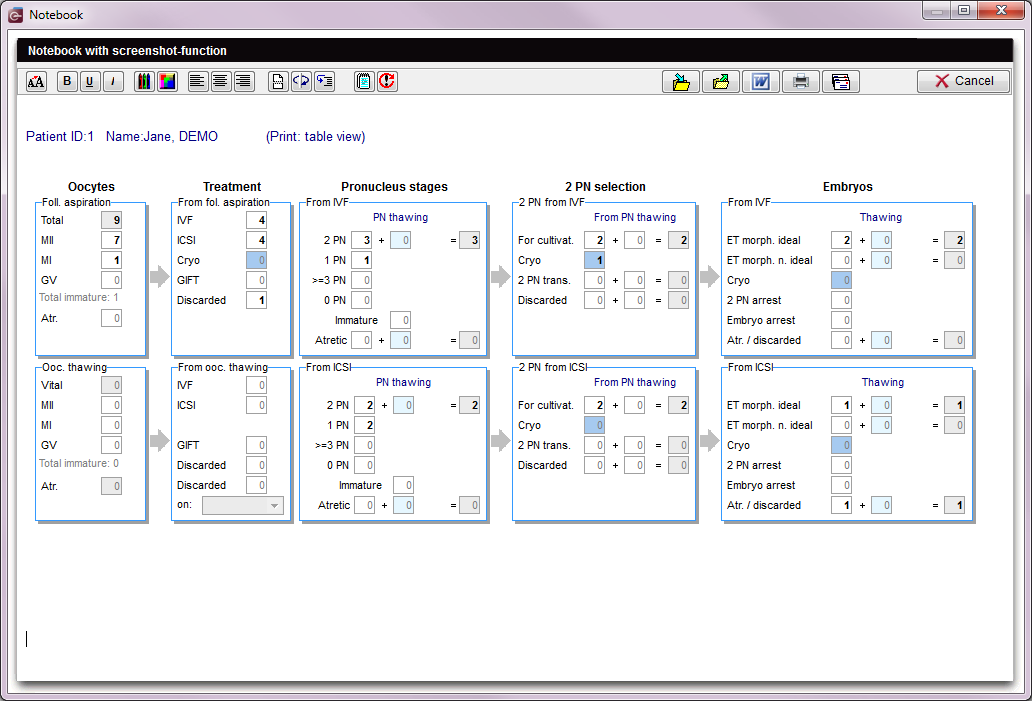
Summed representation
 |
An additional tab – Summed representation – provides a quick overview of the culture progress.
Data input is not possible here.
| Click here to read more about this section. |
| Back to the MedITEX IVF menu | Back to the cycles | Back to top |