Welcome to MedITEX Accounting
From MedITEX - Wiki
| Line 10: | Line 10: | ||
</table> | </table> | ||
<p> </p> | <p> </p> | ||
| + | <p>If you start the program the first time, you find many empty lists. Our first task is to fill them with informations. We need all descriptions, codes, groups and prices for working with the program.</p> | ||
| + | <p>It is your decision if you start with the items or the groups tab.</p> | ||
| + | <p>In this case we will begin adding at the groups tab.</p> | ||
<table border="0"> | <table border="0"> | ||
<tbody> | <tbody> | ||
<tr> | <tr> | ||
| − | + | <td>[[Image:ItemsGroupsAcc.png|none|740px|thumb|left|link=http://wiki.meditex-software.com/images/ItemsGroupsAcc.png| Groups - tab Items.]]</td> | |
| − | + | ||
| − | + | ||
| − | + | ||
| − | + | ||
| − | + | ||
| − | + | ||
| − | + | ||
| − | + | ||
| − | <td>[[Image:ItemsGroupsAcc.png|none|740px|thumb|left|link=http://wiki.meditex-software.com/images/ItemsGroupsAcc.png| Groups - tab Items.]]</td> | + | |
</tr> | </tr> | ||
</tbody> | </tbody> | ||
</table> | </table> | ||
| + | <p>In these tab you have to insert all groups of your items (we will add them in the next step).</p> | ||
| + | <p>The reason for adding groups here: later, if you add an item, you can simply choose a defined group out of the list. You have not to rewrite it.</p> | ||
<p> </p> | <p> </p> | ||
<p><strong>In the whole settings area you will find three kinds of buttons:</strong></p> | <p><strong>In the whole settings area you will find three kinds of buttons:</strong></p> | ||
| Line 47: | Line 43: | ||
</table> | </table> | ||
<p>The description of other, special buttons you can find at their area.</p> | <p>The description of other, special buttons you can find at their area.</p> | ||
| + | <p> </p> | ||
| + | <p> </p> | ||
| + | <p> </p> | ||
| + | <p> </p> | ||
| + | <table border="0"> | ||
| + | <tbody> | ||
| + | <tr> | ||
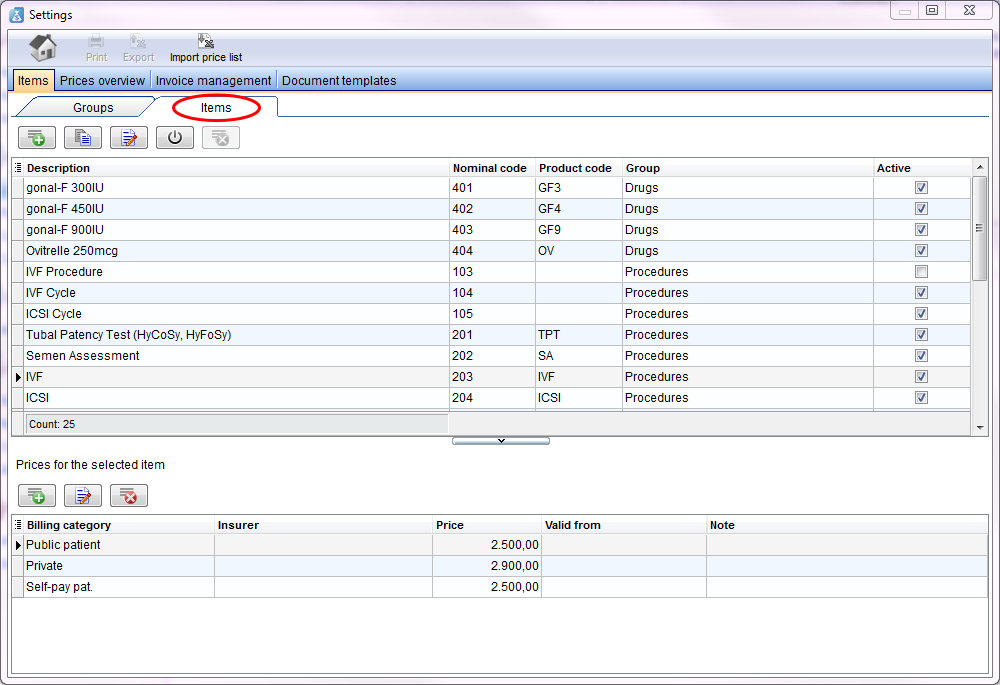
| + | <td>[[Image:ItemsItemsAcc.png|none|740px|thumb|left|link=http://wiki.meditex-software.com/images/ItemsItemsAcc.png| Items - tab Items.]]</td> | ||
| + | </tr> | ||
| + | </tbody> | ||
| + | </table> | ||
| + | <p> </p> | ||
| + | <p> </p> | ||
| + | <p> </p> | ||
<p> </p> | <p> </p> | ||
<p> </p> | <p> </p> | ||
Revision as of 14:25, 22 August 2013
This page will show you a guidance, where you can see how you have to start and which data you should add first.
Open the program and go to the settings. You can find the settings button at the menu bar at the top of the page.
| <img src="/images/MenubarAcc1.png" alt="" width="765" height="149" /> |
If you start the program the first time, you find many empty lists. Our first task is to fill them with informations. We need all descriptions, codes, groups and prices for working with the program.
It is your decision if you start with the items or the groups tab.
In this case we will begin adding at the groups tab.
 |
In these tab you have to insert all groups of your items (we will add them in the next step).
The reason for adding groups here: later, if you add an item, you can simply choose a defined group out of the list. You have not to rewrite it.
In the whole settings area you will find three kinds of buttons:
| <img src="/images/PlusLong.png" alt="" /> |
Insert new data: enter your data in a new line. |
| <img src="/images/EditLong.png" alt="" width="43" height="26" /> | Edit, change inputs and descriptions: mark a line, click the button and change the input. |
| <img src="/images/DeleteLong.png" alt="" width="42" height="28" /> | Delete the entire line: mark a line and delete it with the click on the button. |
The description of other, special buttons you can find at their area.
 |
| <a href="/index.php?title=MedITEX_Accounting_manual">Back to the MedITEX Accounting manual </a> | <a href="#top">Back to top</a> |