Welcome to MedITEX Accounting
From MedITEX - Wiki
| (71 intermediate revisions by 3 users not shown) | |||
| Line 1: | Line 1: | ||
| − | <p><strong> | + | <p style="text-align: justify;">This page will show you a guidance, where you can see <strong>how you have to start</strong> and <strong>which data you should add first</strong>.</p> |
| − | <p> | + | <p style="text-align: justify;">Open the program and go to the <strong>settings</strong>. You can find the <strong>settings button</strong> at the <strong>menu bar</strong> at the top of the page.</p> |
| − | < | + | <table border="0"> |
| − | <table | + | |
<tbody> | <tbody> | ||
<tr> | <tr> | ||
| + | <td style="text-align: center;"><img src="/images/MenubarAcc1.png" alt="" width="765" height="149" /><br /></td> | ||
| + | </tr> | ||
| + | </tbody> | ||
| + | </table> | ||
| + | <p style="text-align: justify;">If you start the program the first time, you will find many <strong>empty lists</strong>. Our first <strong>task </strong>is to <strong>fill them</strong> with information. We need all descriptions, codes, groups and prices for working with the program.</p> | ||
| + | <p> </p> | ||
| + | <h2>Items</h2> | ||
| + | <p style="text-align: justify;">It is your decision if you start with the items or the groups tab. In this case we will begin adding at the <strong>groups tab</strong>.</p> | ||
| + | <h3>Groups</h3> | ||
| + | <table border="0"> | ||
| + | <tbody> | ||
| + | <tr> | ||
| + | <td>[[Image:ItemsGroupsAcc.png|none|740px|thumb|left|link=http://wiki.meditex-software.com/images/ItemsGroupsAcc.png| Groups - tab Items.]]</td> | ||
| + | </tr> | ||
| + | </tbody> | ||
| + | </table> | ||
| + | <p style="text-align: justify;">In these tab you have to <strong>insert all groups</strong> (drugs, laboratory, procedures,...) of your items (we will add them at the next step).</p> | ||
| + | <p style="text-align: justify;">The <strong> reason </strong>for adding groups here: later, if you add an item, you can simply choose a defined group out of the list. You have not to rewrite it.</p> | ||
| + | <p style="text-align: justify;"> </p> | ||
| + | <table border="0"> | ||
| + | <tbody> | ||
| + | <tr> | ||
| + | <td style="text-align: center;"><a href="/index.php?title=How_to_add_a_new_group%3F"><img style="border: 2px dotted blue;" src="/images/PlusLong.png" alt="" /></a></td> | ||
<td> | <td> | ||
| − | < | + | <p><strong>Insert</strong> a new group: enter your data in the new line.</p> |
| − | <img src="/images/ | + | </td> |
| + | </tr> | ||
| + | <tr> | ||
| + | <td style="text-align: center;"><a href="/index.php?title=How_to_edit_a_group%3F"><img style="border: 2px dotted blue;" src="/images/EditLong.png" alt="" width="43" height="26" /></a></td> | ||
| + | <td><strong>Edit, change</strong> the name of a group: mark a line, click the button and change the input.</td> | ||
| + | </tr> | ||
| + | <tr> | ||
| + | <td style="text-align: center;"><a href="/index.php?title=How_to_delete_a_group%3F"><img style="border: 2px dotted blue;" src="/images/DeleteLong.png" alt="" width="42" height="28" /></a></td> | ||
| + | <td><strong>Delete</strong> the entire group: mark a line and delete it with the click on the button.</td> | ||
| + | </tr> | ||
| + | </tbody> | ||
| + | </table> | ||
| + | <p style="text-align: justify;"> </p> | ||
| + | <p style="text-align: justify;">All <strong>groups</strong>, you can choose in <strong>other tabs</strong>, you have to <strong>define </strong>here (at the Group tab). This function should make the work with your tables easier.</p> | ||
| + | <p style="text-align: justify;">In the tab <strong>Prices overview</strong> and <strong>Items </strong>you can find columns with the name groups. If you <strong>add an entry at Items</strong>, you only have to <strong>choose a group</strong> from your list or you can <strong>set filter </strong>for a better overview.</p> | ||
| + | <table border="0"> | ||
| + | <tbody> | ||
| + | <tr> | ||
| + | <td><img src="/images/GroupAcc3.png" alt="" width="765" height="375" /></td> | ||
| + | </tr> | ||
| + | </tbody> | ||
| + | </table> | ||
| + | <table border="0"> | ||
| + | <tbody> | ||
| + | <tr> | ||
| + | <td style="text-align: center;"><img src="/images/howto48.png" alt="" width="48" height="48" /></td> | ||
| + | <td><a href="/index.php?title=MedITEX_Accounting_how_to#Groups">Click here</a> to get detailed information about groups.</td> | ||
</tr> | </tr> | ||
</tbody> | </tbody> | ||
</table> | </table> | ||
<p> </p> | <p> </p> | ||
| − | |||
| − | |||
| − | |||
<p> </p> | <p> </p> | ||
| − | < | + | <h3>Items</h3> |
| − | + | <table border="0"> | |
| − | + | ||
| − | <table | + | |
<tbody> | <tbody> | ||
<tr> | <tr> | ||
| − | <td>[[Image: | + | <td>[[Image:ItemsItemsAcc.png|none|740px|thumb|left|link=http://wiki.meditex-software.com/images/ItemsItemsAcc.png| Items - tab Items.]]</td> |
| + | </tr> | ||
| + | </tbody> | ||
| + | </table> | ||
| + | <p style="text-align: justify;">At the <strong>first table</strong> you can see all informations about the items: description, nominal code, product code, group and the status. If you set the status at active, you can choose the item in the program.</p> | ||
| + | <p style="text-align: justify;">In the <strong>second table</strong> you can enter the prices for the individual billing categories.</p> | ||
| + | <table border="0"> | ||
| + | <tbody> | ||
| + | <tr> | ||
| + | <td style="text-align: center;"><a href="/index.php?title=How_to_add_a_new_item%3F"><img style="border: 2px dotted blue;" src="/images/PlusLong.png" alt="" /></a></td> | ||
| + | <td style="text-align: justify;"> | ||
| + | <p><strong>Insert</strong> a new item: enter your data in a new line.</p> | ||
| + | </td> | ||
| + | </tr> | ||
| + | <tr> | ||
| + | <td style="text-align: center;"><a href="/index.php?title=How_to_copy_an_item%3F"><img style="display: block; margin-left: auto; margin-right: auto; border: 2px dotted blue;" src="/images/CopyAcc.png" alt="" width="42" height="27" /></a></td> | ||
| + | <td style="text-align: justify;"><strong>Copy:</strong> Copies the selected row.</td> | ||
| + | </tr> | ||
| + | <tr> | ||
| + | <td style="text-align: center;"><a href="/index.php?title=How_to_edit_an_item%3F"><img style="border: 2px dotted blue;" src="/images/EditLong.png" alt="" width="43" height="26" /></a></td> | ||
| + | <td style="text-align: justify;"><strong>Edit, change</strong> inputs and descriptions: mark a line, click the button and change the input.</td> | ||
| + | </tr> | ||
| + | <tr> | ||
| + | <td style="text-align: center;"><a href="/index.php?title=How_to_activate_/deactivate_an_item%3F"><img style="border: 2px dotted blue;" src="/images/ActivateAcc.png" alt="" width="43" height="27" /></a></td> | ||
| + | <td style="text-align: justify;"> | ||
| + | <p><strong>Activate/Deactivate:</strong> Set / take away a checkmark for choosing the item in the program.</p> | ||
| + | </td> | ||
| + | </tr> | ||
| + | <tr> | ||
| + | <td style="text-align: center;"><a href="/index.php?title=How_to_delete_an_item%3F"><img style="border: 2px dotted blue;" src="/images/DeleteLong.png" alt="" width="42" height="28" /></a></td> | ||
| + | <td style="text-align: justify;"><strong>Delete</strong> an item: mark a line and delete it with the click on the button.</td> | ||
| + | </tr> | ||
| + | <tr> | ||
| + | <td style="text-align: center;"><a href="/index.php?title=Import_Price_List"><img style="border: 2px dotted blue;" src="/images/ImportPriceList.png" alt="" width="90" height="36" /></a></td> | ||
| + | <td style="text-align: justify;"> | ||
| + | <p><strong>Import:</strong> With this button, you can import a whole list from an Excel file.</p> | ||
| + | <p>The table must have following structure: Item name | Item code | Group name | Price | Billing category.</p> | ||
| + | </td> | ||
</tr> | </tr> | ||
</tbody> | </tbody> | ||
</table> | </table> | ||
| − | |||
| − | |||
<p> </p> | <p> </p> | ||
| − | < | + | <table border="0"> |
| − | < | + | <tbody> |
| − | < | + | <tr> |
| + | <td style="text-align: center;"><img src="/images/howto48.png" alt="" width="48" height="48" /></td> | ||
| + | <td><a href="/index.php?title=MedITEX_Accounting_how_to#Items">Click here</a> to get detailed information about items.</td> | ||
| + | </tr> | ||
| + | </tbody> | ||
| + | </table> | ||
<p> </p> | <p> </p> | ||
| − | < | + | <h2>Prices overview</h2> |
| − | + | <table border="0"> | |
| − | <table | + | |
<tbody> | <tbody> | ||
<tr> | <tr> | ||
| − | <td>[[Image: | + | <td>[[Image:PricesOverviewAcc.png|none|740px|thumb|left|link=http://wiki.meditex-software.com/images/PricesOverviewAcc.png| Overview of prices.]]</td> |
</tr> | </tr> | ||
</tbody> | </tbody> | ||
</table> | </table> | ||
| + | <p>In the window <strong>prices overview </strong>you see a summary of all made entries from the tab items. In this overview you can not change something. Here you get a better overview like in the other separate tables.</p> | ||
<p> </p> | <p> </p> | ||
| + | <h2>Invoice management</h2> | ||
| + | <table border="0"> | ||
| + | <tbody> | ||
| + | <tr> | ||
| + | <td>[[Image:InvoiceManagementAcc.png|none|740px|thumb|left|link=http://wiki.meditex-software.com/images/InvoiceManagementAcc.png| Invoice management.]]</td> | ||
| + | </tr> | ||
| + | </tbody> | ||
| + | </table> | ||
<p> </p> | <p> </p> | ||
| − | < | + | <h3>Changeable system tables</h3> |
| − | <p><strong> | + | <table border="0"> |
| + | <tbody> | ||
| + | <tr> | ||
| + | <td><img style="display: block; margin-left: auto; margin-right: auto;" src="/images/BillingCategoriesAcc.png" alt="" width="362" height="189" /></td> | ||
| + | <td><img style="display: block; margin-left: auto; margin-right: auto;" src="/images/PaymentMethodsAcc.png" alt="" width="359" height="185" /></td> | ||
| + | </tr> | ||
| + | <tr> | ||
| + | <td colspan="2"> | ||
| + | <p>In these both tables you will find <strong>predefined </strong>billing categories and payment methods. You can <strong>insert, edit or delete</strong> categories / methods.</p> | ||
| + | <p>Only self added categories and methods can be deleted!</p> | ||
| + | </td> | ||
| + | </tr> | ||
| + | </tbody> | ||
| + | </table> | ||
<p> </p> | <p> </p> | ||
| − | <h3> | + | <h3>Invoice settings</h3> |
| − | + | <table border="0"> | |
| − | + | ||
| − | + | ||
| − | <table | + | |
<tbody> | <tbody> | ||
<tr> | <tr> | ||
| − | <td><img src="/images/ | + | <td style="text-align: center;"><img src="/images/InvoiceSettingsAcc.png" alt="" width="608" height="94" /></td> |
| + | </tr> | ||
| + | <tr> | ||
| + | <td style="text-align: justify;"> | ||
| + | <p>In these part of the window you can organize the invoice settings.</p> | ||
| + | <p>You can choose a creating rule for the invoice number:</p> | ||
| + | <ul> | ||
| + | <li>sequential number with leading zeroes (6 digits)</li> | ||
| + | <li>sequential number with leading zeroes (8 digits)</li> | ||
| + | <li>current date in YYYYMMDD format + sequental number (4 digits) with leading zeroes</li> | ||
| + | </ul> | ||
| + | <p>Choose the standard value-added tax rate and if it should used in the invoices.</p> | ||
| + | <p>Enter the days of the payment period of an invoice.</p> | ||
| + | </td> | ||
</tr> | </tr> | ||
</tbody> | </tbody> | ||
</table> | </table> | ||
<p> </p> | <p> </p> | ||
| − | <h3> | + | <h3>Dunning levels</h3> |
| − | + | <table border="0"> | |
| − | <table | + | |
<tbody> | <tbody> | ||
<tr> | <tr> | ||
| − | <td><img src="/images/ | + | <td style="text-align: center;" colspan="2"><img src="/images/DunningLevelsAcc.png" alt="" width="765" height="100" /></td> |
| + | </tr> | ||
| + | <tr> | ||
| + | <td colspan="2"> | ||
| + | <p>In this part of the page you can administer the dunning levels of your invoices.</p> | ||
| + | <p>Enter the action, dunning level, description and reaction days.</p> | ||
| + | </td> | ||
</tr> | </tr> | ||
</tbody> | </tbody> | ||
</table> | </table> | ||
<p> </p> | <p> </p> | ||
| − | + | <p> </p> | |
| − | <p> | + | <h2>Document templates</h2> |
| − | < | + | <table border="0"> |
| − | < | + | |
| − | + | ||
<tbody> | <tbody> | ||
<tr> | <tr> | ||
| − | <td>[[Image: | + | <td>[[Image:DocumentTemplatesAcc.png|none|740px|thumb|left|link=http://wiki.meditex-software.com/images/DocumentTemplatesAcc.png| Document templates.]]</td> |
</tr> | </tr> | ||
</tbody> | </tbody> | ||
</table> | </table> | ||
| + | <p>In the upper part of the window you will find a table with all existing templates. You can administer them with the buttons above.</p> | ||
<p> </p> | <p> </p> | ||
| − | < | + | <table border="0"> |
| − | <p> | + | <tbody> |
| + | <tr> | ||
| + | <td style="text-align: center;"><img style="border: 2px dotted blue;" src="/images/PlusLong.png" alt="" /></td> | ||
| + | <td style="text-align: justify;"> | ||
| + | <p><strong>Insert</strong> a new template: enter your data in a new line.</p> | ||
| + | </td> | ||
| + | </tr> | ||
| + | <tr> | ||
| + | <td style="text-align: center;"><img style="display: block; margin-left: auto; margin-right: auto; border: 2px dotted blue;" src="/images/CopyAcc.png" alt="" width="42" height="27" /></td> | ||
| + | <td style="text-align: justify;"><strong>Copy:</strong> Copies the selected row.</td> | ||
| + | </tr> | ||
| + | <tr> | ||
| + | <td style="text-align: center;"><img style="border: 2px dotted blue;" src="/images/EditLong.png" alt="" width="43" height="26" /></td> | ||
| + | <td style="text-align: justify;"><strong>Edit, change</strong> inputs and descriptions: mark a line, click the button and change the input.</td> | ||
| + | </tr> | ||
| + | <tr> | ||
| + | <td style="text-align: center;"><img style="border: 2px dotted blue;" src="/images/ActivateAcc.png" alt="" width="43" height="27" /></td> | ||
| + | <td style="text-align: justify;"> | ||
| + | <p><strong>Activate/Deactivate:</strong> Set / take away a checkmark for choosing the template in the program.</p> | ||
| + | </td> | ||
| + | </tr> | ||
| + | <tr> | ||
| + | <td style="text-align: center;"><img src="/images/DeleteLong.png" alt="" width="42" height="28" /></td> | ||
| + | <td style="text-align: justify;"><strong>Delete</strong> an template: mark a line and delete it with the click on the button.</td> | ||
| + | </tr> | ||
| + | </tbody> | ||
| + | </table> | ||
| + | <table border="0"> | ||
| + | <tbody> | ||
| + | <tr> | ||
| + | <td style="text-align: center;"><a href="/index.php?title=How to edit the template structure"><img style="border: 2px dotted blue;" src="/images/EditTemplateStructure.png" alt="" width="183" height="29" /></a></td> | ||
| + | <td> | ||
| + | <p>With the button Edit template structure you can change / edit the structure and input of your document.</p> | ||
| + | </td> | ||
| + | </tr> | ||
| + | </tbody> | ||
| + | </table> | ||
| + | <p> </p> | ||
| + | <p>At the lower part of the page you see three tabs:</p> | ||
| + | <ul> | ||
| + | <li>Address and info</li> | ||
| + | <li>Text before the table an </li> | ||
| + | <li>Text after the table.</li> | ||
| + | </ul> | ||
| + | <p>Table means this part in the template, where the invoice items be placed.</p> | ||
<p> </p> | <p> </p> | ||
| − | + | <table border="0"> | |
| − | + | ||
| − | + | ||
| − | <table | + | |
<tbody> | <tbody> | ||
<tr> | <tr> | ||
| − | <td> | + | <td>[[Image:TemplatesAcc.png|none|740px|thumb|left|link=http://wiki.meditex-software.com/images/TemplatesAcc.png|]]</td> |
</tr> | </tr> | ||
<tr> | <tr> | ||
| − | <td> | + | <td> |
| + | <ul> | ||
| + | <li>At the <strong>address </strong>window you can see the name and the address of the patient.</li> | ||
| + | <li>At <strong>Info</strong>, the most important informations of the invoice will be shown.</li> | ||
| + | <li>If you will write some informations directly <strong>above the table</strong> you can insert them and their bookmarks at <strong>Text before the table</strong>.</li> | ||
| + | <li>Enter at <strong>Text after the table</strong> informations which should be displayed at the <strong>end of the page</strong>, like a signatur or similar.</li> | ||
| + | <li>You can <strong>insert bookmarks</strong> at each of the three tabs. Simply do this with drag and drop.</li> | ||
| + | </ul> | ||
| + | </td> | ||
</tr> | </tr> | ||
</tbody> | </tbody> | ||
</table> | </table> | ||
| + | <p> </p> | ||
| + | <p> </p> | ||
| + | <p> </p> | ||
<table style="float: right;" border="0"> | <table style="float: right;" border="0"> | ||
<tbody> | <tbody> | ||
Latest revision as of 08:51, 12 October 2016
This page will show you a guidance, where you can see how you have to start and which data you should add first.
Open the program and go to the settings. You can find the settings button at the menu bar at the top of the page.
| <img src="/images/MenubarAcc1.png" alt="" width="765" height="149" /> |
If you start the program the first time, you will find many empty lists. Our first task is to fill them with information. We need all descriptions, codes, groups and prices for working with the program.
Contents |
Items
It is your decision if you start with the items or the groups tab. In this case we will begin adding at the groups tab.
Groups
 |
In these tab you have to insert all groups (drugs, laboratory, procedures,...) of your items (we will add them at the next step).
The reason for adding groups here: later, if you add an item, you can simply choose a defined group out of the list. You have not to rewrite it.
| <a href="/index.php?title=How_to_add_a_new_group%3F"><img style="border: 2px dotted blue;" src="/images/PlusLong.png" alt="" /></a> |
Insert a new group: enter your data in the new line. |
| <a href="/index.php?title=How_to_edit_a_group%3F"><img style="border: 2px dotted blue;" src="/images/EditLong.png" alt="" width="43" height="26" /></a> | Edit, change the name of a group: mark a line, click the button and change the input. |
| <a href="/index.php?title=How_to_delete_a_group%3F"><img style="border: 2px dotted blue;" src="/images/DeleteLong.png" alt="" width="42" height="28" /></a> | Delete the entire group: mark a line and delete it with the click on the button. |
All groups, you can choose in other tabs, you have to define here (at the Group tab). This function should make the work with your tables easier.
In the tab Prices overview and Items you can find columns with the name groups. If you add an entry at Items, you only have to choose a group from your list or you can set filter for a better overview.
| <img src="/images/GroupAcc3.png" alt="" width="765" height="375" /> |
| <img src="/images/howto48.png" alt="" width="48" height="48" /> | <a href="/index.php?title=MedITEX_Accounting_how_to#Groups">Click here</a> to get detailed information about groups. |
Items
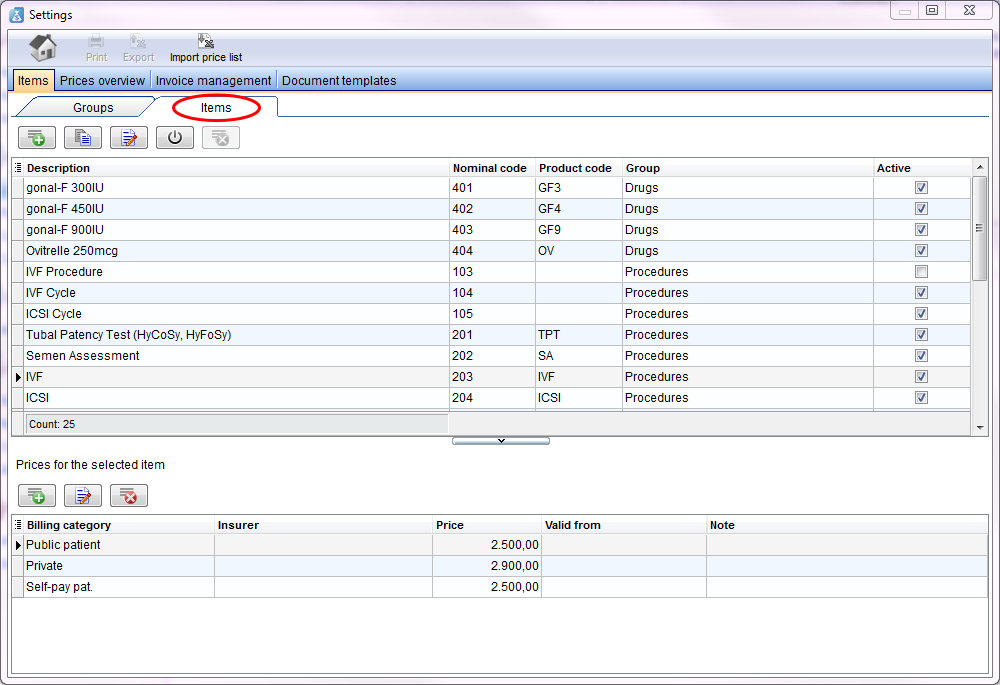 |
At the first table you can see all informations about the items: description, nominal code, product code, group and the status. If you set the status at active, you can choose the item in the program.
In the second table you can enter the prices for the individual billing categories.
| <a href="/index.php?title=How_to_add_a_new_item%3F"><img style="border: 2px dotted blue;" src="/images/PlusLong.png" alt="" /></a> |
Insert a new item: enter your data in a new line. |
| <a href="/index.php?title=How_to_copy_an_item%3F"><img style="display: block; margin-left: auto; margin-right: auto; border: 2px dotted blue;" src="/images/CopyAcc.png" alt="" width="42" height="27" /></a> | Copy: Copies the selected row. |
| <a href="/index.php?title=How_to_edit_an_item%3F"><img style="border: 2px dotted blue;" src="/images/EditLong.png" alt="" width="43" height="26" /></a> | Edit, change inputs and descriptions: mark a line, click the button and change the input. |
| <a href="/index.php?title=How_to_activate_/deactivate_an_item%3F"><img style="border: 2px dotted blue;" src="/images/ActivateAcc.png" alt="" width="43" height="27" /></a> |
Activate/Deactivate: Set / take away a checkmark for choosing the item in the program. |
| <a href="/index.php?title=How_to_delete_an_item%3F"><img style="border: 2px dotted blue;" src="/images/DeleteLong.png" alt="" width="42" height="28" /></a> | Delete an item: mark a line and delete it with the click on the button. |
| <a href="/index.php?title=Import_Price_List"><img style="border: 2px dotted blue;" src="/images/ImportPriceList.png" alt="" width="90" height="36" /></a> |
Import: With this button, you can import a whole list from an Excel file. The table must have following structure: Item name | Item code | Group name | Price | Billing category. |
| <img src="/images/howto48.png" alt="" width="48" height="48" /> | <a href="/index.php?title=MedITEX_Accounting_how_to#Items">Click here</a> to get detailed information about items. |
Prices overview
 |
In the window prices overview you see a summary of all made entries from the tab items. In this overview you can not change something. Here you get a better overview like in the other separate tables.
Invoice management
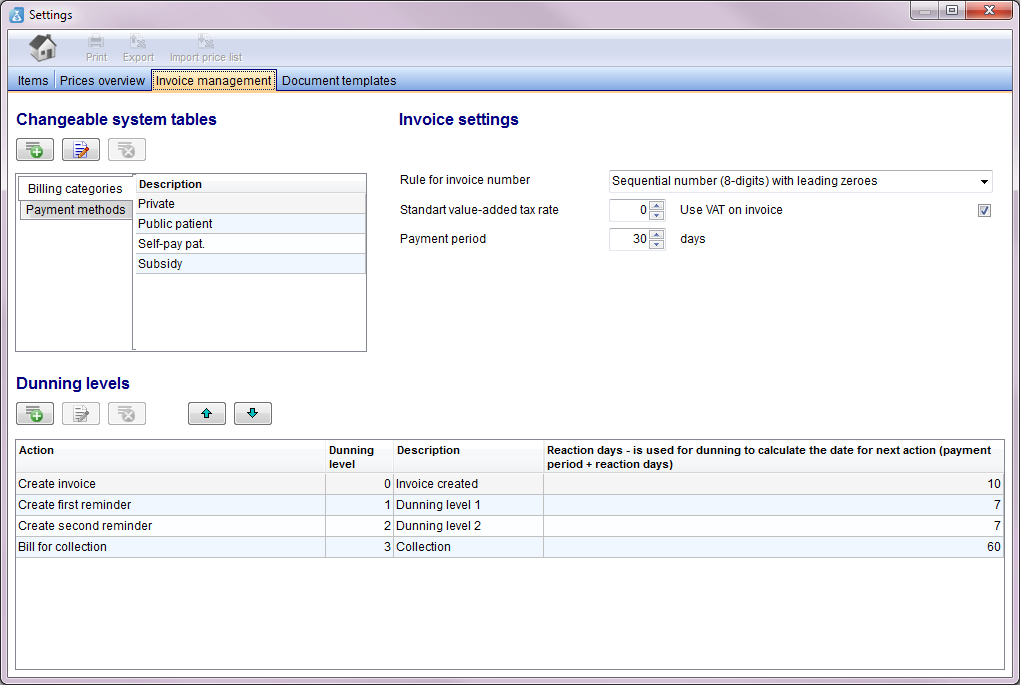 |
Changeable system tables
| <img style="display: block; margin-left: auto; margin-right: auto;" src="/images/BillingCategoriesAcc.png" alt="" width="362" height="189" /> | <img style="display: block; margin-left: auto; margin-right: auto;" src="/images/PaymentMethodsAcc.png" alt="" width="359" height="185" /> |
|
In these both tables you will find predefined billing categories and payment methods. You can insert, edit or delete categories / methods. Only self added categories and methods can be deleted! |
|
Invoice settings
| <img src="/images/InvoiceSettingsAcc.png" alt="" width="608" height="94" /> |
|
In these part of the window you can organize the invoice settings. You can choose a creating rule for the invoice number:
Choose the standard value-added tax rate and if it should used in the invoices. Enter the days of the payment period of an invoice. |
Dunning levels
| <img src="/images/DunningLevelsAcc.png" alt="" width="765" height="100" /> | |
|
In this part of the page you can administer the dunning levels of your invoices. Enter the action, dunning level, description and reaction days. |
Document templates
 |
In the upper part of the window you will find a table with all existing templates. You can administer them with the buttons above.
| <img style="border: 2px dotted blue;" src="/images/PlusLong.png" alt="" /> |
Insert a new template: enter your data in a new line. |
| <img style="display: block; margin-left: auto; margin-right: auto; border: 2px dotted blue;" src="/images/CopyAcc.png" alt="" width="42" height="27" /> | Copy: Copies the selected row. |
| <img style="border: 2px dotted blue;" src="/images/EditLong.png" alt="" width="43" height="26" /> | Edit, change inputs and descriptions: mark a line, click the button and change the input. |
| <img style="border: 2px dotted blue;" src="/images/ActivateAcc.png" alt="" width="43" height="27" /> |
Activate/Deactivate: Set / take away a checkmark for choosing the template in the program. |
| <img src="/images/DeleteLong.png" alt="" width="42" height="28" /> | Delete an template: mark a line and delete it with the click on the button. |
| <a href="/index.php?title=How to edit the template structure"><img style="border: 2px dotted blue;" src="/images/EditTemplateStructure.png" alt="" width="183" height="29" /></a> |
With the button Edit template structure you can change / edit the structure and input of your document. |
At the lower part of the page you see three tabs:
- Address and info
- Text before the table an
- Text after the table.
Table means this part in the template, where the invoice items be placed.
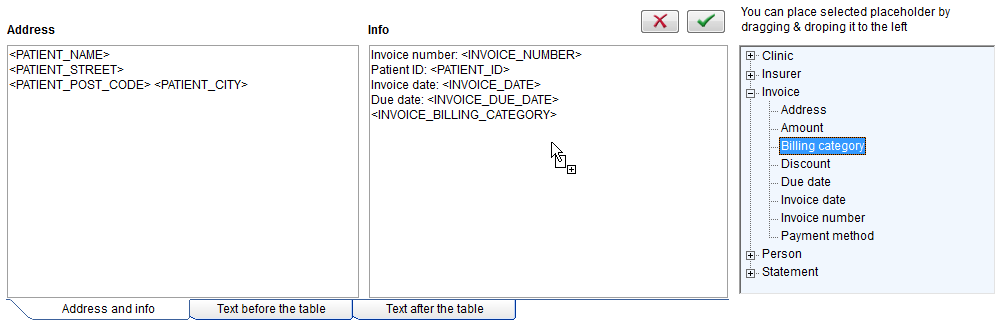 |
|
| <a href="/index.php?title=MedITEX_Accounting_manual">Back to the MedITEX Accounting manual </a> | <a href="#top">Back to top</a> |