Verifalia account
From MedITEX - Wiki
| Line 31: | Line 31: | ||
<p style="text-align: justify;">In "New sub-account" page, which is a client area, you can configure the new sub-account details using the same existing displayed form, by setting a <strong>Name</strong>, an <strong>SID </strong>which will be used to log into Verifalia, either through the clients area or via the API (depending on the specified permissions) and an <strong>Auth token </strong>that represents the password.</p> | <p style="text-align: justify;">In "New sub-account" page, which is a client area, you can configure the new sub-account details using the same existing displayed form, by setting a <strong>Name</strong>, an <strong>SID </strong>which will be used to log into Verifalia, either through the clients area or via the API (depending on the specified permissions) and an <strong>Auth token </strong>that represents the password.</p> | ||
<p style="text-align: justify;">Finally, it is also possible to set the sub-account permissions.</p> | <p style="text-align: justify;">Finally, it is also possible to set the sub-account permissions.</p> | ||
| − | <p>& | + | <h3 style="text-align: justify;">Settings</h3> |
| + | <table style="margin-left: auto; margin-right: auto;" border="0" width="759" height="24"> | ||
| + | <tbody> | ||
| + | <tr> | ||
| + | <td> | ||
| + | <p><span id="result_box" lang="en"><span title="Sollte der Ordner „Updates" nicht vorhanden sein, einfach erstellen. "><span lang="en"><span class="hps"><span id="result_box" lang="en"><span><span id="result_box" lang="en"><span title="Sollte der Ordner „Updates" nicht vorhanden sein, einfach erstellen. "><span id="result_box" lang="en"><span title="Nutzen sie den Refresh Button um die Ansicht zu aktualisieren. "><span id="result_box" lang="en"><span title="Nutzen sie den Refresh Button um die Ansicht zu aktualisieren. "><span id="result_box" lang="en"><span title="Ob die Datei geschlossen werden darf sehen sie anhand des Eintrags der letzten Spalte. "><span id="result_box" lang="en"><span title="Nutzen sie den Refresh Button um die Ansicht zu aktualisieren. "><span id="result_box" lang="en"><span title="Nutzen sie den Refresh Button um die Ansicht zu aktualisieren. ">[[Image:/images/VerifaliaAccount4.png.png|none|600px|thumb|left|link=http://wiki.meditex-software.com/images//images/VerifaliaAccount4.png.png| ]]</span></span></span></span></span></span></span></span></span></span></span></span></span></span></span></span></span></span></p> | ||
| + | </td> | ||
| + | </tr> | ||
| + | </tbody> | ||
| + | </table> | ||
| + | <p>In this panel, the user may enter the account information of his Verifalia registration. The settings may be tested with the button "Validation test" which will perform a validation with his email address.</p> | ||
| + | <p>On the right side of this panel, some information about Verifalia will be displayed to inform the user about this service.</p> | ||
<p> </p> | <p> </p> | ||
<p> </p> | <p> </p> | ||
Revision as of 16:41, 21 December 2016
Verifalia is a web-based email validation service allowing to simply and easily validate lists of email addresses.
With MedITEX IVF, in order to validate patient's email addresses, it is mandatory to sign up at Verifalia and to enter the corresponding credentials into the right fields.
|
|
In order to create a Verifalia account, please go to System -> Configuration / administration -> Settings and then to System -> Interfaces -> Email validation and click on the highlighted link that will redirect you to Verifalia website or you can directly access it from <a href="http://verifalia.com/pricing" target="_blank">here</a>.
Sign up
Follow the steps below:
- Choose your credit pack and click on Sign up.
- Add your email and set a password to personalize your account. It is possible to sign up as an individual or as a business / company.
Then add your personal details to complete your registration. - A confirmation email will be automatically sent to your address, in order to secure your Verifalia account. This will let you access all the features and receive future notifications from Verifalia service.
Once the account is created, go to Dashboard as shown below and then to New sub-account under "API and new sub-accounts".
| <img style="display: block; margin-left: auto; margin-right: auto;" src="/images/VerifaliaAccount2.PNG" alt="" width="584" height="62" /> |
| <img style="display: block; margin-left: auto; margin-right: auto;" src="/images/VerifaliaAccount3.png" alt="" width="620" height="180" /> |
In "New sub-account" page, which is a client area, you can configure the new sub-account details using the same existing displayed form, by setting a Name, an SID which will be used to log into Verifalia, either through the clients area or via the API (depending on the specified permissions) and an Auth token that represents the password.
Finally, it is also possible to set the sub-account permissions.
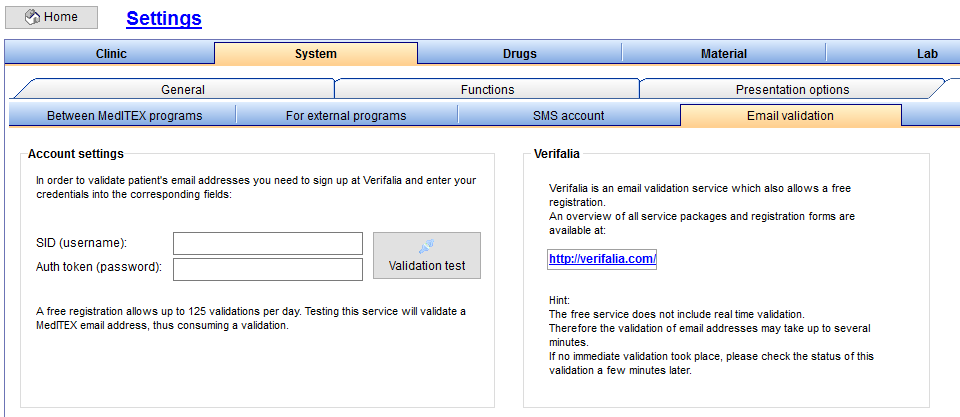
Settings
|
|
In this panel, the user may enter the account information of his Verifalia registration. The settings may be tested with the button "Validation test" which will perform a validation with his email address.
On the right side of this panel, some information about Verifalia will be displayed to inform the user about this service.
| <a href="/index.php?title=MedITEX_IVF_how_to">Back to How to</a> | <a href="#top">Back to top</a> |