Tab patient appointment
From MedITEX - Wiki
| (15 intermediate revisions by 2 users not shown) | |||
| Line 1: | Line 1: | ||
| − | < | + | <table style="margin-left: auto; margin-right: auto;" border="0"> |
| + | <tbody> | ||
| + | <tr> | ||
| + | <td><img src="/images/patientAppointment.png" alt="" width="498" height="814" /></td> | ||
| + | </tr> | ||
| + | </tbody> | ||
| + | </table> | ||
| + | <p> </p> | ||
| + | <h2>Buttons</h2> | ||
| + | <p>Some buttons have special functionalities. Click on it to have more information.</p> | ||
<p> </p> | <p> </p> | ||
| − | + | <table style="margin-left: auto; margin-right: auto;" border="0" width="747" height="99"> | |
| − | <table border="0" width="747" height=" | + | |
<tbody> | <tbody> | ||
<tr> | <tr> | ||
| − | <td style="text-align: center;">< | + | <td style="text-align: center;"><img style="display: block; margin-left: auto; margin-right: auto;" src="/images/Plus.png" alt="" /></td> |
| − | <td>Add resource.</td> | + | <td><strong>Add</strong> resource or <strong>Note</strong>.<br /></td> |
</tr> | </tr> | ||
<tr> | <tr> | ||
| − | <td style="text-align: center; | + | <td style="text-align: center;"><img style="display: block; margin-left: auto; margin-right: auto;" src="/images/DeleteX.png" alt="" width="26" height="24" /></td> |
| − | <td>Remove selected resource.</td> | + | <td><strong>Remove</strong> selected resource.</td> |
</tr> | </tr> | ||
<tr> | <tr> | ||
| − | <td style="text-align: center;">< | + | <td style="text-align: center;"><img style="display: block; margin-left: auto; margin-right: auto;" src="/images/CopyAppointment.png" alt="" width="114" height="27" /></td> |
| − | <td>Copy the selected appointment and save it as a new one.</td> | + | <td><strong>Copy the selected appointment</strong> and save it as a new one.</td> |
</tr> | </tr> | ||
<tr> | <tr> | ||
| − | <td style="text-align: center;"> | + | <td style="text-align: center;"><a href="/index.php?title=Scheduler_main_page"><img style="display: block; margin-left: auto; margin-right: auto; border: 2px dotted blue;" src="/images/DeleteWord.png" alt="" /></a></td> |
| − | <td>Delete the appointment. After deleting, go back to the main window.</td> | + | <td><strong>Delete the appointment</strong>. After deleting, go back to the main window.</td> |
</tr> | </tr> | ||
<tr> | <tr> | ||
| − | <td><a href="/index.php?title=Scheduler_main_page"><img style="display: block; margin-left: auto; margin-right: auto;" src="/images/CancelX.png" alt=" | + | <td><a href="/index.php?title=Scheduler_main_page"><img style="display: block; margin-left: auto; margin-right: auto; border: 2px dotted blue;" src="/images/CancelX.png" alt="" /></a></td> |
| − | <td>Cancel your entry. After canceling, go back to the main window.<br /></td> | + | <td><strong>Cancel your entry</strong>. After canceling, go back to the main window.<br /></td> |
</tr> | </tr> | ||
<tr> | <tr> | ||
| − | <td style="text-align: center;"><a href="/index.php?title=Scheduler_main_page"><img style="display: block; margin-left: auto; margin-right: auto;" src="/images/Save.png" alt="" width="116" height="29" /></a></td> | + | <td style="text-align: center;"><a href="/index.php?title=Scheduler_main_page"><img style="display: block; margin-left: auto; margin-right: auto; border: 2px dotted blue;" src="/images/Save.png" alt="" width="116" height="29" /></a></td> |
| − | <td>Save your entry. After saving, go back to the main window.</td> | + | <td><strong>Save your entry</strong>. After saving, go back to the main window.</td> |
</tr> | </tr> | ||
</tbody> | </tbody> | ||
| Line 32: | Line 40: | ||
<p> </p> | <p> </p> | ||
<h2>Clickable areas</h2> | <h2>Clickable areas</h2> | ||
| − | <p> | + | <p>Some clickable areas have special functionalities. Click on it to have more information.</p> |
| − | <table border="0" width="798" height=" | + | <table border="0" width="798" height="335"> |
<tbody> | <tbody> | ||
<tr> | <tr> | ||
| − | <td><a href="/index.php?title=Scheduler patient data"><img src="/images/Patient.png" alt="" width="239" height="108" /></a></td> | + | <td><a href="/index.php?title=Scheduler patient data"><img style="display: block; margin-left: auto; margin-right: auto; border: 2px dotted blue;" src="/images/Patient.png" alt="" width="239" height="108" /></a></td> |
<td> | <td> | ||
| − | |||
<p>Personal data of the patient.</p> | <p>Personal data of the patient.</p> | ||
| − | <p>With the - | + | <p><strong>The loupe</strong> show the mask with the personal data of the patient.</p> |
| + | <p>With the <strong>"-'"button</strong> can you delete the patient appointment.</p> | ||
</td> | </td> | ||
</tr> | </tr> | ||
<tr> | <tr> | ||
| − | <td | + | <td><img style="display: block; margin-left: auto; margin-right: auto;" src="/images/Treatment.png" alt="" width="253" height="113" /></td> |
| − | + | <td><strong>Choose the Treatment and the subject</strong>. A filter can be set.</td> | |
| − | < | + | |
| − | < | + | |
</tr> | </tr> | ||
<tr> | <tr> | ||
| − | <td | + | <td><img style="display: block; margin-left: auto; margin-right: auto; " src="/images/Start.png" alt="" width="333" height="36" /></td> |
| − | + | <td>Set the <strong>date</strong> on the left an the<strong> time</strong> on the right.</td> | |
| + | </tr> | ||
| + | <tr> | ||
| + | <td><img style="display: block; margin-left: auto; margin-right: auto;" src="/images/Reminder.png" alt="" width="263" height="28" /></td> | ||
| + | <td><strong>Appointment Reminder</strong>. Change the reminder time.</td> | ||
| + | </tr> | ||
| + | <tr> | ||
| + | <td><img style="display: block; margin-left: auto; margin-right: auto;" src="/images/Note.png" alt="" width="486" height="98" /></td> | ||
| + | <td><strong>Add important notes</strong> to this appointment. More information below.</td> | ||
| + | </tr> | ||
| + | </tbody> | ||
| + | </table> | ||
<p> </p> | <p> </p> | ||
| + | <h2>Notes</h2> | ||
| + | <p><strong>Notes</strong> in the <strong>Appointment editor</strong> have the ability to display any information required by the clinic.</p> | ||
| + | <p>This area has two basic functions:</p> | ||
| + | <ol> | ||
| + | <li>Document <strong>any custom information</strong> related to the appoint. It is a free field where anything can be entered.</li> | ||
| + | <li>Display <strong>any information</strong> related to the patient that can be <strong>retrieved from the database</strong>.</li> | ||
| + | </ol> | ||
<p> </p> | <p> </p> | ||
| − | </ | + | <h3>Custom information</h3> |
| − | < | + | <p>Any type of information can be written in the <strong>Notes </strong>field by simply entering the desired text. This information will be displayed in the schedule.</p> |
| + | <p> </p> | ||
| + | <h3>Selectable notes</h3> | ||
| + | <p>Any information can be retrieved from the database and displayed on the schedule.</p> | ||
| + | <p>This information<strong> </strong>is displayed in the schedule in two distinct ways:</p> | ||
| + | <table border="0"> | ||
| + | <tbody> | ||
| + | <tr> | ||
| + | <td><img style="display: block; margin-left: auto; margin-right: auto;" src="/images/NoteMouseOver.png" alt="" /></td> | ||
| + | <td>If the duration of the appoint is not large enough in the schedule, <strong>Notes</strong> cannot be visible. However, you can put the mouse over it to view the information.</td> | ||
</tr> | </tr> | ||
| + | <tr> | ||
| + | <td><img style="display: block; margin-left: auto; margin-right: auto;" src="/images/NoteOnAppointment.png" alt="" width="354" height="96" /></td> | ||
| + | <td>When the appointment occupies a larger space in the schedule, <strong>Notes </strong>will be displayed automatically.</td> | ||
| + | </tr> | ||
| + | </tbody> | ||
| + | </table> | ||
| + | <p> </p> | ||
| + | <p>The retrieving of this information requires special functionalities and cannot be configured by users. In order to use this function, you must ask our support team to make a <strong>Template </strong>that satisfies your needs.</p> | ||
| + | <p>Once the <strong>Templates </strong>are created, you can click on the <strong>Plus </strong>buttom to add it to the patient.</p> | ||
| + | <table style="margin-left: auto; margin-right: auto;" border="0"> | ||
| + | <tbody> | ||
<tr> | <tr> | ||
<td> | <td> | ||
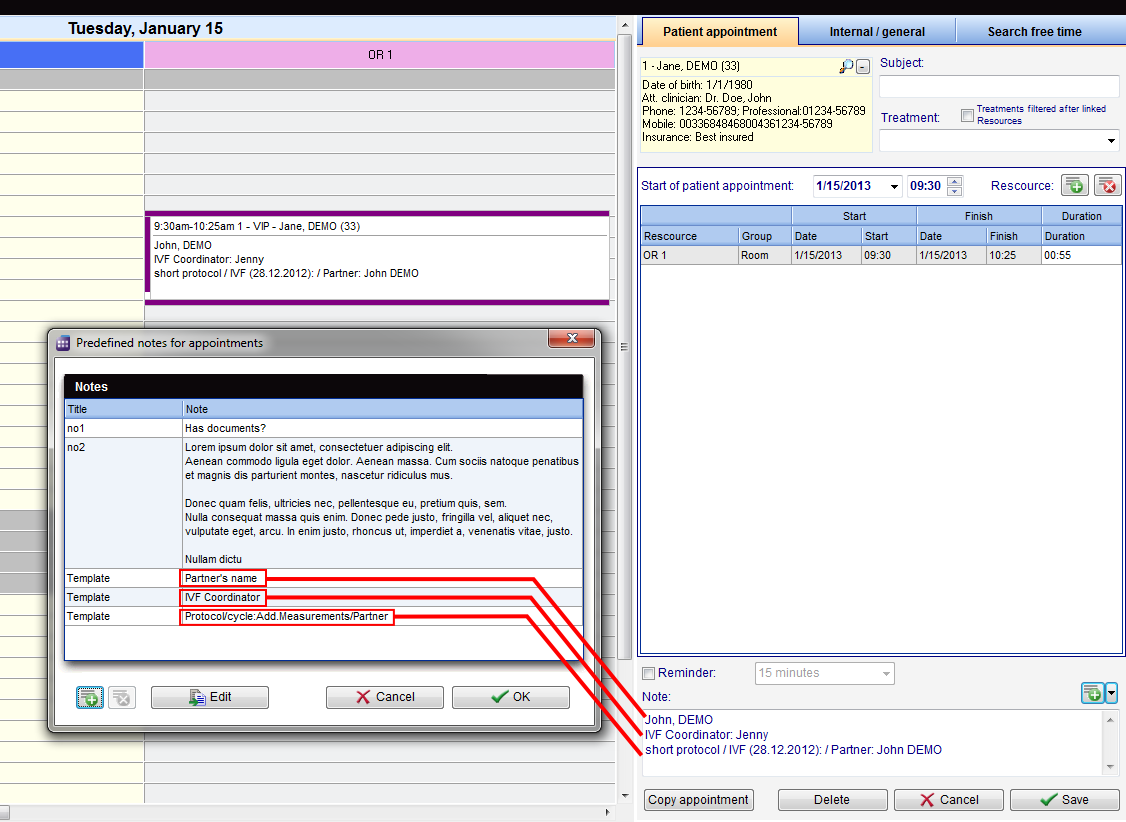
| − | <p>< | + | <p>For this example, three <strong>Templates</strong> were created to retrieve the following information:</p> |
| − | < | + | <ol> |
| + | <li>Partner's name.</li> | ||
| + | <li>IVF Coordinator.</li> | ||
| + | <li>Protocol, cyle, additional mesuraments and partner.</li> | ||
| + | </ol> | ||
| + | <p>One important functionality to notice is that <strong>IVF Coordinator </strong>is not a field belonging to the patient, but instead, text added as an <strong>Attention message</strong>. This demonstrates that even parts of strings can be displayed from the database.</p> | ||
| + | </td> | ||
| + | </tr> | ||
| + | <tr> | ||
| + | <td>[[Image:NotePredefinedNotes.png|none|740px|thumb|left|link=http://wiki.meditex-software.com/images/NotePredefinedNotes.png|]]</td> | ||
| + | </tr> | ||
| + | </tbody> | ||
| + | </table> | ||
<p> </p> | <p> </p> | ||
| + | <table border="0"> | ||
| + | <tbody> | ||
| + | <tr> | ||
| + | <td> | ||
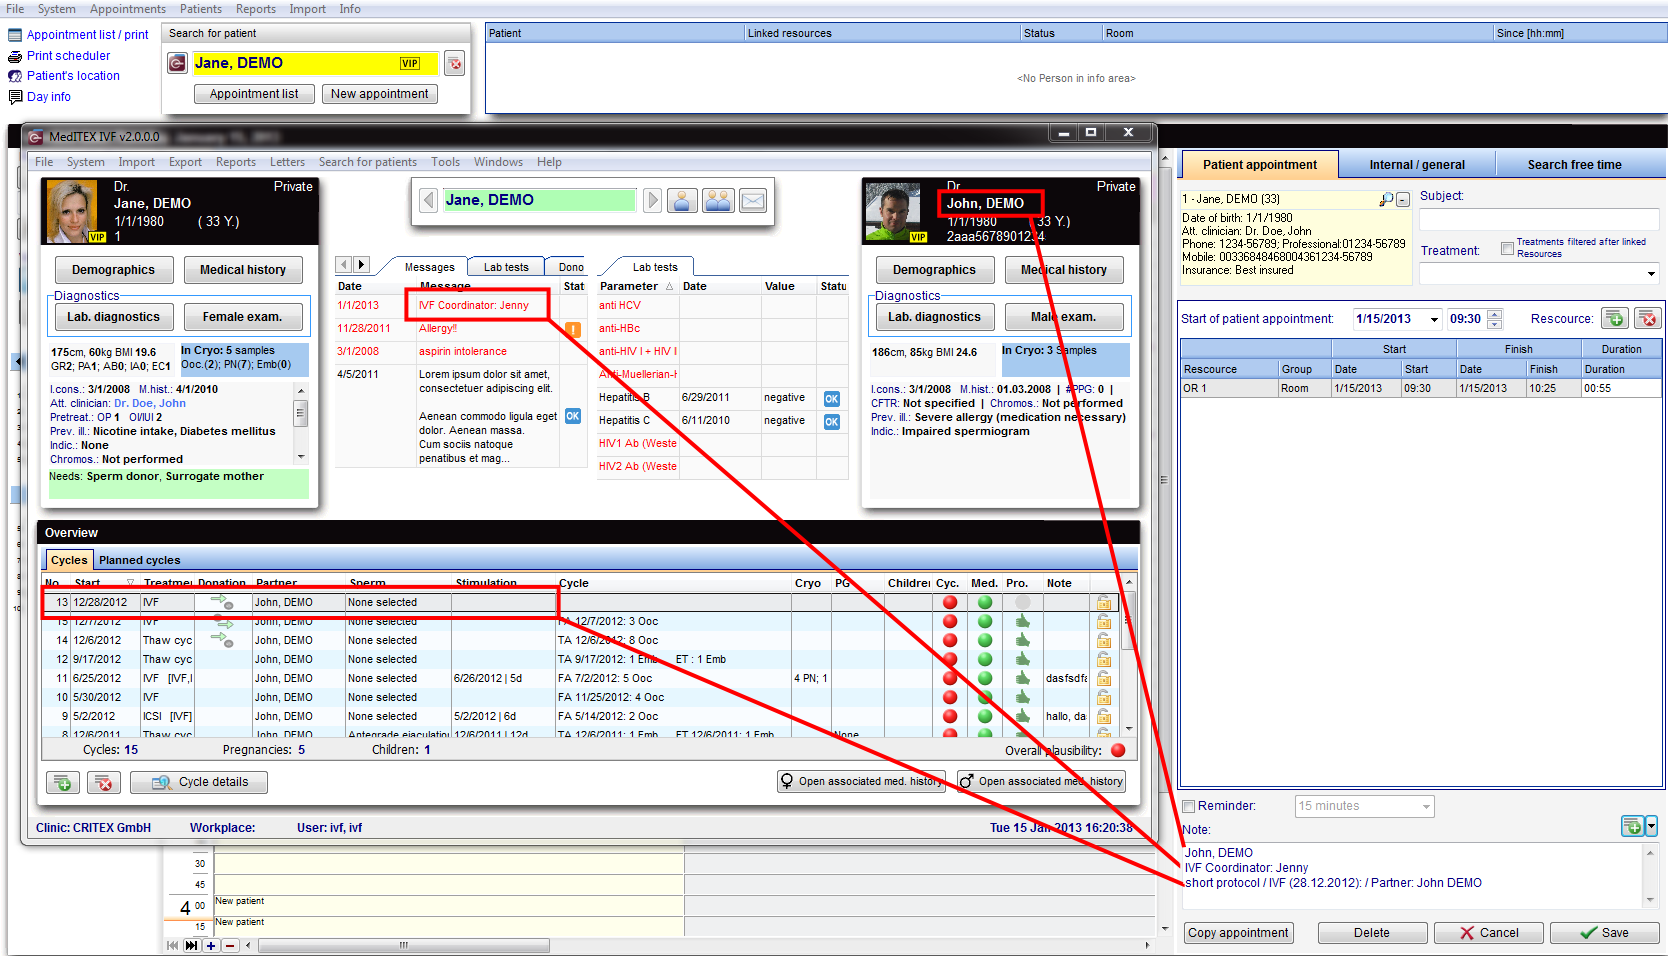
| + | <p>Since <strong>MedITEX IVF</strong> and <strong>Scheduler </strong>use the same database, the information displayed is consistant throughtout all programs.</p> | ||
| + | <p>For this example, the <strong>Templates </strong>retrieved the same information being displayed on <strong>IVF</strong>.</p> | ||
</td> | </td> | ||
| − | |||
</tr> | </tr> | ||
<tr> | <tr> | ||
| − | <td>< | + | <td>[[Image:NoteIVFInfo.png|none|740px|thumb|left|link=http://wiki.meditex-software.com/images/NoteIVFInfo.png|]]</td> |
| − | <td> | + | </tr> |
| + | </tbody> | ||
| + | </table> | ||
| + | <table style="float: right;" border="0"> | ||
| + | <tbody> | ||
| + | <tr> | ||
| + | <td style="text-align: right;"><a href="/index.php?title=MedITEX_Scheduler_manual">Back to the MedITEX Scheduler menu </a></td> | ||
| + | <td style="text-align: right;"><a href="#top">Back to top</a></td> | ||
</tr> | </tr> | ||
</tbody> | </tbody> | ||
</table> | </table> | ||
Latest revision as of 16:16, 16 January 2013
| <img src="/images/patientAppointment.png" alt="" width="498" height="814" /> |
Contents |
Buttons
Some buttons have special functionalities. Click on it to have more information.
| <img style="display: block; margin-left: auto; margin-right: auto;" src="/images/Plus.png" alt="" /> | Add resource or Note. |
| <img style="display: block; margin-left: auto; margin-right: auto;" src="/images/DeleteX.png" alt="" width="26" height="24" /> | Remove selected resource. |
| <img style="display: block; margin-left: auto; margin-right: auto;" src="/images/CopyAppointment.png" alt="" width="114" height="27" /> | Copy the selected appointment and save it as a new one. |
| <a href="/index.php?title=Scheduler_main_page"><img style="display: block; margin-left: auto; margin-right: auto; border: 2px dotted blue;" src="/images/DeleteWord.png" alt="" /></a> | Delete the appointment. After deleting, go back to the main window. |
| <a href="/index.php?title=Scheduler_main_page"><img style="display: block; margin-left: auto; margin-right: auto; border: 2px dotted blue;" src="/images/CancelX.png" alt="" /></a> | Cancel your entry. After canceling, go back to the main window. |
| <a href="/index.php?title=Scheduler_main_page"><img style="display: block; margin-left: auto; margin-right: auto; border: 2px dotted blue;" src="/images/Save.png" alt="" width="116" height="29" /></a> | Save your entry. After saving, go back to the main window. |
Clickable areas
Some clickable areas have special functionalities. Click on it to have more information.
| <a href="/index.php?title=Scheduler patient data"><img style="display: block; margin-left: auto; margin-right: auto; border: 2px dotted blue;" src="/images/Patient.png" alt="" width="239" height="108" /></a> |
Personal data of the patient. The loupe show the mask with the personal data of the patient. With the "-'"button can you delete the patient appointment. |
| <img style="display: block; margin-left: auto; margin-right: auto;" src="/images/Treatment.png" alt="" width="253" height="113" /> | Choose the Treatment and the subject. A filter can be set. |
| <img style="display: block; margin-left: auto; margin-right: auto; " src="/images/Start.png" alt="" width="333" height="36" /> | Set the date on the left an the time on the right. |
| <img style="display: block; margin-left: auto; margin-right: auto;" src="/images/Reminder.png" alt="" width="263" height="28" /> | Appointment Reminder. Change the reminder time. |
| <img style="display: block; margin-left: auto; margin-right: auto;" src="/images/Note.png" alt="" width="486" height="98" /> | Add important notes to this appointment. More information below. |
Notes
Notes in the Appointment editor have the ability to display any information required by the clinic.
This area has two basic functions:
- Document any custom information related to the appoint. It is a free field where anything can be entered.
- Display any information related to the patient that can be retrieved from the database.
Custom information
Any type of information can be written in the Notes field by simply entering the desired text. This information will be displayed in the schedule.
Selectable notes
Any information can be retrieved from the database and displayed on the schedule.
This information is displayed in the schedule in two distinct ways:
| <img style="display: block; margin-left: auto; margin-right: auto;" src="/images/NoteMouseOver.png" alt="" /> | If the duration of the appoint is not large enough in the schedule, Notes cannot be visible. However, you can put the mouse over it to view the information. |
| <img style="display: block; margin-left: auto; margin-right: auto;" src="/images/NoteOnAppointment.png" alt="" width="354" height="96" /> | When the appointment occupies a larger space in the schedule, Notes will be displayed automatically. |
The retrieving of this information requires special functionalities and cannot be configured by users. In order to use this function, you must ask our support team to make a Template that satisfies your needs.
Once the Templates are created, you can click on the Plus buttom to add it to the patient.
|
For this example, three Templates were created to retrieve the following information:
One important functionality to notice is that IVF Coordinator is not a field belonging to the patient, but instead, text added as an Attention message. This demonstrates that even parts of strings can be displayed from the database. |
 |
|
Since MedITEX IVF and Scheduler use the same database, the information displayed is consistant throughtout all programs. For this example, the Templates retrieved the same information being displayed on IVF. |
 |
| <a href="/index.php?title=MedITEX_Scheduler_manual">Back to the MedITEX Scheduler menu </a> | <a href="#top">Back to top</a> |