Scheduler patient data
From MedITEX - Wiki
| (2 intermediate revisions by one user not shown) | |||
| Line 32: | Line 32: | ||
<td style="text-align: center;"><img src="/images/OpenAcc.png" alt="" width="76" height="37" /></td> | <td style="text-align: center;"><img src="/images/OpenAcc.png" alt="" width="76" height="37" /></td> | ||
<td>Open this patient in the MedITEX Accounting module.</td> | <td>Open this patient in the MedITEX Accounting module.</td> | ||
| + | </tr> | ||
| + | <tr> | ||
| + | <td style="text-align: center;"><img src="/images/CancelSch.png" alt="" width="142" height="27" /><br /></td> | ||
| + | <td>Cancel the entries.</td> | ||
</tr> | </tr> | ||
<tr> | <tr> | ||
| Line 39: | Line 43: | ||
</tbody> | </tbody> | ||
</table> | </table> | ||
| − | |||
| − | |||
| − | |||
<p> </p> | <p> </p> | ||
<h2>Clickable Areas</h2> | <h2>Clickable Areas</h2> | ||
| Line 61: | Line 62: | ||
</tbody> | </tbody> | ||
</table> | </table> | ||
| − | <p style="text-align: justify;"><strong>The personal | + | <p style="text-align: justify;"><strong>The personal details of the patient.</strong></p> |
<p style="text-align: justify;">A special field is the <strong>patient ID</strong>. In the settings can be specified whether they entered manually, or generated automatically according to certain rules.</p> | <p style="text-align: justify;">A special field is the <strong>patient ID</strong>. In the settings can be specified whether they entered manually, or generated automatically according to certain rules.</p> | ||
<p style="text-align: justify;">Put a check mark to assign a special or important patient as a <strong>VIP</strong>. The information will appear in the future in addition to the patient's name in the search window.</p> | <p style="text-align: justify;">Put a check mark to assign a special or important patient as a <strong>VIP</strong>. The information will appear in the future in addition to the patient's name in the search window.</p> | ||
| Line 73: | Line 74: | ||
</tbody> | </tbody> | ||
</table> | </table> | ||
| − | <p> | + | <p>Here you can choose an insurer, which you can predefine at "System" --> "Insurances and funder" in MedITEX IVF.</p> |
| − | <p> | + | <p>You can insert also the default payment method of the patient. In each area it is needed, the program add the default payment method automatically. If the patient use a different method for one special treatment, you can modify it in the single entry mask.</p> |
<p> </p> | <p> </p> | ||
<table border="0"> | <table border="0"> | ||
| Line 84: | Line 85: | ||
</table> | </table> | ||
<p style="text-align: justify;"><strong>Referrer data and a possible notification order.</strong></p> | <p style="text-align: justify;"><strong>Referrer data and a possible notification order.</strong></p> | ||
| − | <p style="text-align: justify;">Here the consulting doctor will be added. | + | <p style="text-align: justify;">Here the consulting doctor will be added. <span id="result_box" lang="en"><span class="hps">To select a</span> <span class="hps">doctor</span><span>, it must</span> <span class="hps">be in the</span> Referrers <span class="hps">list</span> <span class="hps">in MEDITEX IVF</span><span> ("System" --> "Referrers").</span></span></p> |
| − | + | ||
<p style="text-align: justify;">Place a checkmark if the consulting doctor should be notified.</p> | <p style="text-align: justify;">Place a checkmark if the consulting doctor should be notified.</p> | ||
<p> </p> | <p> </p> | ||
Latest revision as of 13:38, 4 July 2014
 |
Buttons
Buttons with a blue dotted frame have special functionalities. Click on it to have more information.
| <a href="/index.php?title=How_to_add_a_new_patient%3F"><img style="display: block; margin-left: auto; margin-right: auto; border: 2px dotted blue;" src="/images/OpenPartner.png" alt="" width="93" height="37" /></a> | Open the partner. |
| <img style="display: block; margin-left: auto; margin-right: auto;" src="/images/DeletePerson.png" alt="" width="87" height="39" /> | Delete the patient. |
| <img style="display: block; margin-left: auto; margin-right: auto;" src="/images/NewPatientSch.png" alt="" width="77" height="37" /> | Add a new patient. |
| <img src="/images/OpenPatInIVF.png" alt="" width="79" height="38" /> | Open this patient in MedITEX IVF. |
| <img src="/images/OpenAcc.png" alt="" width="76" height="37" /> | Open this patient in the MedITEX Accounting module. |
| <img src="/images/CancelSch.png" alt="" width="142" height="27" /> |
Cancel the entries. |
| <a href="/index.php?title=Scheduler_main_page"><img style="display: block; margin-left: auto; margin-right: auto; border: 2px dotted blue;" src="/images/OK.png" alt="" width="142" height="29" /></a> | Save your entry. After saving, go back to the main window. |
Clickable Areas
| <img src="/images/SearchPatientSch.png" alt="" width="358" height="35" /> | Search the patient by surname, birthday or patient ID. |
Tabs
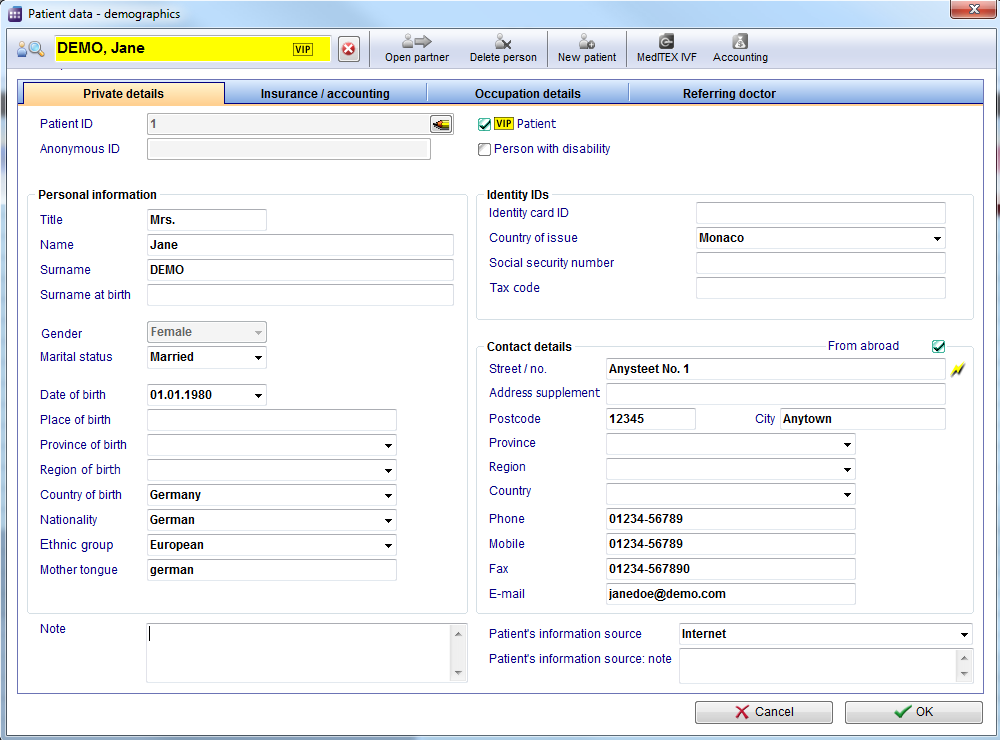
| <img src="/images/PatientData.png" alt="" width="765" height="564" /> |
The personal details of the patient.
A special field is the patient ID. In the settings can be specified whether they entered manually, or generated automatically according to certain rules.
Put a check mark to assign a special or important patient as a VIP. The information will appear in the future in addition to the patient's name in the search window.
Personal contact data of the patient, like phone number, street, city,...
| <img src="/images/InsuranceAcc.png" alt="" width="765" height="564" /> |
Here you can choose an insurer, which you can predefine at "System" --> "Insurances and funder" in MedITEX IVF.
You can insert also the default payment method of the patient. In each area it is needed, the program add the default payment method automatically. If the patient use a different method for one special treatment, you can modify it in the single entry mask.
| <img src="/images/ReferringDocs.png" alt="" width="765" height="564" /> |
Referrer data and a possible notification order.
Here the consulting doctor will be added. To select a doctor, it must be in the Referrers list in MEDITEX IVF ("System" --> "Referrers").
Place a checkmark if the consulting doctor should be notified.
| <a href="/index.php?title=MedITEX_Scheduler_manual">Back to the MedITEX Scheduler menu </a> | <a href="#top">Back to top</a> |