Scheda appuntamento paziente
From MedITEX - Wiki
| Line 7: | Line 7: | ||
</table> | </table> | ||
<p> </p> | <p> </p> | ||
| − | <h2> | + | <h2>Tasti</h2> |
| − | <p> | + | <p>Alcuni tasti possiedono funzioni speciali. Fare click su di essi per maggiori informazioni..</p> |
| − | + | ||
<table style="margin-left: auto; margin-right: auto;" border="0" width="747" height="99"> | <table style="margin-left: auto; margin-right: auto;" border="0" width="747" height="99"> | ||
<tbody> | <tbody> | ||
<tr> | <tr> | ||
<td style="text-align: center;"><img style="display: block; margin-left: auto; margin-right: auto;" src="/images/Plus.png" alt="" /></td> | <td style="text-align: center;"><img style="display: block; margin-left: auto; margin-right: auto;" src="/images/Plus.png" alt="" /></td> | ||
| − | <td><strong> | + | <td><strong>Aggiunge</strong> una risorsa.</td> |
</tr> | </tr> | ||
<tr> | <tr> | ||
<td style="text-align: center;"><img style="display: block; margin-left: auto; margin-right: auto;" src="/images/DeleteX.png" alt="" width="26" height="24" /></td> | <td style="text-align: center;"><img style="display: block; margin-left: auto; margin-right: auto;" src="/images/DeleteX.png" alt="" width="26" height="24" /></td> | ||
| − | <td><strong> | + | <td><strong>Rimuove</strong> la risorsa selezionata.</td> |
</tr> | </tr> | ||
<tr> | <tr> | ||
| − | <td style="text-align: center;"><img style="display: block; margin-left: auto; margin-right: auto;" src="/images/CopyAppointment.png" alt="" width="114" height="27" /></td> | + | <td style="text-align: center;"><a href="/index.php?title=Change resource"><img style="display: block; margin-left: auto; margin-right: auto; border: 2px dotted blue;" src="/images/CopyAppointment.png" alt="" width="114" height="27" /></a></td> |
| − | <td><strong> | + | <td><strong>Copia l'appuntamento selezionato</strong> e lo salva come nuovo.</td> |
</tr> | </tr> | ||
<tr> | <tr> | ||
| − | <td style="text-align: center;"><a href="/index.php?title= | + | <td style="text-align: center;"><a href="/index.php?title=Pagina_principale_di_Scheduler"><img style="display: block; margin-left: auto; margin-right: auto; border: 2px dotted blue;" src="/images/DeleteWord.png" alt="" /></a></td> |
| − | <td><strong> | + | <td><strong>Cancella l'appuntamento</strong>. Dopo la cancellazione torna alla pagina principale.</td> |
</tr> | </tr> | ||
<tr> | <tr> | ||
| − | <td><a href="/index.php?title= | + | <td><a href="/index.php?title=Pagina_principale_di_Scheduler"><img style="display: block; margin-left: auto; margin-right: auto; border: 2px dotted blue;" src="/images/CancelX.png" alt="" /></a></td> |
| − | <td><strong> | + | <td><strong>Cancella i dati inseriti</strong>. Dopo la cancellazione torna alla pagina principale.<br /></td> |
</tr> | </tr> | ||
<tr> | <tr> | ||
| − | <td style="text-align: center;"><a href="/index.php?title= | + | <td style="text-align: center;"><a href="/index.php?title=Pagina_principale_di_Scheduler"><img style="display: block; margin-left: auto; margin-right: auto; border: 2px dotted blue;" src="/images/Save.png" alt="" width="116" height="29" /></a></td> |
| − | <td><strong> | + | <td><strong>Salva i dati inseriti</strong>. Dopo il salvataggio torna alla pagina principale.</td> |
</tr> | </tr> | ||
</tbody> | </tbody> | ||
</table> | </table> | ||
| − | + | <h2>Aree cliccabili</h2> | |
| − | <h2> | + | <p>Alcune aree cliccabili hanno funzioni speciali. Fare click su di esse per maggiori informazioni.</p> |
| − | <p> | + | |
<table border="0" width="798" height="335"> | <table border="0" width="798" height="335"> | ||
<tbody> | <tbody> | ||
| Line 46: | Line 44: | ||
<td><a href="/index.php?title=Scheduler patient data"><img style="display: block; margin-left: auto; margin-right: auto; border: 2px dotted blue;" src="/images/Patient.png" alt="" width="239" height="108" /></a></td> | <td><a href="/index.php?title=Scheduler patient data"><img style="display: block; margin-left: auto; margin-right: auto; border: 2px dotted blue;" src="/images/Patient.png" alt="" width="239" height="108" /></a></td> | ||
<td> | <td> | ||
| − | <p> | + | <p>Dati personali del paziente.</p> |
| − | <p><strong> | + | <p><strong>La lente d'ingrandimento</strong> apre la maschera con i dati personali del paziente.</p> |
| − | <p> | + | <p>Con il <strong>tasto</strong> <strong>"-'"</strong> è possibile cancellare l'appuntamento.</p> |
</td> | </td> | ||
</tr> | </tr> | ||
<tr> | <tr> | ||
<td><img style="display: block; margin-left: auto; margin-right: auto;" src="/images/Treatment.png" alt="" width="253" height="113" /></td> | <td><img style="display: block; margin-left: auto; margin-right: auto;" src="/images/Treatment.png" alt="" width="253" height="113" /></td> | ||
| − | <td><strong> | + | <td><strong>Scegliere il trattamento o l'oggetto</strong>. Può essere impostato un filtro.</td> |
</tr> | </tr> | ||
<tr> | <tr> | ||
<td><img style="display: block; margin-left: auto; margin-right: auto;" src="/images/Start.png" alt="" width="333" height="36" /></td> | <td><img style="display: block; margin-left: auto; margin-right: auto;" src="/images/Start.png" alt="" width="333" height="36" /></td> | ||
| − | <td> | + | <td>Impostare la <strong>data</strong> a sinistra e <strong>l'ora</strong> a destra.</td> |
</tr> | </tr> | ||
<tr> | <tr> | ||
<td><img style="display: block; margin-left: auto; margin-right: auto;" src="/images/Reminder.png" alt="" width="263" height="28" /></td> | <td><img style="display: block; margin-left: auto; margin-right: auto;" src="/images/Reminder.png" alt="" width="263" height="28" /></td> | ||
| − | <td><strong> | + | <td><strong>Memo appuntamenti</strong>. E' possibile l'orario del promemoria.</td> |
</tr> | </tr> | ||
<tr> | <tr> | ||
<td><img style="display: block; margin-left: auto; margin-right: auto;" src="/images/Note.png" alt="" width="486" height="98" /></td> | <td><img style="display: block; margin-left: auto; margin-right: auto;" src="/images/Note.png" alt="" width="486" height="98" /></td> | ||
| − | <td><strong> | + | <td><strong>Aggiungere note importanti</strong> a questo appuntamento. Maggiori informazioni di seguito.</td> |
</tr> | </tr> | ||
</tbody> | </tbody> | ||
</table> | </table> | ||
<p> </p> | <p> </p> | ||
| − | <h2> | + | <h2>Note</h2> |
| − | <p><strong> | + | <p>Le<strong> note</strong> nell'<strong>editor</strong> a<strong>ppuntamenti </strong> possono mostrare ogni informazione richiesta dalla clinica.</p> |
| − | <p> | + | <p>Questa area ha due funzioni di base:</p> |
<ol> | <ol> | ||
| − | <li> | + | <li>Documentare <strong>qualsiasi informazione personalizzata</strong> relativa all'appuntamento. E' un campo libero dove può essere inserito un testo a piacere.</li> |
| − | <li> | + | <li>Mostrare <strong>qualsiasi informazione</strong> relativa al paziente che può essere <strong>reperita nel database</strong>.</li> |
</ol> | </ol> | ||
<p> </p> | <p> </p> | ||
| − | <h3> | + | <h3>Informazioni personalizzate</h3> |
| − | <p> | + | <p>Qualsiasi tipo di informazione può essere scritto nel campo <strong>Note </strong>semplicemente inserendo il testo desiderato. Queste informazioni saranno visualizzate nella pianificazione.</p> |
<p> </p> | <p> </p> | ||
| − | <h3> | + | <h3>Note selezionabili</h3> |
| − | <p> | + | <p>Ogni informazione può essere reperita nel database e mostrata nella pianificazione.</p> |
| − | <p> | + | <p>Queste informazioni sono visualizzate nella pianificazione in due modi distinti:</p> |
<table border="0"> | <table border="0"> | ||
<tbody> | <tbody> | ||
<tr> | <tr> | ||
<td><img style="display: block; margin-left: auto; margin-right: auto;" src="/images/NoteMouseOver.png" alt="" /></td> | <td><img style="display: block; margin-left: auto; margin-right: auto;" src="/images/NoteMouseOver.png" alt="" /></td> | ||
| − | <td> | + | <td>Se la durata dell'appuntamento non è abbastanza lunga, le <strong>note</strong> non possono essere visualizzate. tuttavia passando il cursore sopra l'appuntamento è possibile visualizzare le note. <br /></td> |
</tr> | </tr> | ||
<tr> | <tr> | ||
<td><img style="display: block; margin-left: auto; margin-right: auto;" src="/images/NoteOnAppointment.png" alt="" width="354" height="96" /></td> | <td><img style="display: block; margin-left: auto; margin-right: auto;" src="/images/NoteOnAppointment.png" alt="" width="354" height="96" /></td> | ||
| − | <td> | + | <td>Quando l'appuntamento occupa un tempo più lungo, le <strong>note </strong>saranno visualizzate automaticamente.</td> |
</tr> | </tr> | ||
</tbody> | </tbody> | ||
</table> | </table> | ||
<p> </p> | <p> </p> | ||
| − | <p> | + | <p>I l reperimento di queste informazioni richiede funzionalità speciali che non possono essere configurate dall'utente. Per èersonalizzare questa funzione dovete chiedere al supporto di costruire un <strong>Template </strong>tale da soddisfare i vostri bisogni.</p> |
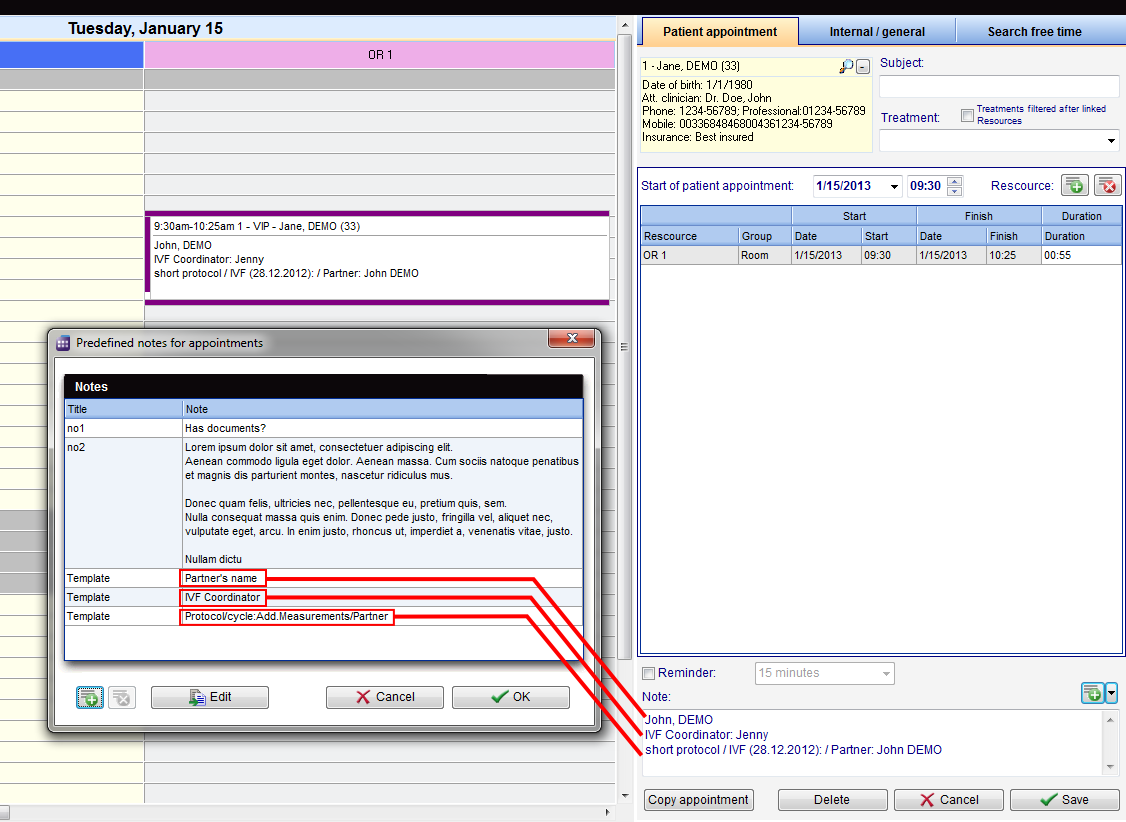
| − | <p> | + | <p>Una volta che i <strong>Template </strong>sono stati creati potete fare click sul tasto <strong>Più </strong>per aggiungerli al paziente.</p> |
<table style="margin-left: auto; margin-right: auto;" border="0"> | <table style="margin-left: auto; margin-right: auto;" border="0"> | ||
<tbody> | <tbody> | ||
<tr> | <tr> | ||
<td> | <td> | ||
| − | <p> | + | <p>In questo esempio, sono stati creati tre <strong>Template</strong> per recuperare le seguenti informazioni:</p> |
<ol> | <ol> | ||
| − | <li> | + | <li>Nome del partner.</li> |
| − | <li>IVF | + | <li>Coordinatore IVF.</li> |
| − | <li> | + | <li>Protocollo, ciclo, misure addizionali e partner.</li> |
</ol> | </ol> | ||
| − | <p> | + | <p>E' importante notare che il campo <strong>Coordinatore</strong> <strong>IVF </strong>non è un campo appartenente al paziente, ma piuttosto un testo aggiunto come <strong>Messaggio di attenzione</strong>. Questo per sottolineare che anche èarti di una stringa possono essere estratte dal database.</p> |
</td> | </td> | ||
</tr> | </tr> | ||
| Line 122: | Line 120: | ||
<tr> | <tr> | ||
<td> | <td> | ||
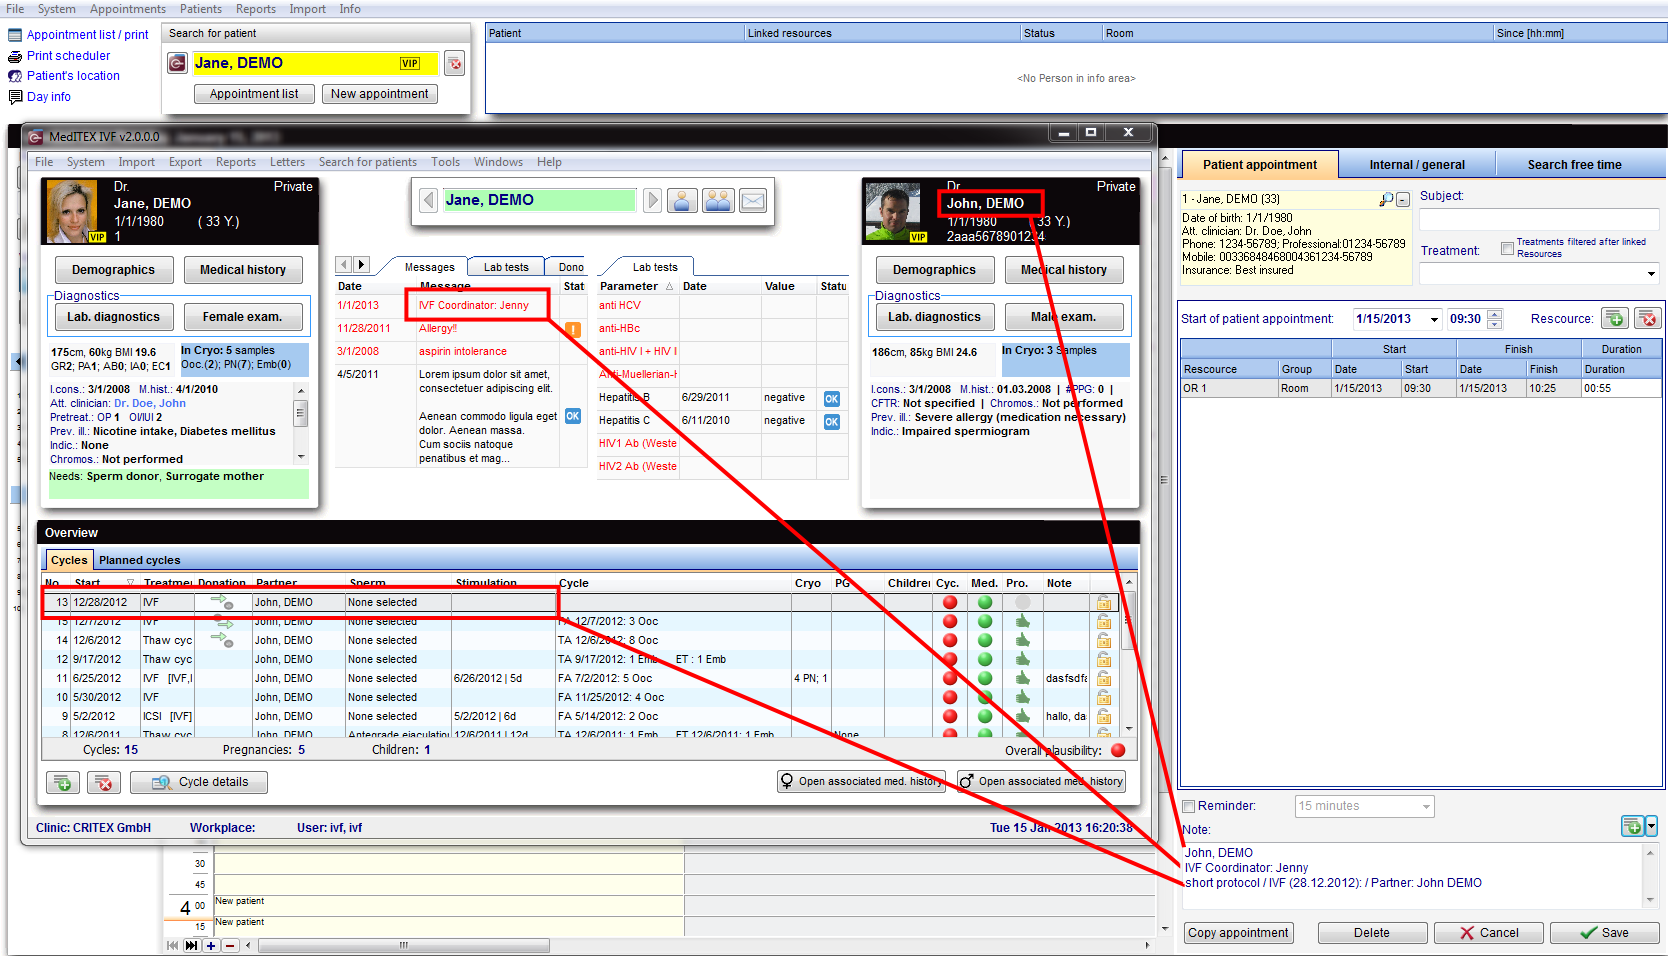
| − | <p> | + | <p>Siccome <strong>MedITEX IVF</strong> e <strong>Scheduler </strong>usano lo stesso database, le informazioni mostrate sono consistenti attraverso entrambi i programmi.</p> |
| − | <p> | + | <p>In questo esempio i <strong>Templates </strong>estraggono le stesse informazioni mostrate in <strong>MedITEX IVF</strong>.</p> |
</td> | </td> | ||
</tr> | </tr> | ||
Latest revision as of 19:43, 24 January 2013
| <img src="/images/patientAppointment.png" alt="" width="498" height="814" /> |
Contents |
Tasti
Alcuni tasti possiedono funzioni speciali. Fare click su di essi per maggiori informazioni..
| <img style="display: block; margin-left: auto; margin-right: auto;" src="/images/Plus.png" alt="" /> | Aggiunge una risorsa. |
| <img style="display: block; margin-left: auto; margin-right: auto;" src="/images/DeleteX.png" alt="" width="26" height="24" /> | Rimuove la risorsa selezionata. |
| <a href="/index.php?title=Change resource"><img style="display: block; margin-left: auto; margin-right: auto; border: 2px dotted blue;" src="/images/CopyAppointment.png" alt="" width="114" height="27" /></a> | Copia l'appuntamento selezionato e lo salva come nuovo. |
| <a href="/index.php?title=Pagina_principale_di_Scheduler"><img style="display: block; margin-left: auto; margin-right: auto; border: 2px dotted blue;" src="/images/DeleteWord.png" alt="" /></a> | Cancella l'appuntamento. Dopo la cancellazione torna alla pagina principale. |
| <a href="/index.php?title=Pagina_principale_di_Scheduler"><img style="display: block; margin-left: auto; margin-right: auto; border: 2px dotted blue;" src="/images/CancelX.png" alt="" /></a> | Cancella i dati inseriti. Dopo la cancellazione torna alla pagina principale. |
| <a href="/index.php?title=Pagina_principale_di_Scheduler"><img style="display: block; margin-left: auto; margin-right: auto; border: 2px dotted blue;" src="/images/Save.png" alt="" width="116" height="29" /></a> | Salva i dati inseriti. Dopo il salvataggio torna alla pagina principale. |
Aree cliccabili
Alcune aree cliccabili hanno funzioni speciali. Fare click su di esse per maggiori informazioni.
| <a href="/index.php?title=Scheduler patient data"><img style="display: block; margin-left: auto; margin-right: auto; border: 2px dotted blue;" src="/images/Patient.png" alt="" width="239" height="108" /></a> |
Dati personali del paziente. La lente d'ingrandimento apre la maschera con i dati personali del paziente. Con il tasto "-'" è possibile cancellare l'appuntamento. |
| <img style="display: block; margin-left: auto; margin-right: auto;" src="/images/Treatment.png" alt="" width="253" height="113" /> | Scegliere il trattamento o l'oggetto. Può essere impostato un filtro. |
| <img style="display: block; margin-left: auto; margin-right: auto;" src="/images/Start.png" alt="" width="333" height="36" /> | Impostare la data a sinistra e l'ora a destra. |
| <img style="display: block; margin-left: auto; margin-right: auto;" src="/images/Reminder.png" alt="" width="263" height="28" /> | Memo appuntamenti. E' possibile l'orario del promemoria. |
| <img style="display: block; margin-left: auto; margin-right: auto;" src="/images/Note.png" alt="" width="486" height="98" /> | Aggiungere note importanti a questo appuntamento. Maggiori informazioni di seguito. |
Note
Le note nell'editor appuntamenti possono mostrare ogni informazione richiesta dalla clinica.
Questa area ha due funzioni di base:
- Documentare qualsiasi informazione personalizzata relativa all'appuntamento. E' un campo libero dove può essere inserito un testo a piacere.
- Mostrare qualsiasi informazione relativa al paziente che può essere reperita nel database.
Informazioni personalizzate
Qualsiasi tipo di informazione può essere scritto nel campo Note semplicemente inserendo il testo desiderato. Queste informazioni saranno visualizzate nella pianificazione.
Note selezionabili
Ogni informazione può essere reperita nel database e mostrata nella pianificazione.
Queste informazioni sono visualizzate nella pianificazione in due modi distinti:
| <img style="display: block; margin-left: auto; margin-right: auto;" src="/images/NoteMouseOver.png" alt="" /> | Se la durata dell'appuntamento non è abbastanza lunga, le note non possono essere visualizzate. tuttavia passando il cursore sopra l'appuntamento è possibile visualizzare le note. |
| <img style="display: block; margin-left: auto; margin-right: auto;" src="/images/NoteOnAppointment.png" alt="" width="354" height="96" /> | Quando l'appuntamento occupa un tempo più lungo, le note saranno visualizzate automaticamente. |
I l reperimento di queste informazioni richiede funzionalità speciali che non possono essere configurate dall'utente. Per èersonalizzare questa funzione dovete chiedere al supporto di costruire un Template tale da soddisfare i vostri bisogni.
Una volta che i Template sono stati creati potete fare click sul tasto Più per aggiungerli al paziente.
|
In questo esempio, sono stati creati tre Template per recuperare le seguenti informazioni:
E' importante notare che il campo Coordinatore IVF non è un campo appartenente al paziente, ma piuttosto un testo aggiunto come Messaggio di attenzione. Questo per sottolineare che anche èarti di una stringa possono essere estratte dal database. |
 |
|
Siccome MedITEX IVF e Scheduler usano lo stesso database, le informazioni mostrate sono consistenti attraverso entrambi i programmi. In questo esempio i Templates estraggono le stesse informazioni mostrate in MedITEX IVF. |
 |
| <a href="/index.php?title=Manuale_Scheduler">Torna al menu di MedITEX Scheduler </a> | <a href="#top">Torna in alto</a> |