Queries of Report editor
From MedITEX - Wiki
| Line 85: | Line 85: | ||
<td><img src="/images/F10.png" alt="" /></td> | <td><img src="/images/F10.png" alt="" /></td> | ||
<td>QM free fields.</td> | <td>QM free fields.</td> | ||
| + | </tr> | ||
| + | </tbody> | ||
| + | </table> | ||
| + | <h3><span class="short_text" lang="en"><span class="hps">2. Area for queries</span></span></h3> | ||
| + | <table border="0"> | ||
| + | <tbody> | ||
| + | <tr> | ||
| + | <td><img src="/images/Person11RE.png" alt="" width="439" height="156" /></td> | ||
| + | <td>In this area the <strong>sub-groups</strong> can be <strong>drag&dropped</strong> from group list or be deleted in order to build the query tree. The sub-groups are hierarchically ordered as a <strong>“Logical cascade”</strong>.</td> | ||
| + | </tr> | ||
| + | </tbody> | ||
| + | </table> | ||
| + | <h3>3. Area for query fields</h3> | ||
| + | <table border="0"> | ||
| + | <tbody> | ||
| + | <tr> | ||
| + | <td><img src="/images/Query_fields.png" alt="" width="373" height="516" /></td> | ||
| + | <td>In this area are grouped all the fields belonging to each sub-group that constitutes the query tree. From this area each field can be chosen in order to build the desired query.</td> | ||
</tr> | </tr> | ||
</tbody> | </tbody> | ||
| Line 92: | Line 110: | ||
<p> </p> | <p> </p> | ||
<p> </p> | <p> </p> | ||
| − | <p> | + | <p> </p> |
| − | + | <p> </p> | |
| − | <p> | + | <p> </p> |
<h3>Menu bar</h3> | <h3>Menu bar</h3> | ||
<table border="0"> | <table border="0"> | ||
| Line 127: | Line 145: | ||
</table> | </table> | ||
<p> </p> | <p> </p> | ||
| − | + | <p> </p> | |
| − | + | ||
| − | + | ||
| − | + | ||
| − | + | ||
| − | <p> | + | |
| − | + | ||
| − | + | ||
| − | + | ||
| − | + | ||
| − | + | ||
| − | + | ||
<p> </p> | <p> </p> | ||
<table border="0"> | <table border="0"> | ||
Revision as of 12:08, 17 December 2012
To open the Report editor, go to Report -> Report editor in the menu bar.
With the "Report editor" you can generate specific queries for various input areas of the software. It is possible to select almost any field in the database, which can then be displayed in a list. This data can then be integrated in individual or serial letters, work lists and other reports, which can be generated individually with the report editor.
All lists that are generated in the report editor can of course be exported and used in other programs such as Excel.
Every query or analysis can be saved and easily accessed in the system with a simple mouse click.
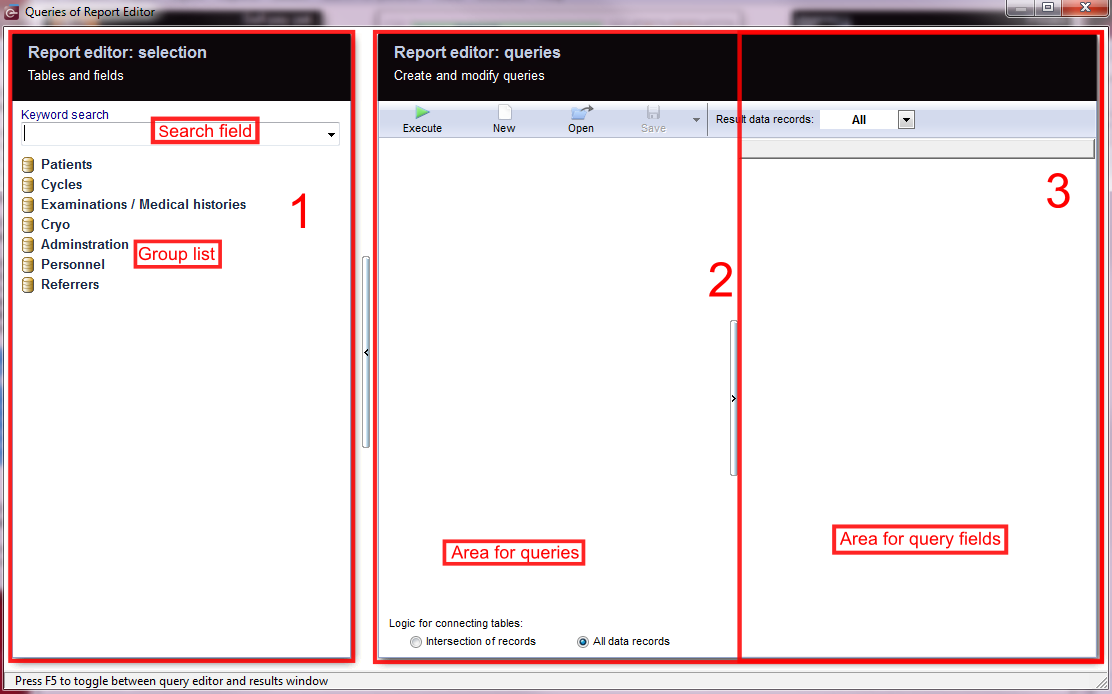
Report editor main window is essentially divided in three parts:
- Group list
- Area for queries
- Area for query fields.
 |
Contents |
1. Group list
From this area can be selected the sub-groups containing the fields necessary to build a query.
If you double-click on a group you will see all available sub-groups . Double-click on a sub-group and you will see all fields that are available in this sub-group.
| <img src="/images/REGroups.png" alt="" width="334" height="466" /> |
On the left, all the tables and fields are placed which you can use for your query:
Pull subgroups from the left in the middle pane to build a query.
|
The symbols before the field name are defined by the corresponding type of data.
Different symbols are:
| <img src="/images/F1.png" alt="" width="51" height="33" /> | Number fields. |
| <img src="/images/F2.png" alt="" width="48" height="41" /> | Text fields. |
| <img src="/images/F3.png" alt="" width="46" height="40" /> |
Note fields (text fields of different sizes). |
| <img src="/images/F4.png" alt="" width="52" height="40" /> | Yes / No fields. |
| <img src="/images/F5.png" alt="" /> | Key fields. |
| <img src="/images/F6.png" alt="" width="43" height="36" /> | Date fields. |
| <img src="/images/F7.png" alt="" width="44" height="35" /> | Telephone fields. |
| <img src="/images/F8.png" alt="" width="42" height="34" /> | QM staff fields. |
| <img src="/images/F9.png" alt="" width="44" height="34" /> | QM material fields. |
| <img src="/images/F10.png" alt="" /> | QM free fields. |
2. Area for queries
| <img src="/images/Person11RE.png" alt="" width="439" height="156" /> | In this area the sub-groups can be drag&dropped from group list or be deleted in order to build the query tree. The sub-groups are hierarchically ordered as a “Logical cascade”. |
3. Area for query fields
| <img src="/images/Query_fields.png" alt="" width="373" height="516" /> | In this area are grouped all the fields belonging to each sub-group that constitutes the query tree. From this area each field can be chosen in order to build the desired query. |
Menu bar
| <img style="display: block; margin-left: auto; margin-right: auto;" src="/images/ExecuteRE.png" alt="" width="89" height="38" /> |
Execute: Start the query. |
| <img style="display: block; margin-left: auto; margin-right: auto;" src="/images/NewRE.png" alt="" width="88" height="36" /> |
New: Clears the contents of the selection window. A new selection can be made. |
| <img style="display: block; margin-left: auto; margin-right: auto;" src="/images/OpenRE.png" alt="" width="92" height="37" /> | |
| <img style="display: block; margin-left: auto; margin-right: auto;" src="/images/SaveRE.png" alt="" width="89" height="83" /> | |
| <img style="display: block; margin-left: auto; margin-right: auto;" src="/images/ResultRE.png" alt="" width="208" height="91" /> |
| <img style="display: block; margin-left: auto; margin-right: auto;" src="/images/Street.png" alt="" width="146" height="53" /> | |
|
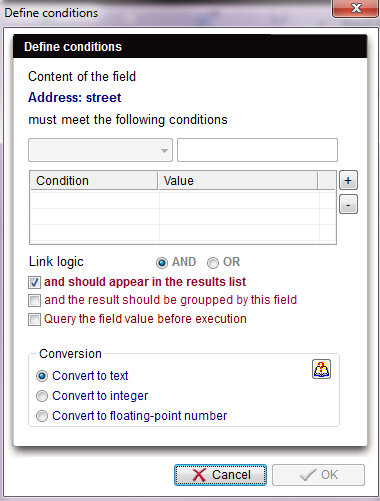
To define conditions on a certain field, double click it's label. |
|
 |