Queries di Report editor
From MedITEX - Wiki
| Line 1: | Line 1: | ||
| − | <p>__TOC__<br />Per | + | <p>__TOC__<br />Per aprire <strong>Report editor</strong>, cliccare su <strong>Reports -> Report editor </strong>nella barra dei menù.</p> |
<table style="margin-left: auto; margin-right: auto;" border="0" width="10" height="24"> | <table style="margin-left: auto; margin-right: auto;" border="0" width="10" height="24"> | ||
<tbody> | <tbody> | ||
| Line 30: | Line 30: | ||
<p> </p> | <p> </p> | ||
<h2>Overview</h2> | <h2>Overview</h2> | ||
| − | <p>Report editor | + | <p>La finestra principale di Report editor è essenzialmente divisa in <strong>tre sezioni</strong>:</p> |
<ol> | <ol> | ||
| − | <li><strong> | + | <li><strong>Lista gruppi</strong></li> |
| − | <li><strong> | + | <li><strong>Sezione per query</strong></li> |
| − | <li><strong> | + | <li><strong>Sezione campi query</strong></li> |
</ol> | </ol> | ||
<table border="0"> | <table border="0"> | ||
| Line 44: | Line 44: | ||
</table> | </table> | ||
<p> </p> | <p> </p> | ||
| − | <h3> | + | <h3>Lista gruppi</h3> |
| − | <p> | + | <p>Da questa sezione è possibile selezionare dei <strong>sotto-gruppi</strong> contenenti i campi necesari per la costruzione della query.</p> |
| − | <p> | + | <p>Facendo <strong>doppio-click </strong>su un gruppo i <strong>sotto-gruppi disponibili</strong> saranno visualizzati.</p> |
| − | <p><strong> | + | <p>Facendo <strong>doppio-click</strong> su un sotto-gruppo i <strong>campi disponibili di quel sotto-gruppo</strong> saranno visualizzati.</p> |
<table border="0"> | <table border="0"> | ||
<tbody> | <tbody> | ||
| Line 53: | Line 53: | ||
<td><img src="/images/REGroups.png" alt="" width="334" height="466" /><br /></td> | <td><img src="/images/REGroups.png" alt="" width="334" height="466" /><br /></td> | ||
<td> | <td> | ||
| − | <p><strong> | + | <p><strong>Sulla sinistra, sono presenti tutte le tabelle e campi utilizzabili nella vostra query:</strong></p> |
<ul> | <ul> | ||
| − | <li> | + | <li>Pazienti</li> |
| − | <li> | + | <li>Terapie</li> |
| − | <li> | + | <li>Esami/anamnesi</li> |
| − | <li> | + | <li>Crio</li> |
| − | <li> | + | <li>Amministrazione</li> |
| − | <li> | + | <li>Personale</li> |
| − | <li> | + | <li>Medici di riferimento/Centri PMA</li> |
</ul> | </ul> | ||
| − | <p><span class="short_text" lang="en"><span class="hps"> | + | <p><span class="short_text" lang="en"><span class="hps">Trascinare sottogruppi dalla sezione di sinistra alla sezione centrale per costruire la query.<br /></span></span></p> |
| − | + | ||
</td> | </td> | ||
</tr> | </tr> | ||
| Line 70: | Line 69: | ||
</table> | </table> | ||
<p> </p> | <p> </p> | ||
| − | <p> | + | <p>Il simbolo che precede il nome del campo definisce il tipo di dato.</p> |
| − | <p><strong> | + | <p><strong>I diversi simboli sono:</strong></p> |
<table style="margin-left: auto; margin-right: auto;" border="0"> | <table style="margin-left: auto; margin-right: auto;" border="0"> | ||
<tbody> | <tbody> | ||
<tr> | <tr> | ||
<td><img src="/images/F1.png" alt="" /></td> | <td><img src="/images/F1.png" alt="" /></td> | ||
| − | <td> | + | <td>Campo numerico.</td> |
<td><img src="/images/F6.png" alt="" /></td> | <td><img src="/images/F6.png" alt="" /></td> | ||
<td>Date fields.</td> | <td>Date fields.</td> | ||
Revision as of 16:27, 5 April 2016
Contents |
Per aprire Report editor, cliccare su Reports -> Report editor nella barra dei menù.
| <img src="/images/ReportEd.png" alt="" width="447" height="263" /> |
Grazie a Report editor è possibile generare specifiche query per varie sezioni di input del software. La quasi totalità dei campi presenti nel database è selezionabile e visualizzabile in liste.
Questi dati possono esere inseriti in lettere singole o seriali, work lists e altri report, generabili singolarmente in report editor.
| <a href="/index.php?title=Lists"><img src="/images/hint48.png" alt="" /></a> | <a href="/index.php?title=Lists">Tutte le liste</a> generate in report editor possono essere esportate ed utilizzate in altri pogrammi come Excel. |
Tutte le query o analisi possono essere salvate e sono facilmente raggiungibili nel sistema con un click.
| <a href="/index.php?title=MedITEX_IVF_Settings#Report_editor"><img src="/images/plus48.png" alt="" width="48" height="48" /></a> | Configurare report editor nelle <a href="/index.php?title=MedITEX_IVF_Settings#Report_editor">impostazioni di sistema</a>. |
Overview
La finestra principale di Report editor è essenzialmente divisa in tre sezioni:
- Lista gruppi
- Sezione per query
- Sezione campi query
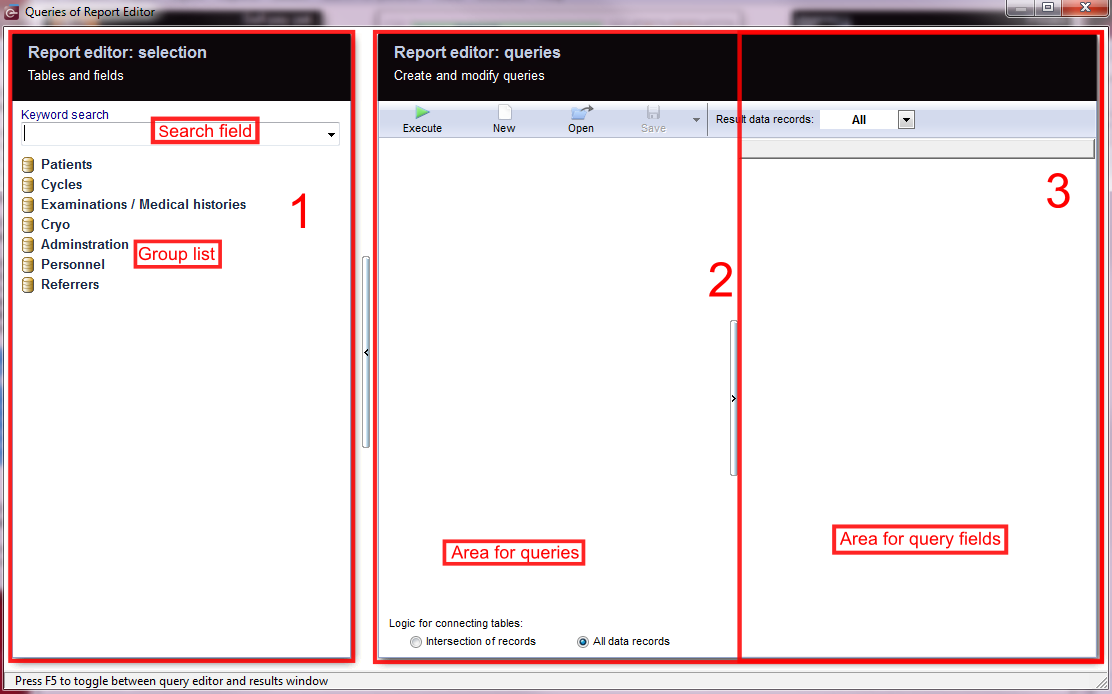 |
Lista gruppi
Da questa sezione è possibile selezionare dei sotto-gruppi contenenti i campi necesari per la costruzione della query.
Facendo doppio-click su un gruppo i sotto-gruppi disponibili saranno visualizzati.
Facendo doppio-click su un sotto-gruppo i campi disponibili di quel sotto-gruppo saranno visualizzati.
| <img src="/images/REGroups.png" alt="" width="334" height="466" /> |
Sulla sinistra, sono presenti tutte le tabelle e campi utilizzabili nella vostra query:
Trascinare sottogruppi dalla sezione di sinistra alla sezione centrale per costruire la query. |
Il simbolo che precede il nome del campo definisce il tipo di dato.
I diversi simboli sono:
| <img src="/images/F1.png" alt="" /> | Campo numerico. | <img src="/images/F6.png" alt="" /> | Date fields. |
| <img src="/images/F2.png" alt="" /> | Text fields. | <img src="/images/F7.png" alt="" /> | Telephone fields. |
| <img src="/images/F3.png" alt="" /> |
Note fields (text fields of different sizes). |
<img src="/images/F8.png" alt="" /> | QM staff fields. |
| <img src="/images/F4.png" alt="" /> | Yes / No fields. | <img src="/images/F9.png" alt="" /> | QM material fields. |
| <img src="/images/F5.png" alt="" /> | Key fields. | <img src="/images/F10.png" alt="" /> | QM free fields. |
Area for queries
| <img src="/images/Person11RE.png" alt="" width="439" height="156" /> | In this area, the sub-groups can be drag and dropped from group list or be deleted in order to build the query tree. The sub-groups are hierarchically ordered as a Logical cascade. |
Buttons with a blue dotted frame have special functionalities. Click on it to have more information.
| <a href="/index.php?title=Result_management"><img style="display: block; margin-left: auto; margin-right: auto; border: 2px dotted blue;" src="/images/ExecuteRE.png" alt="" width="89" height="38" /></a> |
Execute: As soon as you have selected all needed fields, you can launch the query by clicking on this button. The <a href="/index.php?title=Result_management">result window</a> will be opened. |
| <img style="display: block; margin-left: auto; margin-right: auto;" src="/images/NewRE.png" alt="" width="88" height="36" /> |
New: Clears the contents of the selection window. A new selection can be made. |
| <a href="/index.php?title=How_to_load_a_query%3F"><img style="display: block; margin-left: auto; margin-right: auto; border: 2px dotted blue;" src="/images/OpenRE.png" alt="" width="92" height="37" /></a> |
Loading a query: A saved query can be loaded by clicking on the Open button. A new window, Saved queries, will pop up. Read more about it <a href="/index.php?title=How_to_load_a_query%3F">here</a>. |
| <a href="/index.php?title=How_to_save_a_query%3F"><img style="display: block; margin-left: auto; margin-right: auto; border: 2px dotted blue;" src="/images/SaveRE.png" alt="" width="89" height="83" /></a> |
Saving a query: A query can be saved for future use by clicking on the Save button. If the query was created from an existing query, it can be saved choosing <a href="/index.php?title=How_to_save_a_query%3F">Save as</a>. This way, the user can assign a different name to the new query a. |
| <img style="display: block; margin-left: auto; margin-right: auto;" src="/images/ResultRE.png" alt="" width="208" height="91" /> |
Result data records: Here you can select the number of displayed results. |
Area for query fields
| <img src="/images/Query_fields.png" alt="" width="373" height="516" /> | This area groups all fields belonging to each sub-group that constitutes the query tree. From this area, each field can be chosen in order to build the desired query. |
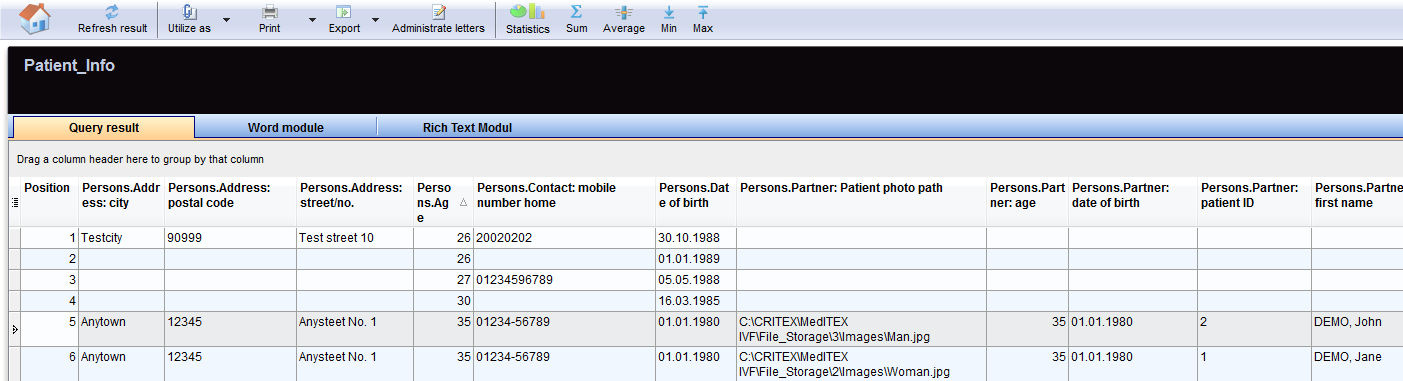
Report editor: results
When the query is executed the window showing the list of results will open. All the selected data fields are all represented in individual columns.
 |
|
You can generally do many things with the query result:
|
Filter, group or sort the list of results
The list of results may be filtered, grouped and sorted by clicking the column headers as explained <a href="/index.php?title=Welcome_to_MedITEX_IVF#Managing_Lists">here</a>. The filtering corresponds to a logical restriction of the data sets displayed in the list of results (e.g. only the pregnant patients of all, etc.).
Statistically analyze, print or export
The results can be easily analyzed and used to build charts. Moreover, the results can be printed or exported as Excel, CSV, HTML, TXT, PDF and XML file.
Generate letters, work lists or reports
The results can be used to build standard templates of letters, reports or working lists. Such reports may be made available for users in other sections of the software such as Administration, Medical History, etc.
Further information
Find more information about the report editor at Important functionalities on the main page:
| <img src="/images/plus48.png" alt="" width="48" height="48" /> |
<a href="/index.php?title=Query_management_tools">Query management tools</a> <a href="/index.php?title=Query_management_tools">Here</a> you can read more about changing text, deleting descriptions, writing protections and the importing/exporting of queries. |
|
<a href="/index.php?title=Result_management">Result management</a> Click <a href="/index.php?title=Result_management">here</a> if you want to get more information about the query results, WOMODs, Rich text modules or Administration of letters. |
|
| <a href="/index.php?title=MedITEX_IVF_how_to#Report_editor"><img src="/images/howto48.png" alt="" width="48" height="48" /></a> |
<a href="/index.php?title=MedITEX_IVF_how_to#Report_editor">Step by step</a> If you want to know how to create a query, open a saved one, etc., <a href="/index.php?title=MedITEX_IVF_how_to#Report_editor">click here</a>. |
| <a href="/index.php?title=MedITEX_IVF_manual">Back to the MedITEX IVF menu </a> | <a href="#top">Back to top</a> |