Patient location
From MedITEX - Wiki
(Difference between revisions)
| (7 intermediate revisions by 2 users not shown) | |||
| Line 1: | Line 1: | ||
| − | < | + | <table style="margin-left: auto; margin-right: auto;" border="0"> |
| − | <p style="text-align: left;">[[Image:WaitingR.png|none| | + | <tbody> |
| + | <tr> | ||
| + | <td> | ||
| + | <p style="text-align: left;">[[Image:WaitingR.png|none|740px|thumb|left|link=http://wiki.meditex-software.com/images/WaitingR.png|target="_blank"]]</p> | ||
| + | </td> | ||
| + | </tr> | ||
| + | </tbody> | ||
| + | </table> | ||
<p style="text-align: left;"> </p> | <p style="text-align: left;"> </p> | ||
<h2>Patients in the waiting room</h2> | <h2>Patients in the waiting room</h2> | ||
| − | <p>In the right upper corner of the scheduler you will find the area | + | <p>In the right upper corner of the scheduler you will find the area<strong> "Patient location"</strong>.</p> |
| − | + | <table style="margin-left: auto; margin-right: auto;" border="0"> | |
| − | <table | + | |
<tbody> | <tbody> | ||
<tr> | <tr> | ||
| − | <td | + | <td>[[Image:Waitingroom2.png|none|740px|thumb|left|link=http://wiki.meditex-software.com/images/Waitingroom2.png|]]</td> |
</tr> | </tr> | ||
| − | + | </tbody> | |
| − | + | </table> | |
| − | < | + | |
<p> </p> | <p> </p> | ||
| − | < | + | <table style="margin-left: auto; margin-right: auto;" border="0" width="701" height="455"> |
| + | <tbody> | ||
| + | <tr> | ||
| + | <td colspan="2">By simply dragging the whole appointment and dropping it in the patient location area in the upper right corner, the patient will be placed in the Waiting room 1, and the appointment status will be set to<strong> “Patient is in waiting room”</strong>.</td> | ||
</tr> | </tr> | ||
<tr> | <tr> | ||
| − | <td>In the column "Room" you can change the room where the patient is | + | <td><strong>The status of the appointment can be adjusted via the appointment context menu</strong> (right-click on the appointment), or <strong>via the context menu</strong> in the patient location area.</td> |
| + | <td> | ||
| + | <p>[[Image:fig64.png|none|740px|thumb|left|link=http://wiki.meditex-software.com/images/fig64.png|]]</p> | ||
| + | <img src="/images/fig63.png" alt="" width="335" height="213" /></td> | ||
| + | </tr> | ||
| + | <tr> | ||
| + | <td>In the column<strong> "Room" </strong>you can change the room where the patient is currently located. In the column<strong> "Since [hh:mm]"</strong> the program displays the current total time for each patient, since the person entered that room.</td> | ||
<td><img src="/images/fig62.png" alt="" width="196" height="158" /></td> | <td><img src="/images/fig62.png" alt="" width="196" height="158" /></td> | ||
</tr> | </tr> | ||
</tbody> | </tbody> | ||
</table> | </table> | ||
| − | <table border="0" width="713" height="150"> | + | <p> </p> |
| + | <table style="margin-left: auto; margin-right: auto;" border="0" width="713" height="150"> | ||
<tbody> | <tbody> | ||
<tr> | <tr> | ||
| − | <td> | + | <td>On the details window, <strong>"Patient's location"</strong> can be viewed over the link in the upper left corner of the main window. This functionality allows the <strong>visualization of details about the current location and appointment status of each patient currently present in the clinic.</strong> Here it is also possible to filter data by a particular resource, so that only the appointments related to that resource are displayed.</td> |
<td><img src="/images/fig65.png" alt="" width="210" height="130" /></td> | <td><img src="/images/fig65.png" alt="" width="210" height="130" /></td> | ||
</tr> | </tr> | ||
| Line 32: | Line 47: | ||
<p> </p> | <p> </p> | ||
<h2>Filter by resources</h2> | <h2>Filter by resources</h2> | ||
| − | < | + | <table style="margin-left: auto; margin-right: auto;" border="0"> |
| − | + | ||
| − | + | ||
<tbody> | <tbody> | ||
<tr> | <tr> | ||
| − | <td | + | <td style="text-align: center;">[[Image:PatientLocation2Filter.png|none|740px|thumb|left|link=http://wiki.meditex-software.com/images/PatientLocation2Filter.png|]]</td> |
| + | </tr> | ||
| + | </tbody> | ||
| + | </table> | ||
| + | <p> </p> | ||
| + | <h2>Open patient's appointment</h2> | ||
| + | <table style="margin-left: auto; margin-right: auto;" border="0" width="484" height="47"> | ||
| + | <tbody> | ||
| + | <tr> | ||
| + | <td> | ||
| + | <p>[[Image:PatientsLChooseRed.png|none|740px|thumb|left|link=http://wiki.meditex-software.com/images/PatientsLChooseRed.png|]]</p> | ||
| + | </td> | ||
</tr> | </tr> | ||
<tr> | <tr> | ||
| − | <td>With a click on the red marked button, you can go to the patient appointment window.</td> | + | <td>With a click on the red marked button, you can go to the patient's appointment window.</td> |
</tr> | </tr> | ||
</tbody> | </tbody> | ||
</table> | </table> | ||
| + | <p class="ListParagraphCxSpUltimo"> </p> | ||
<h2 class="ListParagraphCxSpUltimo">Define the number of rooms</h2> | <h2 class="ListParagraphCxSpUltimo">Define the number of rooms</h2> | ||
<table border="0" width="773" height="159"> | <table border="0" width="773" height="159"> | ||
<tbody> | <tbody> | ||
<tr> | <tr> | ||
| − | <td> | + | <td>Rooms can be defined in the program settings (<strong>Menu: “<a href="/index.php?title=Welcome_to_MedITEX_Scheduler#Resource_administration">System -> Settings</a>”</strong>) as a special resource with a <strong>group <span style="text-decoration: underline;">type</span></strong> “Room”. Additionally it is possible to specify the total number of all waiting rooms, in <strong>general settings</strong>.</td> |
| − | <td><img src="/images/fig67.png" alt="" width=" | + | <td><img src="/images/fig67.png" alt="" width="430" height="143" /></td> |
| + | </tr> | ||
| + | </tbody> | ||
| + | </table> | ||
| + | <p class="ListParagraphCxSpUltimo"> </p> | ||
| + | <table style="margin-left: auto; margin-right: auto;" border="0"> | ||
| + | <tbody> | ||
| + | <tr> | ||
| + | <td>[[Image:fig68.png|none|740px|thumb|left|link=http://wiki.meditex-software.com/images/fig68.png|]]</td> | ||
</tr> | </tr> | ||
</tbody> | </tbody> | ||
</table> | </table> | ||
| − | |||
| − | |||
<table style="float: right;" border="0"> | <table style="float: right;" border="0"> | ||
<tbody> | <tbody> | ||
<tr> | <tr> | ||
| + | <td style="text-align: right;"><a href="/index.php?title=MedITEX_Scheduler_manual">Back to the MedITEX Scheduler menu </a></td> | ||
<td style="text-align: right;"><a href="#top">Back to top</a></td> | <td style="text-align: right;"><a href="#top">Back to top</a></td> | ||
</tr> | </tr> | ||
Latest revision as of 12:33, 3 December 2012
 |
Contents |
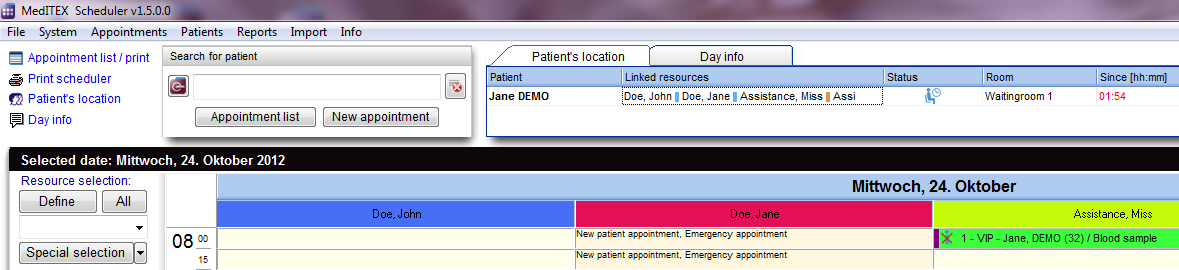
Patients in the waiting room
In the right upper corner of the scheduler you will find the area "Patient location".
 |
| By simply dragging the whole appointment and dropping it in the patient location area in the upper right corner, the patient will be placed in the Waiting room 1, and the appointment status will be set to “Patient is in waiting room”. | |
| The status of the appointment can be adjusted via the appointment context menu (right-click on the appointment), or via the context menu in the patient location area. |
 |
| In the column "Room" you can change the room where the patient is currently located. In the column "Since [hh:mm]" the program displays the current total time for each patient, since the person entered that room. | <img src="/images/fig62.png" alt="" width="196" height="158" /> |
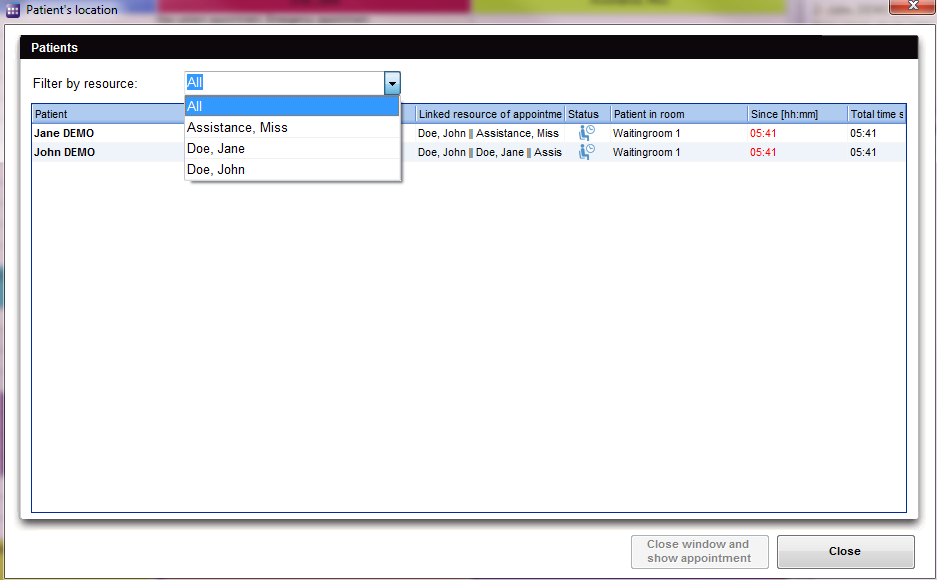
| On the details window, "Patient's location" can be viewed over the link in the upper left corner of the main window. This functionality allows the visualization of details about the current location and appointment status of each patient currently present in the clinic. Here it is also possible to filter data by a particular resource, so that only the appointments related to that resource are displayed. | <img src="/images/fig65.png" alt="" width="210" height="130" /> |
Filter by resources
 |
Open patient's appointment
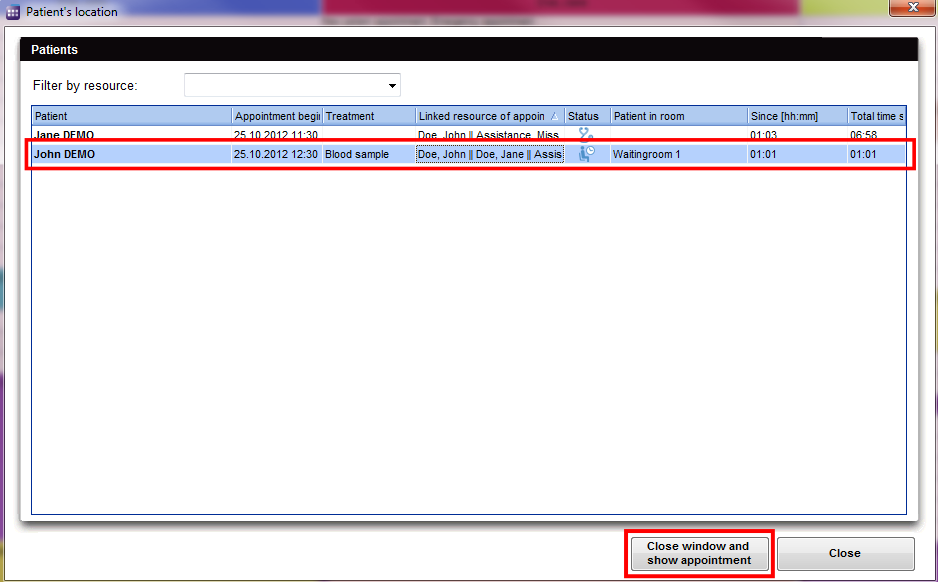 |
| With a click on the red marked button, you can go to the patient's appointment window. |
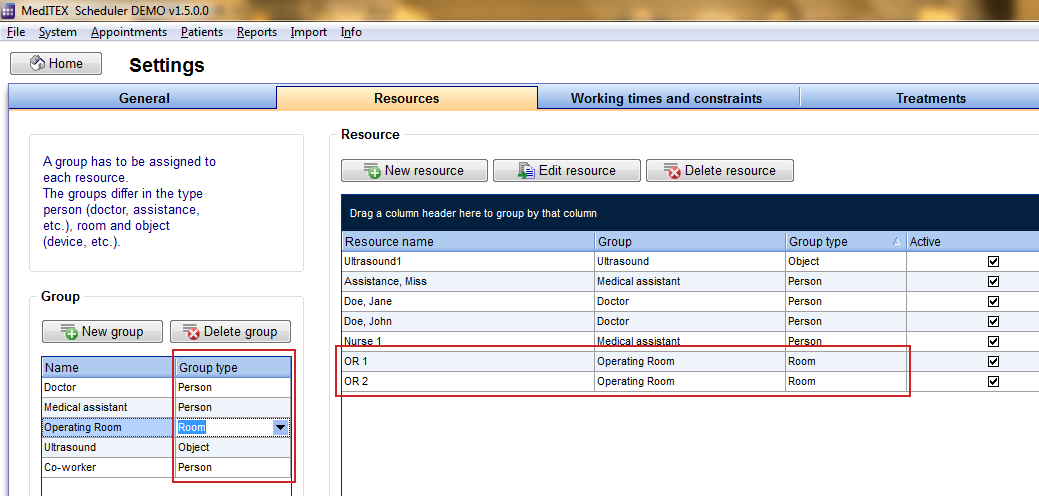
Define the number of rooms
| Rooms can be defined in the program settings (Menu: “<a href="/index.php?title=Welcome_to_MedITEX_Scheduler#Resource_administration">System -> Settings</a>”) as a special resource with a group type “Room”. Additionally it is possible to specify the total number of all waiting rooms, in general settings. | <img src="/images/fig67.png" alt="" width="430" height="143" /> |
 |
| <a href="/index.php?title=MedITEX_Scheduler_manual">Back to the MedITEX Scheduler menu </a> | <a href="#top">Back to top</a> |