Pagina principale di Scheduler
From MedITEX - Wiki
| (29 intermediate revisions by 2 users not shown) | |||
| Line 2: | Line 2: | ||
<tbody> | <tbody> | ||
<tr> | <tr> | ||
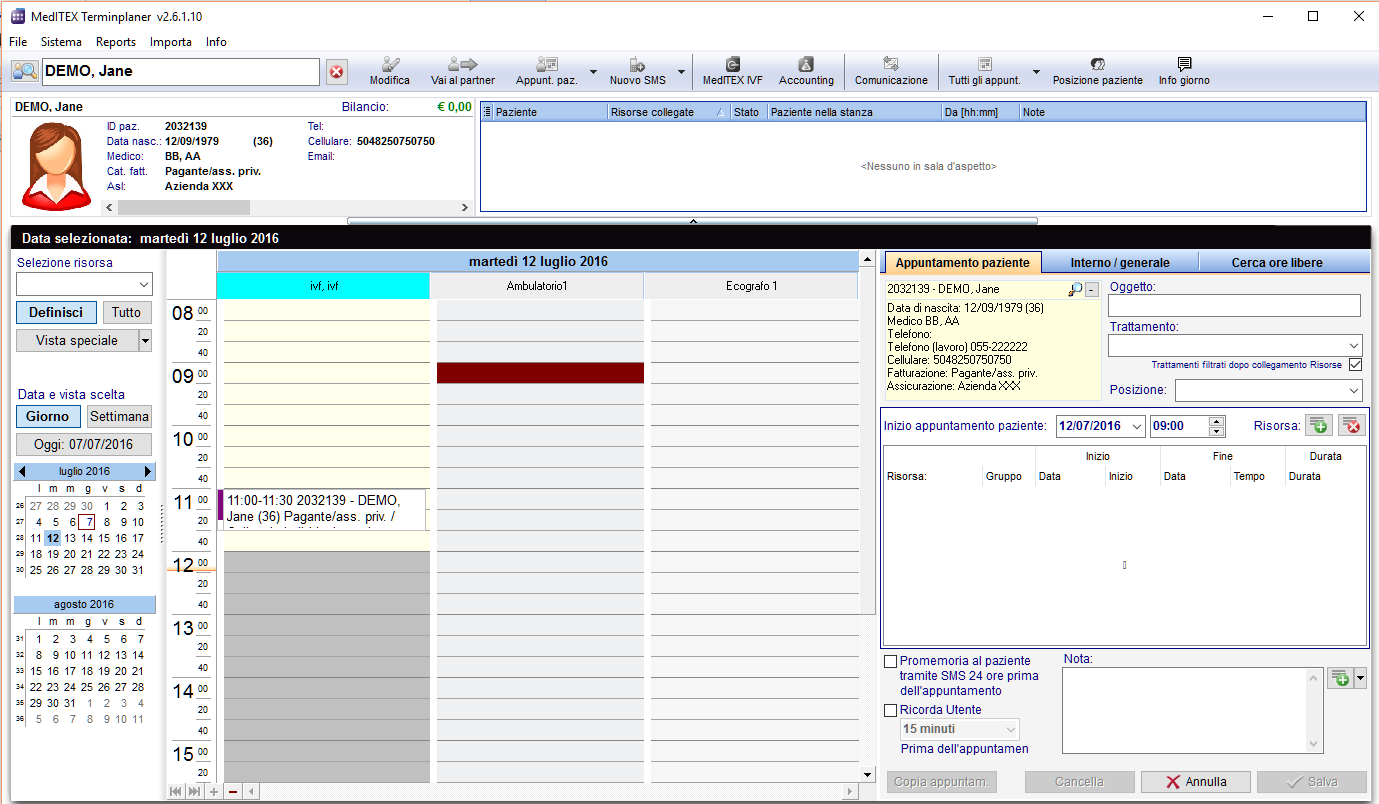
| − | <td style="text-align: center;">[[Image: | + | <td style="text-align: center;">[[Image:Sched_Pag_princ_1A_IT.png|none|745px|thumb|left|link=http://wiki.meditex-software.com/images/Sched_Pag_princ_1A_IT.png|Finestra principale.]]</td> |
</tr> | </tr> | ||
</tbody> | </tbody> | ||
| Line 12: | Line 12: | ||
<tbody> | <tbody> | ||
<tr> | <tr> | ||
| − | <td style="text-align: center;"><a href="/index.php?title=Liste_appuntamenti"><img style="display: block; margin-left: auto; margin-right: auto; border: 2px dotted blue;" src="/images/ | + | <td style="text-align: center;"><a href="/index.php?title=Liste_appuntamenti"><img style="display: block; margin-left: auto; margin-right: auto; border: 2px dotted blue;" src="/images/Sched_Pag_princ_2_IT.png" alt="" width="98" height="38" /></a></td> |
| − | <td style="text-align: justify;"><strong>Visualizza gli appuntamenti </strong>del paziente selezionato.</ | + | <td style="text-align: justify;"> |
| − | < | + | <p><strong>Visualizza gli appuntamenti </strong>del paziente selezionato.</p> |
| − | + | <p>Cliccando sulla freccina a destra dell'icona sono disponibili altre funzionalità tra cui la creazione di un nuovo appuntamento</p> | |
| − | + | </td> | |
| − | + | ||
</tr> | </tr> | ||
<tr> | <tr> | ||
| − | <td style="text-align: center;"><img style="display: block; margin-left: auto; margin-right: auto;" src="/images/ | + | <td style="text-align: center;"><img style="display: block; margin-left: auto; margin-right: auto;" src="/images/Sched_Pag_princ_4_IT.png" alt="" width="78" height="38" /></td> |
| − | <td style="text-align: justify;">Se <strong>MediTEX IVF</strong> è installato, questo | + | <td style="text-align: justify;">Se <strong>MediTEX IVF</strong> è installato, questo tasto apre il paziente in MedITEX IVF.<br /></td> |
</tr> | </tr> | ||
<tr> | <tr> | ||
| − | <td style="text-align: center;"><a href="/index.php?title=Schermate_di_Scheduler#Rappresentazione_delle_risorse"><img style="display: block; margin-left: auto; margin-right: auto; border: 2px dotted blue;" src="/images/ | + | <td style="text-align: center;"><a href="/index.php?title=Schermate_di_Scheduler#Rappresentazione_delle_risorse"><img style="display: block; margin-left: auto; margin-right: auto; border: 2px dotted blue;" src="/images/Sched_Pag_princ_5_IT.png" alt="" width="88" height="31" /></a></td> |
| − | <td style="text-align: justify;"><strong>Definisce la selezione delle | + | <td style="text-align: justify;"><strong>Definisce la selezione delle risorse</strong><span style="font-size: small;">.<br /></span></td> |
</tr> | </tr> | ||
<tr> | <tr> | ||
| − | <td style="text-align: center;"><img src="/images/ | + | <td style="text-align: center;"><img src="/images/A_ita.png" alt="" width="47" height="25" /></td> |
<td style="text-align: justify;"><span style="font-size: small;"> </span><strong>Mostra tutte le risorse</strong> nella pianificazione.</td> | <td style="text-align: justify;"><span style="font-size: small;"> </span><strong>Mostra tutte le risorse</strong> nella pianificazione.</td> | ||
</tr> | </tr> | ||
<tr> | <tr> | ||
| − | <td style="text-align: center;"><a href="/index.php?title=Pagina_principale_di_Scheduler#Selezione_speciale"><img style="display: block; margin-left: auto; margin-right: auto; border: 2px dotted blue;" src="/images/ | + | <td style="text-align: center;"><a href="/index.php?title=Pagina_principale_di_Scheduler#Selezione_speciale"><img style="display: block; margin-left: auto; margin-right: auto; border: 2px dotted blue;" src="/images/Sched_Pag_princ_6_IT.png" alt="" width="143" height="32" /></a></td> |
<td style="text-align: justify;"> | <td style="text-align: justify;"> | ||
| − | <p> | + | <p>Premendo il tasto <strong>Vista speciale</strong> potete aprire la lista di tutte le risorse esistenti ed attive, che sono state definite nelle impostazioni.</p> |
</td> | </td> | ||
</tr> | </tr> | ||
<tr> | <tr> | ||
| − | <td style="text-align: center;"><a href="/index.php?title= | + | <td style="text-align: center;"><a href="/index.php?title=Schermate_di_Scheduler"><img style="display: block; margin-left: auto; margin-right: auto; border: 2px dotted blue;" src="/images/Sched_Pag_princ_7_IT.png" alt="" width="143" height="77" /></a></td> |
| − | <td style="text-align: justify;"><br /> | + | <td style="text-align: justify;"><br />Utilizzare i tasti <strong>Giorno </strong>e <strong>Settimana</strong> per passare dalla visualizzazione giornaliera a quella settimanale.</td> |
</tr> | </tr> | ||
</tbody> | </tbody> | ||
</table> | </table> | ||
<p> </p> | <p> </p> | ||
| − | <h2> | + | <h2>Aree cliccabili sul lato sinistro di scheduler</h2> |
| − | <p> | + | <p>Alcune aree cliccabili hanno funzioni speciali. Fare click su di esse per maggiori informazioni..</p> |
<table style="margin-left: auto; margin-right: auto;" border="0" width="466" height="599"> | <table style="margin-left: auto; margin-right: auto;" border="0" width="466" height="599"> | ||
<tbody> | <tbody> | ||
<tr> | <tr> | ||
| − | <td style="text-align: left;"><a href="/index.php?title= | + | <td style="text-align: left;"><a href="/index.php?title=Schermate_di_Scheduler#Selezione_rapida_di_diversi_set_di_risorse"><img style="display: block; margin-left: auto; margin-right: auto; border: 2px dotted blue;" src="/images/Sched_Pag_princ_8_IT.png" alt="" width="147" height="106" /></a></td> |
| − | <td style="text-align: justify;"><strong> | + | <td style="text-align: justify;"><strong>Scegliere le risorse per gruppo o set</strong><span style="font-size: small;">. <br /></span></td> |
</tr> | </tr> | ||
<tr> | <tr> | ||
| − | <td style="text-align: left;"><a href="/index.php?title= | + | <td style="text-align: left;"><a href="/index.php?title=Schermate_di_Scheduler"><img style="display: block; margin-left: auto; margin-right: auto; border: 2px dotted blue;" src="/images/Date_ita.png" alt="" /></a></td> |
<td style="text-align: justify;"> | <td style="text-align: justify;"> | ||
| − | <p> | + | <p>La data corrente è nel quadrato azzurro.</p> |
| − | <p> | + | <p>E' possibile selezionare un giorno dal calendario per vedere la programmazione degli appuntamenti.</p> |
</td> | </td> | ||
</tr> | </tr> | ||
<tr> | <tr> | ||
| − | <td style="text-align: left;"><a href="/index.php?title= | + | <td style="text-align: left;"><a href="/index.php?title=Pagina_principale_di_Scheduler#Lista_appuntamenti_.2F_stampa"><img style="display: block; margin-left: auto; margin-right: auto; border: 2px dotted blue;" src="/images/Sched_Pag_princ_9_IT.png" alt="" width="105" height="41" /></a></td> |
| − | <td style="text-align: justify;"><strong> | + | <td style="text-align: justify;"> |
| + | <p><strong>Visualizzazione di tutti gli appuntamenti.</strong> E' possibile filtrare la lista per risorse e/o per data o per un determinato periodo di tempo.</p> | ||
| + | <p>Cliccando sull freccina a destra dell'icona è possibile accedere ad ulteriori funzionalità tra cui <a href="/index.php?title=Pagina_principale_di_Scheduler#Anteprima_di_stampa_della_pianificazione">la stampa del calendario</a></p> | ||
| + | </td> | ||
</tr> | </tr> | ||
<tr> | <tr> | ||
| − | <td style="text-align: left;"><a href="/index.php?title= | + | <td style="text-align: left;"><a href="/index.php?title=Posizione_del_paziente"><img style="display: block; margin-left: auto; margin-right: auto; border: 2px dotted blue;" src="/images/Sched_Pag_princ_10_IT.png" alt="" width="104" height="42" /></a> <br /></td> |
| − | <td style="text-align: justify;"><strong> | + | <td style="text-align: justify;"><span id="result_box" class="short_text" lang="en"><strong><span class="hps">Sala d'attesa.</span></strong></span></td> |
</tr> | </tr> | ||
<tr> | <tr> | ||
| − | <td style="text-align: left;"><a href="/index.php?title= | + | <td style="text-align: left;"><a href="/index.php?title=Pagina_principale_di_Scheduler#Messaggio_del_giorno"><img style="display: block; margin-left: auto; margin-right: auto; border: 2px dotted blue;" src="/images/Sched_Pag_princ_11_IT.png" alt="" width="67" height="38" /></a> <br /></td> |
| − | <td style="text-align: justify; | + | <td style="text-align: justify;"><strong>Messaggi importanti per un dato giorno</strong>. I messaggi relativi alla data corrente sono visualizzati nella pagina principale. <br /></td> |
</tr> | </tr> | ||
<tr> | <tr> | ||
| − | <td style="text-align: left;"><a href="/index.php?title= | + | <td style="text-align: left;"><a href="/index.php?title=Pagina_principale_di_Scheduler#Numero_di_risorse_visualizzate"><img style="display: block; margin-left: auto; margin-right: auto; border: 2px dotted blue;" src="/images/MainWindowNSmall_ita.png" alt="" /></a></td> |
| − | <td style="text-align: justify;"><strong> | + | <td style="text-align: justify;"><strong>Modifica le risorse visibili</strong>. E' possibile aumentare o diminuire il numero di risorse visibili nel calendario.</td> |
| − | + | ||
| − | + | ||
| − | + | ||
| − | + | ||
</tr> | </tr> | ||
</tbody> | </tbody> | ||
</table> | </table> | ||
<p> </p> | <p> </p> | ||
| − | <h2> | + | <h2>Schede nella parte alta di scheduler</h2> |
| − | <p> | + | <p>Le schede contengono informazioni utili. Fare click su di esse per saperne di più.</p> |
<table style="margin-left: auto; margin-right: auto;" border="0" width="581" height="144"> | <table style="margin-left: auto; margin-right: auto;" border="0" width="581" height="144"> | ||
<tbody> | <tbody> | ||
<tr> | <tr> | ||
| − | <td style="text-align: center;"><a href="/index.php?title= | + | <td style="text-align: center;"><a href="/index.php?title=Posizione_del_paziente"><img style="display: block; margin-left: auto; margin-right: auto; border: 2px dotted blue;" src="/images/Sched_Pag_princ_12_IT.png" alt="" width="770" height="100" /></a></td> |
</tr> | </tr> | ||
<tr> | <tr> | ||
| − | <td> | + | <td>Pazienti in sala d'attesa. E' possibile vedere il nome del paziente e del dottore, lo status, il numero della stanza e il tempo di attesa.</td> |
</tr> | </tr> | ||
</tbody> | </tbody> | ||
</table> | </table> | ||
| − | |||
| − | |||
| − | |||
| − | |||
| − | |||
| − | |||
| − | |||
| − | |||
| − | |||
| − | |||
| − | |||
| − | |||
| − | |||
| − | |||
<h2>Selezione speciale</h2> | <h2>Selezione speciale</h2> | ||
<table style="margin-left: auto; margin-right: auto;" border="0" width="141" height="44"> | <table style="margin-left: auto; margin-right: auto;" border="0" width="141" height="44"> | ||
<tbody> | <tbody> | ||
<tr> | <tr> | ||
| − | <td><img style="display: block; margin-left: auto; margin-right: auto;" src="/images/ | + | <td><img style="display: block; margin-left: auto; margin-right: auto;" src="/images/Sched_schermate_5_IT.png" alt="" width="650" height="601" /></td> |
</tr> | </tr> | ||
<tr> | <tr> | ||
<td> | <td> | ||
| − | <p>In | + | <p>In questa lista è possibile <strong>variare l'ordine delle risorse</strong> spostando la risorsa selezionata in alto o in basso tramite i tasti corrispondenti presenti a destra.</p> |
| − | <p><strong> | + | <p><strong>Questa personalizzazione è salvata individualmente per ciascun utente</strong>. Quindi se un utente esce da scheduler e successivamente vi rientra, ritrova la visualizzazione così come l'aveva impostata.</p> |
</td> | </td> | ||
</tr> | </tr> | ||
| Line 123: | Line 107: | ||
</table> | </table> | ||
<p> </p> | <p> </p> | ||
| − | <h2> | + | <h2>Lista appuntamenti / stampa</h2> |
<table style="margin-left: auto; margin-right: auto;" border="0" width="441" height="110"> | <table style="margin-left: auto; margin-right: auto;" border="0" width="441" height="110"> | ||
<tbody> | <tbody> | ||
<tr> | <tr> | ||
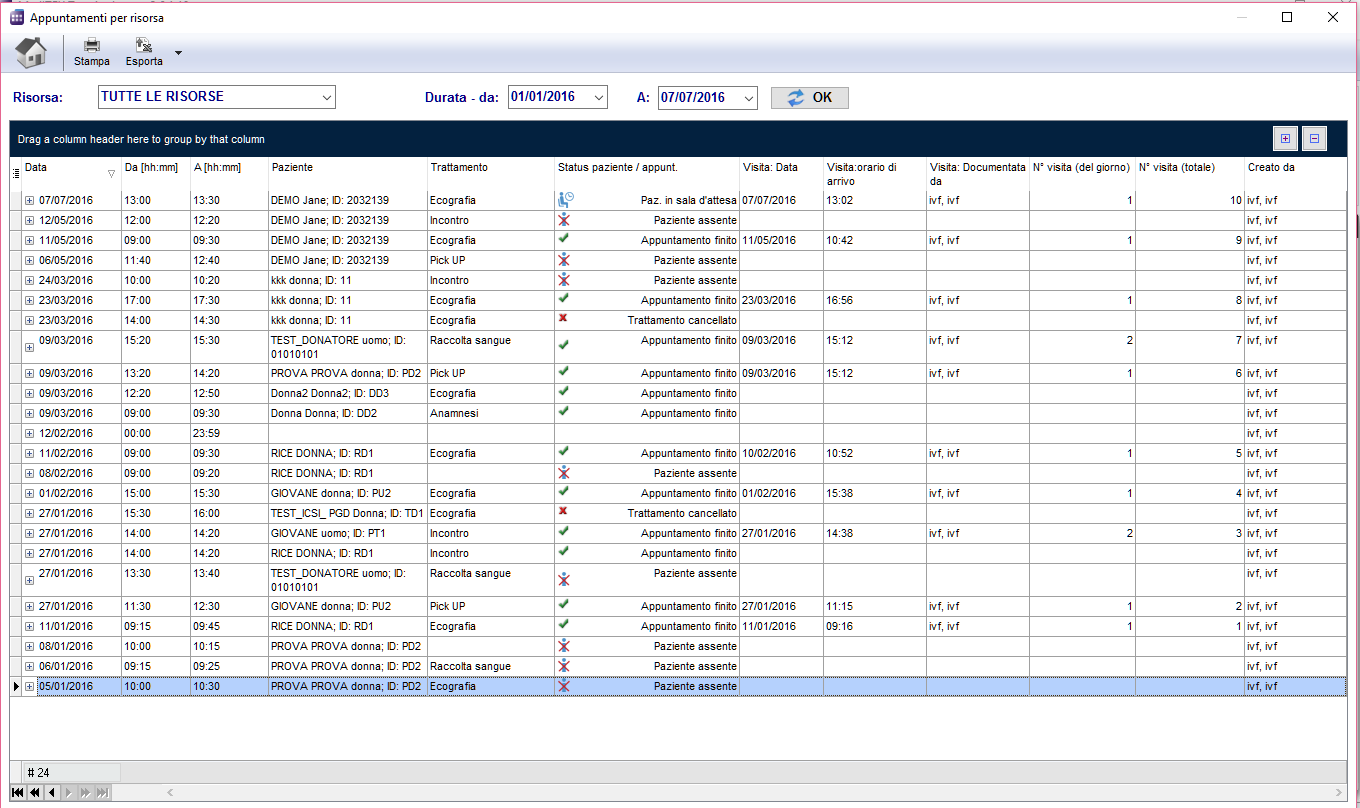
| − | <td>[[Image: | + | <td>[[Image:Sched_Pag_princ_13_IT.png|none|745px|thumb|left|link=http://wiki.meditex-software.com/images/Sched_Pag_princ_13_IT.png|Appuntamenti per risorsa.]]</td> |
</tr> | </tr> | ||
<tr> | <tr> | ||
<td> | <td> | ||
| − | <p><strong> | + | <p><strong>Filtra la lista per risorsa e periodo di tempo</strong>. Se premete il tasto "Stampa" si apre l'anteprima di stampa.</p> |
| − | <p> | + | <p>Questa finestra si può aprire anche attraverso il percorso: <strong>Freccina</strong> a destra di <strong>Tutti gli Appunt.-> Lista generale Appunt./Stampa appunt</strong>.</p> |
</td> | </td> | ||
</tr> | </tr> | ||
| Line 138: | Line 122: | ||
</table> | </table> | ||
<p> </p> | <p> </p> | ||
| − | <h2> | + | <h2>Anteprima di stampa della pianificazione</h2> |
<table style="margin-left: auto; margin-right: auto;" border="0" width="415" height="68"> | <table style="margin-left: auto; margin-right: auto;" border="0" width="415" height="68"> | ||
<tbody> | <tbody> | ||
<tr> | <tr> | ||
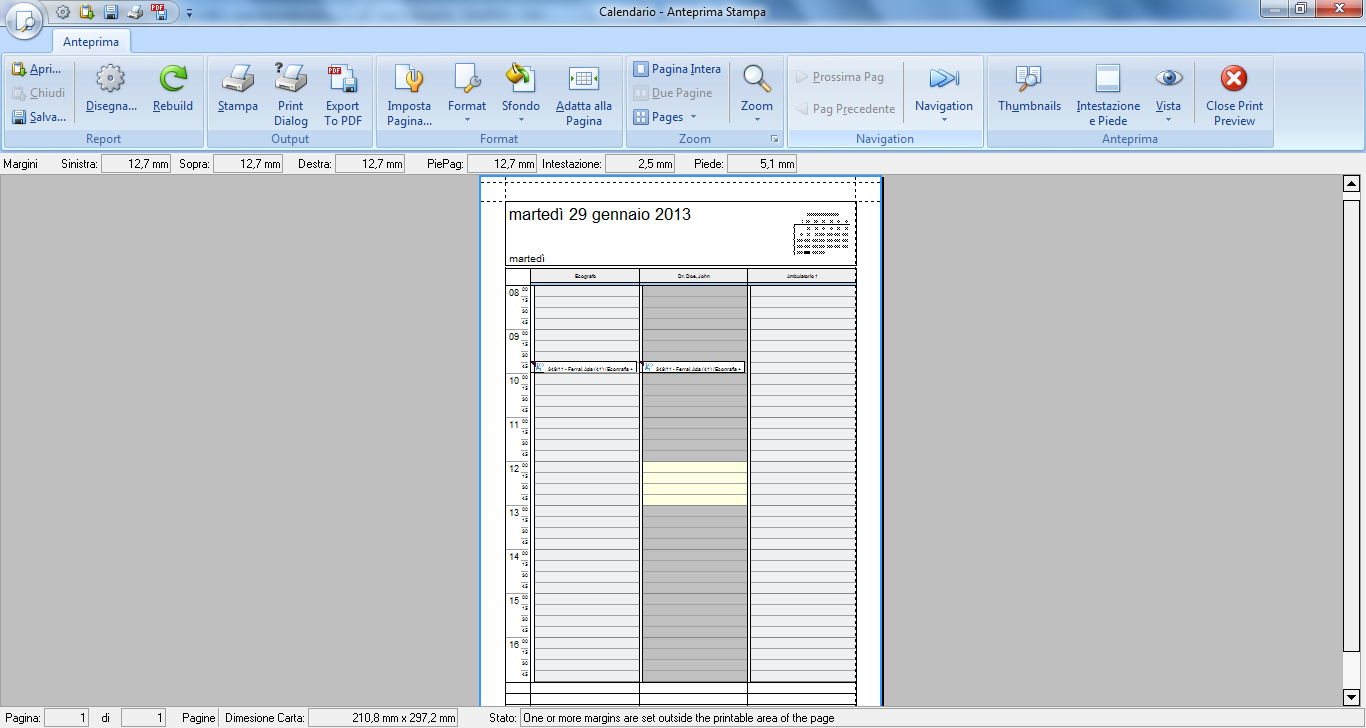
| − | <td>[[Image: | + | <td>[[Image:printScheduler_ita.png|none|745px|thumb|left|link=http://wiki.meditex-software.com/images/printScheduler_ita.png|Anteprima di stampa.]]</td> |
</tr> | </tr> | ||
<tr> | <tr> | ||
<td> | <td> | ||
| − | <p><strong> | + | <p><strong>Stampa</strong> gli appuntamenti.</p> |
| − | <p> | + | <p>Questa finestra si può aprire anche attraverso il percorso: <strong>Freccina</strong> a destra di <strong>Tutti gli Appunt.->Stampa calendario</strong></p> |
| − | </td> | + | <strong> </strong></td> |
</tr> | </tr> | ||
</tbody> | </tbody> | ||
</table> | </table> | ||
<p> </p> | <p> </p> | ||
| − | <h2> | + | <h2>Messaggio del giorno</h2> |
<table style="margin-left: auto; margin-right: auto;" border="0" width="336" height="58"> | <table style="margin-left: auto; margin-right: auto;" border="0" width="336" height="58"> | ||
<tbody> | <tbody> | ||
<tr> | <tr> | ||
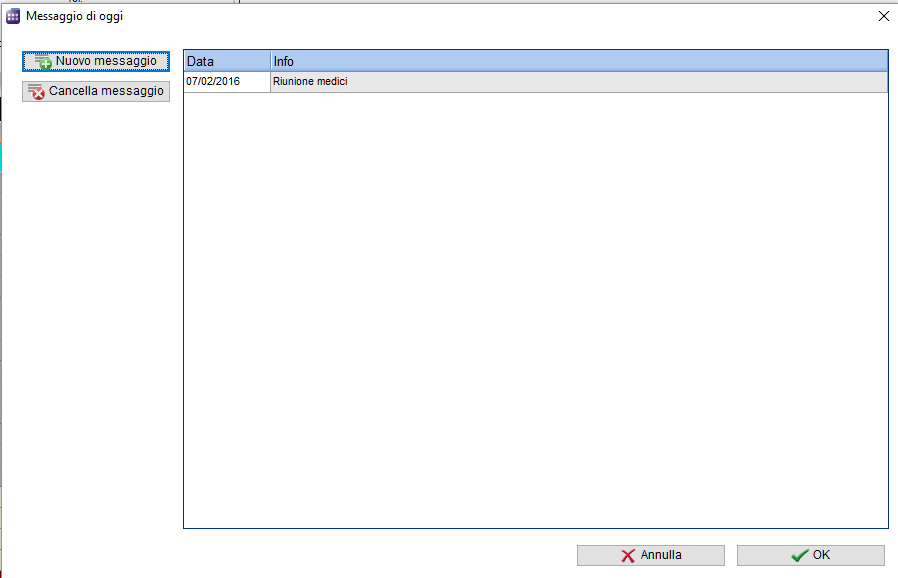
| − | <td>[[Image: | + | <td>[[Image:Sched_Pag_princ_14_IT.png|none|745px|thumb|left|link=http://wiki.meditex-software.com/images/Sched_Pag_princ_14_IT.png|Messaggio del giorno.]]</td> |
</tr> | </tr> | ||
<tr> | <tr> | ||
| − | <td><strong> | + | <td>Da questa finestra si possono <strong>aggiungere, m</strong><strong>odifica</strong>re <strong> </strong>o <strong>cancellare</strong>. Salvare premendo <strong>OK</strong>, altrimenti premere <strong>Cancella</strong>.</td> |
</tr> | </tr> | ||
</tbody> | </tbody> | ||
</table> | </table> | ||
<p> </p> | <p> </p> | ||
| − | <h2> | + | <h2>Messaggi per giorno, per risorsa</h2> |
| + | <p>Come per <strong>Messaggi del giorno, </strong>un utente ora può settare un testo informativo su un giorno o su una risorsa </p> | ||
| + | <p> </p> | ||
| + | <h2>Numero di risorse visualizzate</h2> | ||
<table style="margin-left: auto; margin-right: auto;" border="0" width="790" height="119"> | <table style="margin-left: auto; margin-right: auto;" border="0" width="790" height="119"> | ||
<tbody> | <tbody> | ||
<tr> | <tr> | ||
| − | <td> | + | <td><img style="margin-left: 200px; margin-right: 200px;" src="/images/Sched_schermate_3_IT.png" alt="" width="265" height="211" /><br /></td> |
</tr> | </tr> | ||
<tr> | <tr> | ||
| − | <td> | + | <td>Quando <strong>MedITEX Scheduler</strong> viene aperto e ci sono <strong>più di tre risorse definite</strong>, scheduler mostra di solito <strong>quattro risorse</strong>. Nella parte bassa di scheduler ci sono dei <strong>piccoli tasti di navigazione</strong>. Con <strong>"+"</strong> è possibile aumentare il numero di risorse visualizzate mentre con <strong>"–" </strong>è possibile diminuirlo. <br /></td> |
</tr> | </tr> | ||
</tbody> | </tbody> | ||
| Line 179: | Line 166: | ||
<tbody> | <tbody> | ||
<tr> | <tr> | ||
| − | <td style="text-align: right;"><a href="/index.php?title= | + | <td style="text-align: right;"><a href="/index.php?title=Manuale_Scheduler">Torna al menu di MedITEX Scheduler </a></td> |
| − | <td style="text-align: right;"><a href="#top"> | + | <td style="text-align: right;"><a href="#top">Torna in alto</a> <br /></td> |
</tr> | </tr> | ||
</tbody> | </tbody> | ||
</table> | </table> | ||
<p><span class="mw-headline"><br /></span></p> | <p><span class="mw-headline"><br /></span></p> | ||
Latest revision as of 15:04, 27 September 2022
 |
Contents |
Tasti
Alcuni tasti possiedono funzioni speciali. Fare click su di essi per maggiori informazioni.
| <a href="/index.php?title=Liste_appuntamenti"><img style="display: block; margin-left: auto; margin-right: auto; border: 2px dotted blue;" src="/images/Sched_Pag_princ_2_IT.png" alt="" width="98" height="38" /></a> |
Visualizza gli appuntamenti del paziente selezionato. Cliccando sulla freccina a destra dell'icona sono disponibili altre funzionalità tra cui la creazione di un nuovo appuntamento |
| <img style="display: block; margin-left: auto; margin-right: auto;" src="/images/Sched_Pag_princ_4_IT.png" alt="" width="78" height="38" /> | Se MediTEX IVF è installato, questo tasto apre il paziente in MedITEX IVF. |
| <a href="/index.php?title=Schermate_di_Scheduler#Rappresentazione_delle_risorse"><img style="display: block; margin-left: auto; margin-right: auto; border: 2px dotted blue;" src="/images/Sched_Pag_princ_5_IT.png" alt="" width="88" height="31" /></a> | Definisce la selezione delle risorse. |
| <img src="/images/A_ita.png" alt="" width="47" height="25" /> | Mostra tutte le risorse nella pianificazione. |
| <a href="/index.php?title=Pagina_principale_di_Scheduler#Selezione_speciale"><img style="display: block; margin-left: auto; margin-right: auto; border: 2px dotted blue;" src="/images/Sched_Pag_princ_6_IT.png" alt="" width="143" height="32" /></a> |
Premendo il tasto Vista speciale potete aprire la lista di tutte le risorse esistenti ed attive, che sono state definite nelle impostazioni. |
| <a href="/index.php?title=Schermate_di_Scheduler"><img style="display: block; margin-left: auto; margin-right: auto; border: 2px dotted blue;" src="/images/Sched_Pag_princ_7_IT.png" alt="" width="143" height="77" /></a> | Utilizzare i tasti Giorno e Settimana per passare dalla visualizzazione giornaliera a quella settimanale. |
Aree cliccabili sul lato sinistro di scheduler
Alcune aree cliccabili hanno funzioni speciali. Fare click su di esse per maggiori informazioni..
| <a href="/index.php?title=Schermate_di_Scheduler#Selezione_rapida_di_diversi_set_di_risorse"><img style="display: block; margin-left: auto; margin-right: auto; border: 2px dotted blue;" src="/images/Sched_Pag_princ_8_IT.png" alt="" width="147" height="106" /></a> | Scegliere le risorse per gruppo o set. |
| <a href="/index.php?title=Schermate_di_Scheduler"><img style="display: block; margin-left: auto; margin-right: auto; border: 2px dotted blue;" src="/images/Date_ita.png" alt="" /></a> |
La data corrente è nel quadrato azzurro. E' possibile selezionare un giorno dal calendario per vedere la programmazione degli appuntamenti. |
| <a href="/index.php?title=Pagina_principale_di_Scheduler#Lista_appuntamenti_.2F_stampa"><img style="display: block; margin-left: auto; margin-right: auto; border: 2px dotted blue;" src="/images/Sched_Pag_princ_9_IT.png" alt="" width="105" height="41" /></a> |
Visualizzazione di tutti gli appuntamenti. E' possibile filtrare la lista per risorse e/o per data o per un determinato periodo di tempo. Cliccando sull freccina a destra dell'icona è possibile accedere ad ulteriori funzionalità tra cui <a href="/index.php?title=Pagina_principale_di_Scheduler#Anteprima_di_stampa_della_pianificazione">la stampa del calendario</a> |
| <a href="/index.php?title=Posizione_del_paziente"><img style="display: block; margin-left: auto; margin-right: auto; border: 2px dotted blue;" src="/images/Sched_Pag_princ_10_IT.png" alt="" width="104" height="42" /></a> |
Sala d'attesa. |
| <a href="/index.php?title=Pagina_principale_di_Scheduler#Messaggio_del_giorno"><img style="display: block; margin-left: auto; margin-right: auto; border: 2px dotted blue;" src="/images/Sched_Pag_princ_11_IT.png" alt="" width="67" height="38" /></a> |
Messaggi importanti per un dato giorno. I messaggi relativi alla data corrente sono visualizzati nella pagina principale. |
| <a href="/index.php?title=Pagina_principale_di_Scheduler#Numero_di_risorse_visualizzate"><img style="display: block; margin-left: auto; margin-right: auto; border: 2px dotted blue;" src="/images/MainWindowNSmall_ita.png" alt="" /></a> | Modifica le risorse visibili. E' possibile aumentare o diminuire il numero di risorse visibili nel calendario. |
Schede nella parte alta di scheduler
Le schede contengono informazioni utili. Fare click su di esse per saperne di più.
| <a href="/index.php?title=Posizione_del_paziente"><img style="display: block; margin-left: auto; margin-right: auto; border: 2px dotted blue;" src="/images/Sched_Pag_princ_12_IT.png" alt="" width="770" height="100" /></a> |
| Pazienti in sala d'attesa. E' possibile vedere il nome del paziente e del dottore, lo status, il numero della stanza e il tempo di attesa. |
Selezione speciale
| <img style="display: block; margin-left: auto; margin-right: auto;" src="/images/Sched_schermate_5_IT.png" alt="" width="650" height="601" /> |
|
In questa lista è possibile variare l'ordine delle risorse spostando la risorsa selezionata in alto o in basso tramite i tasti corrispondenti presenti a destra. Questa personalizzazione è salvata individualmente per ciascun utente. Quindi se un utente esce da scheduler e successivamente vi rientra, ritrova la visualizzazione così come l'aveva impostata. |
Lista appuntamenti / stampa
 |
|
Filtra la lista per risorsa e periodo di tempo. Se premete il tasto "Stampa" si apre l'anteprima di stampa. Questa finestra si può aprire anche attraverso il percorso: Freccina a destra di Tutti gli Appunt.-> Lista generale Appunt./Stampa appunt. |
Anteprima di stampa della pianificazione
 |
|
Stampa gli appuntamenti. Questa finestra si può aprire anche attraverso il percorso: Freccina a destra di Tutti gli Appunt.->Stampa calendario |
Messaggio del giorno
 |
| Da questa finestra si possono aggiungere, modificare o cancellare. Salvare premendo OK, altrimenti premere Cancella. |
Messaggi per giorno, per risorsa
Come per Messaggi del giorno, un utente ora può settare un testo informativo su un giorno o su una risorsa
Numero di risorse visualizzate
| <img style="margin-left: 200px; margin-right: 200px;" src="/images/Sched_schermate_3_IT.png" alt="" width="265" height="211" /> |
| Quando MedITEX Scheduler viene aperto e ci sono più di tre risorse definite, scheduler mostra di solito quattro risorse. Nella parte bassa di scheduler ci sono dei piccoli tasti di navigazione. Con "+" è possibile aumentare il numero di risorse visualizzate mentre con "–" è possibile diminuirlo. |
| <a href="/index.php?title=Manuale_Scheduler">Torna al menu di MedITEX Scheduler </a> | <a href="#top">Torna in alto</a> |