MedITEX Accounting - barra dei menù
From MedITEX - Wiki
| (17 intermediate revisions by one user not shown) | |||
| Line 8: | Line 8: | ||
<p> </p> | <p> </p> | ||
<p> </p> | <p> </p> | ||
| − | <h2> | + | <h2>Ricerca pazienti</h2> |
<table border="0"> | <table border="0"> | ||
<tbody> | <tbody> | ||
| Line 16: | Line 16: | ||
</tbody> | </tbody> | ||
</table> | </table> | ||
| − | <p>In | + | <p>In questo campo sarà possibile ricercare i pazienti. La ricerca può essere fatta per <strong>Cognome</strong>, <strong>data di nascita</strong>, <strong>ID Paziente o numero di telefono</strong>. Se solo parte del cognome o id viene inserito, nella lista compariranno tutti i pazienti con tali caratteristiche.</p> |
| − | <p> | + | <p>Per selezionare il paziente dalla lista fare <strong>doppio-click</strong> sul nome. La finestra si aggiornerà e il paziente selezionato verra visualizzato nella sezione superiore della finestra.</p> |
<table border="0"> | <table border="0"> | ||
<tbody> | <tbody> | ||
| Line 27: | Line 27: | ||
<p> </p> | <p> </p> | ||
<p> </p> | <p> </p> | ||
| − | <h2> | + | <h2>Pulsanti</h2> |
| − | <p> | + | <p>Pulsanti con cornice blu tratteggiata hanno funzionalità particolari. Cliccare per avere ulteriori informazioni.</p> |
<table border="0"> | <table border="0"> | ||
<tbody> | <tbody> | ||
<tr> | <tr> | ||
| − | <td | + | <td><img style="display: block; margin-left: auto; margin-right: auto;" src="/images/Acc_BarraMenù_4_IT.png" alt="" width="90" height="36" /></td> |
| − | < | + | <td> |
| + | <p><strong>Vai al partner:</strong> Accounting caricherà automaticamente il partner della persona selezionata e visualizzerà le sue voci del conto.</p> | ||
| + | </td> | ||
</tr> | </tr> | ||
<tr> | <tr> | ||
| − | <td><a href="/index.php?title=MedITEX_Accounting_- | + | <td><a href="/index.php?title=MedITEX_Accounting_-_barra_dei_menù#Nuove_fatture.2FVoci"><img style="display: block; margin-left: auto; margin-right: auto; border: 2px dotted blue;" src="/images/Acc_BarraMenù_5_IT.png" alt="" width="112" height="36" /></a></td> |
| − | <td>< | + | <td> |
| + | <p><strong>Nuove Fatture/Voci:</strong> Permette di inserire voci di fatture e creare fatture per il paziente selezionato.</p> | ||
| + | </td> | ||
</tr> | </tr> | ||
<tr> | <tr> | ||
| − | <td><a href="/index.php?title=MedITEX_Accounting_- | + | <td><a href="/index.php?title=MedITEX_Accounting_-_barra_dei_menù#Nuova_Registrazione"><img style="display: block; margin-left: auto; margin-right: auto; border: 2px dotted blue;" src="/images/Acc_BarraMenù_6_IT.png" alt="" width="100" height="35" /></a></td> |
| − | <td>< | + | <td> |
| + | <p><strong>Nuova registrazione:</strong> Permette di inserire Acconti, pagamenti, Rimborsi, etc.</p> | ||
| + | </td> | ||
</tr> | </tr> | ||
<tr> | <tr> | ||
| − | <td><a href="/index.php?title=MedITEX_Accounting_-_menu_bar#MedITEX_IVF"><img style="display: block; margin-left: auto; margin-right: auto | + | <td><a href="/index.php?title=MedITEX_Accounting_-_menu_bar#MedITEX_IVF"><img style="display: block; margin-left: auto; margin-right: auto;" src="/images/Acc_BarraMenù_7_IT.png" alt="" width="78" height="37" /></a></td> |
| − | <td>< | + | <td> |
| + | <p><strong>MedITEX IVF:</strong> Cliccando questo pulsante <strong>MedITEX IVF si aprirà </strong>nella <strong>overview della coppia /paziente </strong>selezionato in Accounting. Lo user loggato in IVF sarà lo stesso di Accounting e non sarà necessario inserire la password.</p> | ||
| + | </td> | ||
</tr> | </tr> | ||
<tr> | <tr> | ||
<td><img style="display: block; margin-left: auto; margin-right: auto;" src="/images/Acc_BarraMenù_8_IT.png" alt="" width="66" height="35" /></td> | <td><img style="display: block; margin-left: auto; margin-right: auto;" src="/images/Acc_BarraMenù_8_IT.png" alt="" width="66" height="35" /></td> | ||
| − | <td><a href="/index.php?title=MedITEX_Accounting_-_menu_bar#MedITEX_IVF"></a></td> | + | <td> |
| + | <p><strong>MedITEX Scheduler:</strong> Cliccando questo pulsante <strong>MedITEX Scheduler si aprirà </strong>nella <strong>overview del paziente </strong>selezionato in Accounting.<a href="/index.php?title=MedITEX_Accounting_-_menu_bar#MedITEX_IVF"></a></p> | ||
| + | </td> | ||
</tr> | </tr> | ||
<tr> | <tr> | ||
| − | <td><a href="/index.php?title=MedITEX_Accounting_-_menu_bar#Print"><img style="display: block; margin-left: auto; margin-right: auto | + | <td><a href="/index.php?title=MedITEX_Accounting_-_menu_bar#Print"><img style="display: block; margin-left: auto; margin-right: auto;" src="/images/Acc_BarraMenù_9_IT.png" alt="" width="72" height="36" /></a></td> |
| − | <td><a href="/index.php?title=MedITEX_Accounting_-_menu_bar#Print"> | + | <td> |
| + | <p><strong>Stampa:</strong> Cliccando questo pulsante una stampa a video della sezione attiva in Accounting verrà eseguita. <strong>Aprire la sezione desiderata </strong>cliccando l'opzione nella<strong> barra laterale </strong>e premere <strong>Stampa.</strong> L'anteprima si aprirà e le impostazioni di stampa potranno essere modificate a piacere.</p> | ||
| + | <p><a href="/index.php?title=MedITEX_Accounting_-_menu_bar#Print"></a></p> | ||
| + | </td> | ||
</tr> | </tr> | ||
<tr> | <tr> | ||
| − | <td><a href="/index.php?title=MedITEX_Accounting_-_menu_bar#Export"><img style="display: block; margin-left: auto; margin-right: auto | + | <td><a href="/index.php?title=MedITEX_Accounting_-_menu_bar#Export"><img style="display: block; margin-left: auto; margin-right: auto;" src="/images/Acc_BarraMenù_10_IT.png" alt="" width="71" height="39" /></a></td> |
| − | <td>< | + | <td> |
| + | <p><strong>Esporta: </strong>Cliccando questo pulsante una stampa a video della sezione attiva in Accounting verrà esportata in un file Excel, CSV o Testo. <strong>Aprire la sezione desiderata </strong>cliccando l'opzione nella<strong> barra laterale </strong>e premere <strong>la freccia sulla destra del tasto Esporta</strong> e seleziona l'opzione desiderata. </p> | ||
| + | </td> | ||
</tr> | </tr> | ||
<tr> | <tr> | ||
| − | <td><a href="/index.php?title= | + | <td><a href="/index.php?title=Benvenuti_in_MedITEX_Accounting"><img style="display: block; margin-left: auto; margin-right: auto; border: 2px dotted blue;" src="/images/Acc_BarraMenù_11_IT.png" alt="" width="76" height="39" /></a></td> |
| − | <td><a href="/index.php?title=Welcome_to_MedITEX_Accounting"> | + | <td> |
| + | <p>Sezione in cui sono presenti le impostazioni del programma. <a href="/index.php?title=Benvenuti_in_MedITEX_Accounting">Cliccare qui</a> per ulteriori informazioni.<a href="/index.php?title=Welcome_to_MedITEX_Accounting"></a></p> | ||
| + | </td> | ||
</tr> | </tr> | ||
<tr> | <tr> | ||
<td><img style="display: block; margin-left: auto; margin-right: auto;" src="/images/Acc_BarraMenù_12_IT.png" alt="" width="74" height="35" /></td> | <td><img style="display: block; margin-left: auto; margin-right: auto;" src="/images/Acc_BarraMenù_12_IT.png" alt="" width="74" height="35" /></td> | ||
| − | <td><a href="/index.php?title=Welcome_to_MedITEX_Accounting"></a></td> | + | <td> |
| + | <p>Finestra contenente tutti i prezzi inseriti nelle <a href="/index.php?title=Benvenuti_in_MedITEX_Accounting#Panoramica_prezzi.C2.A0">impostazioni.</a><a href="/index.php?title=Welcome_to_MedITEX_Accounting"></a></p> | ||
| + | </td> | ||
</tr> | </tr> | ||
</tbody> | </tbody> | ||
</table> | </table> | ||
<p> </p> | <p> </p> | ||
| − | + | <h3>Vai al partner</h3> | |
| − | <h3> | + | <p id="tw-target-text" class="tw-data-text tw-text-large tw-ta" dir="ltr"><span class="Y2IQFc" lang="it">Il modulo contabilità passa al partner della persona attuale e mostra le sue voci contabili e fatture.</span></p> |
| − | <p> | + | |
<p> </p> | <p> </p> | ||
<p> </p> | <p> </p> | ||
| − | <h3> | + | <h3>Nuove fatture/Voci</h3> |
<table border="0"> | <table border="0"> | ||
<tbody> | <tbody> | ||
<tr> | <tr> | ||
| − | <td>[[Image:Acc_BarraMenù_13_IT.png|none|740px|thumb|left|link=http://wiki.meditex-software.com/images/Acc_BarraMen | + | <td>[[Image:Acc_BarraMenù_13_IT.png|none|740px|thumb|left|link=http://wiki.meditex-software.com/images/Acc_BarraMen%C3%B9_13_IT.png|]]<br /></td> |
| + | </tr> | ||
| + | </tbody> | ||
| + | </table> | ||
| + | <table border="0"> | ||
| + | <tbody> | ||
| + | <tr> | ||
| + | <td><strong>1.</strong></td> | ||
| + | <td><strong>Inserire elenco Voci del conto</strong></td> | ||
| + | <td>Facendo click cul pulsante "+" si potranno inserire le voci del conto e i loro prezzi.</td> | ||
| + | </tr> | ||
| + | <tr> | ||
| + | <td><strong>2.</strong></td> | ||
| + | <td><strong>Selezionare le voci da inserire nella fattura</strong></td> | ||
| + | <td>Facendo click sul quadrato a fianco della voce del conto si selezioneno le voci che andranno a completare la Fattura. Premendo il pulsante "seleziona tutte le voci aperte" seleziono tutte le voci fatturabili.</td> | ||
| + | </tr> | ||
| + | <tr> | ||
| + | <td><strong>3.</strong></td> | ||
| + | <td><strong>Comporre la fattura</strong></td> | ||
| + | <td> | ||
| + | <p>Premendo il pulsante "aggiungi a fattura" le voci selezionate verranno copiate nel modulo della fattura. In questa sezione potrete inserire sconti su ogni voce o sull'intera fattura, e inserire note prima e dopo la tabella.</p> | ||
| + | </td> | ||
| + | </tr> | ||
| + | <tr> | ||
| + | <td><strong> 4.</strong></td> | ||
| + | <td><strong>Destinatario Fattura</strong></td> | ||
| + | <td>Scegliere destinatario Fattura:<br /> | ||
| + | <ul> | ||
| + | <li>Paziente</li> | ||
| + | <li>Assicurazione</li> | ||
| + | </ul> | ||
| + | </td> | ||
| + | </tr> | ||
| + | <tr> | ||
| + | <td><strong> 5.</strong></td> | ||
| + | <td><strong>Template Fattura</strong></td> | ||
| + | <td>Scegliere dalla lista il template della fattura.</td> | ||
| + | </tr> | ||
| + | <tr> | ||
| + | <td><strong> 6.</strong></td> | ||
| + | <td><strong>Genera Fattura</strong></td> | ||
| + | <td>Generare la fattura ed eventuale pagamento immediato.</td> | ||
</tr> | </tr> | ||
</tbody> | </tbody> | ||
</table> | </table> | ||
<p> </p> | <p> </p> | ||
| − | < | + | <h3><span style="font-size: 1.17em;">Nuova Registrazione</span></h3> |
| − | + | ||
| − | + | ||
| − | + | ||
<table border="0"> | <table border="0"> | ||
<tbody> | <tbody> | ||
| Line 98: | Line 154: | ||
<tbody> | <tbody> | ||
<tr> | <tr> | ||
| − | <td><strong>1.</strong></td> | + | <td><strong> 1.</strong></td> |
| − | <td><strong> | + | <td><strong>Scegliere la registrazione da effettuare</strong></td> |
<td> | <td> | ||
<ul> | <ul> | ||
| − | <li> | + | <li>Pagamento</li> |
| − | <li> | + | <li>Pagamento con credito</li> |
| − | <li> | + | <li>Acconto</li> |
| − | <li> | + | <li>Rimborso</li> |
</ul> | </ul> | ||
| − | |||
</td> | </td> | ||
</tr> | </tr> | ||
<tr> | <tr> | ||
| − | <td><strong>2.</strong></td> | + | <td><strong> 2.</strong></td> |
| − | <td><strong> | + | <td><strong>Inserire paziente</strong></td> |
| − | <td> | + | <td>Il nome del paziente sara riempito automaticamente con la persona selezionata precedentemente. Per modificare il pazinete premere la croce rossa e ricercare il nuovo paziente. Nella sezione grigia alla destra del nome sarà visualizzato un piccolo riassunto dei dati più importanti del paziente selezionato.</td> |
</tr> | </tr> | ||
<tr> | <tr> | ||
<td><strong> 3.</strong></td> | <td><strong> 3.</strong></td> | ||
| − | <td><strong> | + | <td><strong>Template transazione</strong></td> |
| − | <td> | + | <td>Segliere tra i disponibili, il template per la stampa di ricevuta della transazione.</td> |
</tr> | </tr> | ||
<tr> | <tr> | ||
<td><strong> 4.</strong></td> | <td><strong> 4.</strong></td> | ||
| − | <td><strong> | + | <td><strong>Importo transazione</strong></td> |
| + | <td>Inserire l'importo della transazione.</td> | ||
| + | </tr> | ||
| + | <tr> | ||
| + | <td><strong> 5.</strong></td> | ||
| + | <td><strong>Scegliere la data della transazione</strong></td> | ||
| + | <td>La data corrente apparirà automaticamente.</td> | ||
| + | </tr> | ||
| + | <tr> | ||
| + | <td><strong> 6.</strong></td> | ||
| + | <td><strong>Metodo Pagamento</strong></td> | ||
<td> | <td> | ||
<ul> | <ul> | ||
| − | <li> | + | <li>Contanti</li> |
| − | <li> | + | <li>Bonifico</li> |
| − | <li> | + | <li>Carta di Credito</li> |
</ul> | </ul> | ||
| + | <p>Opzioni modificabili a piacere dalle <a href="/index.php?title=Benvenuti_in_MedITEX_Accounting#Tabella_sistema_modificabile">Impostazioni.</a></p> | ||
</td> | </td> | ||
</tr> | </tr> | ||
<tr> | <tr> | ||
| − | <td><strong> | + | <td><strong> 7.</strong></td> |
| − | <td><strong> | + | <td><strong>Utente responsabile per la transazione</strong></td> |
| − | <td> | + | <td>L'utente al momento loggato sarà selezionato di default. Per modificarlo selezionare l'utente desiderato dalla lista.</td> |
</tr> | </tr> | ||
<tr> | <tr> | ||
| − | <td><strong> | + | <td><strong> 8.</strong></td> |
| − | <td><strong> | + | <td><strong>Note</strong></td> |
| − | <td> | + | <td>Inserire Note se necessario.</td> |
</tr> | </tr> | ||
<tr> | <tr> | ||
| − | <td><strong> | + | <td><strong> 9.</strong></td> |
| − | <td colspan="2"><strong> | + | <td colspan="2"><strong>Come ultimo passo, nel caso di pagamento e pagamento con credito, scegliere la fattura alla quale la transazione fà riferimento. </strong></td> |
</tr> | </tr> | ||
</tbody> | </tbody> | ||
</table> | </table> | ||
<p> </p> | <p> </p> | ||
| − | < | + | <h3>MedITEX IVF </h3> |
| − | + | <p id="tw-target-text" class="tw-data-text tw-text-large tw-ta" dir="ltr"><span class="Y2IQFc" lang="it">Se si fa clic sul pulsante MedITEX IVF, il programma<strong> MedITEX IVF verrà aperto </strong>nella finestra <strong>panoramica</strong> del<strong> paziente/coppia attuale</strong>.</span></p> | |
| − | <p> | + | <p class="tw-data-text tw-text-large tw-ta" dir="ltr"><span class="Y2IQFc" lang="it"> </span><strong>L'utente sarà lo stesso</strong> dell'utente che ha effettuato l'accesso in MedITEX Accounting. <strong>Non</strong> è necessario inserire nuovamente la password.</p> |
| − | <p> | + | |
<table border="0"> | <table border="0"> | ||
<tbody> | <tbody> | ||
<tr> | <tr> | ||
| − | <td> | + | <td><img src="/images/a11.png" alt="" width="750" height="483" /></td> |
</tr> | </tr> | ||
</tbody> | </tbody> | ||
</table> | </table> | ||
<p> </p> | <p> </p> | ||
| + | <h3>Stampare</h3> | ||
| + | <p id="tw-target-text" class="tw-data-text tw-text-large tw-ta" dir="ltr"><span class="Y2IQFc" lang="it">Con il pulsante stampa è possibile stampare ogni fascia dell' accoounting module. <strong>Aprire l'area desiderata </strong>con un click sul link associato nella barra laterale e <strong>cliccare</strong> successivamente sul <strong>pulsante di stampa</strong>. Si aprirà una<strong> finestra di anteprima</strong> di stampa in cui è possibile modificare le <strong>impostazioni di stampa.</strong></span></p> | ||
<p> </p> | <p> </p> | ||
| − | <h3> | + | <h3>Impostazioni</h3> |
| − | < | + | <table style="margin-left: auto; margin-right: auto;" border="0"> |
| − | + | ||
| − | + | ||
| − | + | ||
| − | + | ||
| − | + | ||
| − | + | ||
| − | + | ||
| − | + | ||
<tbody> | <tbody> | ||
<tr> | <tr> | ||
| − | <td><a href="/index.php?title=Welcome_to_MedITEX_Accounting"><img | + | <td><a href="/index.php?title=Welcome_to_MedITEX_Accounting"><img src="/images/SettingsAcc.png" alt="" width="59" height="38" /></a></td> |
| − | <td><a href="/index.php?title= | + | <td><a href="/index.php?title=Benvenuti_in_MedITEX_Accounting">Clicca qui</a> per andare direttamente alla pagina riguardante le impostazioni.</td> |
</tr> | </tr> | ||
</tbody> | </tbody> | ||
</table> | </table> | ||
| − | <p | + | <p style="text-align: center;"> </p> |
| − | + | ||
| − | + | ||
<p> </p> | <p> </p> | ||
<p> </p> | <p> </p> | ||
| Line 186: | Line 243: | ||
<tbody> | <tbody> | ||
<tr> | <tr> | ||
| − | <td | + | <td><a href="/index.php?title=MedITEX_Accounting_Manuale">Torna al Manuale di MedITEX Accounting</a></td> |
| − | <td | + | <td><a href="#top">Inizio pagina</a><br /></td> |
</tr> | </tr> | ||
</tbody> | </tbody> | ||
</table> | </table> | ||
Latest revision as of 10:51, 27 September 2022
| <img src="/images/Acc_BarraMenù_1_IT.png" alt="" width="750" height="130" /> |
Contents |
Ricerca pazienti
| <img src="/images/Acc_BarraMenù_2_IT.png" alt="" width="340" height="43" /> |
In questo campo sarà possibile ricercare i pazienti. La ricerca può essere fatta per Cognome, data di nascita, ID Paziente o numero di telefono. Se solo parte del cognome o id viene inserito, nella lista compariranno tutti i pazienti con tali caratteristiche.
Per selezionare il paziente dalla lista fare doppio-click sul nome. La finestra si aggiornerà e il paziente selezionato verra visualizzato nella sezione superiore della finestra.
| <img src="/images/Acc_BarraMenù_3_IT.png" alt="" width="500" height="316" /> |
Pulsanti
Pulsanti con cornice blu tratteggiata hanno funzionalità particolari. Cliccare per avere ulteriori informazioni.
| <img style="display: block; margin-left: auto; margin-right: auto;" src="/images/Acc_BarraMenù_4_IT.png" alt="" width="90" height="36" /> |
Vai al partner: Accounting caricherà automaticamente il partner della persona selezionata e visualizzerà le sue voci del conto. |
| <a href="/index.php?title=MedITEX_Accounting_-_barra_dei_menù#Nuove_fatture.2FVoci"><img style="display: block; margin-left: auto; margin-right: auto; border: 2px dotted blue;" src="/images/Acc_BarraMenù_5_IT.png" alt="" width="112" height="36" /></a> |
Nuove Fatture/Voci: Permette di inserire voci di fatture e creare fatture per il paziente selezionato. |
| <a href="/index.php?title=MedITEX_Accounting_-_barra_dei_menù#Nuova_Registrazione"><img style="display: block; margin-left: auto; margin-right: auto; border: 2px dotted blue;" src="/images/Acc_BarraMenù_6_IT.png" alt="" width="100" height="35" /></a> |
Nuova registrazione: Permette di inserire Acconti, pagamenti, Rimborsi, etc. |
| <a href="/index.php?title=MedITEX_Accounting_-_menu_bar#MedITEX_IVF"><img style="display: block; margin-left: auto; margin-right: auto;" src="/images/Acc_BarraMenù_7_IT.png" alt="" width="78" height="37" /></a> |
MedITEX IVF: Cliccando questo pulsante MedITEX IVF si aprirà nella overview della coppia /paziente selezionato in Accounting. Lo user loggato in IVF sarà lo stesso di Accounting e non sarà necessario inserire la password. |
| <img style="display: block; margin-left: auto; margin-right: auto;" src="/images/Acc_BarraMenù_8_IT.png" alt="" width="66" height="35" /> |
MedITEX Scheduler: Cliccando questo pulsante MedITEX Scheduler si aprirà nella overview del paziente selezionato in Accounting.<a href="/index.php?title=MedITEX_Accounting_-_menu_bar#MedITEX_IVF"></a> |
| <a href="/index.php?title=MedITEX_Accounting_-_menu_bar#Print"><img style="display: block; margin-left: auto; margin-right: auto;" src="/images/Acc_BarraMenù_9_IT.png" alt="" width="72" height="36" /></a> |
Stampa: Cliccando questo pulsante una stampa a video della sezione attiva in Accounting verrà eseguita. Aprire la sezione desiderata cliccando l'opzione nella barra laterale e premere Stampa. L'anteprima si aprirà e le impostazioni di stampa potranno essere modificate a piacere. <a href="/index.php?title=MedITEX_Accounting_-_menu_bar#Print"></a> |
| <a href="/index.php?title=MedITEX_Accounting_-_menu_bar#Export"><img style="display: block; margin-left: auto; margin-right: auto;" src="/images/Acc_BarraMenù_10_IT.png" alt="" width="71" height="39" /></a> |
Esporta: Cliccando questo pulsante una stampa a video della sezione attiva in Accounting verrà esportata in un file Excel, CSV o Testo. Aprire la sezione desiderata cliccando l'opzione nella barra laterale e premere la freccia sulla destra del tasto Esporta e seleziona l'opzione desiderata. |
| <a href="/index.php?title=Benvenuti_in_MedITEX_Accounting"><img style="display: block; margin-left: auto; margin-right: auto; border: 2px dotted blue;" src="/images/Acc_BarraMenù_11_IT.png" alt="" width="76" height="39" /></a> |
Sezione in cui sono presenti le impostazioni del programma. <a href="/index.php?title=Benvenuti_in_MedITEX_Accounting">Cliccare qui</a> per ulteriori informazioni.<a href="/index.php?title=Welcome_to_MedITEX_Accounting"></a> |
| <img style="display: block; margin-left: auto; margin-right: auto;" src="/images/Acc_BarraMenù_12_IT.png" alt="" width="74" height="35" /> |
Finestra contenente tutti i prezzi inseriti nelle <a href="/index.php?title=Benvenuti_in_MedITEX_Accounting#Panoramica_prezzi.C2.A0">impostazioni.</a><a href="/index.php?title=Welcome_to_MedITEX_Accounting"></a> |
Vai al partner
Il modulo contabilità passa al partner della persona attuale e mostra le sue voci contabili e fatture.
Nuove fatture/Voci
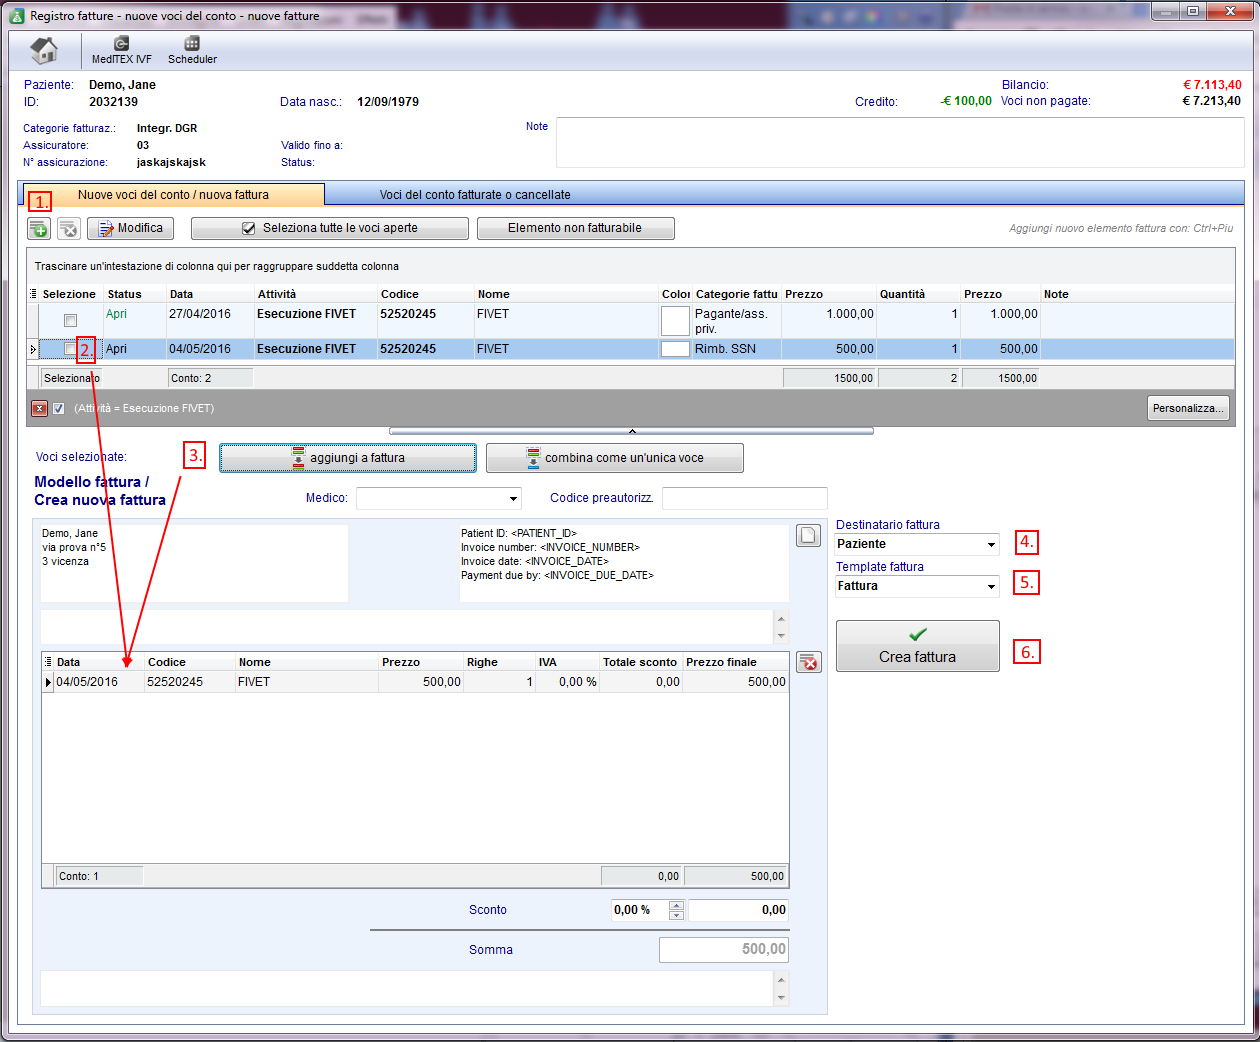 |
| 1. | Inserire elenco Voci del conto | Facendo click cul pulsante "+" si potranno inserire le voci del conto e i loro prezzi. |
| 2. | Selezionare le voci da inserire nella fattura | Facendo click sul quadrato a fianco della voce del conto si selezioneno le voci che andranno a completare la Fattura. Premendo il pulsante "seleziona tutte le voci aperte" seleziono tutte le voci fatturabili. |
| 3. | Comporre la fattura |
Premendo il pulsante "aggiungi a fattura" le voci selezionate verranno copiate nel modulo della fattura. In questa sezione potrete inserire sconti su ogni voce o sull'intera fattura, e inserire note prima e dopo la tabella. |
| 4. | Destinatario Fattura | Scegliere destinatario Fattura:
|
| 5. | Template Fattura | Scegliere dalla lista il template della fattura. |
| 6. | Genera Fattura | Generare la fattura ed eventuale pagamento immediato. |
Nuova Registrazione
| <img src="/images/Acc_BarraMenù_15_IT.png" alt="" width="700" height="454" /> |
| 1. | Scegliere la registrazione da effettuare |
|
| 2. | Inserire paziente | Il nome del paziente sara riempito automaticamente con la persona selezionata precedentemente. Per modificare il pazinete premere la croce rossa e ricercare il nuovo paziente. Nella sezione grigia alla destra del nome sarà visualizzato un piccolo riassunto dei dati più importanti del paziente selezionato. |
| 3. | Template transazione | Segliere tra i disponibili, il template per la stampa di ricevuta della transazione. |
| 4. | Importo transazione | Inserire l'importo della transazione. |
| 5. | Scegliere la data della transazione | La data corrente apparirà automaticamente. |
| 6. | Metodo Pagamento |
Opzioni modificabili a piacere dalle <a href="/index.php?title=Benvenuti_in_MedITEX_Accounting#Tabella_sistema_modificabile">Impostazioni.</a> |
| 7. | Utente responsabile per la transazione | L'utente al momento loggato sarà selezionato di default. Per modificarlo selezionare l'utente desiderato dalla lista. |
| 8. | Note | Inserire Note se necessario. |
| 9. | Come ultimo passo, nel caso di pagamento e pagamento con credito, scegliere la fattura alla quale la transazione fà riferimento. | |
MedITEX IVF
Se si fa clic sul pulsante MedITEX IVF, il programma MedITEX IVF verrà aperto nella finestra panoramica del paziente/coppia attuale.
L'utente sarà lo stesso dell'utente che ha effettuato l'accesso in MedITEX Accounting. Non è necessario inserire nuovamente la password.
| <img src="/images/a11.png" alt="" width="750" height="483" /> |
Stampare
Con il pulsante stampa è possibile stampare ogni fascia dell' accoounting module. Aprire l'area desiderata con un click sul link associato nella barra laterale e cliccare successivamente sul pulsante di stampa. Si aprirà una finestra di anteprima di stampa in cui è possibile modificare le impostazioni di stampa.
Impostazioni
| <a href="/index.php?title=Welcome_to_MedITEX_Accounting"><img src="/images/SettingsAcc.png" alt="" width="59" height="38" /></a> | <a href="/index.php?title=Benvenuti_in_MedITEX_Accounting">Clicca qui</a> per andare direttamente alla pagina riguardante le impostazioni. |
| <a href="/index.php?title=MedITEX_Accounting_Manuale">Torna al Manuale di MedITEX Accounting</a> | <a href="#top">Inizio pagina</a> |