Interfaccia SMS
From MedITEX - Wiki
| Line 4: | Line 4: | ||
<td><img src="/images/hint48.png" alt="" width="48" height="48" /></td> | <td><img src="/images/hint48.png" alt="" width="48" height="48" /></td> | ||
<td> | <td> | ||
| − | <p><strong>Per utilizzare l’interfaccia SMS è necessaria una particolare configurazione. Puoi trovare più dettagli <a href="/index.php?title=How_to_configure_SMS_interface%3F"><span style="text-decoration: underline;">qui</span></a>.</strong | + | <p><strong>Per utilizzare l’interfaccia SMS è necessaria una particolare configurazione. Puoi trovare più dettagli <a href="/index.php?title=How_to_configure_SMS_interface%3F"><span style="text-decoration: underline;">qui</span></a>.</strong></p> |
</td> | </td> | ||
</tr> | </tr> | ||
| Line 65: | Line 65: | ||
</table> | </table> | ||
<p> </p> | <p> </p> | ||
| − | <h3> | + | <h3>Pulsanti</h3> |
<table style="margin-left: auto; margin-right: auto;" border="0"> | <table style="margin-left: auto; margin-right: auto;" border="0"> | ||
<tbody> | <tbody> | ||
| Line 71: | Line 71: | ||
<td><img style="display: block; margin-left: auto; margin-right: auto;" src="/images/SaveSMSOnly.png" alt="" width="198" height="30" /></td> | <td><img style="display: block; margin-left: auto; margin-right: auto;" src="/images/SaveSMSOnly.png" alt="" width="198" height="30" /></td> | ||
<td> | <td> | ||
| − | <p><strong> | + | <p><strong> </strong><strong>Salva SMS senza inviare</strong>.</p> |
</td> | </td> | ||
</tr> | </tr> | ||
<tr> | <tr> | ||
<td><img style="display: block; margin-left: auto; margin-right: auto;" src="/images/CancelSMS.png" alt="" width="102" height="28" /></td> | <td><img style="display: block; margin-left: auto; margin-right: auto;" src="/images/CancelSMS.png" alt="" width="102" height="28" /></td> | ||
| − | <td><span id="result_box" class="short_text" lang="en"><span class="hps"><strong> | + | <td><span id="result_box" class="short_text" lang="en"><span class="hps"><strong> </strong></span><span><strong>Annulla</strong> l’operazione.</span></span></td> |
</tr> | </tr> | ||
<tr> | <tr> | ||
<td><img style="display: block; margin-left: auto; margin-right: auto;" src="/images/SaveAndSendSMS.png" alt="" width="232" height="27" /></td> | <td><img style="display: block; margin-left: auto; margin-right: auto;" src="/images/SaveAndSendSMS.png" alt="" width="232" height="27" /></td> | ||
| − | <td><strong> | + | <td><strong>Salva e invia l’SMS</strong>.</td> |
</tr> | </tr> | ||
</tbody> | </tbody> | ||
</table> | </table> | ||
<p> </p> | <p> </p> | ||
| − | <h3> | + | <h3>Dati da inserire</h3> |
<table style="margin-left: auto; margin-right: auto;" border="0"> | <table style="margin-left: auto; margin-right: auto;" border="0"> | ||
<tbody> | <tbody> | ||
| Line 98: | Line 98: | ||
<tr> | <tr> | ||
<td><img style="display: block; margin-left: auto; margin-right: auto;" src="/images/Date.png" alt="" /></td> | <td><img style="display: block; margin-left: auto; margin-right: auto;" src="/images/Date.png" alt="" /></td> | ||
| − | <td style="text-align: justify;"> | + | <td style="text-align: justify;"> La data corrente è inserita <strong>automaticamente</strong>.</td> |
</tr> | </tr> | ||
<tr> | <tr> | ||
<td><img style="display: block; margin-left: auto; margin-right: auto;" src="/images/By.png" alt="" width="191" height="143" /></td> | <td><img style="display: block; margin-left: auto; margin-right: auto;" src="/images/By.png" alt="" width="191" height="143" /></td> | ||
| − | <td style="text-align: justify;"> <strong> | + | <td style="text-align: justify;"> <strong>Scegliere il mittente del SMS</strong>.</td> |
</tr> | </tr> | ||
<tr> | <tr> | ||
Revision as of 15:59, 4 April 2016
| <img src="/images/hint48.png" alt="" width="48" height="48" /> |
Per utilizzare l’interfaccia SMS è necessaria una particolare configurazione. Puoi trovare più dettagli <a href="/index.php?title=How_to_configure_SMS_interface%3F">qui</a>. |
L’interfaccia SMS può essere utilizzata in MedITEX IVF e in MedITEX Scheduler.
 |
In MedITEX IVF, l’interfaccia SMS è presente nella barra strumenti nelle seguenti sezioni:
- Anagrafica
- Anamnesi
- Diagnostica Laboratorio
- Diagnostica strumentale
- Overview di ogni singola terapia
E’ possibile accedervi inoltre nell’overview terapia, nella sezione <a href="/index.php?title=How_to_edit_drugs%3F#How_to_send_an_SMS_with_instructions_about_the_application_or_dosage_of_a_drug.3F">dove sono elencati tutti I farmaci utilizzati.</a>
 |
In MedITEX Scheduler, l’interfaccia SMS è presente nella barra strumenti nelle seguenti sezioni:
- Pagina principale (quando viene selezionato il paziente)
- Pagina ‘Appuntamenti del paziente’
Possono essere utilizzati per <a href="/index.php?title=How_to_send_appointment_details_via_SMS%3F">comunicare dettagli relativi agli appuntamenti</a> al paziente.
Contents |
Mandare SMS
| <img src="/images/CreateSMS.png" alt="" /> |
Pulsanti
| <img style="display: block; margin-left: auto; margin-right: auto;" src="/images/SaveSMSOnly.png" alt="" width="198" height="30" /> |
Salva SMS senza inviare. |
| <img style="display: block; margin-left: auto; margin-right: auto;" src="/images/CancelSMS.png" alt="" width="102" height="28" /> | Annulla l’operazione. |
| <img style="display: block; margin-left: auto; margin-right: auto;" src="/images/SaveAndSendSMS.png" alt="" width="232" height="27" /> | Salva e invia l’SMS. |
Dati da inserire
| <img src="/images/ClickableAreas.png" alt="" /> |
| <img style="display: block; margin-left: auto; margin-right: auto;" src="/images/Date.png" alt="" /> | La data corrente è inserita automaticamente. | ||
| <img style="display: block; margin-left: auto; margin-right: auto;" src="/images/By.png" alt="" width="191" height="143" /> | Scegliere il mittente del SMS. | ||
 |
Insert the mobile phone number of the patient. If the patient has a mobile phone number in the system, it will be automatically added. Pay attention to the phone number format. It has to begin with international country calling code. The code can be added manually by the user or automatically by MedITEX if the code is entered in <a href="/index.php?title=How_to_configure_an_SMS_interface%3F">SMS settings</a>. |
||
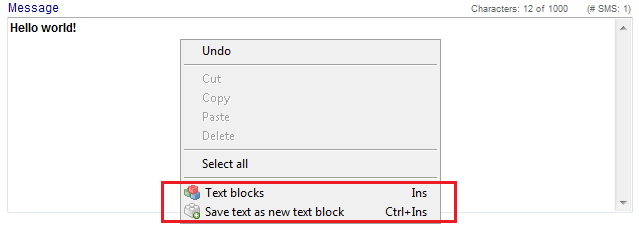 |
The text field for your message. Right-click in this field gives the possibility to use existing and create new SMS templates in the form of <a href="/index.php?title=How_to_create_and_use_text_blocks%3F">textblocks</a>.
|
||
| <img style="display: block; margin-left: auto; margin-right: auto;" src="/images/NumberOfChars.png" alt="" /> |
In this little box above the text box, you can see how many characters you have available. |
SMS status
| <img src="/images/SentSMSstatusRed.png" alt="" width="695" height="703" /> |
There are 6 possible statuses of a sent SMS message. In the field Protocol you can see the exact date and time when the message was created, saved, submitted etc.
| <img src="/images/StatusDraft.png" alt="" /> | Draft |
| <img src="/images/StatusSending.png" alt="" /> |
Sending |
| <img src="/images/StatusSent.png" alt="" width="44" height="23" /> |
Sent (not yet delivered) |
| <img src="/images/StatusDelivered.png" alt="" width="43" height="24" /> |
Delivered |
| <img src="/images/StatusErrorNotDelivered.png" alt="" width="44" height="26" /> |
Error: SMS could not be delivered |
| <img src="/images/StatusErrorTimeOut.png" alt="" width="44" height="26" /> |
Error: SMS could not be sent |
Receiving SMS
| <img style="display: block; margin-left: auto; margin-right: auto;" src="/images/ReceivedSMS.png" alt="" /> |
Buttons
| <img style="display: block; margin-left: auto; margin-right: auto;" src="/images/CancelSMS.png" alt="" width="102" height="28" /> | Cancel the operation. |
| <img src="/images/SMSMarkAsRead.png" alt="" width="230" height="24" /> | Mark message as read. |
SMS status
| <img src="/images/ReceivedSMSstatusRed.png" alt="" /> |
There are 2 possible statuses of a received SMS message. In the field Protocol you can see the exact date and time when the message was sent by a patient, received by MedITEX and read by user.
| <img src="/images/StatusUnread.png" alt="" width="40" height="24" /> | Unread |
| <img src="/images/StatusRead.png" alt="" width="41" height="24" /> | Read |
Communication overview
| <a href="/index.php?title=Communication_overview"><img src="/images/plus48.png" alt="" width="48" height="48" /></a> | <a href="/index.php?title=Communication_overview">Click here</a> to read more about the Communication overview. |
How to...
| <a href="/index.php?title=MedITEX_IVF_how_to#SMS"><img style="vertical-align: middle;" src="/images/howto48.png" alt="" width="48" height="48" /></a> <a href="/index.php?title=MedITEX_IVF_how_to#SMS">SMS interface</a> |
| <a href="/index.php?title=Main_Page">Back to MedITEX products </a> | <a href="#top">Back to top</a> |