Inserire un nuovo elemento
From MedITEX - Wiki
| Line 1: | Line 1: | ||
| − | <h2 style="text-align: justify;"> | + | <h2 style="text-align: justify;">Inserire un nuovo elemento</h2> |
| − | <p style="text-align: justify;"> | + | <p style="text-align: justify;">Per documentare i risultati di una singola analisi è sufficiente fare clic sulla freccia a destra dell'icona Nuovo campione e scegliere uno dei seguenti tipi:</p> |
<ul> | <ul> | ||
| − | <li> | + | <li>Altro</li> |
| − | <li> | + | <li>Biochimica</li> |
| − | <li> | + | <li>Biologia</li> |
| − | <li> | + | <li>Chimica clinica</li> |
| − | <li> | + | <li>Citologia</li> |
| − | <li> | + | <li>Ematologia</li> |
| − | <li> | + | <li>Endocrinologia</li> |
| + | <li>Genetica</li> | ||
| + | <li>Marcatori tumorali</li> | ||
| + | <li>Microbilogia</li> | ||
| + | <li>Ormoni</li> | ||
| + | <li>Sielologia</li> | ||
| + | <li>Spermiogramma (solamente in Diagnostica Lab. maschile)</li> | ||
</ul> | </ul> | ||
<p> </p> | <p> </p> | ||
| − | <p style="text-align: justify;"> | + | <p style="text-align: justify;">La seguiente finestra si apre (<strong>Per esempio Ormoni</strong>):</p> |
<table style="margin-left: auto; margin-right: auto;" border="0"> | <table style="margin-left: auto; margin-right: auto;" border="0"> | ||
<tbody> | <tbody> | ||
<tr> | <tr> | ||
| − | <td>[[Image:Hormones.png|none|740px|thumb|left|link=http://wiki.meditex-software.com/images/Hormones.png| | + | <td>[[Image:Hormones.png|none|740px|thumb|left|link=http://wiki.meditex-software.com/images/Hormones.png|Inserire un nuovo valore ormonale.]]</td> |
</tr> | </tr> | ||
</tbody> | </tbody> | ||
</table> | </table> | ||
| − | <h3> | + | <h3>Pulsanti</h3> |
| − | <p> | + | <p> </p> |
| − | < | + | <p><span>Pulsanti contornati da una linea blu tratteggiata hanno delle funzionalità particolari. Cliccare per avere ulteriori informazioni.</span></p> |
<table border="0"> | <table border="0"> | ||
<tbody> | <tbody> | ||
<tr> | <tr> | ||
| − | <td><a href="/index.php?title= | + | <td><a href="/index.php?title=Campi_liberi_/_QM"><img style="display: block; margin-left: auto; margin-right: auto; border: 2px dotted blue;" src="/images/QMButton.png" alt="" width="73" height="41" /></a></td> |
| − | <td><strong>QM | + | <td><strong>Campi liberi/QM: </strong>Questo pulsante puo essere utilizzato per accedere ai campi Qm associati a questa sezione. |
<ul style="text-align: justify;"> | <ul style="text-align: justify;"> | ||
</ul> | </ul> | ||
| Line 33: | Line 39: | ||
<tr> | <tr> | ||
<td><img style="display: block; margin-left: auto; margin-right: auto;" src="/images/Browse.png" alt="" width="82" height="85" /></td> | <td><img style="display: block; margin-left: auto; margin-right: auto;" src="/images/Browse.png" alt="" width="82" height="85" /></td> | ||
| − | <td><strong> | + | <td><strong>Naviga:</strong> Cliccando sulle frecce è possibile passare da un valore di laboratorio documentato all'altro.</td> |
</tr> | </tr> | ||
<tr> | <tr> | ||
<td><img style="display: block; margin-left: auto; margin-right: auto;" src="/images/Search2.png" alt="" /></td> | <td><img style="display: block; margin-left: auto; margin-right: auto;" src="/images/Search2.png" alt="" /></td> | ||
| − | <td><strong> | + | <td><strong>Aggiungi documento:</strong> Permette di selezionate e allegare un singolo documento all'elemento.</td> |
| + | </tr> | ||
| + | <tr> | ||
| + | <td> </td> | ||
| + | <td><strong>Aprire </strong>il documento allegato.</td> | ||
</tr> | </tr> | ||
<tr> | <tr> | ||
<td><img style="display: block; margin-left: auto; margin-right: auto;" src="/images/CancelX.png" alt="" /></td> | <td><img style="display: block; margin-left: auto; margin-right: auto;" src="/images/CancelX.png" alt="" /></td> | ||
| − | <td> | + | <td><strong>Cancella: </strong>premendo cancella i dati inseriti non verrano salvati.</td> |
</tr> | </tr> | ||
<tr> | <tr> | ||
<td><img style="display: block; margin-left: auto; margin-right: auto;" src="/images/OK.png" alt="" /></td> | <td><img style="display: block; margin-left: auto; margin-right: auto;" src="/images/OK.png" alt="" /></td> | ||
<td> | <td> | ||
| − | <p><strong>OK: </strong> | + | <p><strong>OK: </strong>premendo ok i dati inseriti verranno salvati.</p> |
| − | <p> | + | <p>L' overview di tutti i risultati saranno visualizzati nella tab "Valori lab" nella finestra Diagnostica di laboratorio (ordinati per data). Lo stato di ciascun valore può essere visualizzato dalla lista nella colonna Stato.</p> |
</td> | </td> | ||
</tr> | </tr> | ||
| Line 53: | Line 63: | ||
</table> | </table> | ||
<p> </p> | <p> </p> | ||
| − | <h3> | + | <h3>Aree interattive</h3> |
<hr /> | <hr /> | ||
<table border="0"> | <table border="0"> | ||
<tbody> | <tbody> | ||
<tr> | <tr> | ||
| − | <td style="text-align: justify;"><strong> | + | <td style="text-align: justify;"><strong>ID Campione</strong></td> |
| − | <td style="text-align: justify;"><strong> </strong>ID | + | <td style="text-align: justify;"><strong> </strong>Codice ID del campione.</td> |
</tr> | </tr> | ||
<tr> | <tr> | ||
| − | <td style="text-align: justify;"><strong> | + | <td style="text-align: justify;"><strong>Parametro</strong></td> |
<td style="text-align: justify;"> | <td style="text-align: justify;"> | ||
| − | <p> | + | <p>Nome del parametro il cui valore deve essere inserito. Per selezionare il parametro è sufficiente digitare il nome nel campo e cliccare la freccia nera alla destra del campo. Solamente parametri appartenenti al tipo di elemento selezionato (es. Ormoni) verranno visualizzati.</p> |
| − | <p><span style="text-decoration: underline;"> | + | <p><span style="text-decoration: underline;">Suggerimento:</span> Inserire le prime lettere del parametro da cercare e premere la freccia nera. MedITEX mostrera automaticamente i parametri che corrispondono a quelle poche lettere inserite.</p> |
</td> | </td> | ||
</tr> | </tr> | ||
<tr> | <tr> | ||
| − | <td style="text-align: justify;"><strong> | + | <td style="text-align: justify;"><strong>Valore</strong></td> |
| − | <td style="text-align: justify;"> | + | <td style="text-align: justify;">Inserire in questo campo il valore del parametro selezionato, a meno che valori standard non siano stati impostati nella <strong><a href="/index.php?title=MedITEX_IVF_Impostazioni#Lab">sezione Lab nelle impostazioni</a></strong>. Se valori standard sono presenti cliccare sulla freccia nera e selezionare il valore.</td> |
</tr> | </tr> | ||
<tr> | <tr> | ||
| − | <td style="text-align: justify;"><strong>Unit</strong></td> | + | <td style="text-align: justify;"><strong>Unità</strong></td> |
| − | <td style="text-align: justify;"> | + | <td style="text-align: justify;">Unità di misura di default per il parametro. Questà unità può essere modificata per il corrente esame agendo sulla freccia nera alle destra del campo. Per modificare l'unità di default occorre andare nella <strong><a href="/index.php?title=MedITEX_IVF_Impostazioni#Lab">sezione Lab nelle impostazioni</a></strong>.</td> |
</tr> | </tr> | ||
<tr> | <tr> | ||
| − | <td style="text-align: justify;"><strong> | + | <td style="text-align: justify;"><strong>Periodo validità</strong></td> |
| − | <td style="text-align: justify;"> | + | <td style="text-align: justify;">Periodo di validità dell'analisi. Per modificare tale periodo andare nella <strong><a href="/index.php?title=MedITEX_IVF_Impostazioni#Lab">sezione Lab nelle impostazioni</a>.</strong></td> |
</tr> | </tr> | ||
<tr> | <tr> | ||
| − | <td style="text-align: justify;"><strong> | + | <td style="text-align: justify;"><strong>Stato</strong></td> |
<td style="text-align: justify;"> | <td style="text-align: justify;"> | ||
| − | <p> | + | <p>La scelta dello stato è ristretta a <strong>"Normale"</strong> o <strong>"Anormale</strong><strong>"</strong>.</p> |
| − | + | ||
</td> | </td> | ||
</tr> | </tr> | ||
<tr> | <tr> | ||
| − | <td style="text-align: justify;"><strong> | + | <td style="text-align: justify;"> |
| − | <td style="text-align: justify;"> | + | <p><strong>Intervallo valori </strong><strong>parametro</strong></p> |
| − | + | </td> | |
| − | + | <td style="text-align: justify;">Qui vengono visualizzati, se impostati, i range di valori del parametro selezionato. Questi range possono essere inseriti e/o modificati nell <strong><a href="/index.php?title=MedITEX_IVF_Impostazioni#Lab">sezione Lab nelle impostazioni</a>.</strong></td> | |
| − | + | ||
| − | + | ||
| − | + | ||
| − | + | ||
| − | + | ||
| − | + | ||
</tr> | </tr> | ||
</tbody> | </tbody> | ||
</table> | </table> | ||
<ul> | <ul> | ||
| − | <li> | + | <li>Cliccando <strong>"OK"</strong> i risultati inseriti verranno salvati e visualizzati nell'overview di diagnostica laboratorio e nella rispettiva tab nella pagina principale se la relativa opzione è selezionata nella <strong><a href="/index.php?title=MedITEX_IVF_Impostazioni#Lab">sezione Lab nelle impostazioni</a></strong>.</li> |
</ul> | </ul> | ||
<ul> | <ul> | ||
| − | <li> | + | <li>Se il valore visualizzato in queste due sezioni è di <strong>color rosso</strong> il periodo di validità dell'esame(impostato nei settings) è scaduto.</li> |
</ul> | </ul> | ||
<p style="text-align: justify;"> </p> | <p style="text-align: justify;"> </p> | ||
| − | <h2 style="text-align: justify;"> | + | <h2 style="text-align: justify;">Inserimento multiplo</h2> |
| − | <p style="text-align: justify;"><strong> | + | <p style="text-align: justify;"><strong>Cliccando il pulsante inserimento multiplo la seguente finestra si aprirà:</strong></p> |
<table border="0"> | <table border="0"> | ||
<tbody> | <tbody> | ||
<tr> | <tr> | ||
| − | <td>[[Image:mulentr.png|none|740px|thumb|left|link=http://wiki.meditex-software.com/images/mulentr.png| | + | <td>[[Image:mulentr.png|none|740px|thumb|left|link=http://wiki.meditex-software.com/images/mulentr.png| Inserimento multiplo.]]</td> |
</tr> | </tr> | ||
</tbody> | </tbody> | ||
</table> | </table> | ||
<p style="text-align: justify;"> </p> | <p style="text-align: justify;"> </p> | ||
| − | <h3 style="text-align: justify;"> | + | <h3 style="text-align: justify;">Aree interattive |
<hr /> | <hr /> | ||
</h3> | </h3> | ||
| Line 124: | Line 127: | ||
<tbody> | <tbody> | ||
<tr> | <tr> | ||
| − | <td style="text-align: justify;"><strong> | + | <td style="text-align: justify;"><strong>Data</strong></td> |
| − | <td style="text-align: justify;"> | + | <td style="text-align: justify;">Data analisi. La data inserita sarà la stessa per tutte le analisi documentate. Cliccando il fulmine la data corrente verrà inserita.</td> |
</tr> | </tr> | ||
<tr> | <tr> | ||
| − | <td style="text-align: justify;"><strong> | + | <td style="text-align: justify;"><strong>TOra</strong></td> |
| − | <td style="text-align: justify;"> | + | <td style="text-align: justify;"><span>Ora analisi. L'ora inserita sarà la stessa per tutte le analisi documentate. Cliccando il fulmine l'ora corrente verrà inserita.</span></td> |
</tr> | </tr> | ||
<tr> | <tr> | ||
<td style="text-align: justify;"><strong> </strong><strong>Sample ID</strong></td> | <td style="text-align: justify;"><strong> </strong><strong>Sample ID</strong></td> | ||
| − | <td style="text-align: justify;">< | + | <td style="text-align: justify;"><span>Codice ID del campione.</span><br /></td> |
</tr> | </tr> | ||
<tr> | <tr> | ||
| − | <td style="text-align: justify;"><strong> | + | <td style="text-align: justify;"><strong>Medico</strong></td> |
| − | <td style="text-align: justify;"> | + | <td style="text-align: justify;">Medico curante.</td> |
</tr> | </tr> | ||
</tbody> | </tbody> | ||
</table> | </table> | ||
<p style="text-align: justify;"> </p> | <p style="text-align: justify;"> </p> | ||
| − | <h3 style="text-align: justify;"> | + | <h3 style="text-align: justify;">Liste |
<hr /> | <hr /> | ||
</h3> | </h3> | ||
Revision as of 16:27, 19 April 2016
Contents |
Inserire un nuovo elemento
Per documentare i risultati di una singola analisi è sufficiente fare clic sulla freccia a destra dell'icona Nuovo campione e scegliere uno dei seguenti tipi:
- Altro
- Biochimica
- Biologia
- Chimica clinica
- Citologia
- Ematologia
- Endocrinologia
- Genetica
- Marcatori tumorali
- Microbilogia
- Ormoni
- Sielologia
- Spermiogramma (solamente in Diagnostica Lab. maschile)
La seguiente finestra si apre (Per esempio Ormoni):
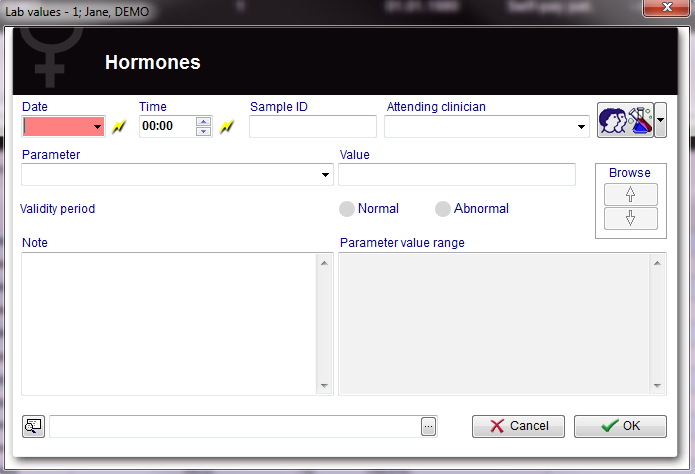 |
Pulsanti
Pulsanti contornati da una linea blu tratteggiata hanno delle funzionalità particolari. Cliccare per avere ulteriori informazioni.
| <a href="/index.php?title=Campi_liberi_/_QM"><img style="display: block; margin-left: auto; margin-right: auto; border: 2px dotted blue;" src="/images/QMButton.png" alt="" width="73" height="41" /></a> | Campi liberi/QM: Questo pulsante puo essere utilizzato per accedere ai campi Qm associati a questa sezione.
|
| <img style="display: block; margin-left: auto; margin-right: auto;" src="/images/Browse.png" alt="" width="82" height="85" /> | Naviga: Cliccando sulle frecce è possibile passare da un valore di laboratorio documentato all'altro. |
| <img style="display: block; margin-left: auto; margin-right: auto;" src="/images/Search2.png" alt="" /> | Aggiungi documento: Permette di selezionate e allegare un singolo documento all'elemento. |
| Aprire il documento allegato. | |
| <img style="display: block; margin-left: auto; margin-right: auto;" src="/images/CancelX.png" alt="" /> | Cancella: premendo cancella i dati inseriti non verrano salvati. |
| <img style="display: block; margin-left: auto; margin-right: auto;" src="/images/OK.png" alt="" /> |
OK: premendo ok i dati inseriti verranno salvati. L' overview di tutti i risultati saranno visualizzati nella tab "Valori lab" nella finestra Diagnostica di laboratorio (ordinati per data). Lo stato di ciascun valore può essere visualizzato dalla lista nella colonna Stato. |
Aree interattive
| ID Campione | Codice ID del campione. |
| Parametro |
Nome del parametro il cui valore deve essere inserito. Per selezionare il parametro è sufficiente digitare il nome nel campo e cliccare la freccia nera alla destra del campo. Solamente parametri appartenenti al tipo di elemento selezionato (es. Ormoni) verranno visualizzati. Suggerimento: Inserire le prime lettere del parametro da cercare e premere la freccia nera. MedITEX mostrera automaticamente i parametri che corrispondono a quelle poche lettere inserite. |
| Valore | Inserire in questo campo il valore del parametro selezionato, a meno che valori standard non siano stati impostati nella <a href="/index.php?title=MedITEX_IVF_Impostazioni#Lab">sezione Lab nelle impostazioni</a>. Se valori standard sono presenti cliccare sulla freccia nera e selezionare il valore. |
| Unità | Unità di misura di default per il parametro. Questà unità può essere modificata per il corrente esame agendo sulla freccia nera alle destra del campo. Per modificare l'unità di default occorre andare nella <a href="/index.php?title=MedITEX_IVF_Impostazioni#Lab">sezione Lab nelle impostazioni</a>. |
| Periodo validità | Periodo di validità dell'analisi. Per modificare tale periodo andare nella <a href="/index.php?title=MedITEX_IVF_Impostazioni#Lab">sezione Lab nelle impostazioni</a>. |
| Stato |
La scelta dello stato è ristretta a "Normale" o "Anormale". |
|
Intervallo valori parametro |
Qui vengono visualizzati, se impostati, i range di valori del parametro selezionato. Questi range possono essere inseriti e/o modificati nell <a href="/index.php?title=MedITEX_IVF_Impostazioni#Lab">sezione Lab nelle impostazioni</a>. |
- Cliccando "OK" i risultati inseriti verranno salvati e visualizzati nell'overview di diagnostica laboratorio e nella rispettiva tab nella pagina principale se la relativa opzione è selezionata nella <a href="/index.php?title=MedITEX_IVF_Impostazioni#Lab">sezione Lab nelle impostazioni</a>.
- Se il valore visualizzato in queste due sezioni è di color rosso il periodo di validità dell'esame(impostato nei settings) è scaduto.
Inserimento multiplo
Cliccando il pulsante inserimento multiplo la seguente finestra si aprirà:
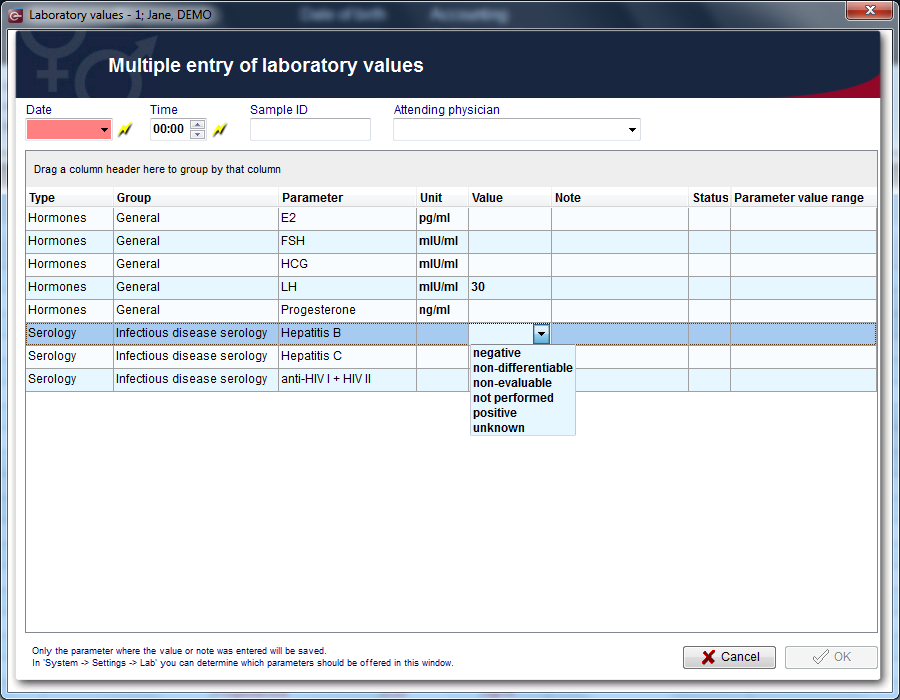 |
Aree interattive
| Data | Data analisi. La data inserita sarà la stessa per tutte le analisi documentate. Cliccando il fulmine la data corrente verrà inserita. |
| TOra | Ora analisi. L'ora inserita sarà la stessa per tutte le analisi documentate. Cliccando il fulmine l'ora corrente verrà inserita. |
| Sample ID | Codice ID del campione. |
| Medico | Medico curante. |
Liste
 |
|
| Type: | Family of analisys which the parameter belongs. |
| Group: | Group of analisys which the parameter belongs. To change the group go to the Lab section in the settings. To set a new group go to the <a href="/index.php?title=MedITEX_IVF_Settings#System_tables">system table section</a> in the settings. |
| Parameter: | Parameter investigated. To add/remove parameters to/from the Multiple entry tool, go to the Lab section in the settings. |
| Unit: | Default units for the parameter. It is possible to select different units by clicking on the field and the on the black arrow. To change the default units for the parameter go to the Lab section in the settings. |
| Value: | Fill this field with the value found with the analisys unless standard values are set in the Lab section in the settings. If standard values are set a black arrow will appear on the right when the free field is clicked. Click on the black arrow and select the value. |
| Note: | This is a free field to be filled with notes. |
| Status: | Normal (OK icon) or abnormal (! icon) can be notified for the analisys. Just click on the free field and then on the black arrow to select the status. |
| Parameter value range: | Here are shown, if set, the value ranges for the parameter. To change the parameters go to the Lab section in the settings. |
- By clicking on OK the results of all the analisys where the value or note was entered will be saved. They will be also published in the main window if the related box in the the Lab section in the settings was checked.
- If the parameter shown in the lab diagnostics list or in the homepage is red it means that the lab test has reached the expiry date set by the user.
- In the Lab section in the settings can be chosen which parameters should be offered in the multiple entry window.
Inserire un nuovo spermiogramma
If you choose a new semen analysis the following window will open:
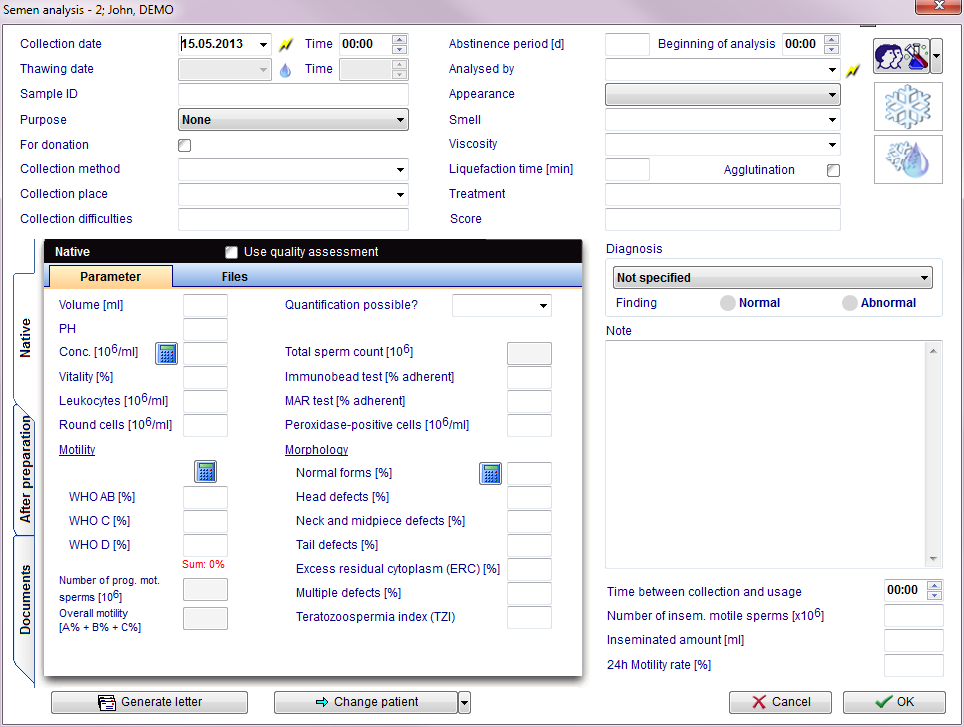 |
This window is divided in several areas:
- General area including date, time and collection method, indication, diagnosis and preparation method.
- Area for values before preparation.
- Area for values after preparation.
- Area for documents.
You can calculate the percentage values for the concentration, motility and morpholgy by using the calculators. Press the calculator symbol and enter the number of total sperms.
| <img src="/images/plus48.png" alt="" width="48" height="48" /> | Use the semen counters at the entry mask.Click <a href="/index.php?title=Semen_counter">here</a>, to get more information about it. |
| Get more information about quality assessment, <a href="/index.php?title=Quality_assessment">here</a>. |
Buttons with a blue dotted frame have special functionalities. Click on it to have more information.
| <a href="/index.php?title=Freezing_a_new_sample#Freezing_a_sperm_sample"><img style="display: block; margin-left: auto; margin-right: auto; border: 2px dotted blue;" src="/images/CryoCryo.png" alt="" width="77" height="56" /></a> |
If you wish to freeze collected sperm samples, press this button. Confirm the dialog box "Do you want to cryopreserve samples from this semen analysis?" by pressing the "Yes" button. |
| <a href="/index.php?title=Cryo_storage"><img style="display: block; margin-left: auto; margin-right: auto; border: 2px dotted blue;" src="/images/Semen123.png" alt="" width="77" height="54" /></a> |
Thaw a sample from the cryo storage. |
| <img src="/images/GenerateLetter.png" alt="" width="205" height="29" /> | Generate and print a standard semen analysis letter. |
| <img style="display: block; margin-left: auto; margin-right: auto;" src="/images/ChangePatient.png" alt="" width="198" height="29" /> | By clicking on this icon it is possible to freeze a new sample for any selected patient. It is also possible to skip to the latest frozen material for any selected patient by clicking on the right black arrow and selecting the relevant option. |
Enter all necessary data and confirm by pressing OK.
In the window Semen analysis you can document the findings.
- In the overview of the main window Semen analysis, all semen analysis will be displayed (sorted by date). Their respective statuses can be seen on the right side of the overview.
- Entries in the overview can be sorted or filtered by clicking the column headers. They can also be grouped by dragging them to the desired position. The changes will be saved and will not be lost.
- Semen analysis can be edited again by double-clicking them.
| <img src="/images/plus48.png" alt="" width="48" height="48" /> | Change the options of the smell in the <a href="/index.php?title=MedITEX_IVF_Settings#System_tables">system tables</a> in the settings. |
| <a href="/index.php?title=MedITEX_IVF_manual">Back to the MedITEX IVF menu </a> | <a href="#top">Back to top</a> |