How to reserve straws?
From MedITEX - Wiki
(Difference between revisions)
| (One intermediate revision by one user not shown) | |||
| Line 1: | Line 1: | ||
| − | <p> | + | <p> </p> |
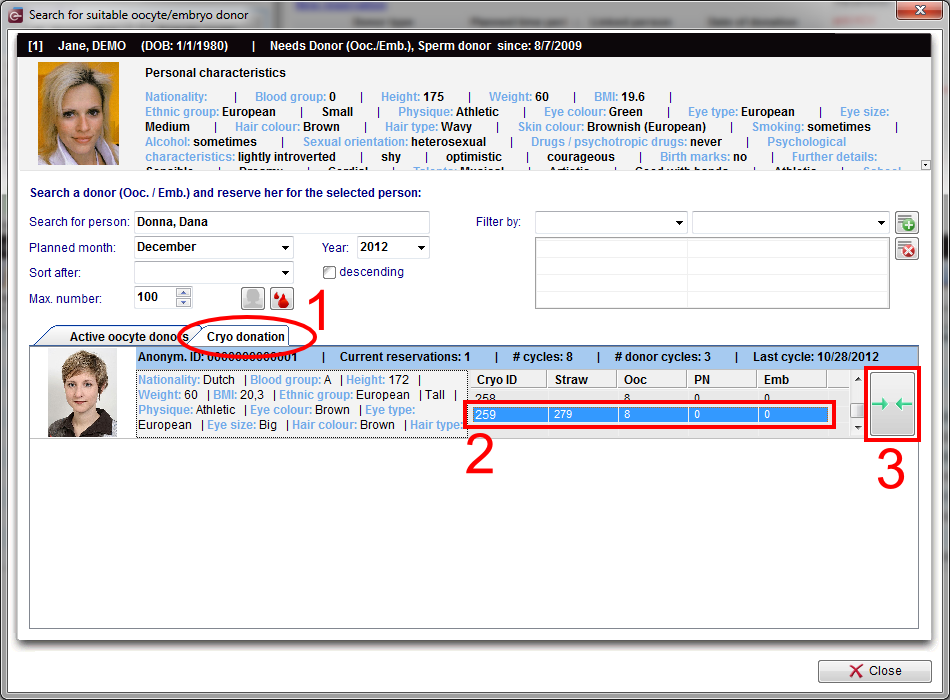
<p>On the recipient’s main screen, open <strong>Matcher</strong> (<strong>Donor info</strong> -> <strong>New </strong>reservation). On the <strong>Cryo donation</strong> tab (1) search the donor you need and choose the straws you want to have reserved (2). Click on the matcher button (3).</p> | <p>On the recipient’s main screen, open <strong>Matcher</strong> (<strong>Donor info</strong> -> <strong>New </strong>reservation). On the <strong>Cryo donation</strong> tab (1) search the donor you need and choose the straws you want to have reserved (2). Click on the matcher button (3).</p> | ||
<table style="margin-left: auto; margin-right: auto;" border="0"> | <table style="margin-left: auto; margin-right: auto;" border="0"> | ||
| Line 32: | Line 32: | ||
</table> | </table> | ||
<p> </p> | <p> </p> | ||
| − | |||
| − | |||
| − | |||
| − | |||
| − | |||
| − | |||
| − | |||
| − | |||
| − | |||
| − | |||
| − | |||
| − | |||
| − | |||
| − | |||
| − | |||
| − | |||
| − | |||
| − | |||
| − | |||
| − | |||
| − | |||
| − | |||
| − | |||
| − | |||
| − | |||
| − | |||
| − | |||
| − | |||
| − | |||
| − | |||
| − | |||
| − | |||
| − | |||
| − | |||
| − | |||
| − | |||
| − | |||
| − | |||
| − | |||
| − | |||
| − | |||
| − | |||
| − | |||
| − | |||
| − | |||
| − | |||
| − | |||
| − | |||
| − | |||
| − | |||
| − | |||
| − | |||
| − | |||
<table style="float: right;" border="0"> | <table style="float: right;" border="0"> | ||
<tbody> | <tbody> | ||
Latest revision as of 16:16, 10 January 2013
On the recipient’s main screen, open Matcher (Donor info -> New reservation). On the Cryo donation tab (1) search the donor you need and choose the straws you want to have reserved (2). Click on the matcher button (3).
 |
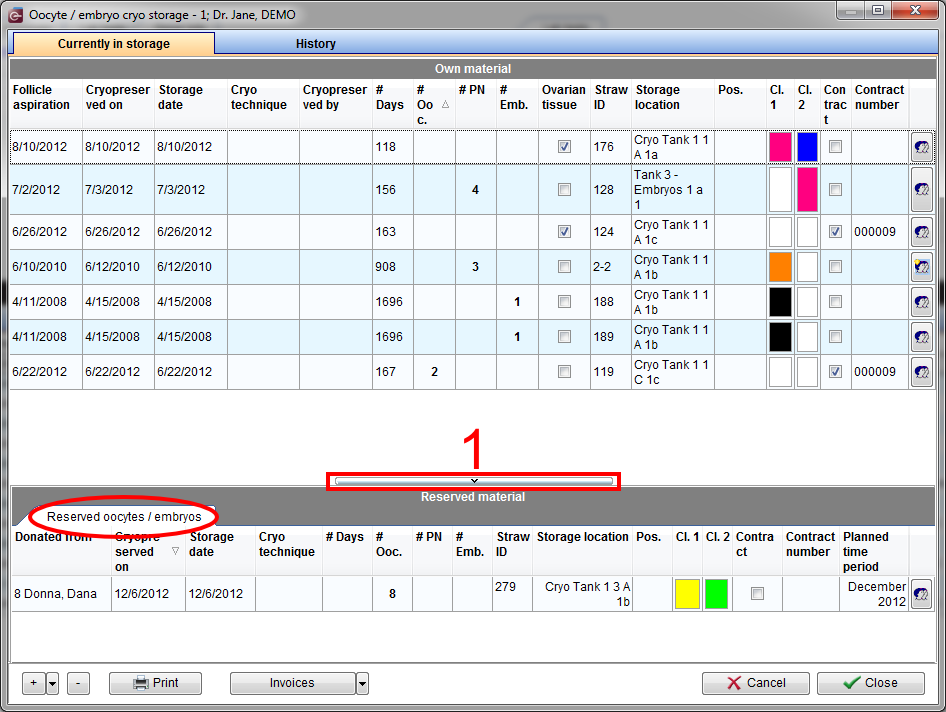
Now we are able to see the reserved straws in the recipient’s cryo area. From the patient’s main screen, double-click the blue area.
| <img src="/images/DonationCryo7Red.png" alt="" width="277" height="321" /> |
If the Reserved material area is not visible, click on the bar at the bottom of the window (1).
 |
| <a href="/index.php?title=MedITEX_IVF_how_to">Back to the How to</a> | <a href="#top">Back to top</a> |