How to make a patient become a donor?
From MedITEX - Wiki
(Difference between revisions)
| (One intermediate revision by one user not shown) | |||
| Line 8: | Line 8: | ||
</table> | </table> | ||
<p> </p> | <p> </p> | ||
| − | < | + | <h2>Female donor</h2> |
<p>On the opened window <strong>Person and donor information</strong>, you need to check that the <strong><span style="text-decoration: underline;">Person is:</span> Donor (Ooc./Emb.)</strong>.</p> | <p>On the opened window <strong>Person and donor information</strong>, you need to check that the <strong><span style="text-decoration: underline;">Person is:</span> Donor (Ooc./Emb.)</strong>.</p> | ||
<table style="margin-left: auto; margin-right: auto;" border="0"> | <table style="margin-left: auto; margin-right: auto;" border="0"> | ||
| Line 18: | Line 18: | ||
</table> | </table> | ||
<p> </p> | <p> </p> | ||
| − | < | + | <h2>Male donor</h2> |
<p>On the opened window <strong>Person and donor information</strong> you have only one option. Check that the <strong><span style="text-decoration: underline;">Person is:</span> Sperm donor</strong>.</p> | <p>On the opened window <strong>Person and donor information</strong> you have only one option. Check that the <strong><span style="text-decoration: underline;">Person is:</span> Sperm donor</strong>.</p> | ||
<table style="margin-left: auto; margin-right: auto;" border="0"> | <table style="margin-left: auto; margin-right: auto;" border="0"> | ||
| Line 29: | Line 29: | ||
<p> </p> | <p> </p> | ||
<p> </p> | <p> </p> | ||
| − | < | + | <h2>New donation fields</h2> |
<p>Following fields will be created after you have selected a donor option.</p> | <p>Following fields will be created after you have selected a donor option.</p> | ||
| − | + | <table border="0"> | |
| − | <table | + | |
<tbody> | <tbody> | ||
<tr> | <tr> | ||
| − | <td><img src="/images/MainDonorRed.png" alt="" width=" | + | <td><img style="display: block; margin-left: auto; margin-right: auto;" src="/images/MainDonorRed.png" alt="" width="250" height="299" /></td> |
<td> | <td> | ||
<p><strong>Main window:</strong></p> | <p><strong>Main window:</strong></p> | ||
| Line 42: | Line 41: | ||
</tr> | </tr> | ||
<tr> | <tr> | ||
| − | <td><img src="/images/ForDonation.png" alt="" width=" | + | <td><img src="/images/ForDonation.png" alt="" width="550" height="404" /></td> |
<td> | <td> | ||
<p><strong>Cryopreservation input mask:</strong></p> | <p><strong>Cryopreservation input mask:</strong></p> | ||
| Line 51: | Line 50: | ||
</table> | </table> | ||
<p> </p> | <p> </p> | ||
| − | + | <table style="float: right;" border="0" width="199" height="37"> | |
| − | <table style="float: right;" border="0" width=" | + | |
<tbody> | <tbody> | ||
<tr> | <tr> | ||
Latest revision as of 10:44, 21 May 2013
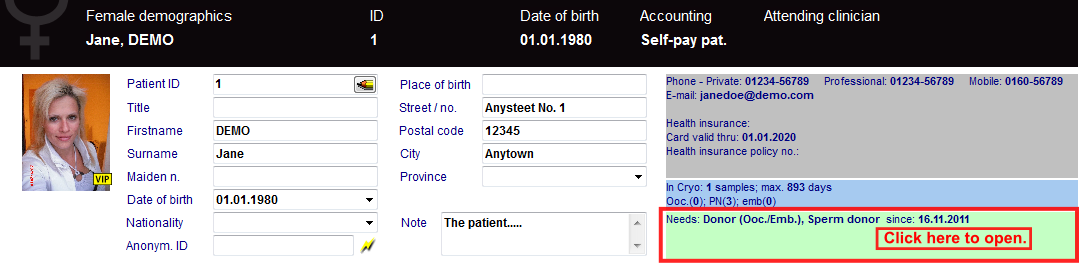
Click on Demographics (female or male) then, double-click the green area on the right.
 |
Female donor
On the opened window Person and donor information, you need to check that the Person is: Donor (Ooc./Emb.).
| <img src="/images/PandDInfo1.1Red.png" alt="" width="612" height="184" /> |
Male donor
On the opened window Person and donor information you have only one option. Check that the Person is: Sperm donor.
| <img src="/images/PandDInfo1.2Red.png" alt="" width="584" height="55" /> |
New donation fields
Following fields will be created after you have selected a donor option.
| <img style="display: block; margin-left: auto; margin-right: auto;" src="/images/MainDonorRed.png" alt="" width="250" height="299" /> |
Main window: Once donor options have been checked, this information will also be displayed at the patient’s main window. |
| <img src="/images/ForDonation.png" alt="" width="550" height="404" /> |
Cryopreservation input mask: After selecting a "Person is donor" field, you can choose "For donation" at the cryopreservation mask. |
| <a href="/index.php?title=MedITEX_IVF_how_to">Back to the How to</a> | <a href="#top">Back to top</a> |