How to donate fresh oocytes (2) or embryos?
From MedITEX - Wiki
| Line 1: | Line 1: | ||
| − | a | + | <p>In order to donate fresh oocytes, a few prerequisites need to be fulfilled.</p> |
| + | <h3>Donor</h3> | ||
| + | <p>The option <strong><span style="text-decoration: underline;">Person is:</span> Donor (Ooc./Emb.) </strong>needs to be checked for the donor of the oocytes. These are the steps:<strong><br /></strong></p> | ||
| + | <ul> | ||
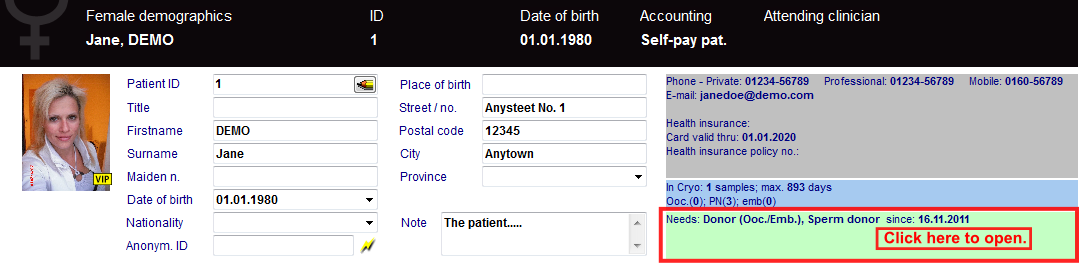
| + | <li>Click on <strong>Demographics </strong>(female) then, double-click the green area on the right.</li> | ||
| + | </ul> | ||
| + | <table style="margin-left: auto; margin-right: auto;" border="0"> | ||
| + | <tbody> | ||
| + | <tr> | ||
| + | <td>[[Image:DemographicsDonorRed.png|none|740px|thumb|left|link=http://wiki.meditex-software.com/images/DemographicsDonorRed.png|]]</td> | ||
| + | </tr> | ||
| + | </tbody> | ||
| + | </table> | ||
| + | <ul> | ||
| + | <li>On the opened window <strong>Person and donor information</strong>, you need to check that the <strong><span style="text-decoration: underline;">Person is:</span> Donor (Ooc./Emb.)</strong>.</li> | ||
| + | </ul> | ||
| + | <table style="margin-left: auto; margin-right: auto;" border="0"> | ||
| + | <tbody> | ||
| + | <tr> | ||
| + | <td><img src="/images/PandDInfo1.1Red.png" alt="" width="612" height="184" /></td> | ||
| + | </tr> | ||
| + | </tbody> | ||
| + | </table> | ||
| + | <p> </p> | ||
| + | <p>Change to the recipient patient.</p> | ||
| + | <p> </p> | ||
| + | <h3>Recipient</h3> | ||
| + | <p>The option <strong><span style="text-decoration: underline;">Person needs:</span></strong> <strong>Donor (Ooc./Emb.) </strong>needs to be checked for the recipient of the oocytes. These are the steps:</p> | ||
| + | <ul> | ||
| + | <li>Click on <strong>Demographics </strong>(female) then, double-click the green area on the right.</li> | ||
| + | </ul> | ||
| + | <table style="margin-left: auto; margin-right: auto;" border="0"> | ||
| + | <tbody> | ||
| + | <tr> | ||
| + | <td>[[Image:DemographicsDonorRed.png|none|740px|thumb|left|link=http://wiki.meditex-software.com/images/DemographicsDonorRed.png|]]</td> | ||
| + | </tr> | ||
| + | </tbody> | ||
| + | </table> | ||
| + | <ul> | ||
| + | <li>On the opened window <strong>Person and donor information</strong>, you need to check that the <strong><span style="text-decoration: underline;">Person needs:</span></strong> <strong>Donor (Ooc./Emb.)</strong>.</li> | ||
| + | </ul> | ||
| + | <table style="margin-left: auto; margin-right: auto;" border="0"> | ||
| + | <tbody> | ||
| + | <tr> | ||
| + | <td><img src="/images/PandDInfo1.3Red.png" alt="" width="612" height="184" /></td> | ||
| + | </tr> | ||
| + | </tbody> | ||
| + | </table> | ||
| + | <p> </p> | ||
| + | <h2>Matching donor and recipient</h2> | ||
| + | <p>After you activate the donation functionality for a patient, you will be able to see a new tab on main screen called <strong>Donor info</strong>. You can match patients with donors (and vice versa) from here by clicking on <span style="text-decoration: underline;"><strong>New reservation</strong></span>.</p> | ||
| + | <p>Matcher will open.</p> | ||
| + | <table style="margin-left: auto; margin-right: auto;" border="0"> | ||
| + | <tbody> | ||
| + | <tr> | ||
| + | <td><img src="/images/DonationNewReservationRed.png" alt="" width="573" height="327" /></td> | ||
| + | </tr> | ||
| + | </tbody> | ||
| + | </table> | ||
| + | <p> </p> | ||
| + | <p>On the <strong>Active oocyte donors</strong> tab we can select a donor by searching (1) or filtering (2) it. After we have found a suitable donor, we need to click on the matching button (3).</p> | ||
| + | <table style="margin-left: auto; margin-right: auto;" border="0"> | ||
| + | <tbody> | ||
| + | <tr> | ||
| + | <td>[[Image:DonationMatcherOocyteRed.png|none|740px|thumb|left|link=http://wiki.meditex-software.com/images/DonationMatcherOocyteRed.png|]]</td> | ||
| + | </tr> | ||
| + | </tbody> | ||
| + | </table> | ||
| + | <p> </p> | ||
| + | <p>Once we have created the match, we can see it on main screen and even open (right-click) the respective donor or cycle (if it exists).</p> | ||
| + | <table style="margin-left: auto; margin-right: auto;" border="0"> | ||
| + | <tbody> | ||
| + | <tr> | ||
| + | <td><img src="/images/DonationDonorInfoOocyteRed.png" alt="" width="437" height="162" /></td> | ||
| + | </tr> | ||
| + | </tbody> | ||
| + | </table> | ||
| + | <p> </p> | ||
| + | <h2>Cycles</h2> | ||
| + | <p>After matching donors, we need to match cycles.</p> | ||
| + | <p>To create a cycle, click on the '<strong>+</strong>' button at the bottom left corner of the main patient's window.</p> | ||
| + | <table style="margin-left: auto; margin-right: auto;" border="0"> | ||
| + | <tbody> | ||
| + | <tr> | ||
| + | <td>[[Image:MainWindowNewCycleRed.png|none|740px|thumb|left|link=http://wiki.meditex-software.com/images/MainWindowNewCycleRed.png|]]</td> | ||
| + | </tr> | ||
| + | </tbody> | ||
| + | </table> | ||
| + | <p> </p> | ||
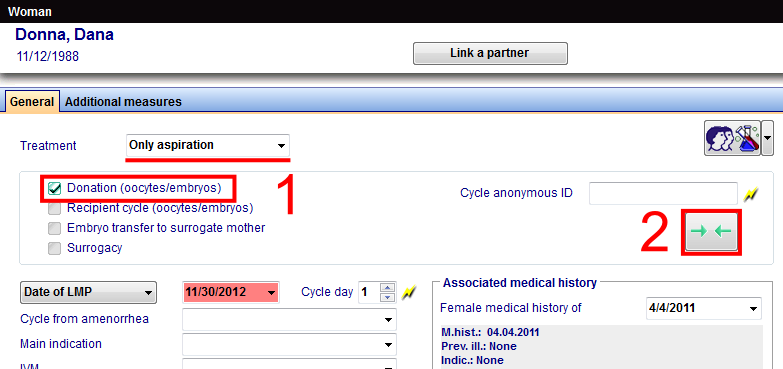
| + | <p>You will have to create two cycles: one for the donor, one for the recipient. When creating the donor’s cycle, you need to select <strong>IVF/ICSI</strong> and check <strong>Donation (Ooc/Emb)</strong> (1). You can create the recipient’s cycle directly from here by clicking on the <strong>Matcher</strong> button (2).</p> | ||
| + | <table style="margin-left: auto; margin-right: auto;" border="0"> | ||
| + | <tbody> | ||
| + | <tr> | ||
| + | <td> | ||
| + | <p>[[Image:DonationCycleMatchingDonorRed.png|none|740px|thumb|left|link=http://wiki.meditex-software.com/images/DonationCycleMatchingDonorRed.png|]]</p> | ||
| + | </td> | ||
| + | </tr> | ||
| + | </tbody> | ||
| + | </table> | ||
| + | <p> </p> | ||
| + | <p>In this mask you can select which cycle to link. But as we do not have a cycle for a recipient yet, we can create it by clicking on the <strong>Matcher</strong> button (1) or by double-clicking on the grey area (2).</p> | ||
| + | <table style="margin-left: auto; margin-right: auto;" border="0"> | ||
| + | <tbody> | ||
| + | <tr> | ||
| + | <td><img src="/images/LinkRecipientForDonorRed.png" alt="" width="703" height="314" /></td> | ||
| + | </tr> | ||
| + | </tbody> | ||
| + | </table> | ||
| + | <p> </p> | ||
| + | <p>On this new window (for the recipient), you just need to select IVF/ICSI cycle and set a date. <strong>Reception (Ooc/Emb)</strong> must be automatically checked.</p> | ||
| + | <table style="margin-left: auto; margin-right: auto;" border="0"> | ||
| + | <tbody> | ||
| + | <tr> | ||
| + | <td><img src="/images/LinkRecipientForRecipientRed.png" alt="" width="421" height="281" /></td> | ||
| + | </tr> | ||
| + | </tbody> | ||
| + | </table> | ||
| + | <p> </p> | ||
| + | <p>Now, both cycles are linked. You can see an icon (1) that represents this link. But, before the transfer of embryos is performed, you can undo this procedure (linking another cycle) by pressing the <strong>Matcher</strong> button (2).</p> | ||
| + | <table style="margin-left: auto; margin-right: auto;" border="0"> | ||
| + | <tbody> | ||
| + | <tr> | ||
| + | <td><img src="/images/PatientsLinkedRed.png" alt="" width="703" height="314" /></td> | ||
| + | </tr> | ||
| + | </tbody> | ||
| + | </table> | ||
| + | <p> </p> | ||
| + | <p>We have linked patients and their cycles. We can proceed to the follicle aspiration procedure.</p> | ||
Revision as of 12:46, 5 December 2012
In order to donate fresh oocytes, a few prerequisites need to be fulfilled.
Contents |
Donor
The option Person is: Donor (Ooc./Emb.) needs to be checked for the donor of the oocytes. These are the steps:
- Click on Demographics (female) then, double-click the green area on the right.
 |
- On the opened window Person and donor information, you need to check that the Person is: Donor (Ooc./Emb.).
| <img src="/images/PandDInfo1.1Red.png" alt="" width="612" height="184" /> |
Change to the recipient patient.
Recipient
The option Person needs: Donor (Ooc./Emb.) needs to be checked for the recipient of the oocytes. These are the steps:
- Click on Demographics (female) then, double-click the green area on the right.
| |
- On the opened window Person and donor information, you need to check that the Person needs: Donor (Ooc./Emb.).
| <img src="/images/PandDInfo1.3Red.png" alt="" width="612" height="184" /> |
Matching donor and recipient
After you activate the donation functionality for a patient, you will be able to see a new tab on main screen called Donor info. You can match patients with donors (and vice versa) from here by clicking on New reservation.
Matcher will open.
| <img src="/images/DonationNewReservationRed.png" alt="" width="573" height="327" /> |
On the Active oocyte donors tab we can select a donor by searching (1) or filtering (2) it. After we have found a suitable donor, we need to click on the matching button (3).
 |
Once we have created the match, we can see it on main screen and even open (right-click) the respective donor or cycle (if it exists).
| <img src="/images/DonationDonorInfoOocyteRed.png" alt="" width="437" height="162" /> |
Cycles
After matching donors, we need to match cycles.
To create a cycle, click on the '+' button at the bottom left corner of the main patient's window.
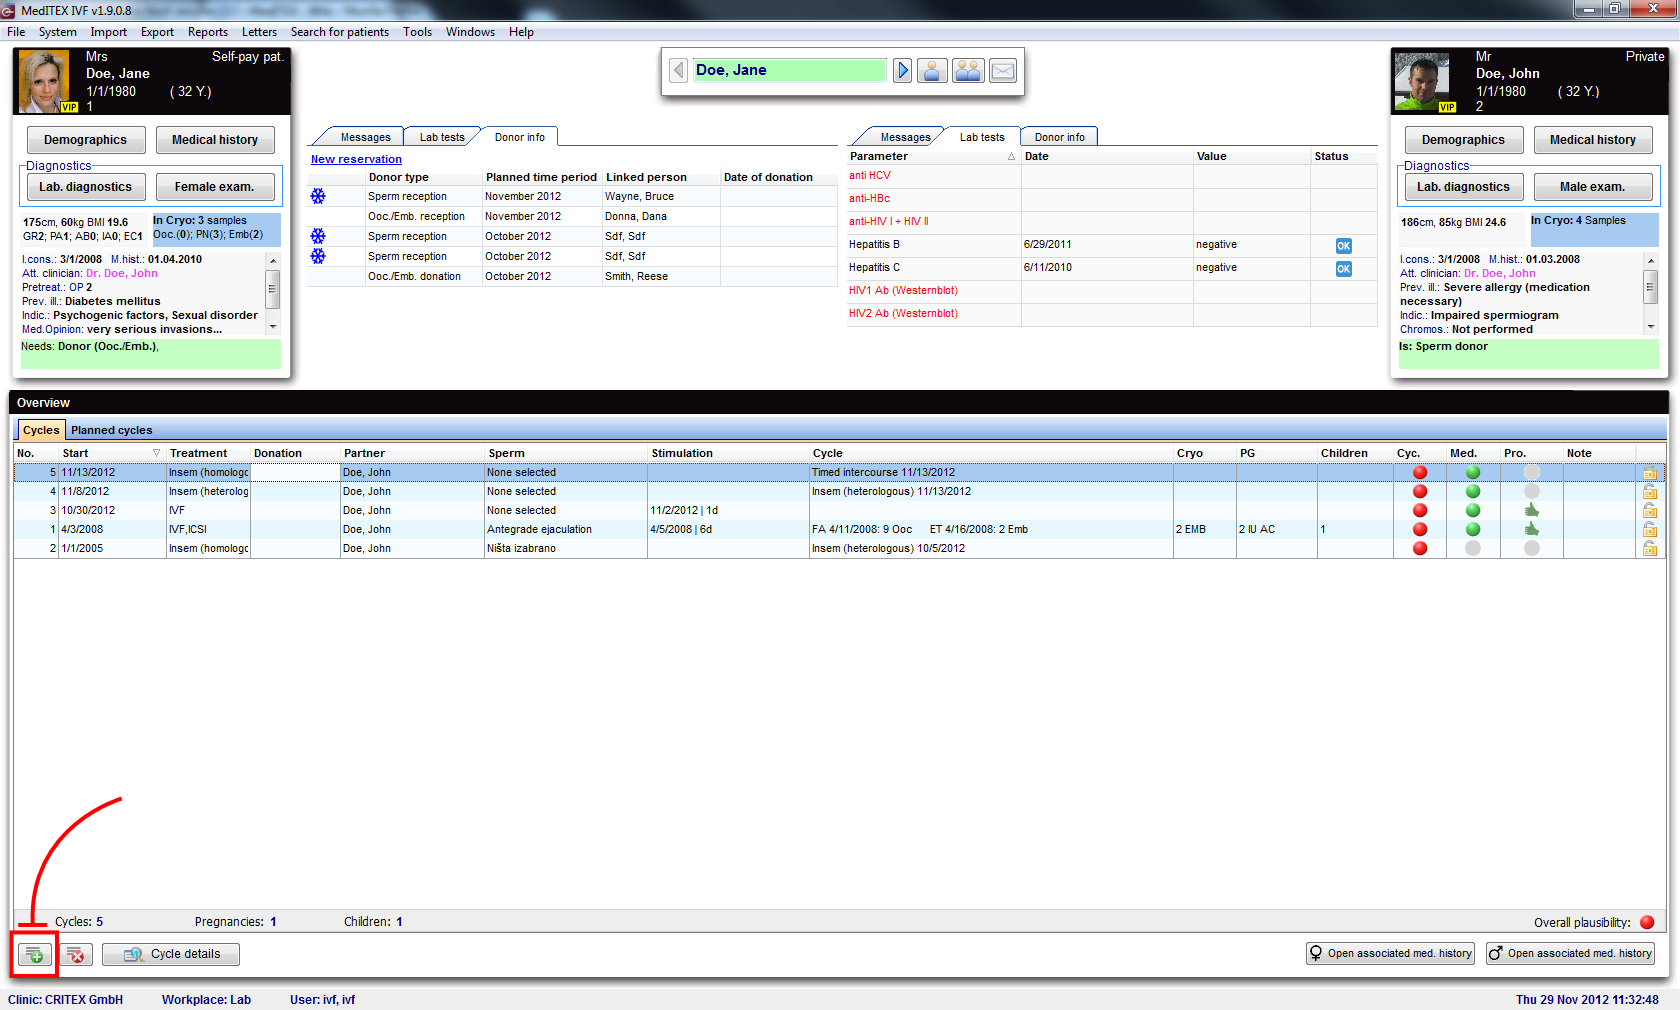 |
You will have to create two cycles: one for the donor, one for the recipient. When creating the donor’s cycle, you need to select IVF/ICSI and check Donation (Ooc/Emb) (1). You can create the recipient’s cycle directly from here by clicking on the Matcher button (2).
 |
In this mask you can select which cycle to link. But as we do not have a cycle for a recipient yet, we can create it by clicking on the Matcher button (1) or by double-clicking on the grey area (2).
| <img src="/images/LinkRecipientForDonorRed.png" alt="" width="703" height="314" /> |
On this new window (for the recipient), you just need to select IVF/ICSI cycle and set a date. Reception (Ooc/Emb) must be automatically checked.
| <img src="/images/LinkRecipientForRecipientRed.png" alt="" width="421" height="281" /> |
Now, both cycles are linked. You can see an icon (1) that represents this link. But, before the transfer of embryos is performed, you can undo this procedure (linking another cycle) by pressing the Matcher button (2).
| <img src="/images/PatientsLinkedRed.png" alt="" width="703" height="314" /> |
We have linked patients and their cycles. We can proceed to the follicle aspiration procedure.