How to customize the Cycle Summary?
From MedITEX - Wiki
| (10 intermediate revisions by one user not shown) | |||
| Line 21: | Line 21: | ||
</tr> | </tr> | ||
<tr> | <tr> | ||
| − | <td style="text-align: center;"><img src="/images/CS91.png" alt="" width=" | + | <td style="text-align: center;"><img src="/images/CS91.png" alt="" width="500" height="206" /><br /></td> |
<td style="text-align: justify;">With the buttons <img src="/images/CS2.png" alt="" width="16" height="16" /> (Collapse) and <img src="/images/CS3.png" alt="" /> (Expand) you can hide or show the content of an area.</td> | <td style="text-align: justify;">With the buttons <img src="/images/CS2.png" alt="" width="16" height="16" /> (Collapse) and <img src="/images/CS3.png" alt="" /> (Expand) you can hide or show the content of an area.</td> | ||
</tr> | </tr> | ||
| Line 27: | Line 27: | ||
</table> | </table> | ||
<p> </p> | <p> </p> | ||
| − | <p>At the menu point <strong>Layout</strong>, you have the possibility to customize, save, load or reset the layout.</p> | + | <p> </p> |
| + | <p>At the menu point <strong>Layout</strong>, you have the possibility to <strong>customize, save, load</strong> or <strong>reset </strong>the layout.</p> | ||
| + | <p>At this point, we will explain you<strong> how to customize the layout</strong>.</p> | ||
| + | <p>If you click on <strong>Customize layout</strong> the smaller<strong> Customize window</strong> will opened additionally.</p> | ||
<table style="margin-left: auto; margin-right: auto;" border="0"> | <table style="margin-left: auto; margin-right: auto;" border="0"> | ||
<tbody> | <tbody> | ||
| Line 35: | Line 38: | ||
</tbody> | </tbody> | ||
</table> | </table> | ||
| − | |||
| − | |||
| − | |||
<p> </p> | <p> </p> | ||
<h3>Customize</h3> | <h3>Customize</h3> | ||
| − | <p>You can choose between two views:</p> | + | <p>You can choose between <strong>two views</strong>:</p> |
<ul> | <ul> | ||
<li>the <strong>window view</strong> with two windows side-by-side.</li> | <li>the <strong>window view</strong> with two windows side-by-side.</li> | ||
| Line 56: | Line 56: | ||
</tbody> | </tbody> | ||
</table> | </table> | ||
| + | <p><strong>In each view you can see two areas:</strong></p> | ||
| + | <ul> | ||
| + | <li>Layout tree view </li> | ||
| + | <li>Available items</li> | ||
| + | </ul> | ||
<p> </p> | <p> </p> | ||
| − | |||
<h4>Layout Tree View</h4> | <h4>Layout Tree View</h4> | ||
<p>Here you can see the layout tree with <strong>all items of your current cycle summary</strong>.</p> | <p>Here you can see the layout tree with <strong>all items of your current cycle summary</strong>.</p> | ||
| − | <p><strong>Select a title in | + | <p><strong>Select a title in your customize window</strong> (with one click) and the <strong>associated field </strong>in the <strong>cycle summary window will be selected</strong> too. Conversely applies the same rule. If you select an area in the cycle summary window, jumps the layout tree view to this position in the list.</p> |
| − | <p>This function | + | <p>This function makes it easy to find the right place for the wished changes.</p> |
<p> </p> | <p> </p> | ||
<h4>Available Items</h4> | <h4>Available Items</h4> | ||
<p>In this list you see all available Items, which are <strong>currently not used in the cycle summary</strong>.</p> | <p>In this list you see all available Items, which are <strong>currently not used in the cycle summary</strong>.</p> | ||
<p>If you <strong>wish to add</strong> an item to the layout tree, do it with <strong>drag and drop</strong>. Click on it and set it into the wished area.</p> | <p>If you <strong>wish to add</strong> an item to the layout tree, do it with <strong>drag and drop</strong>. Click on it and set it into the wished area.</p> | ||
| − | <p>For removing fields out of the layout tree, the same rule applies (only from left to the right).The right window will be ordered automatically alphabetically | + | <p>For removing fields out of the layout tree, the same rule applies (only from left to the right).The right window will be ordered automatically alphabetically.</p> |
<p> </p> | <p> </p> | ||
<h4>Explanation of the buttons</h4> | <h4>Explanation of the buttons</h4> | ||
| Line 114: | Line 118: | ||
</table> | </table> | ||
<p> </p> | <p> </p> | ||
| − | <h3 style="text-align: justify;"> | + | <h3 style="text-align: justify;">Detailed descriptions</h3> |
<table border="0"> | <table border="0"> | ||
<tbody> | <tbody> | ||
Latest revision as of 12:04, 17 June 2013
Contents |
This functionality is accessible at the menu bar. Go to Reports -> Cycle summary.
 |
Helpful functionalities
| <img src="/images/CS90.png" alt="" width="435" height="161" /> |
The only possibilities to change something in this window, is to modify the table arrangement with a click on the head of a column or to filter it with a click on the arrow beside. |
| <img src="/images/CS91.png" alt="" width="500" height="206" /> |
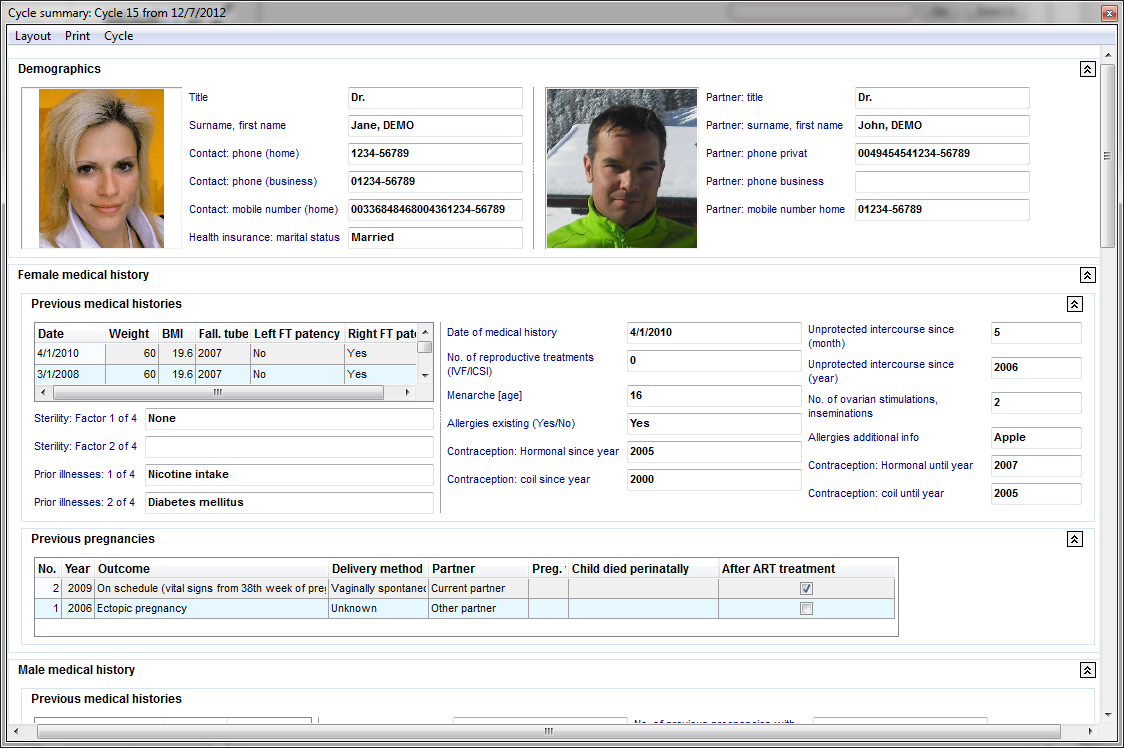
With the buttons <img src="/images/CS2.png" alt="" width="16" height="16" /> (Collapse) and <img src="/images/CS3.png" alt="" /> (Expand) you can hide or show the content of an area. |
At the menu point Layout, you have the possibility to customize, save, load or reset the layout.
At this point, we will explain you how to customize the layout.
If you click on Customize layout the smaller Customize window will opened additionally.
| <img src="/images/CS411.png" alt="" width="304" height="149" /> |
Customize
You can choose between two views:
- the window view with two windows side-by-side.
- the tabbed view with two tabs consecutive.
You can change them with the little tickmark in the left corner.
| <img style="display: block; margin-left: auto; margin-right: auto;" src="/images/CS51.png" alt="" width="350" /> | <img style="display: block; margin-left: auto; margin-right: auto;" src="/images/CS6.png" alt="" width="350" height="375" /> |
In each view you can see two areas:
- Layout tree view
- Available items
Layout Tree View
Here you can see the layout tree with all items of your current cycle summary.
Select a title in your customize window (with one click) and the associated field in the cycle summary window will be selected too. Conversely applies the same rule. If you select an area in the cycle summary window, jumps the layout tree view to this position in the list.
This function makes it easy to find the right place for the wished changes.
Available Items
In this list you see all available Items, which are currently not used in the cycle summary.
If you wish to add an item to the layout tree, do it with drag and drop. Click on it and set it into the wished area.
For removing fields out of the layout tree, the same rule applies (only from left to the right).The right window will be ordered automatically alphabetically.
Explanation of the buttons
| <img style="display: block; margin-left: auto; margin-right: auto;" src="/images/CS7.png" alt="" width="15" height="13" /> | Undo: undoes the last procedure. |
| <img style="display: block; margin-left: auto; margin-right: auto;" src="/images/CS8.png" alt="" width="15" height="13" /> | Redo: redoes the last procedure. |
| <img style="display: block; margin-left: auto; margin-right: auto;" src="/images/CS9.png" alt="" width="16" height="16" /> | Store Layout: saves the layout after it has been customized. |
| <img style="display: block; margin-left: auto; margin-right: auto;" src="/images/CS10.png" alt="" width="16" height="16" /> | Restore Layout: after saving the layout, clicking on this button will restore it to the previous state. |
| <img style="display: block; margin-left: auto; margin-right: auto;" src="/images/CS12.png" alt="" width="16" height="16" /> | Collapse All: hides the hierarchy of the tree. |
| <img style="display: block; margin-left: auto; margin-right: auto;" src="/images/CS11.png" alt="" width="16" height="16" /> | Expand All: shows the hierarchy of the tree. |
| <img style="display: block; margin-left: auto; margin-right: auto;" src="/images/CS13.png" alt="" width="16" height="16" /> | Delete: this button is only active if you create a new group or auxiliary item. It deletes these newly created groups/items. |
| <img style="display: block; margin-left: auto; margin-right: auto;" src="/images/CS15.png" alt="" width="16" height="16" /> | Add Group: adds a new group. The use of this functionality is not advisable. Instead, use the already available groups. |
| <img style="display: block; margin-left: auto; margin-right: auto;" src="/images/CS14.png" alt="" width="16" height="16" /> | Add Auxiliary Item: adds a new auxiliary item. The use of this functionality is not advisable. Instead, use the already available items. |
| <img style="display: block; margin-left: auto; margin-right: auto;" src="/images/CS16.png" alt="" width="23" height="20" /> | View as Tree / Plain List: changes the layout of the Available Items. |
Detailed descriptions
| <img style="display: block; margin-left: auto; margin-right: auto;" src="/images/plus48.png" alt="" width="48" height="48" /> |
<a href="/index.php?title=How to change the size of fields / areas?">How to change the size of fields / areas?</a> <a href="/index.php?title=How to add an item / field to the cycle summary?">How to add an item / field to the cycle summary?</a> <a href="/index.php?title=How to delete an item / field from the cycle summary?">How to delete an item / field from the cycle summary?</a> <a href="/index.php?title=How to change the position of an item?">How to change the position of an item?</a> |
| <a href="/index.php?title=MedITEX_IVF_how_to">Back to How to</a> | <a href="#top">Back to top</a> |