How to create a new query?
From MedITEX - Wiki
| (17 intermediate revisions by 2 users not shown) | |||
| Line 1: | Line 1: | ||
| − | <p> | + | <p>To open <strong>Report editor</strong>, go to <strong>Reports -> Report editor </strong>in the menu bar.</p> |
| − | < | + | <table style="margin-left: auto; margin-right: auto;" border="0"> |
| − | + | ||
| − | < | + | |
| − | + | ||
<tbody> | <tbody> | ||
<tr> | <tr> | ||
| − | <td colspan=" | + | <td colspan="2"><img style="display: block; margin-left: auto; margin-right: auto;" src="/images/ReportEd.png" alt="" /></td> |
| − | < | + | |
| − | + | ||
| − | </td> | + | |
</tr> | </tr> | ||
<tr> | <tr> | ||
| − | <td><img src="/images/ | + | <td><img style="display: block; margin-left: auto; margin-right: auto;" src="/images/plus48.png" alt="" width="48" height="48" /></td> |
| − | <td> | + | <td><a href="/index.php?title=Queries_of_Report_editor">Read here</a> more about the queries of the report editor.</td> |
| − | + | ||
| − | + | ||
</tr> | </tr> | ||
| + | </tbody> | ||
| + | </table> | ||
| + | <p> </p> | ||
| + | <p><strong>Report editor</strong> will open.</p> | ||
| + | <table style="margin-left: auto; margin-right: auto;" border="0"> | ||
| + | <tbody> | ||
<tr> | <tr> | ||
| − | <td> | + | <td>[[Image:REWindowShort.png|none|740px|thumb|left|link=http://wiki.meditex-software.com/images/REWindowShort.png| ]]</td> |
| − | + | ||
| − | + | ||
| − | + | ||
</tr> | </tr> | ||
| + | </tbody> | ||
| + | </table> | ||
| + | <p>__TOC__</p> | ||
| + | <h2>Selecting the needed fields</h2> | ||
| + | <p>To select the fields in order to <strong>build a query</strong> you need to browse the content of the subgroups.</p> | ||
| + | <p>If you <strong>double-click on a group</strong> you will see <strong>all available sub-groups</strong>.</p> | ||
| + | <p><strong>Double-click a sub-group</strong> and you will see <strong>all fields that are available</strong> in this sub-group.</p> | ||
| + | <table style="margin-left: auto; margin-right: auto;" border="0"> | ||
| + | <tbody> | ||
<tr> | <tr> | ||
| − | <td> | + | <td>[[Image:REGroups.png|none|740px|thumb|left|link=http://wiki.meditex-software.com/images/REGroups.png| ]]</td> |
| − | + | ||
| − | + | ||
| − | + | ||
| − | + | ||
| − | + | ||
| − | + | ||
| − | + | ||
| − | + | ||
| − | + | ||
| − | + | ||
| − | + | ||
| − | + | ||
| − | + | ||
| − | + | ||
| − | + | ||
| − | + | ||
| − | + | ||
</tr> | </tr> | ||
</tbody> | </tbody> | ||
</table> | </table> | ||
<p> </p> | <p> </p> | ||
| − | <p>Alternatively you can search the field you need with a keyword search.</p> | + | <p>Alternatively you can <strong>search the field</strong> you need with a keyword search.</p> |
| − | <p>Assume you need to search a field related to the person | + | <p>For this example, we are going to create a <strong>Follicle Aspiration</strong> letter.</p> |
| − | <table border="0"> | + | <p>Assume you need to search a field related to the person name:</p> |
| + | <table style="margin-left: auto; margin-right: auto;" border="0"> | ||
<tbody> | <tbody> | ||
<tr> | <tr> | ||
| Line 55: | Line 43: | ||
</tbody> | </tbody> | ||
</table> | </table> | ||
| − | <p>Just type the keyword<strong> | + | <p> </p> |
| − | <p>The group containing | + | <p>Just type the keyword<strong> name</strong> in the <strong>Search field</strong> and press <strong>Enter</strong>. You will be provided with a list of fields that contain that keyword along with their groups and sub-groups. Choose the field you need and click on it.</p> |
| − | <p>Once you have found the sub-group containing the field(s) you need, drag the | + | <p>The group containing that field will open.</p> |
| − | <table border="0"> | + | <p>Once you have<strong> found the sub-group</strong> containing the field(s) you need, <strong>drag the sub-group</strong> from the <strong>Group</strong> list into the <strong>Area</strong> for queries.</p> |
| + | <table style="margin-left: auto; margin-right: auto;" border="0"> | ||
<tbody> | <tbody> | ||
<tr> | <tr> | ||
| Line 65: | Line 54: | ||
</tbody> | </tbody> | ||
</table> | </table> | ||
| − | <p>To select a field (i.e. the | + | <p> </p> |
| − | <table border="0" width="51" height="24"> | + | <p>To <strong>select a field</strong> (i.e.: the <strong>First name</strong> field) for the query, <strong>check the empty box</strong>. In order to build our Follicle aspiration discharge letter you may need to <strong>select other fields</strong> of this sub-group such as: <strong>Surname</strong>, <strong>Partner: surname</strong> and <strong>Partner: name</strong>.</p> |
| + | <table style="margin-left: auto; margin-right: auto;" border="0" width="51" height="24"> | ||
<tbody> | <tbody> | ||
<tr> | <tr> | ||
| − | <td><img src="/images/RE3.png" alt=" | + | <td><img src="/images/RE3.png" alt="" /><br /></td> |
</tr> | </tr> | ||
</tbody> | </tbody> | ||
</table> | </table> | ||
| − | <p>Let’s go on building our discharge letter. Since in the | + | <p> </p> |
| − | <table border="0"> | + | <p>Let’s go on building our discharge letter.</p> |
| + | <p>Since in the sub-group <strong>Person</strong>, you <strong>will not find fields related to the therapy</strong>, you will need to link to the sub-group <strong>Persons</strong>, the subgroup <strong>Cycle of women</strong> by dragging it from the <strong>Group </strong>list into the <strong>Area </strong>for queries as previously described.</p> | ||
| + | <p>Now the desired fields from the sub-group <strong>Cycle of women</strong> can be selected as seen above for the other fields. When all the needed fields from the sub-group <strong>Cycle of women</strong> have been selected, another sub-group, if necessary, shall be <strong>dragged and dropped</strong>. This process is repeated until the query is done.</p> | ||
| + | <table style="margin-left: auto; margin-right: auto;" border="0"> | ||
<tbody> | <tbody> | ||
<tr> | <tr> | ||
| − | <td><img src="/images/Person11RE.png" alt="" width="439" height="156" /> | + | <td><img style="display: block; margin-left: auto; margin-right: auto;" src="/images/Person11RE.png" alt="" width="439" height="156" /></td> |
| − | + | ||
</tr> | </tr> | ||
<tr> | <tr> | ||
| − | <td | + | <td> |
| − | < | + | <ul> |
| + | <li>Keep in mind that the <strong>order of the sub-groups added</strong> to a query <strong>has an effect</strong> on the way the <strong>results</strong> are displayed ("logical cascade"). In the example patients which have received cycles would be displayed after the query and not cycles that have been assigned to certain patients.</li> | ||
| + | </ul> | ||
| + | <ul> | ||
| + | <li>If a <strong>QM Field</strong> is created but it is not previously filled in, it won’t be available in the related <strong>Report Editor</strong> sub-group.</li> | ||
| + | </ul> | ||
</td> | </td> | ||
</tr> | </tr> | ||
| Line 88: | Line 85: | ||
</table> | </table> | ||
<p> </p> | <p> </p> | ||
| − | <h2>Defining fields | + | <h2>Defining fields conditions</h2> |
| − | <p>In some cases it could be useful to restrict | + | <p>In some cases it could be useful to<strong> restrict values</strong> of the selected fields to some conditions.</p> |
| − | <p>Simply double-click on the desired field name and the following window will open:</p> | + | <p><strong>For example,</strong> you may want to select only cycles where the number of collected oocytes is greater than 8.</p> |
| − | <table border="0"> | + | <p>Simply <strong>double-click</strong> on the desired field name and the following window will open:</p> |
| + | <table style="margin-left: auto; margin-right: auto;" border="0"> | ||
<tbody> | <tbody> | ||
<tr> | <tr> | ||
<td><img src="/images/RE4.png" alt="" width="390" height="404" /></td> | <td><img src="/images/RE4.png" alt="" width="390" height="404" /></td> | ||
<td colspan="2"> | <td colspan="2"> | ||
| − | <p>Press the | + | <p>Press the <strong>"+" button</strong> to <strong>add a new filter</strong> or <strong>condition</strong>.</p> |
| − | < | + | <p>Now you can <strong>add conditions</strong> and <strong>values accordingly</strong>.</p> |
| − | <p>Now you can add | + | <p>For this example, only cycles with more than 8 oocytes collected will be displayed.</p> |
| − | < | + | <p>To <strong>add another condition press the "+" button again</strong> and enter the information. If you wish to <strong>delete</strong> a condition or filter, <strong>select the condition</strong> in the list and press the <strong>"-" button</strong>.</p> |
| − | <p> | + | |
| − | <p> | + | |
| − | + | ||
</td> | </td> | ||
</tr> | </tr> | ||
<tr> | <tr> | ||
<td rowspan="3"><img src="/images/RE5.png" alt="" width="390" height="551" /></td> | <td rowspan="3"><img src="/images/RE5.png" alt="" width="390" height="551" /></td> | ||
| − | <td colspan="2">The following conditions can be defined:</td> | + | <td colspan="2"><strong>The following conditions can be defined:</strong></td> |
</tr> | </tr> | ||
<tr> | <tr> | ||
| Line 134: | Line 129: | ||
</tr> | </tr> | ||
<tr> | <tr> | ||
| − | <td colspan="2">If the selected field is a QM field, you can also enable or disable | + | <td colspan="2">If the selected field is a <strong>QM field</strong>, you can also <strong>enable </strong>or <strong>disable</strong> certain <strong>QM criterias</strong> (function, value, note, data, start and end) for the resulting table.</td> |
</tr> | </tr> | ||
</tbody> | </tbody> | ||
</table> | </table> | ||
| − | < | + | <ul> |
| − | < | + | <li>You can <strong>add </strong>and <strong>combine different conditions</strong> for any field. Two or more conditions may be linked logically with<strong> AND</strong> or <strong>OR </strong>when pre-filtering.</li> |
| − | < | + | <li>If you <strong>uncheck </strong>the box <strong>"and should appear in the results list"</strong>, your query will be filtered but the field itself will not be displayed in the list. This can help you to create arranged lists and statistics more clearly. <strong>Example:</strong> you wish to analyze only the male patients and limit the list to men.</li> |
| − | <p> | + | <li>You can also <strong>decide </strong>if the list of results should be <strong>automatically grouped by certain fields</strong>. To do so, simply check the box <strong>"and the result should be grouped by this field"</strong> when adding a condition. The order of your definition is decisive for the <strong>graphical representation</strong> of the resulting table.</li> |
| + | <li>If you select <strong>Query the field value before execution</strong>, you will be asked what value to use before running the query. This window is displayed below and you can change de value by clicking on the corresponding field.</li> | ||
| + | </ul> | ||
| + | <table style="margin-left: auto; margin-right: auto;" border="0"> | ||
| + | <tbody> | ||
| + | <tr> | ||
| + | <td><img src="/images/ReportEditorQueryBeforeRunning.png" alt="" width="634" height="230" /></td> | ||
| + | </tr> | ||
| + | </tbody> | ||
| + | </table> | ||
| + | <p> </p> | ||
| + | <h2><span id="result_box" class="short_text" lang="en"><span class="hps">Next</span> <span class="hps">possible steps</span></span></h2> | ||
| + | <p>Buttons with a blue dotted frame have special functionalities. Click on it to have more information.</p> | ||
<table border="0"> | <table border="0"> | ||
<tbody> | <tbody> | ||
<tr> | <tr> | ||
| − | <td style="text-align: center;"><a href="/index.php?title=Result_management"><img style="display: block; margin-left: auto; margin-right: auto;" src="/images/ExecuteRE.png" alt="" width="89" height="38" /></a></td> | + | <td style="text-align: center;"><a href="/index.php?title=Result_management"><img style="display: block; margin-left: auto; margin-right: auto; border: 2px dotted blue;" src="/images/ExecuteRE.png" alt="" width="89" height="38" /></a></td> |
<td> | <td> | ||
| − | <p><strong>Execute | + | <p><strong>Execute</strong>:</p> |
| − | As soon as you have selected all needed fields you can launch the query by clicking the <strong> | + | As soon as you have selected all needed fields you can launch the query by clicking the <strong>Execute</strong>. The <a href="/index.php?title=Result_management">Results</a> window will open.</td> |
</tr> | </tr> | ||
<tr> | <tr> | ||
<td><img style="display: block; margin-left: auto; margin-right: auto;" src="/images/NewRE.png" alt="" width="88" height="36" /></td> | <td><img style="display: block; margin-left: auto; margin-right: auto;" src="/images/NewRE.png" alt="" width="88" height="36" /></td> | ||
<td> | <td> | ||
| − | <p><strong>New | + | <p><strong>New</strong>:</p> |
| − | <p>Clears the | + | <p>Clears the content of the selection window. A new selection can be made.</p> |
</td> | </td> | ||
</tr> | </tr> | ||
<tr> | <tr> | ||
| − | <td><a href="/index.php?title=How_to_load_a_query%3F"><img style="display: block; margin-left: auto; margin-right: auto;" src="/images/OpenRE.png" alt="" width="92" height="37" /></a></td> | + | <td><a href="/index.php?title=How_to_load_a_query%3F"><img style="display: block; margin-left: auto; margin-right: auto; border: 2px dotted blue;" src="/images/OpenRE.png" alt="" width="92" height="37" /></a></td> |
<td> | <td> | ||
| − | <p><strong> | + | <p><strong>Open</strong>:</p> |
| − | <p>A saved query can be | + | <p>A previously saved query can be loaded by clicking the <strong><a href="/index.php?title=How_to_load_a_query%3F">Open</a> </strong>button.</p> |
</td> | </td> | ||
</tr> | </tr> | ||
<tr> | <tr> | ||
| − | <td><a href="/index.php?title=How_to_save_a_query%3F"><img style="display: block; margin-left: auto; margin-right: auto;" src="/images/SaveRE.png" alt="" width="89" height="83" /></a></td> | + | <td><a href="/index.php?title=How_to_save_a_query%3F"><img style="display: block; margin-left: auto; margin-right: auto; border: 2px dotted blue;" src="/images/SaveRE.png" alt="" width="89" height="83" /></a></td> |
<td> | <td> | ||
| − | <p><strong> | + | <p><strong>Save</strong>:</p> |
| − | <p>A query can be saved for future use by clicking | + | <p>A query can be saved for future use by clicking <strong>Save</strong>. If the query was created from an existing query it can be saved using<strong> <a href="/index.php?title=How_to_save_a_query%3F">Save as</a></strong>. This way, the user can assign a different name to this new query.</p> |
</td> | </td> | ||
</tr> | </tr> | ||
| Line 174: | Line 181: | ||
<td><img style="display: block; margin-left: auto; margin-right: auto;" src="/images/ResultRE.png" alt="" width="208" height="91" /></td> | <td><img style="display: block; margin-left: auto; margin-right: auto;" src="/images/ResultRE.png" alt="" width="208" height="91" /></td> | ||
<td> | <td> | ||
| − | <p><strong>Result data records | + | <p><strong>Result data records</strong>:</p> |
| − | <p> | + | <p>Here you can select the number of displayed results.</p> |
<p> </p> | <p> </p> | ||
</td> | </td> | ||
| Line 181: | Line 188: | ||
</tbody> | </tbody> | ||
</table> | </table> | ||
| − | |||
| − | |||
<table style="float: right;" border="0"> | <table style="float: right;" border="0"> | ||
<tbody> | <tbody> | ||
Latest revision as of 16:35, 18 July 2013
To open Report editor, go to Reports -> Report editor in the menu bar.
| <img style="display: block; margin-left: auto; margin-right: auto;" src="/images/ReportEd.png" alt="" /> | |
| <img style="display: block; margin-left: auto; margin-right: auto;" src="/images/plus48.png" alt="" width="48" height="48" /> | <a href="/index.php?title=Queries_of_Report_editor">Read here</a> more about the queries of the report editor. |
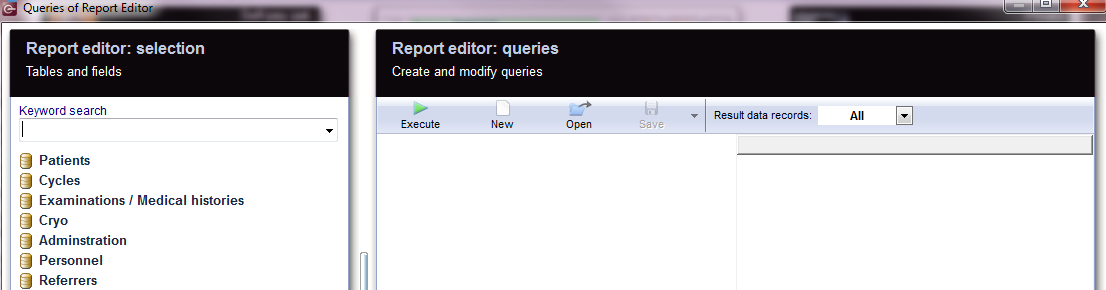
Report editor will open.
 |
Contents |
Selecting the needed fields
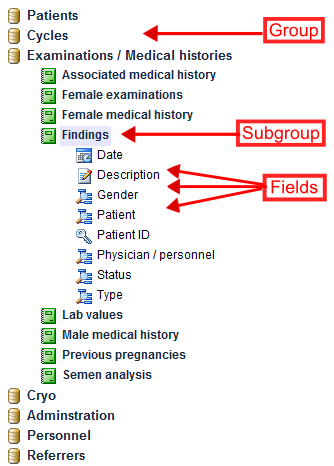
To select the fields in order to build a query you need to browse the content of the subgroups.
If you double-click on a group you will see all available sub-groups.
Double-click a sub-group and you will see all fields that are available in this sub-group.
 |
Alternatively you can search the field you need with a keyword search.
For this example, we are going to create a Follicle Aspiration letter.
Assume you need to search a field related to the person name:
| <img src="/images/RE1.png" alt="" width="373" height="395" /> |
Just type the keyword name in the Search field and press Enter. You will be provided with a list of fields that contain that keyword along with their groups and sub-groups. Choose the field you need and click on it.
The group containing that field will open.
Once you have found the sub-group containing the field(s) you need, drag the sub-group from the Group list into the Area for queries.
| <img src="/images/RE2.png" alt="" /> |
To select a field (i.e.: the First name field) for the query, check the empty box. In order to build our Follicle aspiration discharge letter you may need to select other fields of this sub-group such as: Surname, Partner: surname and Partner: name.
| <img src="/images/RE3.png" alt="" /> |
Let’s go on building our discharge letter.
Since in the sub-group Person, you will not find fields related to the therapy, you will need to link to the sub-group Persons, the subgroup Cycle of women by dragging it from the Group list into the Area for queries as previously described.
Now the desired fields from the sub-group Cycle of women can be selected as seen above for the other fields. When all the needed fields from the sub-group Cycle of women have been selected, another sub-group, if necessary, shall be dragged and dropped. This process is repeated until the query is done.
| <img style="display: block; margin-left: auto; margin-right: auto;" src="/images/Person11RE.png" alt="" width="439" height="156" /> |
|
Defining fields conditions
In some cases it could be useful to restrict values of the selected fields to some conditions.
For example, you may want to select only cycles where the number of collected oocytes is greater than 8.
Simply double-click on the desired field name and the following window will open:
| <img src="/images/RE4.png" alt="" width="390" height="404" /> |
Press the "+" button to add a new filter or condition. Now you can add conditions and values accordingly. For this example, only cycles with more than 8 oocytes collected will be displayed. To add another condition press the "+" button again and enter the information. If you wish to delete a condition or filter, select the condition in the list and press the "-" button. |
|
| <img src="/images/RE5.png" alt="" width="390" height="551" /> | The following conditions can be defined: | |
|
Condition: Is equal Is not equal Is greater Is smaller Is not empty Is empty Is like Is not like |
Example: Gender: F ZIP code: 12345 No. of children: 0 BMI: 25 previous PG Chrom. anomaly Surname: Miller Surname: Miller |
|
| If the selected field is a QM field, you can also enable or disable certain QM criterias (function, value, note, data, start and end) for the resulting table. | ||
- You can add and combine different conditions for any field. Two or more conditions may be linked logically with AND or OR when pre-filtering.
- If you uncheck the box "and should appear in the results list", your query will be filtered but the field itself will not be displayed in the list. This can help you to create arranged lists and statistics more clearly. Example: you wish to analyze only the male patients and limit the list to men.
- You can also decide if the list of results should be automatically grouped by certain fields. To do so, simply check the box "and the result should be grouped by this field" when adding a condition. The order of your definition is decisive for the graphical representation of the resulting table.
- If you select Query the field value before execution, you will be asked what value to use before running the query. This window is displayed below and you can change de value by clicking on the corresponding field.
| <img src="/images/ReportEditorQueryBeforeRunning.png" alt="" width="634" height="230" /> |
Next possible steps
Buttons with a blue dotted frame have special functionalities. Click on it to have more information.
| <a href="/index.php?title=Result_management"><img style="display: block; margin-left: auto; margin-right: auto; border: 2px dotted blue;" src="/images/ExecuteRE.png" alt="" width="89" height="38" /></a> |
Execute: As soon as you have selected all needed fields you can launch the query by clicking the Execute. The <a href="/index.php?title=Result_management">Results</a> window will open. |
| <img style="display: block; margin-left: auto; margin-right: auto;" src="/images/NewRE.png" alt="" width="88" height="36" /> |
New: Clears the content of the selection window. A new selection can be made. |
| <a href="/index.php?title=How_to_load_a_query%3F"><img style="display: block; margin-left: auto; margin-right: auto; border: 2px dotted blue;" src="/images/OpenRE.png" alt="" width="92" height="37" /></a> |
Open: A previously saved query can be loaded by clicking the <a href="/index.php?title=How_to_load_a_query%3F">Open</a> button. |
| <a href="/index.php?title=How_to_save_a_query%3F"><img style="display: block; margin-left: auto; margin-right: auto; border: 2px dotted blue;" src="/images/SaveRE.png" alt="" width="89" height="83" /></a> |
Save: A query can be saved for future use by clicking Save. If the query was created from an existing query it can be saved using <a href="/index.php?title=How_to_save_a_query%3F">Save as</a>. This way, the user can assign a different name to this new query. |
| <img style="display: block; margin-left: auto; margin-right: auto;" src="/images/ResultRE.png" alt="" width="208" height="91" /> |
Result data records: Here you can select the number of displayed results.
|
| <a href="/index.php?title=MedITEX_IVF_how_to">Back to How to</a> | <a href="#top">Back to top</a> |