How to create a new medical history?
From MedITEX - Wiki
| Line 1: | Line 1: | ||
<h2 style="text-align: justify;">Creating a Medical History</h2> | <h2 style="text-align: justify;">Creating a Medical History</h2> | ||
| − | <p style="text-align: justify;">When | + | <p style="text-align: justify;">When <strong>Medical History</strong> is selected a window will open. There are two different windows, one for the female patient the other for the male patient.</p> |
<p style="text-align: justify;"> </p> | <p style="text-align: justify;"> </p> | ||
<h3 style="text-align: justify;">Creating a female Medical History</h3> | <h3 style="text-align: justify;">Creating a female Medical History</h3> | ||
| − | <p style="text-align: justify;">If | + | <p style="text-align: justify;">If <strong>Medical History</strong> is selected when the selected patient is a woman, the following window will open:</p> |
| − | <table border="0"> | + | <table style="margin-left: auto; margin-right: auto;" border="0" width="605" height="157"> |
<tbody> | <tbody> | ||
<tr> | <tr> | ||
| − | <td colspan | + | <td colspan="3">[[Image:femedhis.jpg|none|740px|thumb|left|link=http://wiki.meditex-software.com/images/femedhis.jpg|]]</td> |
| − | + | ||
| − | + | ||
| − | + | ||
</tr> | </tr> | ||
<tr> | <tr> | ||
| − | <td style=" | + | <td><img style="display: block; margin-left: auto; margin-right: auto; vertical-align: middle;" src="/images/QMico.jpg" alt="" /></td> |
| + | <td><a href="/index.php?title=Medical_History#Documenting_previous_pregnancies"><img style="display: block; margin-left: auto; margin-right: auto;" src="/images/gravidapara2.jpg" alt="" /></a></td> | ||
| + | <td><a href="/index.php?title=Medical_History#Documenting_examination_findings"><img style="display: block; margin-left: auto; margin-right: auto;" src="/images/examico.jpg" alt="" /></a></td> | ||
</tr> | </tr> | ||
<tr> | <tr> | ||
| − | <td | + | <td>Click on this icon to access the <strong>QM field</strong> section related to this area or on the right arrow to block the QM fields or to see the change log.</td> |
| + | <td>Click on this link or onto the red arrow icon to document <a href="/index.php?title=Medical_History#Documenting_previous_pregnancies">previous pregnancies' outcome</a>.</td> | ||
| + | <td><span style="font-size: x-small;">Click on this icon to document <a href="/index.php?title=Medical_History#Documenting_examination_findings">examination</a> findings related to the Medical History.</span></td> | ||
</tr> | </tr> | ||
| + | </tbody> | ||
| + | </table> | ||
| + | <p style="text-align: justify;"> </p> | ||
| + | <p style="text-align: justify;">On each section of the Medical History may be documented several data. The fields with the red background have to be filled in order to fullfil the D.I.R. (only for the German version) requirements. From this page, it is possible to access the previous pregnancy's section and the examination section. When all the data you need to document are insterted, press <strong>OK</strong>.</p> | ||
| + | <p style="text-align: justify;"><em>Note: it is possible to customize the <strong>Prior illness</strong> and the <strong>Sterility factors</strong> modifing the related <strong>system tables</strong>.</em></p> | ||
| + | <p style="text-align: justify;"><em>Note 2: if there is at least one previous <strong>Medical History</strong>, the system will ask if the user wants to take over the data from the most recent one.</em></p> | ||
| + | <p style="text-align: justify;"><em>Note 3: if the date of the new Medical History is empty or earlier than the date of an existing <strong>Medical History</strong>, the system will ask if the date of the first interview is to be updated to the date of the <strong>Medical History</strong>.</em></p> | ||
| + | <h4 style="text-align: justify;"></h4> | ||
| + | <h3 style="text-align: justify;">Documenting previous pregnancies</h3> | ||
| + | <p style="text-align: justify;">Clicking on the <strong>Gravida:_Para:</strong> link or on the red arrow icon, the following window will open:</p> | ||
| + | <table style="margin-left: auto; margin-right: auto;" border="0"> | ||
| + | <tbody> | ||
<tr> | <tr> | ||
| − | <td> | + | <td>[[Image:prevlist.jpg|none|740px|thumb|left|link=http://wiki.meditex-software.com/images/prevlist.jpg|]]</td> |
| − | + | ||
| − | + | ||
</tr> | </tr> | ||
| + | </tbody> | ||
| + | </table> | ||
| + | <p> </p> | ||
| + | <p style="text-align: justify;">In the new window, you will see a list of all pregnancies assigned to this <strong>Medical History</strong>. To document a pregnancy just click on <strong>New</strong>. It is also possible to remove a erroneously documented pregnancy: just select it and click on <strong>Delete</strong>.</p> | ||
| + | <h4 style="text-align: justify;"></h4> | ||
| + | <h3 style="text-align: justify;">Documenting examination findings</h3> | ||
| + | <p style="text-align: justify;">It is possible to link examination findings to a <strong>Medical History</strong> by clicking on the <strong>Examination</strong> in the section <strong>Female Medical History</strong>. The following window will open:</p> | ||
| + | <table style="margin-left: auto; margin-right: auto;" border="0"> | ||
| + | <tbody> | ||
<tr> | <tr> | ||
| − | <td> | + | <td>[[Image:examination.jpg|none|740px|thumb|left|link=http://wiki.meditex-software.com/images/examination.jpg|]]</td> |
| − | + | ||
| − | + | ||
</tr> | </tr> | ||
</tbody> | </tbody> | ||
</table> | </table> | ||
| − | <p | + | <p> </p> |
| − | + | ||
| − | + | ||
| − | + | ||
| − | + | ||
| − | + | ||
| − | + | ||
| − | + | ||
| − | + | ||
| − | + | ||
| − | + | ||
<p style="text-align: justify;">In the examination section it is possible to document several exames. If you want to import data from an existing examination, select the examination desired and press "Copy data" button. When all the data you need to document are insterted just press ok.</p> | <p style="text-align: justify;">In the examination section it is possible to document several exames. If you want to import data from an existing examination, select the examination desired and press "Copy data" button. When all the data you need to document are insterted just press ok.</p> | ||
<h3 style="text-align: justify;">Creating a male Medical History</h3> | <h3 style="text-align: justify;">Creating a male Medical History</h3> | ||
| − | <p style="text-align: justify;">If | + | <p style="text-align: justify;">If <strong>Medical History</strong> is selected when the selected patient is a man, the following window will open:</p> |
| − | <table border="0"> | + | <table style="margin-left: auto; margin-right: auto;" border="0" width="444" height="157"> |
<tbody> | <tbody> | ||
<tr> | <tr> | ||
| − | <td | + | <td colspan="2">[[Image:mamedhis.png|none|740px|thumb|left|link=http://wiki.meditex-software.com/images/mamedhis.png|]]</td> |
| − | <td> | + | </tr> |
| − | + | <tr> | |
| + | <td><img style="display: block; margin-left: auto; margin-right: auto; vertical-align: middle;" src="/images/QMico.jpg" alt="" /></td> | ||
| + | <td><a href="/index.php?title=Lab_diagnostics#Creating_a_spermiogram.C2.A0"><img src="/images/spermedhis.png" alt="" width="384" height="26" /></a></td> | ||
</tr> | </tr> | ||
<tr> | <tr> | ||
| − | <td> | + | <td>Click on this icon to access the <strong>QM field</strong> section related to this area or on the right arrow to block the QM fields or to see the change log.</td> |
| − | <td | + | <td>Double-click on the empty field or press the lightning icon to create a new <a href="/index.php?title=Lab_diagnostics#Creating_a_spermiogram.C2.A0">semen analysis</a> and link it to the <strong>Medical History</strong>.</td> |
</tr> | </tr> | ||
</tbody> | </tbody> | ||
</table> | </table> | ||
| − | <p style="text-align: justify;"> | + | <p> </p> |
| − | <p style="text-align: justify;"><em>Note: it is possible to customize the | + | <p style="text-align: justify;">The fields with the red background have to be filled in order to fullfil the D.I.R. (only for the German version) requirements. When all the data you need to document are insterted, press <strong>OK</strong>.</p> |
| − | <p style="text-align: justify;"><em>Note 2: | + | <p style="text-align: justify;"><em>Note: <strong> </strong></em><em>it is possible to customize the <strong>Prior illness</strong> and the <strong>Sterility factors</strong> modifing the related <strong>system tables</strong>.</em></p> |
| − | <p style="text-align: justify;"><em>Note 3: | + | <p style="text-align: justify;"><em>Note 2: </em><em>if there is at least one previous <strong>Medical History</strong>, the system will ask if the user wants to take over the data from the most recent one.</em></p> |
| + | <p style="text-align: justify;"><em>Note 3: </em><em>if the date of the new Medical History is empty or earlier than the date of an existing <strong>Medical History</strong>, the system will ask if the date of the first interview is to be updated to the date of the <strong>Medical History</strong>.</em></p> | ||
Revision as of 15:35, 14 December 2012
Contents |
Creating a Medical History
When Medical History is selected a window will open. There are two different windows, one for the female patient the other for the male patient.
Creating a female Medical History
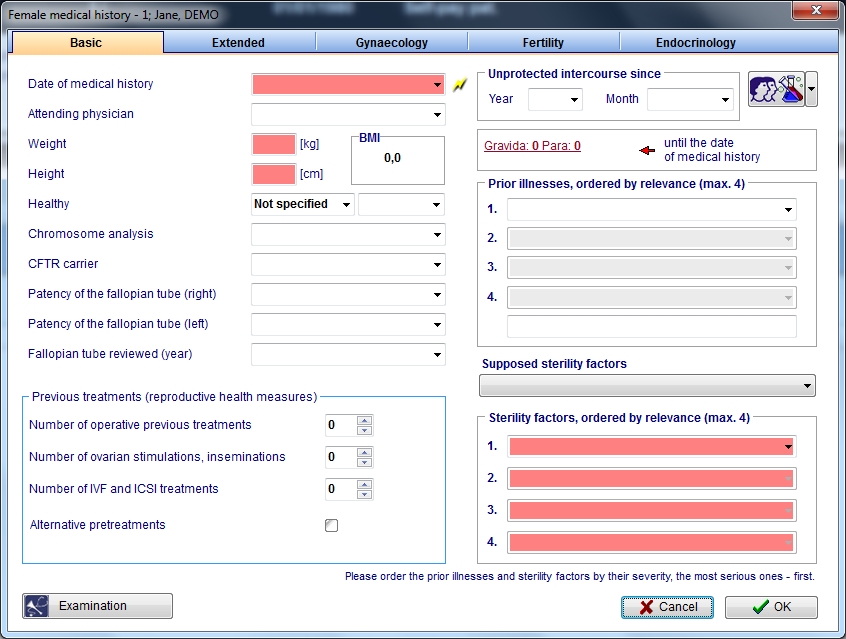
If Medical History is selected when the selected patient is a woman, the following window will open:
 |
||
| <img style="display: block; margin-left: auto; margin-right: auto; vertical-align: middle;" src="/images/QMico.jpg" alt="" /> | <a href="/index.php?title=Medical_History#Documenting_previous_pregnancies"><img style="display: block; margin-left: auto; margin-right: auto;" src="/images/gravidapara2.jpg" alt="" /></a> | <a href="/index.php?title=Medical_History#Documenting_examination_findings"><img style="display: block; margin-left: auto; margin-right: auto;" src="/images/examico.jpg" alt="" /></a> |
| Click on this icon to access the QM field section related to this area or on the right arrow to block the QM fields or to see the change log. | Click on this link or onto the red arrow icon to document <a href="/index.php?title=Medical_History#Documenting_previous_pregnancies">previous pregnancies' outcome</a>. | Click on this icon to document <a href="/index.php?title=Medical_History#Documenting_examination_findings">examination</a> findings related to the Medical History. |
On each section of the Medical History may be documented several data. The fields with the red background have to be filled in order to fullfil the D.I.R. (only for the German version) requirements. From this page, it is possible to access the previous pregnancy's section and the examination section. When all the data you need to document are insterted, press OK.
Note: it is possible to customize the Prior illness and the Sterility factors modifing the related system tables.
Note 2: if there is at least one previous Medical History, the system will ask if the user wants to take over the data from the most recent one.
Note 3: if the date of the new Medical History is empty or earlier than the date of an existing Medical History, the system will ask if the date of the first interview is to be updated to the date of the Medical History.
Documenting previous pregnancies
Clicking on the Gravida:_Para: link or on the red arrow icon, the following window will open:
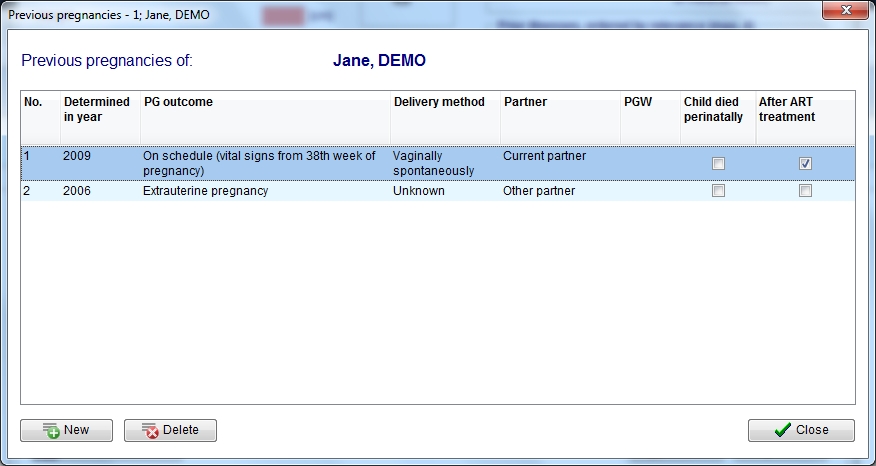 |
In the new window, you will see a list of all pregnancies assigned to this Medical History. To document a pregnancy just click on New. It is also possible to remove a erroneously documented pregnancy: just select it and click on Delete.
Documenting examination findings
It is possible to link examination findings to a Medical History by clicking on the Examination in the section Female Medical History. The following window will open:
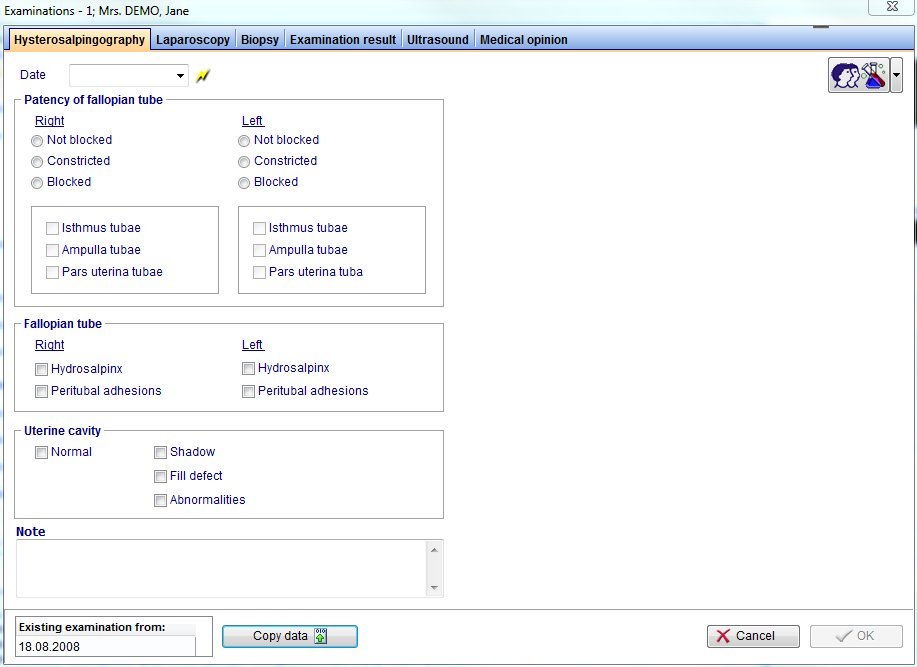 |
In the examination section it is possible to document several exames. If you want to import data from an existing examination, select the examination desired and press "Copy data" button. When all the data you need to document are insterted just press ok.
Creating a male Medical History
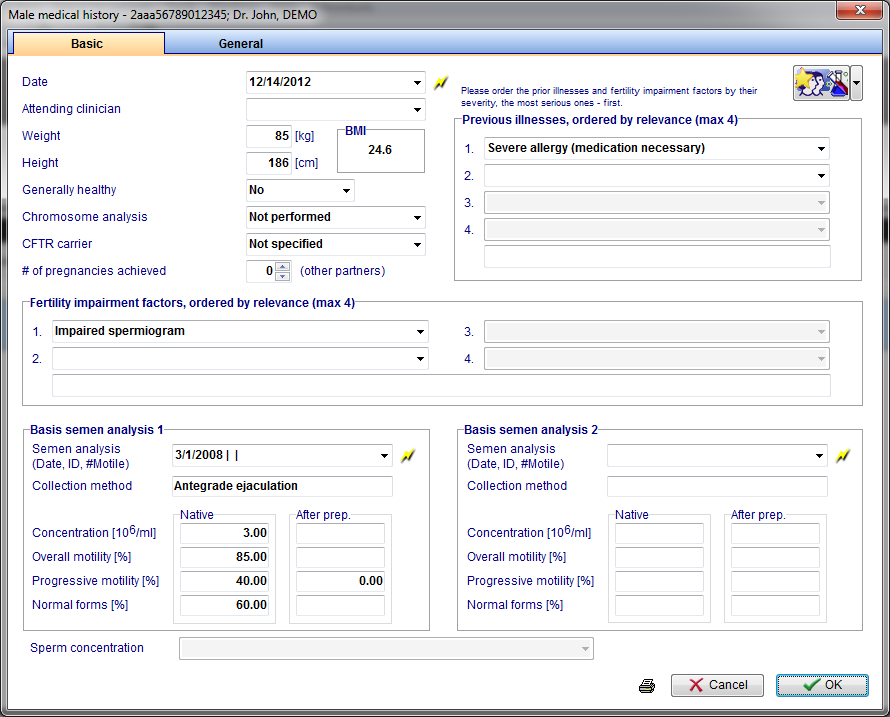
If Medical History is selected when the selected patient is a man, the following window will open:
 |
|
| <img style="display: block; margin-left: auto; margin-right: auto; vertical-align: middle;" src="/images/QMico.jpg" alt="" /> | <a href="/index.php?title=Lab_diagnostics#Creating_a_spermiogram.C2.A0"><img src="/images/spermedhis.png" alt="" width="384" height="26" /></a> |
| Click on this icon to access the QM field section related to this area or on the right arrow to block the QM fields or to see the change log. | Double-click on the empty field or press the lightning icon to create a new <a href="/index.php?title=Lab_diagnostics#Creating_a_spermiogram.C2.A0">semen analysis</a> and link it to the Medical History. |
The fields with the red background have to be filled in order to fullfil the D.I.R. (only for the German version) requirements. When all the data you need to document are insterted, press OK.
Note: it is possible to customize the Prior illness and the Sterility factors modifing the related system tables.
Note 2: if there is at least one previous Medical History, the system will ask if the user wants to take over the data from the most recent one.
Note 3: if the date of the new Medical History is empty or earlier than the date of an existing Medical History, the system will ask if the date of the first interview is to be updated to the date of the Medical History.