How to create a day info?
From MedITEX - Wiki
(Difference between revisions)
| Line 1: | Line 1: | ||
| − | + | <p><span id="result_box" lang="en"><span class="hps">To add</span> <span class="hps">a new Info,</span> <span class="hps">select</span> <span class="hps atn">the button "</span>Day info<span class="hps"> </span><span>"</span><span>, which is located</span> <span class="hps">on the left</span> <span class="hps">top of the main</span> <span class="hps">window</span><span>.</span></span></p> | |
| + | <table border="0"> | ||
| + | <tbody> | ||
| + | <tr> | ||
| + | <td>[[Image:dayInfoNewRed3.png|none|740px|thumb|left|link=http://wiki.meditex-software.com/images/dayInfoNewRed3.png| ]]</td> | ||
| + | </tr> | ||
| + | </tbody> | ||
| + | </table> | ||
| + | <p> </p> | ||
| + | <ul> | ||
| + | <li>This opens a window in which with a click on "New message" a blank line is added in the information window.</li> | ||
| + | </ul> | ||
| + | <ul> | ||
| + | <li><span id="result_box" lang="en"><span class="hps">Choose a date</span> <span class="hps">and</span> <span class="hps">then</span> <span class="hps">fill</span> <span class="hps">the text box</span> <span class="hps">with the appropriate information</span><span>.</span></span></li> | ||
| + | </ul> | ||
| + | <table border="0"> | ||
| + | <tbody> | ||
| + | <tr> | ||
| + | <td>[[Image:dayInfoNew1.png|none|740px|thumb|left|link=http://wiki.meditex-software.com/images/dayInfoNew1.png| ]]</td> | ||
| + | </tr> | ||
| + | </tbody> | ||
| + | </table> | ||
| + | <ul> | ||
| + | <li><span id="result_box" lang="en"><span class="hps">If you</span> <span class="hps">wish, you can</span> <span class="hps">set filters</span> <span class="hps">on</span> <span class="hps">date and / or</span> <span class="hps">at</span> <span class="hps">the</span> <span class="hps">information</span><span>.</span></span></li> | ||
| + | <li><span id="result_box" lang="en"><span class="hps">The required</span> <span class="hps">box</span> <span class="hps">opens when</span> <span class="hps">you click on the</span> <span class="hps">end of the line</span><span>.</span></span><span id="result_box" lang="en"><span> </span></span></li> | ||
| + | </ul> | ||
| + | <table border="0"> | ||
| + | <tbody> | ||
| + | <tr> | ||
| + | <td>[[Image:dayInfoNew4Red.png|none|740px|thumb|left|link=http://wiki.meditex-software.com/images/dayInfoNew4Red.png| ]]</td> | ||
| + | </tr> | ||
| + | </tbody> | ||
| + | </table> | ||
| + | <ul> | ||
| + | <li><span id="result_box" lang="en"><span class="hps">Once saved, the</span> <span class="hps">message</span> <span class="hps">appears</span> <span class="hps">on the</span> fixed <span class="hps">day in the main</span> <span class="hps">window</span><span>.</span></span></li> | ||
| + | </ul> | ||
| + | <table border="0"> | ||
| + | <tbody> | ||
| + | <tr> | ||
| + | <td>[[Image:dayInfoNewRed2.png|none|740px|thumb|left|link=http://wiki.meditex-software.com/images/dayInfoNewRed2.png| ]]</td> | ||
| + | </tr> | ||
| + | </tbody> | ||
| + | </table> | ||
| + | <p> </p> | ||
| + | <table style="float: right;" border="0"> | ||
| + | <tbody> | ||
| + | <tr> | ||
| + | <td style="text-align: right;"><a href="/index.php?title=MedITEX_Scheduler_how_to...">Back to How to...</a></td> | ||
| + | <td style="text-align: right;"><a href="#top">Back to top</a></td> | ||
| + | </tr> | ||
| + | </tbody> | ||
| + | </table> | ||
| + | <p><span class="mw-headline"><br /></span></p> | ||
Revision as of 17:39, 7 November 2012
To add a new Info, select the button "Day info ", which is located on the left top of the main window.
 |
- This opens a window in which with a click on "New message" a blank line is added in the information window.
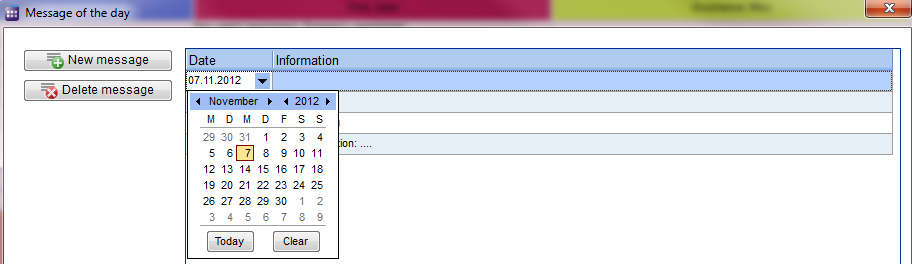
- Choose a date and then fill the text box with the appropriate information.
 |
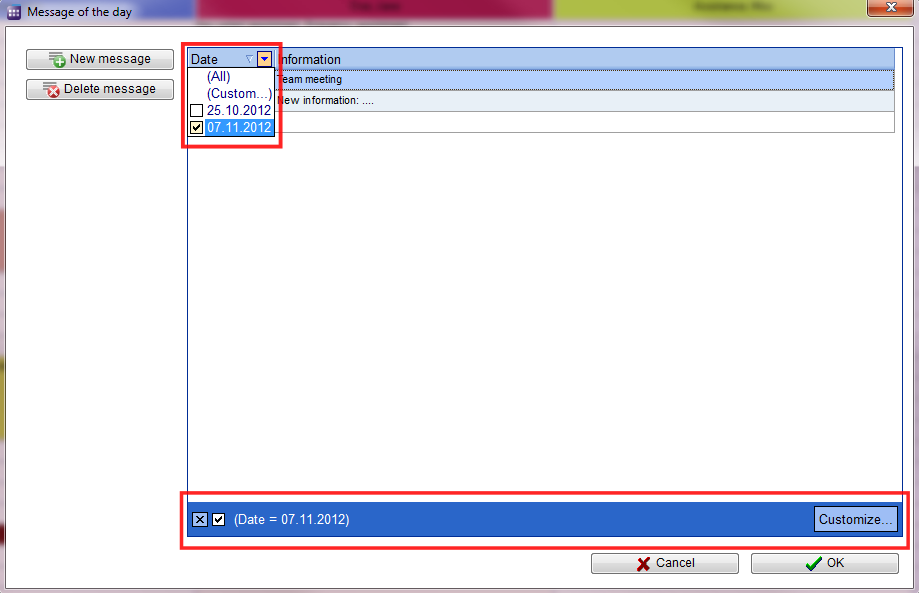
- If you wish, you can set filters on date and / or at the information.
- The required box opens when you click on the end of the line.
 |
- Once saved, the message appears on the fixed day in the main window.
 |
| <a href="/index.php?title=MedITEX_Scheduler_how_to...">Back to How to...</a> | <a href="#top">Back to top</a> |