How to configure cryo contracts and invoices?
From MedITEX - Wiki
(Difference between revisions)
| (5 intermediate revisions by 2 users not shown) | |||
| Line 1: | Line 1: | ||
| − | <p>Cryo Contract settings can be accessed at the Cryo contracts and accounting tab sheet.</p> | + | <p><strong>Cryo Contract settings</strong> can be accessed at the <strong>Cryo contracts and accounting</strong> tab sheet.</p> |
| − | <p>At the menu, click on System -> | + | <p>At the menu, click on <strong>System -> Configuration / administration -> Settings</strong>.</p> |
| − | <table border="0"> | + | <table style="margin-left: auto; margin-right: auto;" border="0"> |
<tbody> | <tbody> | ||
<tr> | <tr> | ||
| − | <td | + | <td><img src="/images/SystemRed.png" alt="" width="561" height="388" /></td> |
| − | + | ||
| − | </td> | + | |
</tr> | </tr> | ||
</tbody> | </tbody> | ||
</table> | </table> | ||
| − | <p>Once Settings is loaded, switch to System at the top level tab and then select Functions followed by Cryo contracts and accounting.</p> | + | <p> </p> |
| + | <p>Once Settings is loaded, switch to <strong>System </strong>at the top level tab and then select <strong>Functions </strong>followed by <strong>Cryo contracts and accounting</strong>.</p> | ||
<table border="0"> | <table border="0"> | ||
<tbody> | <tbody> | ||
| Line 20: | Line 19: | ||
</tbody> | </tbody> | ||
</table> | </table> | ||
| + | <p style="text-align: justify;"> </p> | ||
<p style="text-align: justify;">Explanation of the fields/icons:</p> | <p style="text-align: justify;">Explanation of the fields/icons:</p> | ||
<ul> | <ul> | ||
| − | <li>Active cryo contract and accounting: by default, this option is checked. It enables the creation of cryo contracts and invoices for a patient. If this option is unchecked, all contract and invoice functionalities will be disabled throughout the program.</li> | + | <li><strong>Active cryo contract and accounting</strong>: by default, this option is checked. It enables the creation of cryo contracts and invoices for a patient. If this option is unchecked, all contract and invoice functionalities will be disabled throughout the program.</li> |
| − | <li>Cryo contracts: settings for cryo contracts.</li> | + | <li><strong>Cryo contracts</strong>: settings for cryo contracts.</li> |
| − | <li>Automatically create contract number with following rule: if this option is checked, it will apply a predefined rule to generate a number once every cryo contract is created.</li> | + | <li><strong>Automatically create contract number with following rule</strong>: if this option is checked, it will apply a predefined rule to generate a number once every cryo contract is created.</li> |
| − | <li>Edit contract template: opens MS Word to enable creation and editing of the template used for cryo contracts.</li> | + | <li><strong>Edit contract template</strong>: opens MS Word to enable creation and editing of the template used for cryo contracts.</li> |
| − | <li>Contract types: displays current cryo contracts. Cryo contracts can differ in amount and cycle. To add a new contract, click on <img src="/images/add_item_17.png" alt="File:add item 17.png" width="17" height="17" />. To delete, select an existing contract and click on <img src="/images/delete_item_17.png" alt="File:delete item 17.png" width="17" height="17" />. Changes can be made to a contract double clicking it.</li> | + | <li><strong>Contract types</strong>: displays current cryo contracts. Cryo contracts can differ in amount and cycle. To add a new contract, click on <img src="/images/add_item_17.png" alt="File:add item 17.png" width="17" height="17" />. To delete, select an existing contract and click on <img src="/images/delete_item_17.png" alt="File:delete item 17.png" width="17" height="17" />. Changes can be made to a contract double clicking it.</li> |
| − | <li>Invoices: settings for invoices.</li> | + | <li><strong>Invoices</strong>: settings for invoices.</li> |
| − | <li>Automatically create invoice no. with following rule: if this option is checked, it will apply a predefined rule to generate a number once every invoice is created.</li> | + | <li><strong>Automatically create invoice no. with following rule</strong>: if this option is checked, it will apply a predefined rule to generate a number once every invoice is created.</li> |
| − | <li>Automatically create invoice tittle with: sets the name for the created invoice according to the information provided by this setting. If this option is unchecked, when creating a new invoice, no name will be automatically created, although it will still be possible to click on the auto generate button <img src="/images/strawID.jpg" alt="File:strawID.jpg" width="21" height="19" /> or enter the desired name. If (from month / year – until month / year) is checked, it also includes month and year to the name.</li> | + | <li><strong>Automatically create invoice tittle with</strong>: sets the name for the created invoice according to the information provided by this setting. If this option is unchecked, when creating a new invoice, no name will be automatically created, although it will still be possible to click on the auto generate button <img src="/images/strawID.jpg" alt="File:strawID.jpg" width="21" height="19" /> or enter the desired name. If (from month / year – until month / year) is checked, it also includes month and year to the name.</li> |
| − | <li>Actions and document templates: settings for invoice actions and documents.</li> | + | <li><strong>Actions and document templates</strong>: settings for invoice actions and documents.</li> |
| − | <li>Invoice: the first invoice created.</li> | + | <li><strong>Invoice</strong>: the first invoice created.</li> |
| − | <li>Dunning level 1: first document emitted if payment for the invoice has not been done.</li> | + | <li><strong>Dunning level 1</strong>: first document emitted if payment for the invoice has not been done.</li> |
| − | <li>Dunning level 2: second document emitted if payment for the invoice has not been done.</li> | + | <li><strong>Dunning level 2</strong>: second document emitted if payment for the invoice has not been done.</li> |
| − | <li>Dunning level 3: third and final document emitted if payment for the invoice has not been done.</li> | + | <li><strong>Dunning level 3</strong>: third and final document emitted if payment for the invoice has not been done.</li> |
| − | <li>Description: describes the content of the document. This information appears when navigating through Administration of documents for a patient.</li> | + | <li><strong>Description</strong>: describes the content of the document. This information appears when navigating through Administration of documents for a patient.</li> |
| − | <li>Action: describes what action is taken when creating the document. This information appears when navigating through Outstanding invoices and on individual invoices for a patient.</li> | + | <li><strong>Action</strong>: describes what action is taken when creating the document. This information appears when navigating through Outstanding invoices and on individual invoices for a patient.</li> |
| − | <li>Word templates: option to create and edit template of documents. A few options are available when licking the Edit button: Create new document prompts for a Template name and opens MSWord so it is possible to create a brand new document. To edit, delete or rename an existing template, select the desired template and choose one of the options.</li> | + | <li><strong>Word templates</strong>: option to create and edit template of documents. A few options are available when licking the Edit button: Create new document prompts for a Template name and opens MSWord so it is possible to create a brand new document. To edit, delete or rename an existing template, select the desired template and choose one of the options.</li> |
| − | <li>Standard format for invoice: sets a format for invoices created.</li> | + | <li><strong>Standard format for invoice</strong>: sets a format for invoices created.</li> |
| − | <li>MS Word: sets the format to a *.doc file.</li> | + | <li><strong>MS Word</strong>: sets the format to a *.doc file.</li> |
| − | <li>PDF: sets the format to a *.pdf file.</li> | + | <li><strong>PDF</strong>: sets the format to a *.pdf file.</li> |
| − | <li> Reaction period: the amount of days the patient has to pay the invoice.</li> | + | <li><strong>Reaction period</strong>: the amount of days the patient has to pay the invoice.</li> |
</ul> | </ul> | ||
| + | <table border="0"> | ||
| + | <tbody> | ||
| + | <tr> | ||
| + | <td><img src="/images/plus48.png" alt="" width="48" height="48" /></td> | ||
| + | <td>Change the options for payment method, reason for contract termination and reason for invoice cancellation in the <a href="/index.php?title=MedITEX_IVF_Settings#System_tables">system tables</a> in the settings.</td> | ||
| + | </tr> | ||
| + | </tbody> | ||
| + | </table> | ||
| + | <table style="float: right;" border="0"> | ||
| + | <tbody> | ||
| + | <tr> | ||
| + | <td style="text-align: right;"><a href="/index.php?title=MedITEX_IVF_how_to">Back to How to</a></td> | ||
| + | <td style="text-align: right;"><a href="#top">Back to top</a></td> | ||
| + | </tr> | ||
| + | </tbody> | ||
| + | </table> | ||
| + | <p><span class="mw-headline"><br /></span></p> | ||
Latest revision as of 18:08, 4 March 2013
Cryo Contract settings can be accessed at the Cryo contracts and accounting tab sheet.
At the menu, click on System -> Configuration / administration -> Settings.
| <img src="/images/SystemRed.png" alt="" width="561" height="388" /> |
Once Settings is loaded, switch to System at the top level tab and then select Functions followed by Cryo contracts and accounting.
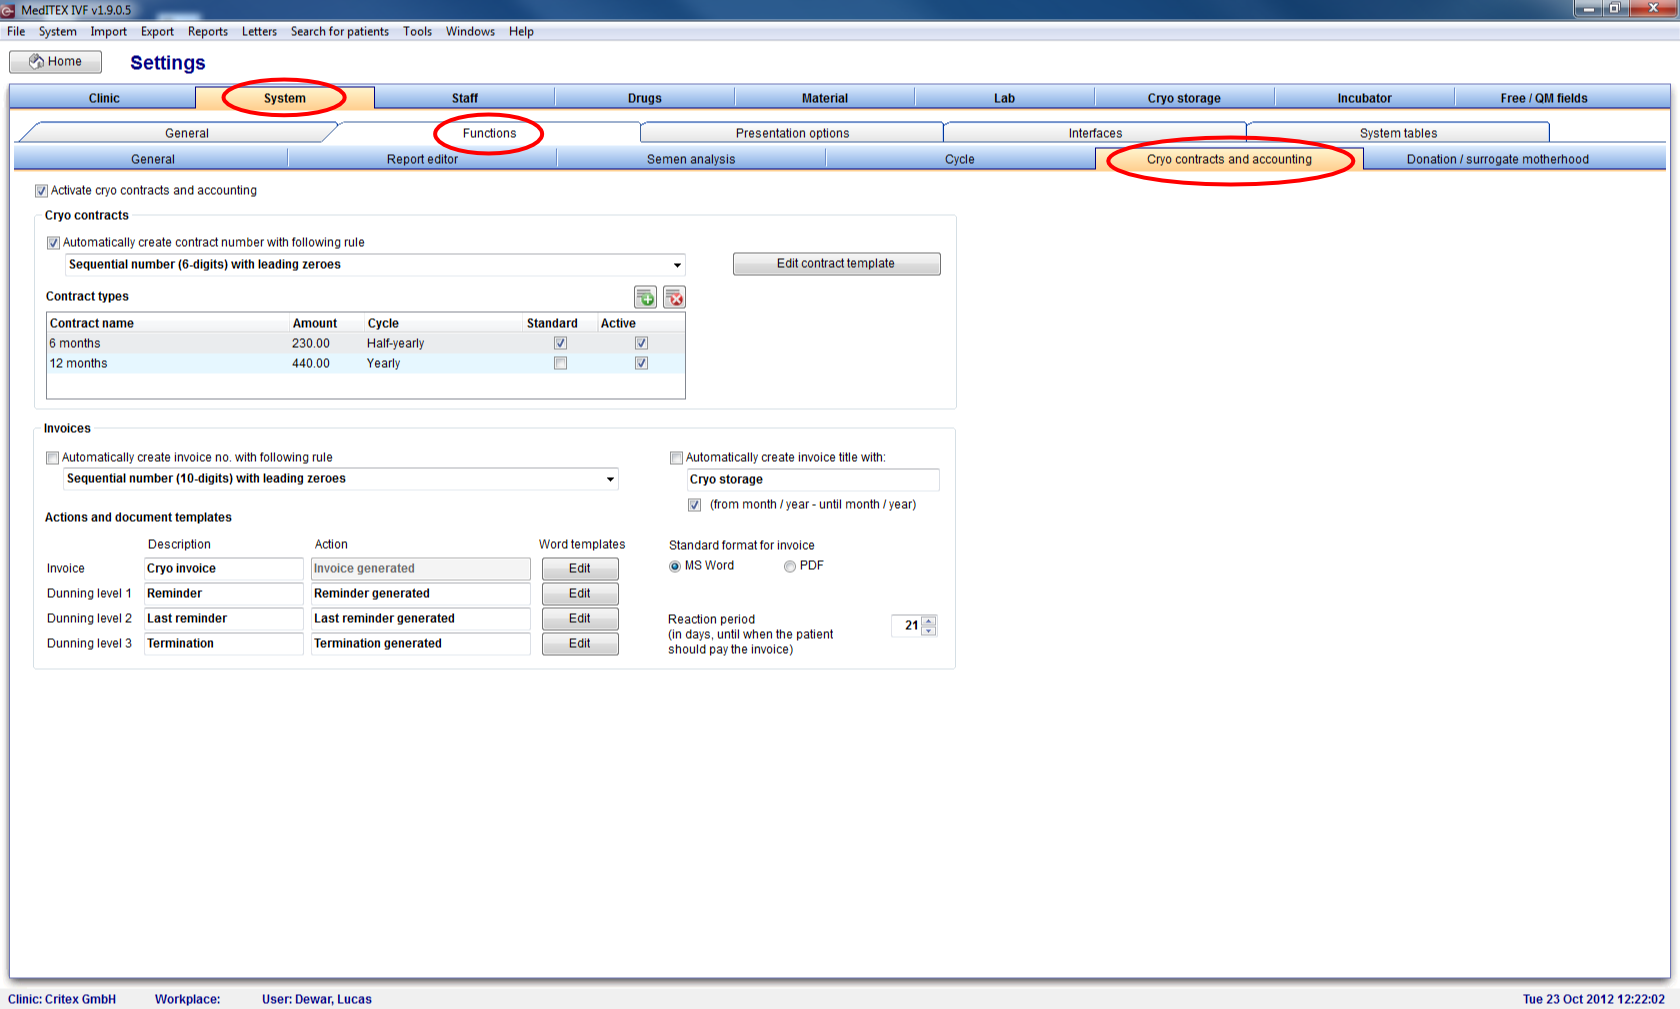 |
Explanation of the fields/icons:
- Active cryo contract and accounting: by default, this option is checked. It enables the creation of cryo contracts and invoices for a patient. If this option is unchecked, all contract and invoice functionalities will be disabled throughout the program.
- Cryo contracts: settings for cryo contracts.
- Automatically create contract number with following rule: if this option is checked, it will apply a predefined rule to generate a number once every cryo contract is created.
- Edit contract template: opens MS Word to enable creation and editing of the template used for cryo contracts.
- Contract types: displays current cryo contracts. Cryo contracts can differ in amount and cycle. To add a new contract, click on <img src="/images/add_item_17.png" alt="File:add item 17.png" width="17" height="17" />. To delete, select an existing contract and click on <img src="/images/delete_item_17.png" alt="File:delete item 17.png" width="17" height="17" />. Changes can be made to a contract double clicking it.
- Invoices: settings for invoices.
- Automatically create invoice no. with following rule: if this option is checked, it will apply a predefined rule to generate a number once every invoice is created.
- Automatically create invoice tittle with: sets the name for the created invoice according to the information provided by this setting. If this option is unchecked, when creating a new invoice, no name will be automatically created, although it will still be possible to click on the auto generate button <img src="/images/strawID.jpg" alt="File:strawID.jpg" width="21" height="19" /> or enter the desired name. If (from month / year – until month / year) is checked, it also includes month and year to the name.
- Actions and document templates: settings for invoice actions and documents.
- Invoice: the first invoice created.
- Dunning level 1: first document emitted if payment for the invoice has not been done.
- Dunning level 2: second document emitted if payment for the invoice has not been done.
- Dunning level 3: third and final document emitted if payment for the invoice has not been done.
- Description: describes the content of the document. This information appears when navigating through Administration of documents for a patient.
- Action: describes what action is taken when creating the document. This information appears when navigating through Outstanding invoices and on individual invoices for a patient.
- Word templates: option to create and edit template of documents. A few options are available when licking the Edit button: Create new document prompts for a Template name and opens MSWord so it is possible to create a brand new document. To edit, delete or rename an existing template, select the desired template and choose one of the options.
- Standard format for invoice: sets a format for invoices created.
- MS Word: sets the format to a *.doc file.
- PDF: sets the format to a *.pdf file.
- Reaction period: the amount of days the patient has to pay the invoice.
| <img src="/images/plus48.png" alt="" width="48" height="48" /> | Change the options for payment method, reason for contract termination and reason for invoice cancellation in the <a href="/index.php?title=MedITEX_IVF_Settings#System_tables">system tables</a> in the settings. |
| <a href="/index.php?title=MedITEX_IVF_how_to">Back to How to</a> | <a href="#top">Back to top</a> |