How to add material articles / batches?
From MedITEX - Wiki
| (5 intermediate revisions by 2 users not shown) | |||
| Line 1: | Line 1: | ||
| − | <p> | + | <p>On the top menu, go to <strong>System -> Configuration / administration-> Settings -> Material</strong>.<strong><br /></strong></p> |
| − | <table border="0"> | + | <p>On this tab, you can add the needed materials to the list and make them available for the creation of <strong>QM fields</strong>.</p> |
| + | <table style="margin-left: auto; margin-right: auto;" border="0"> | ||
<tbody> | <tbody> | ||
<tr> | <tr> | ||
| Line 10: | Line 11: | ||
<tbody> | <tbody> | ||
<tr> | <tr> | ||
| − | <td><img style="display: block; margin-left: auto; margin-right: auto;" src="/images/Plus.png" alt=" | + | <td><img style="display: block; margin-left: auto; margin-right: auto;" src="/images/Plus.png" alt="" /></td> |
| − | <td>Press this button on the top right to add a new article.</td> | + | <td>Press this button on the top right corner to add a new article.</td> |
</tr> | </tr> | ||
<tr> | <tr> | ||
<td><img style="display: block; margin-left: auto; margin-right: auto;" src="/images/DeleteX.png" alt="" width="26" height="24" /></td> | <td><img style="display: block; margin-left: auto; margin-right: auto;" src="/images/DeleteX.png" alt="" width="26" height="24" /></td> | ||
| − | <td>Delete it with this button.</td> | + | <td> |
| + | <p>Delete it with this button.</p> | ||
| + | <p>Articles can only be deleted if they have not yet been used.</p> | ||
| + | <p>This is only possible if articles have not been assigned to <strong>QM fields</strong> or used otherwise. Should this be the case, deactivate the item by unchecking the box <strong>Active</strong>. This data will then be hidden without being deleted.</p> | ||
| + | </td> | ||
</tr> | </tr> | ||
</tbody> | </tbody> | ||
</table> | </table> | ||
| − | <table border="0" width="463" height="341"> | + | <table style="margin-left: auto; margin-right: auto;" border="0" width="463" height="341"> |
<tbody> | <tbody> | ||
<tr> | <tr> | ||
| − | <td><img style="display: block; margin-left: auto; margin-right: auto;" src="/images/Material8.png" alt=" | + | <td><img style="display: block; margin-left: auto; margin-right: auto;" src="/images/Material8.png" alt="" /></td> |
</tr> | </tr> | ||
<tr> | <tr> | ||
<td> | <td> | ||
| − | <p>In this new window you can choose the material group and the manufacturer. If the necessary information is not available in the | + | <p>In this new window, you can choose the material group and the manufacturer. If the necessary information is not available in the drop-down menu, you have the option to quickly create a new manufacturer or group in this window. To do this, press the <strong>lightning </strong>button.</p> |
| − | <p>Now you can enter the article name and check | + | <p>Now you can enter the article name and check <strong>Article can be used</strong>.</p> |
| + | <p>After creating you have to define the specific batch you are using at the moment.</p> | ||
</td> | </td> | ||
</tr> | </tr> | ||
</tbody> | </tbody> | ||
</table> | </table> | ||
| − | |||
<table border="0"> | <table border="0"> | ||
<tbody> | <tbody> | ||
<tr> | <tr> | ||
| − | <td><img style="display: block; margin-left: auto; margin-right: auto;" src="/images/Material9.png" alt=" | + | <td><img style="display: block; margin-left: auto; margin-right: auto;" src="/images/Material9.png" alt="" /></td> |
</tr> | </tr> | ||
<tr> | <tr> | ||
<td> | <td> | ||
| − | <p> | + | <p>Enter the description for the batch and the period of use. You can also add a note. Please remember to check the box <strong>Batch can be used</strong>. Otherwise, the material will not appear in the list for the creation of <strong>QM fields</strong>.</p> |
| + | <p>Confirm the entry by clicking <strong>OK</strong> and the new material and its corresponding batch will appear in the overview list. </p> | ||
</td> | </td> | ||
</tr> | </tr> | ||
</tbody> | </tbody> | ||
</table> | </table> | ||
| − | |||
| − | |||
<table border="0"> | <table border="0"> | ||
<tbody> | <tbody> | ||
| Line 55: | Line 59: | ||
</table> | </table> | ||
<p> </p> | <p> </p> | ||
| + | <hr /> | ||
| + | <p> </p> | ||
| + | <p>If you are using more them one batches of one article at the same time you can define them by clicking on the green<strong> </strong><strong>+</strong> button in the right middle section.</p> | ||
<p> </p> | <p> </p> | ||
| + | <p>After you have defined the material you then have to go to the "Free/QM fields" section and define the new QM fields where you want to document your material during a cycle.</p> | ||
<table style="float: right;" border="0"> | <table style="float: right;" border="0"> | ||
<tbody> | <tbody> | ||
| Line 64: | Line 72: | ||
</tbody> | </tbody> | ||
</table> | </table> | ||
| − | |||
Latest revision as of 17:20, 3 July 2014
On the top menu, go to System -> Configuration / administration-> Settings -> Material.
On this tab, you can add the needed materials to the list and make them available for the creation of QM fields.
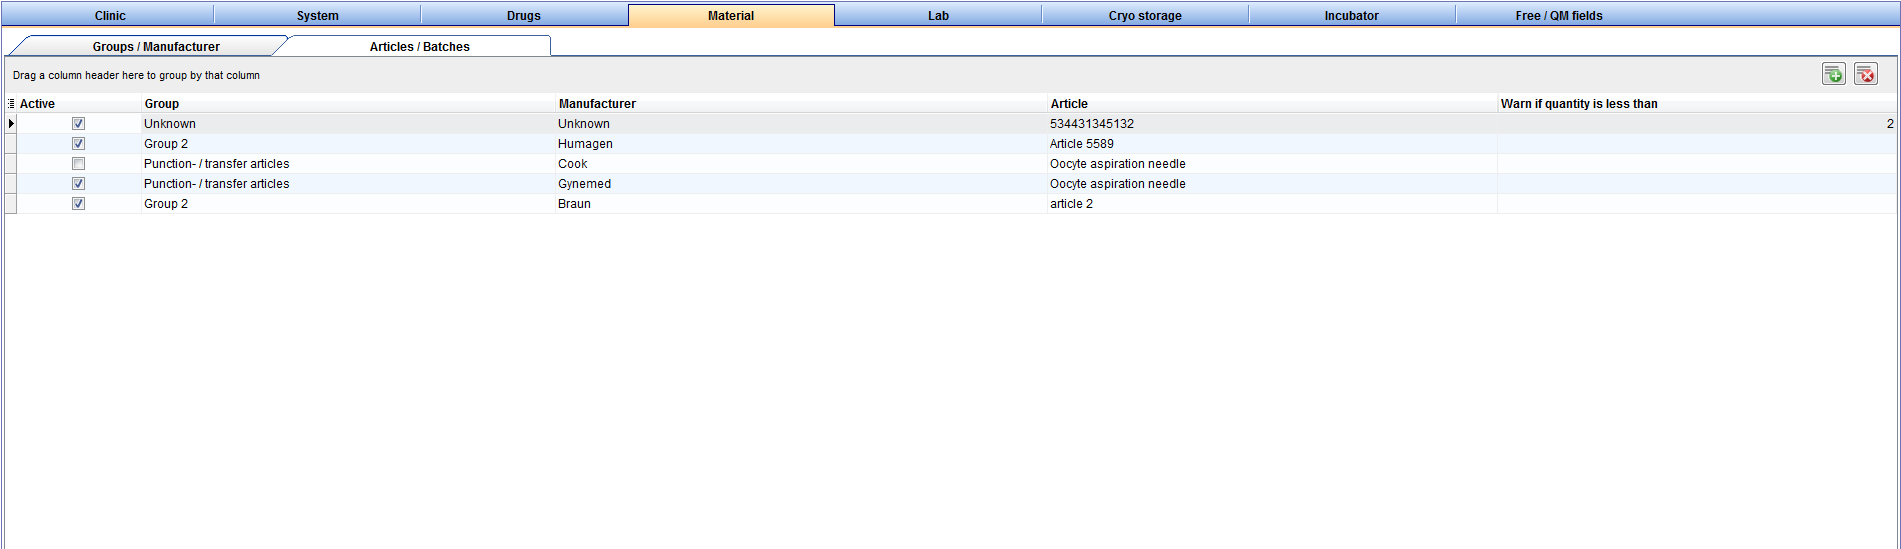 |
| <img style="display: block; margin-left: auto; margin-right: auto;" src="/images/Plus.png" alt="" /> | Press this button on the top right corner to add a new article. |
| <img style="display: block; margin-left: auto; margin-right: auto;" src="/images/DeleteX.png" alt="" width="26" height="24" /> |
Delete it with this button. Articles can only be deleted if they have not yet been used. This is only possible if articles have not been assigned to QM fields or used otherwise. Should this be the case, deactivate the item by unchecking the box Active. This data will then be hidden without being deleted. |
| <img style="display: block; margin-left: auto; margin-right: auto;" src="/images/Material8.png" alt="" /> |
|
In this new window, you can choose the material group and the manufacturer. If the necessary information is not available in the drop-down menu, you have the option to quickly create a new manufacturer or group in this window. To do this, press the lightning button. Now you can enter the article name and check Article can be used. After creating you have to define the specific batch you are using at the moment. |
| <img style="display: block; margin-left: auto; margin-right: auto;" src="/images/Material9.png" alt="" /> |
|
Enter the description for the batch and the period of use. You can also add a note. Please remember to check the box Batch can be used. Otherwise, the material will not appear in the list for the creation of QM fields. Confirm the entry by clicking OK and the new material and its corresponding batch will appear in the overview list. |
| <img style="display: block; margin-left: auto; margin-right: auto;" src="/images/Material90.png" alt="" width="765" height="176" /> |
If you are using more them one batches of one article at the same time you can define them by clicking on the green + button in the right middle section.
After you have defined the material you then have to go to the "Free/QM fields" section and define the new QM fields where you want to document your material during a cycle.
| <a href="/index.php?title=MedITEX_IVF_how_to">Back to How to</a> | <a href="#top">Back to top</a> |