How to add / edit an incubator?
From MedITEX - Wiki
(Difference between revisions)
| (18 intermediate revisions by 2 users not shown) | |||
| Line 1: | Line 1: | ||
| − | + | <p>On the top menu, go to <strong>System -> Configuration /administration -> Settings -> Incubator.</strong></p> | |
| + | <p>__NOTOC__</p> | ||
| + | <h3>Add an new incubator:</h3> | ||
| + | <ul> | ||
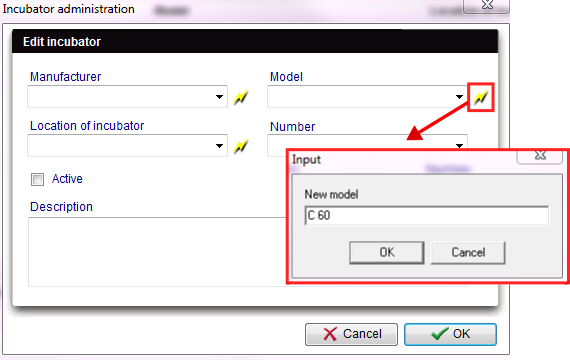
| + | <li>You can add a new incubator manufacturer, model or the location with the <strong>lightening button</strong> behind the fields.</li> | ||
| + | <li>Insert all necessary informations.</li> | ||
| + | </ul> | ||
| + | <p> </p> | ||
| + | <ul> | ||
| + | </ul> | ||
| + | <h3>Edit an incubator:</h3> | ||
| + | <ul> | ||
| + | <li>With a <strong>double-click</strong> on a row, the incubator editor will be opened.</li> | ||
| + | </ul> | ||
| + | <ul> | ||
| + | <li>Insert all necessary informations.</li> | ||
| + | </ul> | ||
| + | <table style="margin-left: auto; margin-right: auto;" border="0" width="685" height="24"> | ||
| + | <tbody> | ||
| + | <tr> | ||
| + | <td>[[Image:IncubatorNew.png|none|740px|thumb|left|link=http://wiki.meditex-software.com/images/IncubatorNew.png| ]]</td> | ||
| + | </tr> | ||
| + | </tbody> | ||
| + | </table> | ||
| + | <p> </p> | ||
| + | <ul> | ||
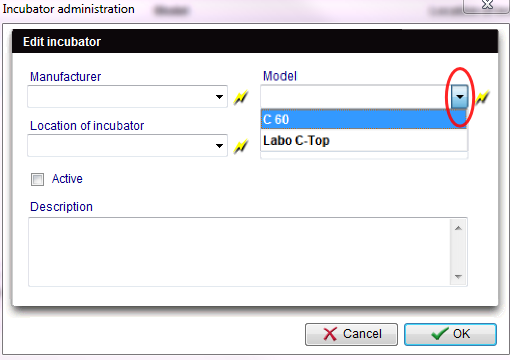
| + | <li><strong>After adding</strong> of all necessary information you can choose the added entry from the <strong>drop-down list</strong>.</li> | ||
| + | </ul> | ||
| + | <table style="margin-left: auto; margin-right: auto;" border="0"> | ||
| + | <tbody> | ||
| + | <tr> | ||
| + | <td>[[Image:IncubatorNew1.png|none|740px|thumb|left|link=http://wiki.meditex-software.com/images/IncubatorNew1.png| ]]</td> | ||
| + | </tr> | ||
| + | </tbody> | ||
| + | </table> | ||
| + | <p> </p> | ||
| + | <h3>The same procedures can be used to edit the following tabs:</h3> | ||
| + | <ul> | ||
| + | </ul> | ||
| + | <ul> | ||
| + | <li><strong>Location of incubator</strong></li> | ||
| + | </ul> | ||
| + | <ul> | ||
| + | <li><strong>Model</strong></li> | ||
| + | </ul> | ||
| + | <ul> | ||
| + | <li><strong>Manufacturer</strong></li> | ||
| + | </ul> | ||
| + | <table style="float: right;" border="0"> | ||
| + | <tbody> | ||
| + | <tr> | ||
| + | <td style="text-align: right;"><a href="/index.php?title=MedITEX_IVF_how_to">Back to How to</a></td> | ||
| + | <td style="text-align: right;"><a href="#top">Back to top</a></td> | ||
| + | </tr> | ||
| + | </tbody> | ||
| + | </table> | ||
| + | <p><span class="mw-headline"><br /></span></p> | ||
Latest revision as of 16:31, 12 March 2013
On the top menu, go to System -> Configuration /administration -> Settings -> Incubator.
Add an new incubator:
- You can add a new incubator manufacturer, model or the location with the lightening button behind the fields.
- Insert all necessary informations.
Edit an incubator:
- With a double-click on a row, the incubator editor will be opened.
- Insert all necessary informations.
 |
- After adding of all necessary information you can choose the added entry from the drop-down list.
 |
The same procedures can be used to edit the following tabs:
- Location of incubator
- Model
- Manufacturer
| <a href="/index.php?title=MedITEX_IVF_how_to">Back to How to</a> | <a href="#top">Back to top</a> |