Gestione staff e utenti
From MedITEX - Wiki
| Line 96: | Line 96: | ||
</tbody> | </tbody> | ||
</table> | </table> | ||
| − | <h2>Import/ | + | <h2>Import/sincronizzazione utenti da Active directory</h2> |
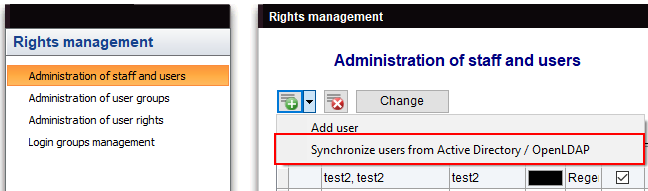
<p>The import of users from <strong>Active Directory</strong> is done by clicking on the <strong>Synchronize users from Active directory</strong> button.</p> | <p>The import of users from <strong>Active Directory</strong> is done by clicking on the <strong>Synchronize users from Active directory</strong> button.</p> | ||
<table border="0" width="111" height="24"> | <table border="0" width="111" height="24"> | ||
Revision as of 15:16, 18 February 2019
| <img src="/images/Administration_1_IT.PNG" alt="" width="750" height="429" /> |
Contents |
Pulsanti
| <img src="/images/Plus.png" alt="" /> | Nuovo utente: cliccare qui per aggiungere un nuovo utente alla lista. |
| <img src="/images/DeleteX.png" alt="" width="26" height="24" /> | Cancella utente: cliccare qui per cancellare l'utente selezionato dalla lista. E' richiesta una conferma per effettuare l'operazione. |
| <img src="/images/Administration_2_IT.PNG" alt="" width="103" height="32" /> | Modifica utente: cliccare qui per modificare le informazioni relative all'utente selezionato. |
Inserimento nuovo utente / Cambia
Facendo doppio click sulla freccina a sinistra della lista, cliccando su "Nuovo utente" o su "Cambia" si aprirà una finestra da cui è possibile aggiungere o modificare informazioni sugli utenti.
Pulsanti
| <img src="/images/Administration_3_IT.PNG" alt="" width="91" height="39" /> | Scegli colore: per aggiungere o cambiare l'etichetta di quell'utente. |
| <img src="/images/Administration_4_IT.PNG" alt="" width="180" height="58" /> | Modifica password: questo pulsante è selezionabile solo se sono state mofidicate informazioni dell'utente. |
| <img style="display: block; margin-left: auto; margin-right: auto;" src="/images/Administration_5_IT.PNG" alt="" width="182" height="61" /> | Inserisci nome utente e password: questo pulsante è selezionabile solo se è stato aggiunto un nuovo utente. |
Tabs
| <img src="/images/Administration_6_IT.PNG" alt="" width="700" height="522" /> |
|
Nome utente: visualizza il nome utente durante la modifica di una persona. Se si aggiunge una nuova persona, questo campo sarà vuoto. Col. di visualizzazione: questo è il colore con cui sarà visualizzato l'utente in tutte le sezioni di MedITEX. Lingua: la lingua utilizzata dall'utente per MedITEX. Membro esterno staff: si seleziona questa opzione per membri esterni che lavorano per la clinica. L'utente ha accesso ai dati dei pazienti da: in caso di più sedi permette agli utenti di vedere i dati dei pazienti da tutte le sedi non solo da quella in cui l'utente è al momento dell'accesso. Attivo: questa opzione permette di essere selezionabile nei vari campi staff del programma, ad esempio se il Dr. Rossi non ha quest'opzione attiva non è possibile selezionarlo come medico per effettuare un trattamento. Funzione: qualifica/competenza dell'utente. Location: in caso di più sedi questa impostazione identifica in quale l'utente lavora ed ha accesso. Si lasci vuota nel caso l'utente voglia essere visibile in tutte le sedi. |
|
<img src="/images/Administration_7_IT.PNG" alt="" width="750" height="558" /> |
|
Diritti: questi sono i permessi, cioè a cosa ha accesso l'utente.
|
| <img src="/images/Administration_8_IT.PNG" alt="" width="456" height="535" /> |
| Contatti relativi all'utente. |
| <img style="display: block; margin-left: auto; margin-right: auto;" src="/images/howto48.png" alt="" width="48" height="48" /> | Se si vuole avere ulteriori informazioni, seguire <a href="/index.php?title=MedITEX_Administration_Come_fare">questo link</a> e vedere le nostre pagine Come fare.... |
Import/sincronizzazione utenti da Active directory
The import of users from Active Directory is done by clicking on the Synchronize users from Active directory button.
 |
If a user already exists in MedITEX, MedITEX checks if he belongs to other groups and assigns it the according login rights.
If a user doesn’t exist in MedITEX yet, MedITEX would create a new one during synchronization. Name, surname and title would be taken over from Active Directory to MedITEX. The username of the MedITEX user will be the same one from Active Directory. MedITEX doesn't support all special characters though, as there are restrictions concerning the database username (Firebird username). In order to complete the import, new usernames without special characters must be created. These usernames will only be used internally and are not required for logging in. At the end of the synchronization, a list contains all users imported with special characters and a suggestion for the internal username (MedITEX username) is shown. Usernames can be customized in the list. Users will be able to connect to MedITEX using their Active Directory usernames with special characters.
The easiest way would be to avoid special characters already in Active directory.
The synchronization can take a while, because of the connection to the AD server.
It is recommended that whenever a change is done on the AD server (new users, updated groups, etc.), a synchronisation in MedITEX Administration should be done.
| <a href="/index.php?title=MedITEX_Administration_manuale">Torna al manuale MedITEX Administration </a> |
<a href="#top">Inizio pagina</a> |